
Understanding the Importance of Proper Derailleur Alignment
Proper rear derailleur alignment is crucial for smooth shifting, efficient pedaling, and preventing damage to the bike’s drivetrain. A well-adjusted rear derailleur ensures that the chain moves seamlessly between gears, reducing wear and tear on the components. The Shimano Ultegra groupset, a high-performance example, relies heavily on precise derailleur alignment to deliver optimal shifting performance. When the rear derailleur is misaligned, it can lead to a range of issues, including ghost shifting, uneven gear changes, and grinding noises. These problems can be frustrating for riders and may result in costly repairs if left unchecked. By understanding the importance of proper derailleur alignment, riders can take the first step towards achieving smooth, efficient shifting and prolonging the life of their bike’s drivetrain.

Click Image to Find eBike Products
In addition to the performance benefits, proper rear derailleur alignment also plays a critical role in preventing damage to the bike’s components. When the derailleur is misaligned, it can put excessive stress on the chain, cassette, and chainrings, leading to premature wear and potentially catastrophic failures. By adjusting the rear derailleur correctly, riders can help distribute the stress evenly across the drivetrain, reducing the risk of damage and ensuring a longer lifespan for their components. Furthermore, proper derailleur alignment can also improve the overall riding experience, allowing riders to focus on their performance and enjoy a smoother, more efficient ride.
For riders using the Shimano Ultegra groupset, proper rear derailleur alignment is particularly important. The Ultegra groupset is designed to deliver high-performance shifting, and precise derailleur alignment is essential to achieving this level of performance. By following the manufacturer’s guidelines and taking the time to adjust the rear derailleur correctly, riders can unlock the full potential of their Ultegra groupset and enjoy a riding experience that is both smooth and efficient.
How to Identify Misalignment and Common Issues with Your Rear Derailleur
Identifying misalignment and common issues with your rear derailleur is crucial to ensuring smooth shifting and preventing damage to your bike’s drivetrain. When the rear derailleur is misaligned, it can cause a range of problems, including ghost shifting, uneven gear changes, and grinding noises. To diagnose these issues, it’s essential to visually inspect the derailleur and identify potential problems.
One of the most common symptoms of misalignment is ghost shifting, where the chain shifts into a gear without the rider’s input. This can be caused by a misaligned derailleur or worn-out components. To check for ghost shifting, shift the chain into the smallest cog and pedal slowly. If the chain shifts into a different gear without your input, it may indicate a misaligned derailleur.
Another common issue is uneven gear changes, where the chain hesitates or skips gears during shifting. This can be caused by a misaligned derailleur or incorrect cable tension. To check for uneven gear changes, shift the chain through the gears and listen for any unusual noises or hesitations. If you notice any issues, it may indicate a misaligned derailleur or incorrect cable tension.
Grinding noises are another common symptom of misalignment, where the chain grinds against the cassette or chainrings during shifting. This can be caused by a misaligned derailleur or worn-out components. To check for grinding noises, shift the chain through the gears and listen for any unusual noises. If you notice any grinding noises, it may indicate a misaligned derailleur or worn-out components.
To visually inspect the derailleur, start by checking the alignment of the derailleur hanger. The hanger should be parallel to the cassette and chainrings. If the hanger is misaligned, it can cause the derailleur to shift incorrectly. Next, check the cable tension and adjust it according to the manufacturer’s instructions. Finally, inspect the derailleur’s limit screws and adjust them to ensure proper alignment.
By identifying and addressing common issues with your rear derailleur, you can ensure smooth shifting and prevent damage to your bike’s drivetrain. Regular maintenance and inspection can help prevent these issues and ensure optimal performance. For riders using the Shimano Ultegra groupset, proper derailleur alignment is particularly important to achieve high-performance shifting.

The Basics of Rear Derailleur Adjustment: A Step-by-Step Guide
Adjusting the rear derailleur is a crucial step in ensuring smooth shifting and optimal performance from your bike’s drivetrain. In this section, we will provide a step-by-step guide on how to adjust the rear derailleur, including adjusting the limit screws, B-tension, and cable tension.
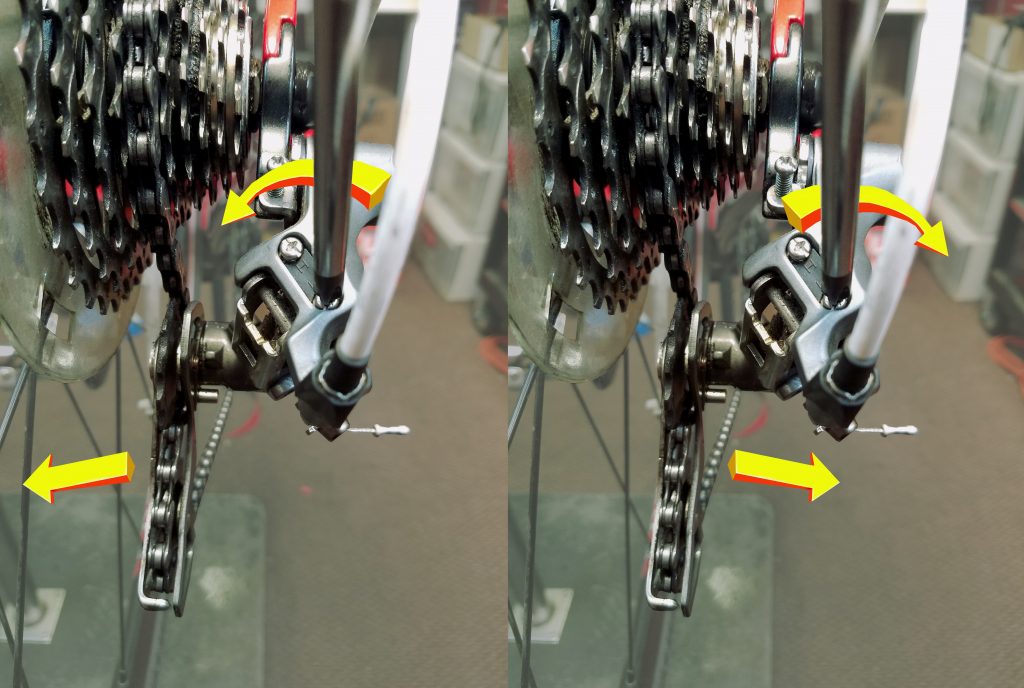
**Step 1: Adjusting the Limit Screws**
The limit screws control the derailleur’s range of motion and prevent the chain from shifting into the spokes or beyond the largest cog. To adjust the limit screws, follow these steps:
1. Shift the chain into the smallest cog and pedal slowly. 2. Locate the limit screws on the derailleur and turn them clockwise to tighten or counterclockwise to loosen. 3. Adjust the limit screws until the chain is centered over the smallest cog and does not shift into the spokes.
**Step 2: Adjusting the B-Tension**
The B-tension screw controls the derailleur’s angle and ensures proper shifting. To adjust the B-tension, follow these steps:
1. Shift the chain into the largest cog and pedal slowly. 2. Locate the B-tension screw on the derailleur and turn it clockwise to tighten or counterclockwise to loosen. 3. Adjust the B-tension until the chain is centered over the largest cog and does not shift into the spokes.
**Step 3: Adjusting the Cable Tension**
The cable tension controls the derailleur’s shifting speed and accuracy. To adjust the cable tension, follow these steps:
1. Shift the chain into the smallest cog and pedal slowly. 2. Locate the cable tension adjuster on the derailleur and turn it clockwise to tighten or counterclockwise to loosen. 3. Adjust the cable tension until the chain shifts smoothly and accurately into each gear.
**Tips and Tricks**
When adjusting the rear derailleur, it’s essential to use a systematic approach to ensure proper alignment and shifting. Here are some tips and tricks to keep in mind:
Use a derailleur alignment tool to ensure proper alignment of the derailleur hanger. Use a cable tension gauge to ensure proper cable tension. Adjust the limit screws and B-tension in small increments to avoid over-tightening or under-tightening. Test the shifting performance after each adjustment to ensure smooth and accurate shifting.
By following these steps and tips, you can ensure proper adjustment of your rear derailleur and achieve smooth shifting and optimal performance from your bike’s drivetrain. For riders using the Shimano Ultegra groupset, proper derailleur adjustment is particularly important to achieve high-performance shifting.
Troubleshooting Common Issues with Your Ultegra Rear Derailleur
When adjusting the rear derailleur, it’s not uncommon to encounter issues that can affect the shifting performance. In this section, we’ll address common issues that may arise during the adjustment process, such as uneven gear changes or grinding noises, and provide troubleshooting tips and solutions specific to the Shimano Ultegra groupset.
**Uneven Gear Changes**
Uneven gear changes can be caused by a misaligned derailleur or incorrect cable tension. To troubleshoot this issue, follow these steps:
1. Check the derailleur alignment and adjust the limit screws as needed. 2. Adjust the cable tension to ensure proper shifting. 3. Check the cassette and chainrings for wear or damage and replace if necessary.
**Grinding Noises**
Grinding noises can be caused by a misaligned derailleur or worn-out components. To troubleshoot this issue, follow these steps:
1. Check the derailleur alignment and adjust the limit screws as needed. 2. Inspect the cassette and chainrings for wear or damage and replace if necessary. 3. Check the derailleur’s B-tension and adjust as needed to ensure proper shifting.
**Other Common Issues**
Other common issues that may arise during the adjustment process include:
Ghost shifting: This can be caused by a misaligned derailleur or incorrect cable tension. To troubleshoot this issue, follow the steps outlined above.
Chain skipping: This can be caused by a worn-out chain or incorrect derailleur alignment. To troubleshoot this issue, inspect the chain and replace if necessary, and adjust the derailleur alignment as needed.
**Tips and Tricks**
When troubleshooting common issues with your Ultegra rear derailleur, it’s essential to use a systematic approach to ensure proper alignment and shifting. Here are some tips and tricks to keep in mind:
Use a derailleur alignment tool to ensure proper alignment of the derailleur hanger. Use a cable tension gauge to ensure proper cable tension. Adjust the limit screws and B-tension in small increments to avoid over-tightening or under-tightening. Test the shifting performance after each adjustment to ensure smooth and accurate shifting.
By following these troubleshooting tips and solutions, you can ensure proper adjustment of your Ultegra rear derailleur and achieve smooth shifting and optimal performance. Remember to always refer to the manufacturer’s instructions and guidelines for specific adjustment procedures.

Advanced Techniques for Fine-Tuning Your Rear Derailleur
Once you have mastered the basics of rear derailleur adjustment, it’s time to take your skills to the next level with advanced techniques for fine-tuning your rear derailleur. In this section, we’ll explore advanced techniques for adjusting the derailleur’s angle and optimizing cable tension, as well as the benefits of using a barrel adjuster.
**Adjusting the Derailleur’s Angle**
The derailleur’s angle is critical for proper shifting performance. To adjust the derailleur’s angle, follow these steps:
1. Locate the derailleur’s angle adjustment screw, usually located on the derailleur’s body. 2. Turn the screw clockwise to increase the angle or counterclockwise to decrease the angle. 3. Check the derailleur’s alignment and adjust the angle as needed to ensure proper shifting.
**Optimizing Cable Tension**
Cable tension is critical for proper shifting performance. To optimize cable tension, follow these steps:
1. Locate the cable tension adjuster, usually located on the derailleur’s body. 2. Turn the adjuster clockwise to increase the tension or counterclockwise to decrease the tension. 3. Check the derailleur’s shifting performance and adjust the cable tension as needed to ensure smooth and accurate shifting.
**Using a Barrel Adjuster**
A barrel adjuster is a useful tool for fine-tuning the rear derailleur’s cable tension. To use a barrel adjuster, follow these steps:
1. Locate the barrel adjuster, usually located on the derailleur’s body. 2. Turn the adjuster clockwise to increase the tension or counterclockwise to decrease the tension. 3. Check the derailleur’s shifting performance and adjust the barrel adjuster as needed to ensure smooth and accurate shifting.
**Benefits of Using a Barrel Adjuster**
Using a barrel adjuster offers several benefits, including:
Improved shifting performance: A barrel adjuster allows for precise control over the cable tension, ensuring smooth and accurate shifting. Increased adjustability: A barrel adjuster provides a wider range of adjustment, making it easier to fine-tune the rear derailleur. Reduced maintenance: A barrel adjuster reduces the need for frequent adjustments, making it easier to maintain the rear derailleur.
By mastering these advanced techniques, you can take your rear derailleur adjustment skills to the next level and achieve optimal performance from your bike’s drivetrain. Remember to always refer to the manufacturer’s instructions and guidelines for specific adjustment procedures.
Best Practices for Maintaining Your Rear Derailleur and Drivetrain
Regular maintenance is essential to ensure optimal performance and longevity of your rear derailleur and drivetrain. In this section, we’ll provide tips on how to clean, lubricate, and inspect the components to keep your bike running smoothly.
**Cleaning the Rear Derailleur and Drivetrain**
Cleaning the rear derailleur and drivetrain is crucial to remove dirt, grime, and old lubricant that can affect shifting performance. To clean the components, follow these steps:
1. Use a soft-bristled brush to remove any loose dirt or debris from the derailleur and drivetrain. 2. Mix a solution of mild soap and water, and use a soft cloth to wipe down the components. 3. Use a clean, dry cloth to wipe away any excess moisture and prevent rust or corrosion.
**Lubricating the Rear Derailleur and Drivetrain**
Lubricating the rear derailleur and drivetrain is essential to reduce friction and wear on the components. To lubricate the components, follow these steps:
1. Apply a few drops of lubricant to the pivot points and moving parts of the derailleur. 2. Use a clean, dry cloth to wipe away any excess lubricant and prevent drips or mess. 3. Apply lubricant to the chain and cassette, following the manufacturer’s instructions.
**Inspecting the Rear Derailleur and Drivetrain**
Regular inspection of the rear derailleur and drivetrain is crucial to identify any potential issues before they become major problems. To inspect the components, follow these steps:
1. Visually inspect the derailleur and drivetrain for any signs of wear, damage, or corrosion. 2. Check the derailleur’s alignment and adjust as needed to ensure proper shifting. 3. Check the cable tension and adjust as needed to ensure smooth shifting.
**Tips and Tricks**
Here are some additional tips and tricks to keep in mind when maintaining your rear derailleur and drivetrain:
Use a derailleur alignment tool to ensure proper alignment of the derailleur hanger. Use a cable tension gauge to ensure proper cable tension. Regularly clean and lubricate the components to prevent wear and corrosion. Inspect the components regularly to identify any potential issues before they become major problems.
By following these best practices, you can ensure optimal performance and longevity of your rear derailleur and drivetrain. Remember to always refer to the manufacturer’s instructions and guidelines for specific maintenance procedures.
![]()
Common Mistakes to Avoid When Adjusting Your Rear Derailleur
When adjusting your rear derailleur, it’s essential to avoid common mistakes that can lead to poor shifting performance, damage to the components, or even safety issues. In this section, we’ll highlight common mistakes to avoid and provide advice on how to ensure a smooth adjustment process.
**Over-Tightening or Under-Tightening the Limit Screws**
One of the most common mistakes when adjusting the rear derailleur is over-tightening or under-tightening the limit screws. This can lead to poor shifting performance, damage to the components, or even safety issues. To avoid this mistake, follow these steps:
1. Use a torque wrench to ensure the limit screws are tightened to the recommended specification. 2. Check the derailleur’s alignment and adjust the limit screws as needed to ensure proper shifting. 3. Avoid over-tightening or under-tightening the limit screws, as this can lead to poor shifting performance or damage to the components.
**Incorrect Cable Tension**
Incorrect cable tension is another common mistake when adjusting the rear derailleur. This can lead to poor shifting performance, damage to the components, or even safety issues. To avoid this mistake, follow these steps:
1. Use a cable tension gauge to ensure the cable tension is set to the recommended specification. 2. Check the derailleur’s alignment and adjust the cable tension as needed to ensure proper shifting. 3. Avoid over-tightening or under-tightening the cable, as this can lead to poor shifting performance or damage to the components.
**Not Checking the Derailleur’s Alignment**
Not checking the derailleur’s alignment is another common mistake when adjusting the rear derailleur. This can lead to poor shifting performance, damage to the components, or even safety issues. To avoid this mistake, follow these steps:
1. Use a derailleur alignment tool to ensure the derailleur is properly aligned. 2. Check the derailleur’s alignment and adjust as needed to ensure proper shifting. 3. Avoid neglecting to check the derailleur’s alignment, as this can lead to poor shifting performance or damage to the components.
**Tips and Tricks**
Here are some additional tips and tricks to keep in mind when adjusting your rear derailleur:
Use a derailleur adjustment guide to ensure proper adjustment of the derailleur. Use a cable tension gauge to ensure proper cable tension. Check the derailleur’s alignment and adjust as needed to ensure proper shifting. Avoid over-tightening or under-tightening the limit screws or cable, as this can lead to poor shifting performance or damage to the components.
By avoiding these common mistakes and following these tips and tricks, you can ensure a smooth adjustment process and optimal performance from your rear derailleur. Remember to always refer to the manufacturer’s instructions and guidelines for specific adjustment procedures.
Conclusion: Mastering the Art of Rear Derailleur Adjustment for a Smoother Ride
In conclusion, adjusting the rear derailleur is a crucial aspect of maintaining a smooth and efficient ride. By following the steps and tips outlined in this article, you can master the art of rear derailleur adjustment and ensure optimal performance from your bike’s drivetrain.
Proper rear derailleur adjustment is essential for smooth shifting, efficient pedaling, and preventing damage to the bike’s drivetrain. The Shimano Ultegra groupset, a high-performance example, requires precise adjustment to deliver optimal shifting performance.
By understanding the importance of proper derailleur alignment, identifying common issues, and following the step-by-step guide for adjustment, you can ensure a smooth and efficient ride. Additionally, troubleshooting common issues, fine-tuning the derailleur, and maintaining the drivetrain are all crucial aspects of mastering the art of rear derailleur adjustment.
Remember, practice and refinement are key to achieving optimal performance. By following the tips and techniques outlined in this article, you can develop the skills and knowledge necessary to adjust your rear derailleur with confidence and precision.
So, take the time to master the art of rear derailleur adjustment and experience the joy of a smoother, more efficient ride. With practice and patience, you’ll be shifting like a pro in no time!
