
Understanding the Importance of Measuring Bicycle Frame Sizes
Choosing the right bicycle frame size is crucial for a comfortable and efficient riding experience. A correctly sized frame significantly impacts the rider’s performance and enjoyment. A poorly fitted frame can lead to discomfort, inefficiency, and even injuries. By measuring bicycle frame sizes accurately, cyclists can ensure a perfect fit, enhancing their overall biking experience.

Click Image to Find eBike Products

The Anatomy of a Bicycle Frame: Identifying Key Measurements
A bicycle frame is composed of several key components that significantly influence the overall fit and feel of the bicycle. Understanding these measurements is essential for measuring bicycle frame sizes accurately and selecting the right frame size for a comfortable and efficient riding experience.
- Seat Tube: The seat tube is the vertical tube that connects the bottom bracket to the saddle. It is a crucial measurement in determining the overall frame size. The seat tube length is usually measured from the center of the bottom bracket to the top of the seat tube, where the seat post is inserted.
- Top Tube: The top tube runs parallel to the ground, connecting the saddle and handlebars. It affects the rider’s reach and the distance between the saddle and handlebars. Top tube measurements can vary depending on the frame design, such as traditional, compact, or sloping geometry.
- Head Tube: The head tube is the vertical tube that houses the headset and fork. It connects the top tube and down tube, and its length affects the bike’s handling and stability. A longer head tube results in a more relaxed and stable ride, while a shorter head tube provides quicker handling and a more aggressive riding position.
- Down Tube: The down tube connects the head tube to the bottom bracket and is one of the frame’s primary load-bearing elements. Its length and diameter contribute to the bike’s stiffness and overall strength.
- Chainstays: The chainstays are the pair of tubes that connect the bottom bracket to the rear dropouts, where the rear wheel is attached. Chainstay length affects the bike’s stability, acceleration, and handling. Shorter chainstays provide quicker acceleration and more agile handling, while longer chainstays offer better stability and a smoother ride.
By understanding these key frame components and their measurements, cyclists can make informed decisions when measuring bicycle frame sizes and selecting the right frame size for their needs.

How to Measure Bicycle Frame Sizes: A Step-by-Step Guide
When it comes to ensuring a comfortable and efficient riding experience, measuring bicycle frame sizes accurately is of utmost importance. The correct frame size significantly impacts the rider’s performance and enjoyment. In this step-by-step guide, we will provide you with the necessary tools and techniques to measure bicycle frame sizes with precision.
To measure bicycle frame sizes, you will need a measuring tape, a spirit level, and a helper. Here are the steps to follow:
- Identify the Seat Tube: The seat tube is the vertical tube that runs from the bottom bracket to the saddle. It is often the reference point for determining bicycle frame sizes.
- Measure the Seat Tube Length: Measure from the center of the bottom bracket to the top of the seat tube, where the seat post enters the frame. Ensure that the measuring tape is parallel to the ground, using a spirit level to maintain accuracy. Record this measurement in millimeters.
- Determine the Frame Size: Refer to a bicycle frame size chart to determine the frame size based on the seat tube length. Note that some manufacturers may use different sizing systems, so it’s essential to consult the specific chart for the brand and model you are measuring.
- Consider Top Tube and Head Tube Lengths: While seat tube length is the primary measurement for determining frame size, top tube and head tube lengths also impact the overall fit and feel of the bicycle. Measure these lengths and compare them to the recommended measurements for your height, inseam length, and riding style.
By following these steps, you can measure bicycle frame sizes accurately and ensure a comfortable and efficient riding experience. Remember that precision and accuracy are crucial in the measurement process, as even small errors can lead to discomfort or decreased performance.
Choosing the Right Bicycle Frame Size: Factors to Consider
When selecting the perfect bicycle frame size, several factors come into play, including the rider’s height, inseam length, riding style, and flexibility. By considering these factors, you can achieve the best fit and enjoy a comfortable and efficient riding experience.
Rider’s Height: The rider’s height is the most crucial factor in determining the appropriate bicycle frame size. As a general rule, taller riders require larger frames, while shorter riders require smaller frames. However, this is not always the case, as other factors, such as inseam length, can also impact the frame size selection.
Inseam Length: The rider’s inseam length, or the distance from the crotch to the ground, is another critical measurement to consider when choosing a bicycle frame size. A proper inseam measurement ensures that the rider’s legs are not overextended or cramped, leading to discomfort and decreased performance.
Riding Style: The rider’s riding style can also influence the choice of bicycle frame size. For instance, aggressive or competitive riders may prefer a smaller frame size for better maneuverability and control, while recreational riders may prefer a larger frame size for a more comfortable and relaxed riding position.
Flexibility: A rider’s flexibility can also impact the choice of bicycle frame size. Riders with limited flexibility may require a larger frame size to accommodate a more upright riding position, while flexible riders may prefer a smaller frame size for a more aerodynamic position.
In conclusion, considering the rider’s height, inseam length, riding style, and flexibility is crucial when choosing the right bicycle frame size. By taking these factors into account, you can achieve the best fit and enjoy a comfortable and efficient riding experience. Remember that precision and accuracy are essential in the measurement process, as even small errors can lead to discomfort or decreased performance.

Bicycle Frame Size Charts: A Helpful Resource
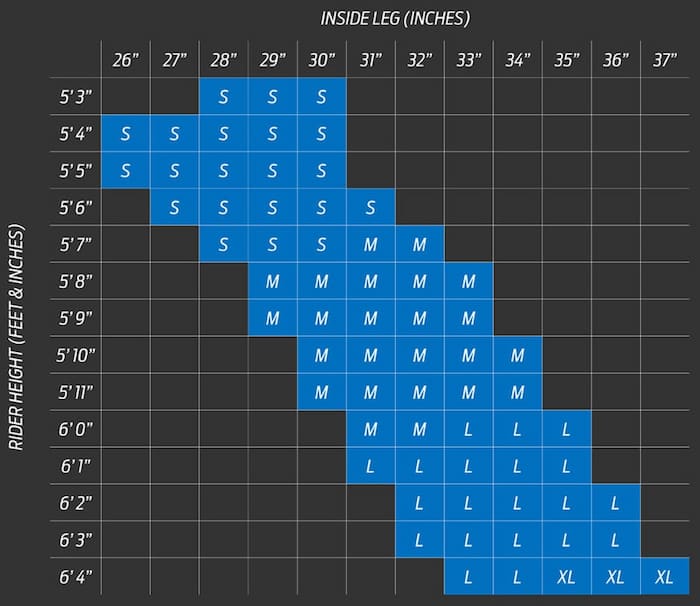
Bicycle frame size charts are valuable tools for riders to determine the appropriate frame size for their body measurements. These charts provide a quick and easy way to compare your measurements to the recommended frame sizes for different bicycle brands and models. However, it’s essential to understand how to use these charts and their limitations.
To use a bicycle frame size chart, you will need to know your height and inseam length. Some charts may also require information about your arm length or torso length. Once you have these measurements, locate them on the chart and find the corresponding frame size.
It’s important to note that bicycle frame size charts may have limitations. For instance, some charts may not account for variations in riding styles or flexibility. Additionally, different bicycle brands and models may have different sizing systems, making it difficult to compare sizes directly.
To overcome these limitations, it’s essential to consider other factors when choosing a bicycle frame size. For example, if you have a long torso or arms, you may require a larger frame size, even if your height falls within the recommended range for a smaller frame size. Similarly, if you have limited flexibility, you may require a larger frame size to accommodate a more upright riding position.
In conclusion, while bicycle frame size charts can be helpful tools for determining the appropriate frame size, it’s essential to consider other factors, such as riding style and flexibility, to achieve the best fit. Remember that precision and accuracy are crucial in the measurement process, as even small errors can lead to discomfort or decreased performance.
Fine-Tuning the Bicycle Fit: Adjusting Saddle Height, Reach, and Handlebar Position
Once you have chosen the right bicycle frame size, there are several minor adjustments you can make to optimize the bicycle fit further. These adjustments include saddle height, reach, and handlebar position. By fine-tuning these measurements, you can achieve a comfortable and efficient riding position that enhances your performance and enjoyment.
Saddle Height
Saddle height is the distance from the center of the bottom bracket to the top of the saddle. A proper saddle height ensures that the rider’s legs are not overextended or cramped, leading to discomfort and decreased performance. To adjust the saddle height, loosen the seat post clamp, adjust the seat post to the desired height, and re-tighten the clamp.
Reach
Reach is the distance from the saddle to the handlebars. A proper reach ensures that the rider’s arms are not overextended or cramped, leading to discomfort and decreased control. To adjust the reach, loosen the stem clamp, adjust the stem to the desired position, and re-tighten the clamp.
Handlebar Position
Handlebar position is the angle and height of the handlebars. A proper handlebar position ensures that the rider’s back and shoulders are in a comfortable and efficient position. To adjust the handlebar position, loosen the handlebar clamp, adjust the handlebars to the desired angle and height, and re-tighten the clamp.
In conclusion, fine-tuning the bicycle fit by adjusting saddle height, reach, and handlebar position can significantly impact the rider’s comfort and performance. By making these minor adjustments, you can optimize the bicycle fit and enjoy a comfortable and efficient riding experience. Remember that precision and accuracy are crucial in the adjustment process, as even small errors can lead to discomfort or decreased performance.

Common Mistakes to Avoid When Measuring Bicycle Frame Sizes
Measuring bicycle frame sizes accurately is crucial for a comfortable and efficient riding experience. However, riders often make common mistakes that can lead to an ill-fitting bicycle. In this section, we will identify these errors and offer tips on how to avoid them.
Mistake #1: Using Outdated or Inaccurate Measurement Techniques
Using outdated or inaccurate measurement techniques can lead to incorrect frame size selection. To avoid this mistake, use the proper techniques and tools, such as a measuring tape and level, to ensure accuracy.
Mistake #2: Neglecting to Consider Other Factors
Neglecting to consider other factors, such as riding style and flexibility, can lead to an ill-fitting bicycle. To avoid this mistake, consider these factors in addition to height and inseam length when choosing a bicycle frame size.
Mistake #3: Relying Solely on Bicycle Frame Size Charts
Relying solely on bicycle frame size charts can be limiting, as they may not account for variations in riding styles or flexibility. To avoid this mistake, use frame size charts as a starting point and fine-tune the fit with minor adjustments to the saddle height, reach, and handlebar position.
Mistake #4: Ignoring the Importance of Precision and Accuracy
Ignoring the importance of precision and accuracy in the measurement process can lead to discomfort or decreased performance. To avoid this mistake, take the time to measure bicycle frame sizes accurately and make minor adjustments as needed.
In conclusion, avoiding common mistakes, such as using outdated measurement techniques, neglecting other factors, relying solely on frame size charts, and ignoring precision and accuracy, can lead to a well-fitted bicycle. By following the proper techniques and considering all relevant factors, you can ensure a comfortable and efficient riding experience.

Benefits of a Properly Fitted Bicycle: Enhanced Comfort, Performance, and Safety
A well-fitted bicycle can significantly enhance a rider’s comfort, performance, and safety. By measuring bicycle frame sizes correctly and making minor adjustments to the saddle height, reach, and handlebar position, riders can enjoy a more comfortable and efficient riding experience.
Improved Comfort
A properly fitted bicycle ensures that the rider’s body is in a natural and comfortable position. This position reduces strain on the back, neck, and shoulders, preventing pain and discomfort during and after rides. Additionally, a comfortable riding position encourages riders to spend more time on their bicycles, leading to increased enjoyment and a more active lifestyle.
Increased Performance
A well-fitted bicycle also improves a rider’s performance by optimizing the bike’s geometry for the rider’s body measurements. This optimization ensures that the rider’s power is efficiently transferred to the pedals, reducing energy loss and increasing speed and endurance. Additionally, a properly fitted bicycle improves handling and control, allowing riders to navigate turns and obstacles with confidence and precision.
Better Safety
A properly fitted bicycle also enhances safety by ensuring that the rider is in control of the bike at all times. A comfortable and efficient riding position reduces the risk of accidents caused by fatigue or discomfort. Additionally, proper handlebar and saddle adjustments improve visibility and control, reducing the risk of collisions and falls.
In conclusion, measuring bicycle frame sizes correctly and fine-tuning the bicycle fit can significantly enhance a rider’s comfort, performance, and safety. By investing time and effort in measuring bicycle frame sizes, riders can enjoy a more comfortable and efficient riding experience, leading to increased enjoyment and a more active lifestyle.