
Identifying the Anatomy of a Bicycle: Key Parts and Their Functions
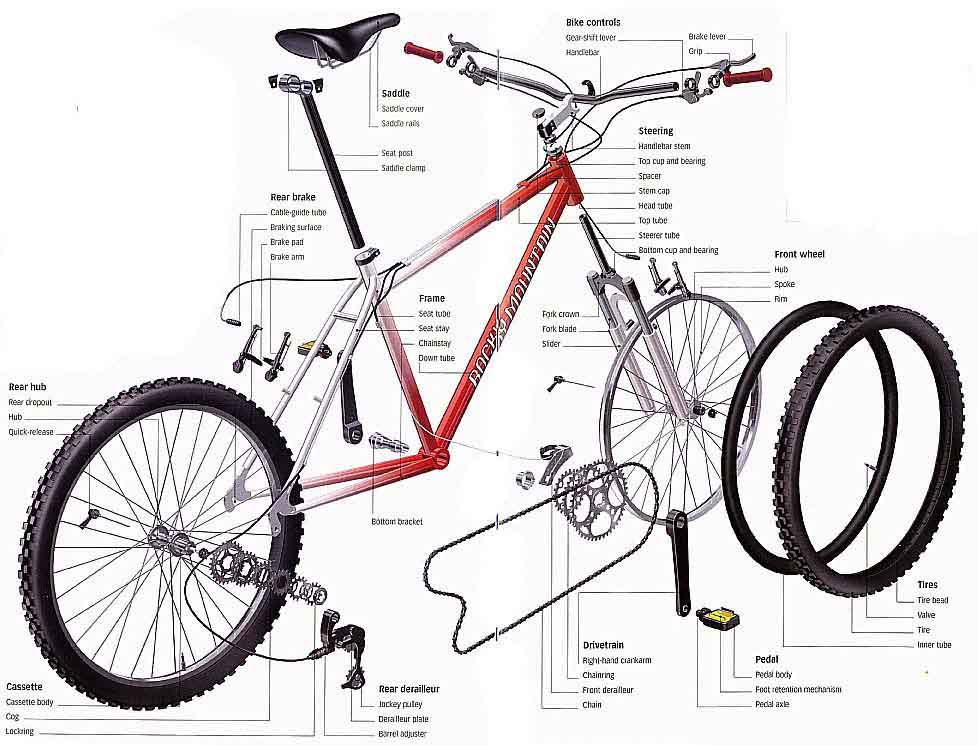
Cycling is a popular activity enjoyed by millions worldwide, and understanding the basic components of a bicycle is essential for both beginners and experienced riders. A bicycle is a complex machine consisting of various parts, each serving a unique function. Familiarizing oneself with the names and functions of these parts can significantly enhance the cycling experience, making maintenance and upgrades more manageable. This comprehensive guide will delve into the anatomy of a bicycle, focusing on key parts and their roles.

Click Image to Find eBike Products
At the heart of every bicycle lies the frame, the structural foundation that supports the entire machine. Frames are typically made of materials such as steel, aluminum, titanium, or carbon fiber, each offering distinct advantages in terms of weight, durability, and cost. The frame connects to the wheels, which are the bicycle’s primary contact points with the road. Wheels consist of a rim, spokes, and a hub, with a tire inflated around the rim to provide traction and cushioning.
Braking systems are crucial for safe cycling, and bicycles employ various braking mechanisms. The two most common types are rim brakes and disc brakes. Rim brakes use pads that clamp onto the wheel’s rim to slow down or stop the bicycle, while disc brakes utilize calipers that squeeze a rotor attached to the wheel’s hub. Both systems consist of brake levers mounted on the handlebars, which the rider actuates to engage the brakes.
The drivetrain is the system responsible for propelling the bicycle forward. It comprises the pedals, cranks, chainrings, chain, cassette, and derailleurs. The rider applies force to the pedals, which rotate the cranks and chainrings, transmitting power to the rear wheel via the chain and cassette. Derailleurs, guided by cables connected to the shifters, move the chain between different chainrings and cogs to adjust the bicycle’s gear ratio, making it easier or more challenging to pedal.
Breaking Down the Drivetrain: A Closer Look at Gears and Derailleurs
The drivetrain is a complex system responsible for converting the rider’s pedaling power into forward motion. To better understand this system, let’s delve deeper into its components, including gears, derailleurs, chainrings, and cassettes. Familiarizing oneself with these parts is essential for proper maintenance, upgrades, and troubleshooting.
At the heart of the drivetrain are the chainrings, also known as front rings or cranksets. These are typically mounted in pairs or triples on the bicycle’s cranks and are responsible for transmitting power from the pedals to the chain. Chainrings come in various sizes, with the number of teeth ranging from 28 to 53, depending on the bicycle’s intended use and gear ratios. A larger chainring requires more effort to turn but provides higher top speeds, while a smaller chainring requires less effort but limits top speeds.
Connected to the chainrings is the chain, a series of interconnected links that transmit power from the chainrings to the rear cassette. The chain is a crucial component of the drivetrain, and maintaining its proper tension and lubrication is essential for optimal performance and longevity.
The cassette, also known as the freewheel or cluster, is a set of cogs mounted on the rear wheel’s hub. Like chainrings, cassettes come in various sizes, with the number of cogs ranging from 5 to 12 and the number of teeth ranging from 11 to 36. A larger cog requires less effort to turn but provides lower top speeds, while a smaller cog requires more effort but allows for higher top speeds.
Guiding the chain between the chainrings and cassette are the derailleurs. Derailleurs are mechanical devices that use pulleys and cables to move the chain between different chainrings and cogs, adjusting the bicycle’s gear ratio and making it easier or more challenging to pedal. Front derailleurs manage the chain’s movement between chainrings, while rear derailleurs handle the chain’s movement between cogs. Properly adjusting and maintaining derailleurs is crucial for smooth and accurate gear shifts.
To better understand the components of the drivetrain, refer to the following illustration, which provides clear, labeled images of each part:

By familiarizing oneself with the components of the drivetrain, riders can better maintain, upgrade, and troubleshoot their bicycles, ensuring optimal performance and longevity.

Braking Systems: Understanding the Components of Safe Stopping
Braking systems are essential components of any bicycle, ensuring riders can stop safely and efficiently. Two primary braking systems are commonly found on bicycles: rim brakes and disc brakes. Understanding the components and functions of each system is crucial for proper maintenance and safe cycling.
Rim Brakes
Rim brakes are the most traditional braking system, utilizing pads that clamp onto the rim of the wheel to slow down or stop the bicycle. Two main types of rim brakes are caliper brakes and cantilever brakes. Caliper brakes have a single brake arm that pivots from a central point, while cantilever brakes have two separate arms that attach to the frame or fork via bosses. Both systems consist of brake levers, cables, and housing, which connect the levers to the brake arms.
Disc Brakes
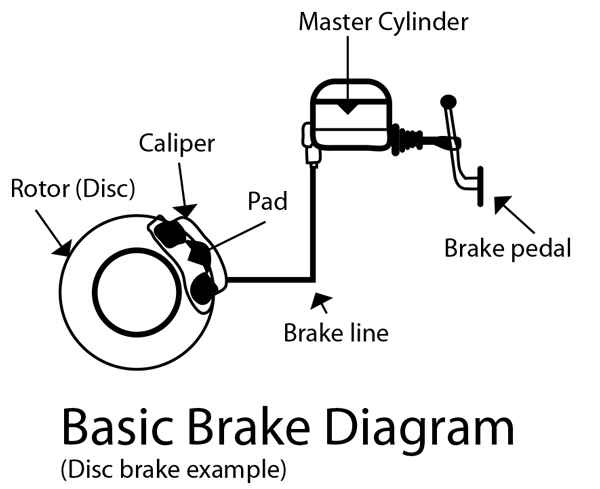
Disc brakes have become increasingly popular in recent years, offering superior stopping power and modulation, especially in wet or muddy conditions. Disc brakes consist of a rotor attached to the wheel’s hub, calipers that squeeze the rotor to create friction, and brake levers that actuate the calipers via cables or hydraulic lines. Two primary types of disc brakes are mechanical disc brakes and hydraulic disc brakes. Mechanical disc brakes use cables to actuate the calipers, while hydraulic disc brakes use fluid-filled lines for more precise and powerful braking.
Regardless of the braking system, proper maintenance is essential for safe and efficient operation. Regularly inspect brake pads for wear, ensure cables are properly lubricated and free from damage, and check rotors for warping or scoring. Adjusting brakes can often be done with simple tools, but it is crucial to consult manufacturer instructions or a professional mechanic if unsure.
By understanding the components and functions of braking systems, riders can ensure their bicycles are well-maintained and safe for the road. Properly adjusted brakes not only enhance safety but also contribute to a more enjoyable and comfortable cycling experience.
Wheels and Tires: The Contact Points Between Bicycle and Road
Wheels and tires are critical components of any bicycle, serving as the primary contact points between the bicycle and the road. Understanding the anatomy and function of these parts can help riders make informed decisions when maintaining, upgrading, or troubleshooting their bicycles. This section will discuss the components of wheels and tires, including the rim, spokes, hub, and tire, and their roles in providing stability, traction, and comfort during rides.
Rims
The rim is the outermost component of a wheel, forming the circular shape that supports the tire. Rims can be made from various materials, including aluminum, carbon fiber, or steel, and are designed to be lightweight yet durable. Modern bicycle rims often feature tubeless-ready technology, allowing riders to install tubeless tires for improved puncture resistance and lower rolling resistance.
Spokes
Spokes are the thin rods that connect the rim to the hub (the central component of the wheel). Spokes are typically made of steel or aluminum and are tensioned to maintain the wheel’s shape and structural integrity. The number, thickness, and pattern of spokes can significantly impact a wheel’s strength, weight, and aerodynamics.
Hubs
The hub is the centerpiece of the wheel, housing the bearings that allow the wheel to spin freely around its axis. Hubs consist of two primary parts: the axle and the body. The axle connects the hub to the bicycle’s frame or fork, while the body houses the bearings and often incorporates a freehub or freewheel mechanism for engaging the rear cassette or cluster.
Tires
The tire is the outermost layer that interfaces with the road surface, providing traction, cushioning, and puncture protection. Tires can be classified into two primary categories: clincher tires and tubeless tires. Clincher tires require an inner tube to hold air, while tubeless tires use a special rim and sealant to create an airtight seal without an inner tube. Tires come in various widths, tread patterns, and compounds, each designed for specific riding conditions and preferences.
By understanding the components of wheels and tires, riders can better maintain, upgrade, and troubleshoot their bicycles. Proper tire selection, inflation, and maintenance can significantly impact a bicycle’s performance, safety, and longevity. Utilize the following illustration to visualize the components discussed:

With this knowledge, riders can make informed decisions when selecting, maintaining, and upgrading their bicycle’s wheels and tires, ensuring optimal performance and enjoyment on the road.

How to Maintain Your Bicycle Parts: Essential Tools and Techniques
Regular maintenance is crucial for ensuring the longevity, safety, and performance of your bicycle. Equipping yourself with the proper tools and techniques can help you tackle common maintenance tasks with confidence. This section will discuss essential tools and step-by-step instructions for maintaining various bicycle parts, including adjusting brakes, changing a flat tire, and lubricating the chain.
Adjusting Brakes
Properly adjusted brakes are essential for safe cycling. To adjust your brakes, follow these steps:
- Check the brake pads for wear and alignment. If misaligned, loosen the pinch bolt and recenter the pads.
- Adjust the cable tension by turning the barrel adjuster at the brake lever or near the caliper. Tightening the cable will bring the pads closer to the rim, while loosening the cable will move the pads away.
- Test the brake lever feel and adjust as necessary. The lever should engage the pads smoothly, without excessive force or travel.
Changing a Flat Tire
Changing a flat tire is a fundamental cycling skill. To change a flat tire, follow these steps:
- Remove the wheel from the bicycle and deflate the tire completely.
- Insert tire levers between the tire and rim to break the bead, then carefully remove one side of the tire from the rim.
- Remove the damaged inner tube, taking care not to puncture it further. Inspect the tire for any embedded debris and remove as necessary.
- Inflate the new inner tube slightly, then insert it into the tire, ensuring the valve stem is properly aligned.
- Replace the tire onto the rim, seating the bead carefully. Inflate the tire to the recommended pressure, ensuring it is properly seated and centered on the rim.
- Reattach the wheel to the bicycle and tighten the quick-release lever or axle nuts securely.
Lubricating the Chain
A well-lubricated chain reduces friction, prolongs component life, and enhances overall performance. To lubricate your chain, follow these steps:
- Clean the chain thoroughly using a chain cleaning tool or a rag soaked in degreaser. Allow the chain to dry completely.
- Place a drop of bicycle-specific chain lubricant on each roller, starting at the chainring and working toward the rear cassette.
- Slowly pedal backward to distribute the lubricant evenly, allowing it to penetrate the chain links and rollers.
- Wipe off any excess lubricant using a clean, dry rag to prevent attracting dirt and grime.
By mastering these essential maintenance tasks, riders can save time and money while ensuring their bicycles remain in optimal condition. Invest in high-quality tools, lubricants, and replacement parts to further enhance your maintenance experience. Regular maintenance not only extends the life of your bicycle but also fosters a deeper understanding and appreciation for the intricate components that make cycling possible.
Upgrading Your Bicycle: Popular Parts for Enhanced Performance
Upgrading your bicycle can significantly improve its performance, aesthetics, and overall riding experience. Various components can be upgraded, from carbon fiber components to high-performance tires and electronic shifting systems. This section will discuss popular upgrades, their benefits, and recommendations for specific products, helping you make informed decisions when enhancing your bicycle’s capabilities.
Carbon Fiber Components
Carbon fiber components, such as frames, forks, handlebars, and seatposts, offer improved stiffness, strength, and reduced weight compared to traditional materials like aluminum and steel. These upgrades can lead to more efficient power transfer, better handling, and a smoother ride. Popular brands offering carbon fiber components include Specialized, Trek, Giant, and Cannondale.
High-Performance Tires
High-performance tires provide better grip, lower rolling resistance, and improved puncture resistance, enhancing your bicycle’s speed, handling, and durability. Top-rated tire brands include Continental, Schwalbe, Michelin, and Vittoria. Consider models like the Continental Grand Prix 5000, Schwalbe Pro One TLE, Michelin Power Road, or Vittoria Corsa G+ for your next tire upgrade.
Electronic Shifting Systems
Electronic shifting systems offer precise, smooth, and reliable gear changes, often with additional features like automatic shifting and diagnostic capabilities. Popular electronic shifting systems include Shimano Di2, SRAM eTap, and Campagnolo EPS. These systems can significantly enhance your cycling experience, but they come at a premium price.
When upgrading your bicycle, consider your budget, riding style, and performance goals. Consult with a professional mechanic or bicycle shop to ensure proper installation and compatibility with your existing components. By investing in high-quality upgrades, you can elevate your cycling experience, maximizing both enjoyment and performance on the road.
Troubleshooting Common Issues: Diagnosing and Solving Problems
Regular maintenance and care can help prevent many issues from arising on your bicycle. However, even with proper care, problems can still occur. This section will discuss common issues that riders may encounter with their bicycle parts, offering troubleshooting tips and solutions to help you become more self-sufficient in maintaining your bicycle.
Squeaky Brakes
Squeaky brakes can be caused by contamination, worn-out pads, or improperly aligned brake pads. To troubleshoot, first, clean the brake pads and rim with rubbing alcohol. If squeaking persists, check pad alignment and adjust as necessary. If pads are worn out, replace them with new ones. Ensure the brake lever is not too close to the handlebar, which can cause excessive force on the brake pads and result in squeaking.
Slipping Gears
Slipping gears can be caused by a worn-out chain, dirty cassette or chainrings, or improperly adjusted derailleurs. To troubleshoot, clean and lube the chain, then check the cassette and chainrings for debris and clean as needed. Adjust the limit screws and cable tension on the derailleurs to ensure accurate gear shifts. If the chain is worn out, replace it with a new one to prevent further slipping.
Punctured Tires
Punctured tires can be caused by debris, sharp objects, or worn-out tire tread. To troubleshoot, first, remove the damaged inner tube and inspect the tire for any embedded debris. Patch or replace the inner tube, then install it back into the tire. Inspect the tire tread for wear and replace the tire if necessary. Regularly check tire pressure and ensure it is inflated to the recommended PSI for optimal puncture resistance.
By understanding common issues and their solutions, riders can become more self-sufficient in maintaining their bicycles. Regularly inspect your bicycle for signs of wear, damage, or debris, and address any issues promptly to ensure a safe and enjoyable riding experience. Remember that preventative maintenance is key to minimizing problems and prolonging the life of your bicycle components.

Sustainable Cycling: Choosing Eco-Friendly Bicycle Parts
As the world becomes increasingly aware of the need for sustainability, many cyclists are looking for ways to reduce their environmental impact. By choosing eco-friendly bicycle parts and adopting sustainable practices, riders can contribute to a greener planet while also saving money in the long run. This section will discuss the importance of sustainability in cycling and suggest eco-friendly bicycle parts and practices for responsible cyclists.
Eco-Friendly Bicycle Parts
When selecting bicycle parts, consider the environmental impact of the materials used in their production. Opt for components made from recycled or renewable materials, such as recycled aluminum or bamboo. Additionally, look for products with minimal packaging or packaging made from recycled materials. Brands like Woodcycle and Green Oil offer eco-friendly bicycle parts and products, such as bamboo handlebars and biodegradable chain lubricant.
Sustainable Practices
Beyond eco-friendly parts, adopting sustainable practices can further reduce your environmental impact. Regularly maintain your bicycle to ensure optimal performance and longevity, minimizing the need for frequent part replacements. When upgrading or replacing parts, consider purchasing used or refurbished components from online marketplaces or local bicycle shops. Additionally, support local bicycle manufacturers and businesses to reduce transportation emissions and contribute to the local economy.
By incorporating eco-friendly bicycle parts and sustainable practices into your cycling routine, you can help protect the environment while still enjoying the many benefits of cycling. As the demand for sustainable products grows, so too will the availability and affordability of eco-friendly bicycle parts, making it easier than ever for cyclists to make responsible choices for both the planet and their wallets.
![]()