
Why Bike Size Matters for Young Riders
Choosing the right bike size for children is crucial for their safety, comfort, and performance. A well-fitting bike can help prevent injuries and promote a lifelong love of cycling. When a child rides a bike that is too small or too large, they may experience discomfort, difficulty controlling the bike, and a higher risk of accidents. On the other hand, a bike that fits properly can enhance their riding experience, boost their confidence, and encourage them to continue cycling.

Click Image to Find eBike Products
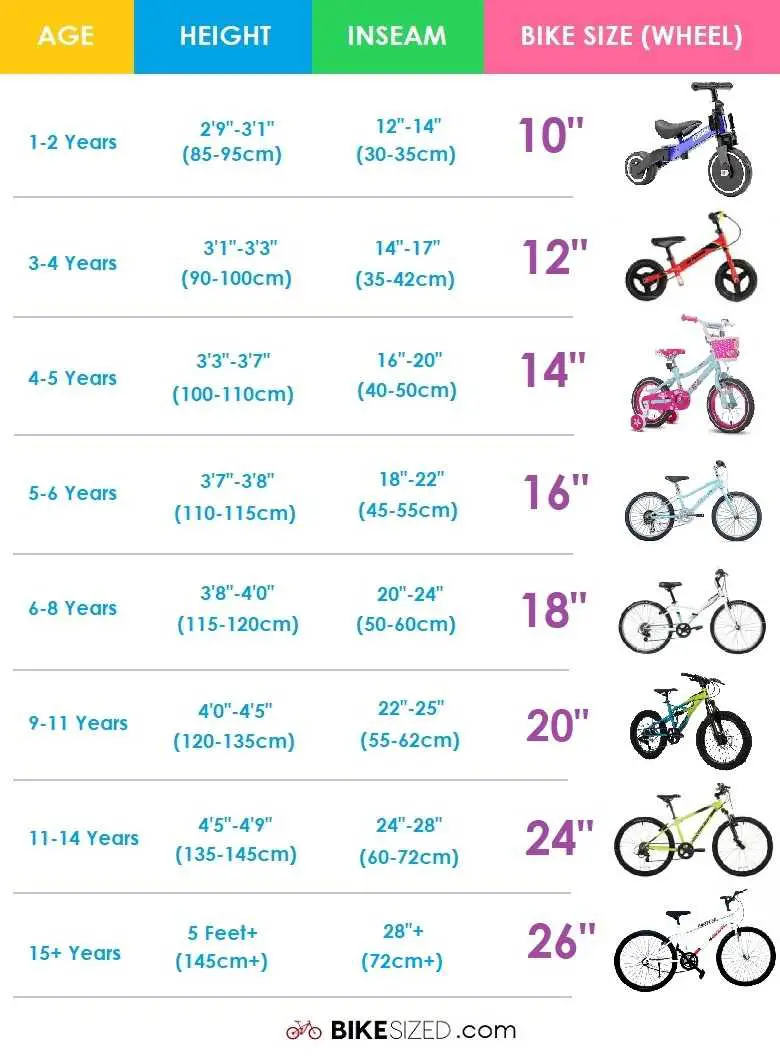
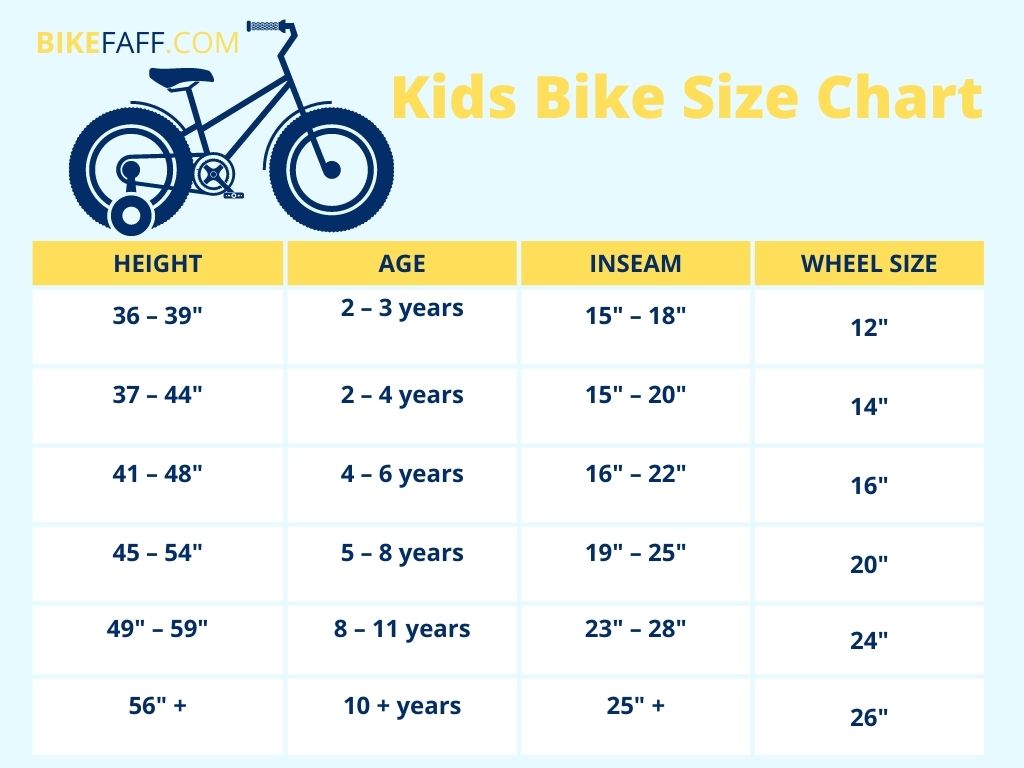
According to bike size charts for youth, a child’s height, inseam, and arm length are essential factors in determining the ideal bike size. A bike that is too small may cause a child to hunch over or stretch to reach the handlebars, leading to discomfort and fatigue. Conversely, a bike that is too large may be difficult to control, making it challenging for the child to maneuver and balance.
In addition to safety and comfort, a well-fitting bike can also impact a child’s performance. When a child rides a bike that fits properly, they can maintain a more efficient riding position, generate more power, and enjoy a smoother ride. This can help them to build confidence, develop their skills, and progress to more challenging rides.
Furthermore, a bike size chart for youth can help parents make an informed decision when purchasing a bike for their child. By considering factors such as the child’s height, inseam, and arm length, parents can select a bike that meets their child’s specific needs and provides a comfortable and safe riding experience.
In conclusion, choosing the right bike size for children is essential for their safety, comfort, and performance. By using a bike size chart for youth and considering factors such as height, inseam, and arm length, parents can select a bike that provides a comfortable and safe riding experience, promotes a lifelong love of cycling, and helps their child to develop their skills and confidence.

How to Measure Your Child for a Bike
To determine the ideal bike size for your child, you’ll need to take a few measurements. This will help you to choose a bike that fits your child properly and provides a comfortable and safe riding experience. Here’s a step-by-step guide on how to measure your child for a bike:
1. Measure your child’s height: Stand your child against a wall and measure their height from the floor to the top of their head. Make sure to take the measurement in inches or centimeters.
2. Measure your child’s inseam: Measure the length of your child’s inseam by placing a book or a ruler between their legs, just above the knee. This will give you an idea of the minimum standover height required for the bike.
3. Measure your child’s arm length: Measure the length of your child’s arm from the center of their back to the tip of their fingers. This will help you to determine the ideal handlebar height.
Once you have these measurements, you can use a bike size chart for youth to determine the ideal bike size for your child. Most bike manufacturers provide size charts on their websites or in their stores. You can also use online bike size calculators to help you determine the ideal bike size.
When using a bike size chart, make sure to consider the following factors:
Standover height: This is the minimum height required for your child to stand over the bike with both feet flat on the ground. A lower standover height can make it easier for your child to get on and off the bike.
Handlebar height: This is the height of the handlebars in relation to the saddle. A higher handlebar height can provide more comfort and control for your child.
Wheel size: This is the diameter of the wheels on the bike. A larger wheel size can provide more stability and speed, while a smaller wheel size can provide more maneuverability.
By considering these factors and using a bike size chart for youth, you can help ensure that your child gets a bike that fits them properly and provides a comfortable and safe riding experience.

Understanding Bike Size Charts for Youth
Bike size charts for youth can be a valuable tool for parents who are looking to buy a bike for their child. However, with so many different types of charts available, it can be confusing to know which one to use. In this section, we’ll explain the different types of bike size charts available and provide examples of popular bike brands that offer youth-specific sizing charts.
Age-based bike size charts: These charts use the child’s age to determine the ideal bike size. While age-based charts can be a good starting point, they may not always provide an accurate fit. Children can vary significantly in terms of height and weight, and age-based charts may not take these factors into account.
Height-based bike size charts: These charts use the child’s height to determine the ideal bike size. Height-based charts are often more accurate than age-based charts, as they take into account the child’s actual height rather than their age.
Wheel size-based bike size charts: These charts use the wheel size of the bike to determine the ideal bike size. Wheel size-based charts can be useful for parents who are looking for a bike with a specific wheel size, such as a 24-inch wheel bike.
Some popular bike brands that offer youth-specific sizing charts include Trek, Specialized, and Giant. These brands provide detailed sizing charts that take into account the child’s height, inseam, and arm length. By using these charts, parents can ensure that their child gets a bike that fits them properly and provides a comfortable and safe riding experience.
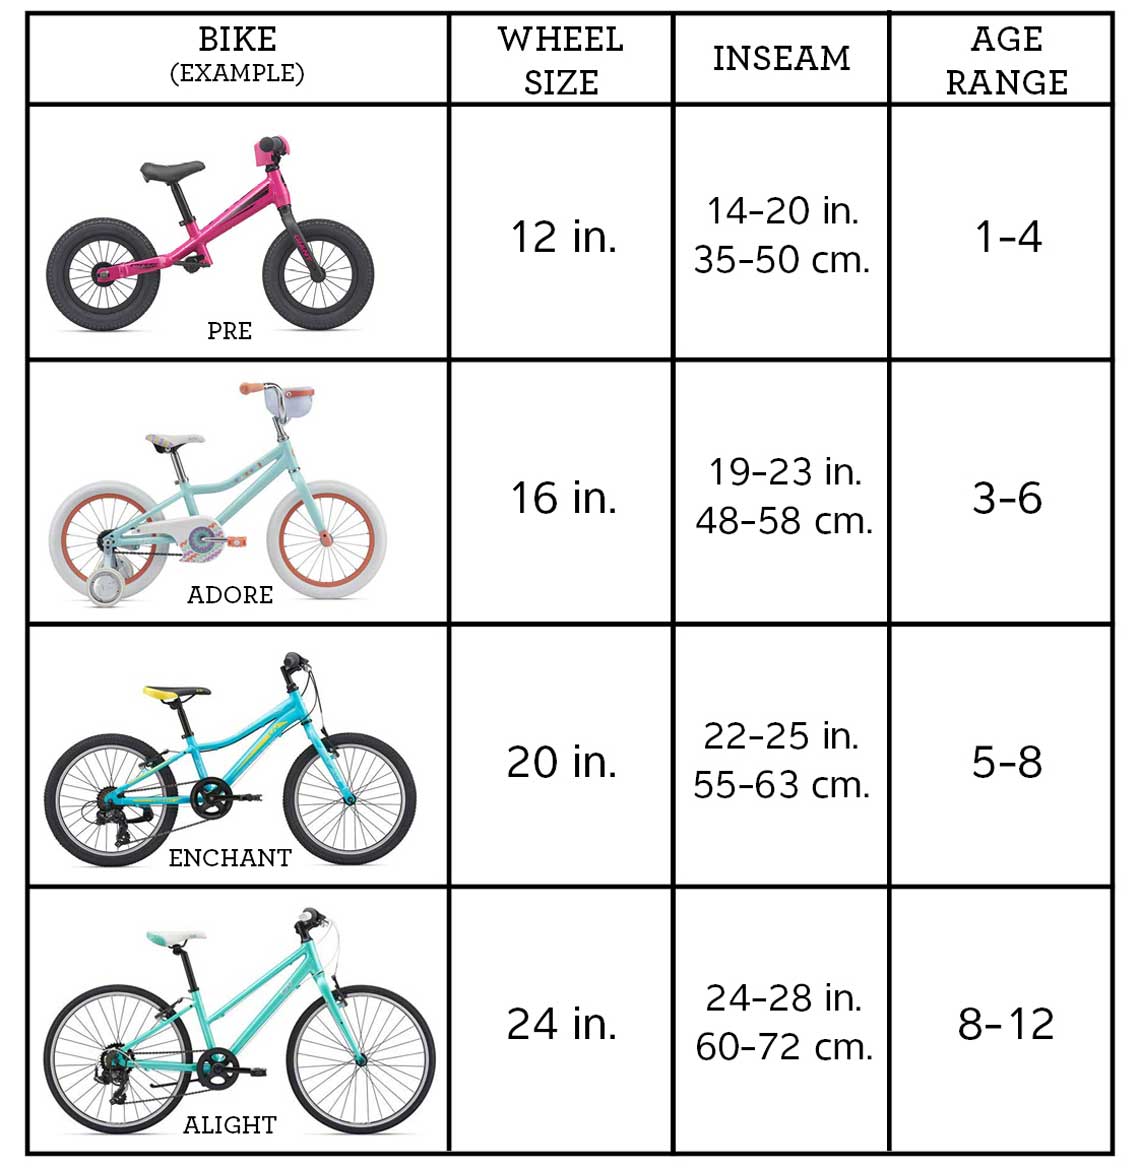
For example, Trek’s youth sizing chart uses a combination of height and inseam to determine the ideal bike size. The chart provides a range of sizes, from 12 inches to 24 inches, and includes recommendations for different types of riding, such as road riding and mountain biking.
Specialized’s youth sizing chart uses a similar approach, with a range of sizes from 12 inches to 26 inches. The chart also includes recommendations for different types of riding, as well as a guide to help parents determine the ideal bike size based on their child’s height and inseam.
By understanding the different types of bike size charts available and using a chart that takes into account the child’s height, inseam, and arm length, parents can ensure that their child gets a bike that fits them properly and provides a comfortable and safe riding experience.
Popular Bike Brands for Kids: A Size Chart Comparison
When it comes to choosing a bike for your child, there are many popular bike brands to consider. Each brand has its own unique features, benefits, and sizing charts. In this section, we’ll compare the size charts of three popular bike brands for kids: Trek, Specialized, and Giant.
Trek’s youth sizing chart is based on the child’s height and inseam. The chart provides a range of sizes, from 12 inches to 24 inches, and includes recommendations for different types of riding, such as road riding and mountain biking. Trek’s bikes are known for their high-quality components and durable construction, making them a great choice for kids who are serious about cycling.
Specialized’s youth sizing chart is also based on the child’s height and inseam. The chart provides a range of sizes, from 12 inches to 26 inches, and includes recommendations for different types of riding, such as road riding and mountain biking. Specialized’s bikes are known for their innovative designs and high-performance components, making them a great choice for kids who are looking for a bike that can keep up with their active lifestyle.
Giant’s youth sizing chart is based on the child’s height and inseam, as well as their riding style. The chart provides a range of sizes, from 12 inches to 24 inches, and includes recommendations for different types of riding, such as road riding and mountain biking. Giant’s bikes are known for their high-quality components and durable construction, making them a great choice for kids who are looking for a bike that can withstand the rigors of regular use.
When comparing the size charts of these three brands, it’s clear that each brand has its own unique approach to sizing. However, all three brands provide a range of sizes to fit different types of riders and riding styles. By using a bike size chart for youth, parents can ensure that their child gets a bike that fits them properly and provides a comfortable and safe riding experience.
Ultimately, the best bike brand for your child will depend on their individual needs and preferences. By considering factors such as the type of riding they will be doing, the terrain they will be riding on, and any specific features they may need, parents can make an informed decision and choose a bike that is both safe and fun for their child to ride.

Additional Factors to Consider When Choosing a Bike for Your Child
When choosing a bike for your child, there are several additional factors to consider beyond just the bike size chart for youth. These factors can help ensure that your child gets a bike that is both safe and fun to ride.
Type of riding: Consider the type of riding your child will be doing most often. If they will be riding on paved roads, a road bike or hybrid bike may be a good choice. If they will be riding on trails or off-road, a mountain bike may be more suitable.
Terrain: Consider the terrain your child will be riding on. If they will be riding on hills or mountains, a bike with gears or a more robust suspension system may be necessary. If they will be riding on flat terrain, a bike with a simpler gear system or less suspension may be sufficient.
Specific features: Consider any specific features your child may need or want. For example, if they will be riding in low-light conditions, a bike with lights or reflectors may be necessary. If they will be carrying gear or supplies, a bike with a rack or basket may be useful.
Brakes: Consider the type of brakes your child’s bike has. Rim brakes are common on kids’ bikes, but disc brakes may be more effective in wet or muddy conditions.
Gears: Consider the type of gear system your child’s bike has. A bike with a simple gear system may be easier for younger children to use, while a bike with a more complex gear system may be more suitable for older children or those who will be riding in hilly terrain.
Suspension: Consider the type of suspension system your child’s bike has. A bike with a front suspension fork may be more comfortable for children who will be riding on bumpy terrain, while a bike with a full suspension system may be more suitable for children who will be riding on very rough terrain.
By considering these additional factors, parents can help ensure that their child gets a bike that is both safe and fun to ride. A bike that is well-suited to your child’s needs and riding style can help promote a lifelong love of cycling and provide hours of enjoyment and exercise.
How to Test Ride a Bike with Your Child
Once you’ve narrowed down your options and found a few bikes that fit your child’s needs, it’s time to take them for a test ride. This is an important step in the bike-buying process, as it allows your child to get a feel for the bike and ensures that it’s a good fit.
Before you head out to test ride bikes, make sure your child is wearing the same type of clothing and shoes they plan to wear while riding. This will give you a more accurate idea of how the bike will fit and feel during regular use.
When test riding a bike, pay attention to how your child sits on the bike and how they interact with the controls. Make sure they can comfortably reach the handlebars and pedals, and that they can easily operate the brakes and gears.
Also, pay attention to how the bike handles and responds to your child’s input. A bike that is too small or too large can be difficult to control, so make sure your child feels comfortable and confident on the bike.
As you test ride bikes, ask your child for feedback on how the bike feels and handles. Do they feel comfortable and confident on the bike? Are there any features they particularly like or dislike?
By taking the time to test ride bikes and get your child’s feedback, you can ensure that you find a bike that is both safe and fun for them to ride. Remember, the goal is to find a bike that your child will love and enjoy riding, so don’t be afraid to take your time and try out a few different options.
Additionally, consider the following tips when test riding a bike with your child:
Make sure the bike is properly adjusted to fit your child’s height and inseam.
Check the bike’s safety features, such as brakes and reflectors.
Take the bike on a variety of terrain, such as hills and flat ground, to get a sense of how it handles.
Ask the salesperson or bike shop staff for their opinion on the bike’s fit and performance.
By following these tips and taking the time to test ride bikes, you can find a bike that is both safe and fun for your child to ride.
Common Mistakes to Avoid When Buying a Bike for Your Child
When buying a bike for your child, there are several common mistakes that parents make. These mistakes can lead to a bike that is not safe or fun for your child to ride, which can ultimately discourage them from cycling. In this section, we’ll discuss some of the most common mistakes to avoid when buying a bike for your child.
Buying a bike that is too small or too large: One of the most common mistakes parents make is buying a bike that is either too small or too large for their child. A bike that is too small can be difficult to control, while a bike that is too large can be intimidating and uncomfortable to ride. To avoid this mistake, make sure to use a bike size chart for youth to determine the ideal bike size for your child.
Not considering the child’s riding style: Another common mistake parents make is not considering their child’s riding style when buying a bike. For example, if your child will be riding on trails or off-road, they will need a bike with more robust tires and suspension. On the other hand, if your child will be riding on paved roads, a bike with thinner tires and less suspension may be more suitable.
Not checking the bike’s safety features: Safety should always be the top priority when buying a bike for your child. Make sure to check the bike’s safety features, such as brakes, reflectors, and a bell. Also, consider additional safety features such as a helmet and knee pads.
Not test riding the bike: Finally, not test riding the bike is another common mistake parents make. Test riding the bike allows you to ensure that it is a good fit for your child and that they feel comfortable and confident on the bike.
By avoiding these common mistakes, you can ensure that your child gets a bike that is both safe and fun to ride. Remember, the goal is to find a bike that your child will love and enjoy riding, so take your time and do your research.
Additionally, consider the following tips to avoid common mistakes when buying a bike for your child:
Read reviews and do research on different bike models and brands.
Ask for recommendations from friends, family, or a local bike shop.
Consider the bike’s warranty and maintenance requirements.
Don’t be afraid to ask questions or seek advice from a bike shop professional.
Conclusion: Finding the Perfect Bike for Your Child
Choosing the right bike size for your child is a crucial decision that can impact their safety, comfort, and overall cycling experience. By following the guidelines outlined in this article, you can ensure that your child gets a bike that is both safe and fun to ride.
Remember, the key to finding the perfect bike for your child is to consider their individual needs and preferences. Take the time to measure your child’s height, inseam, and arm length, and use a bike size chart for youth to determine the ideal bike size.
Additionally, consider the type of riding your child will be doing, the terrain they will be riding on, and any specific features they may need. Don’t be afraid to ask questions or seek advice from a bike shop professional.
By taking the time to find the perfect bike for your child, you can help promote a lifelong love of cycling and provide them with a fun and safe way to get exercise and explore the world around them.
In conclusion, finding the perfect bike for your child requires careful consideration and attention to detail. By following the guidelines outlined in this article, you can ensure that your child gets a bike that is both safe and fun to ride.
So, what are you waiting for? Start your search for the perfect bike today, and help your child develop a lifelong love of cycling!