
Understanding the Importance of Standover Height in Bike Fitting
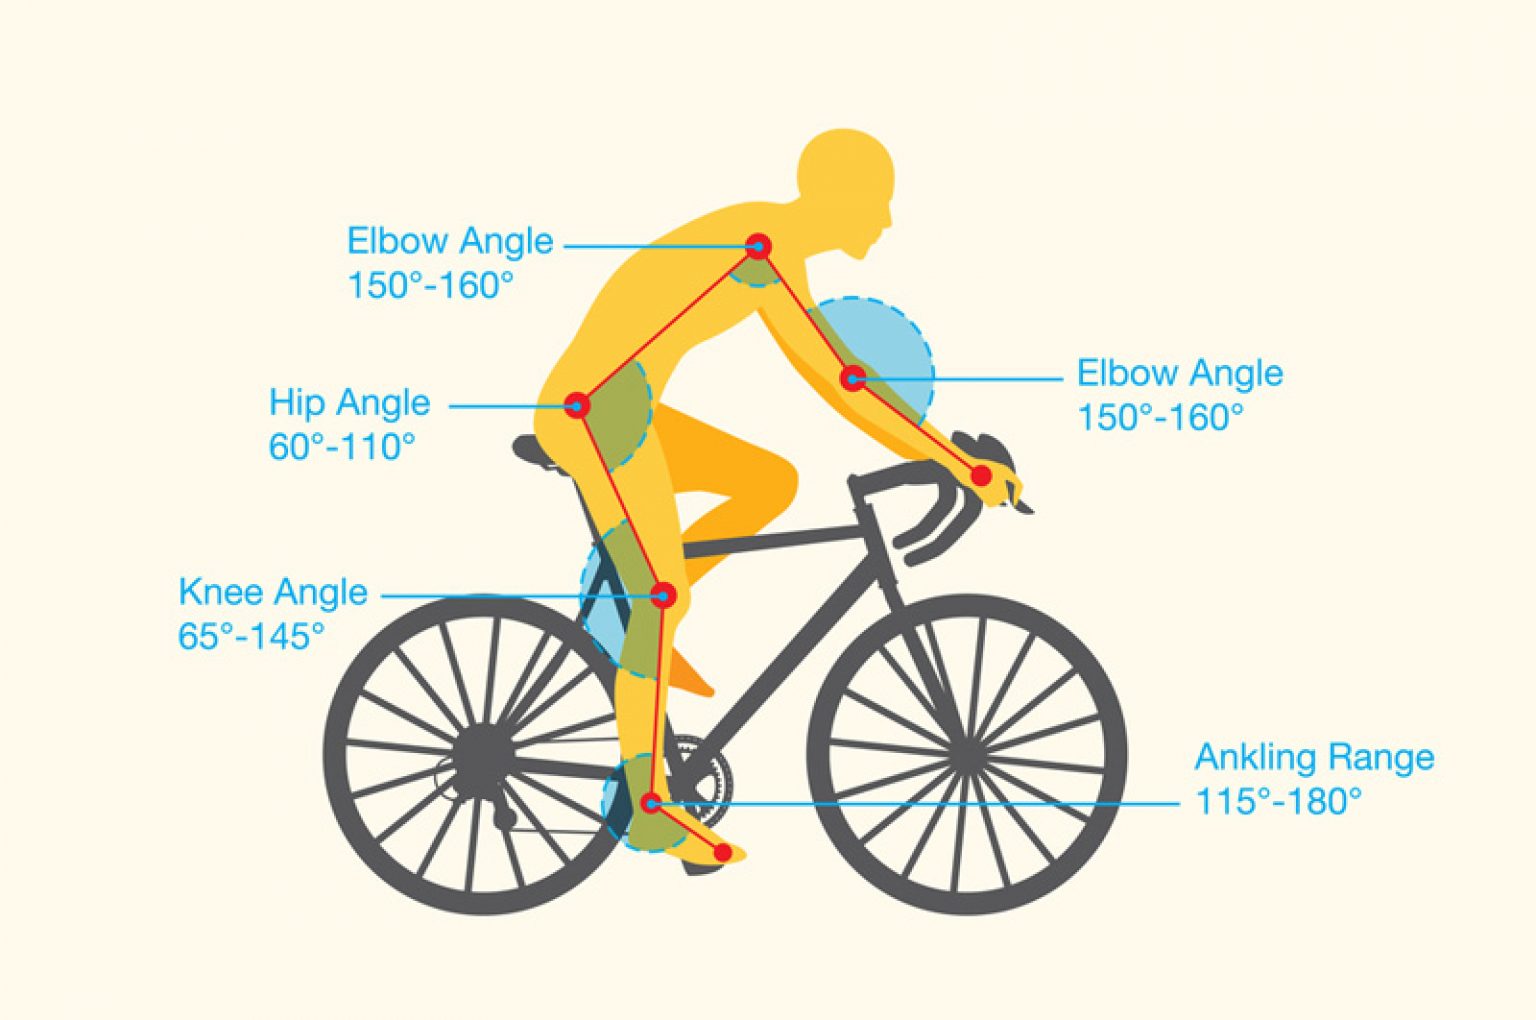
Standover height is a critical component of bike fitting, playing a significant role in ensuring a comfortable and safe riding experience. A proper standover height can prevent injuries, improve overall bike handling, and enhance the rider’s confidence. When a rider has the correct standover height, they can maintain a comfortable riding position, with their leg almost fully extended when the pedal is in its lowest position. This allows for efficient pedaling, reduced strain on the knees and ankles, and improved control over the bike.

Click Image to Find eBike Products
A bike stand over height that is too low or too high can lead to a range of issues, including discomfort, fatigue, and increased risk of injury. For example, a standover height that is too low can cause the rider to feel cramped and restricted, leading to back and neck pain. On the other hand, a standover height that is too high can result in the rider feeling stretched out and unstable, increasing the risk of accidents.
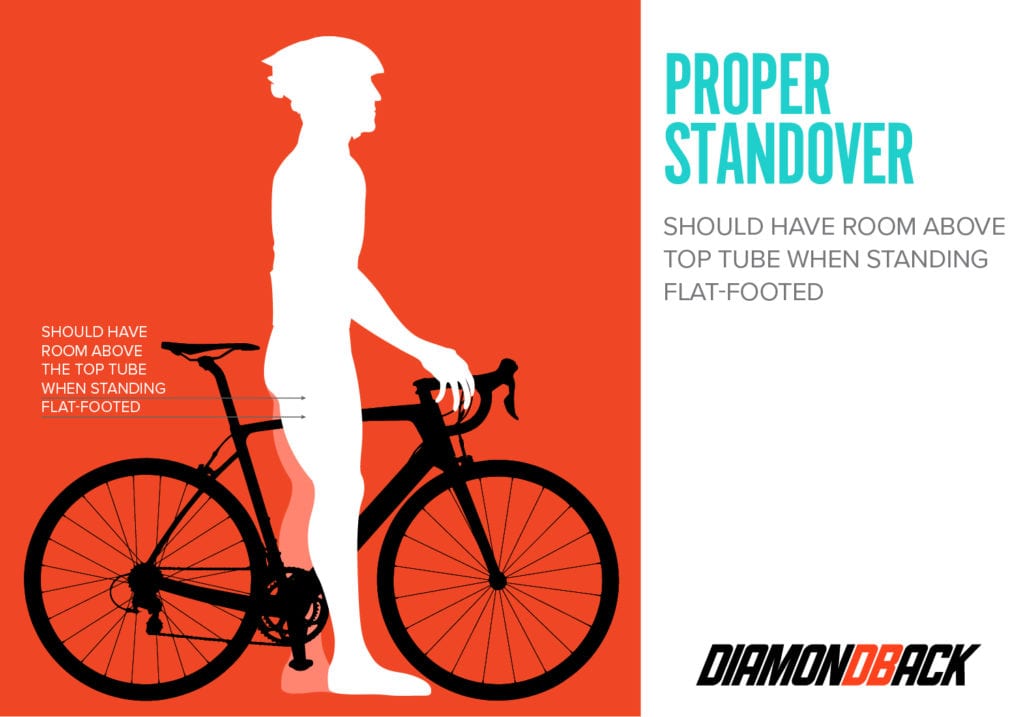
Furthermore, a proper standover height is essential for maintaining a safe riding position. When a rider is able to stand over the bike with both feet flat on the ground, they can quickly put a foot down to stabilize the bike or come to a stop. This is particularly important for beginners or those riding in heavy traffic or rough terrain.
In addition to safety and comfort, a correct standover height can also improve the overall performance of the bike. When the rider is able to maintain a comfortable riding position, they can generate more power and efficiency, leading to faster times and improved overall performance.
As a result, it is essential to prioritize standover height when fitting a bike. By taking the time to ensure a proper standover height, riders can enjoy a more comfortable, safe, and efficient riding experience. In the next section, we will explore how to measure standover height and provide a step-by-step guide for determining the perfect standover height for your bike.

How to Measure Your Standover Height: A Step-by-Step Guide
Measuring your standover height is a crucial step in finding the perfect bike fit. To ensure accurate measurement, follow these steps:
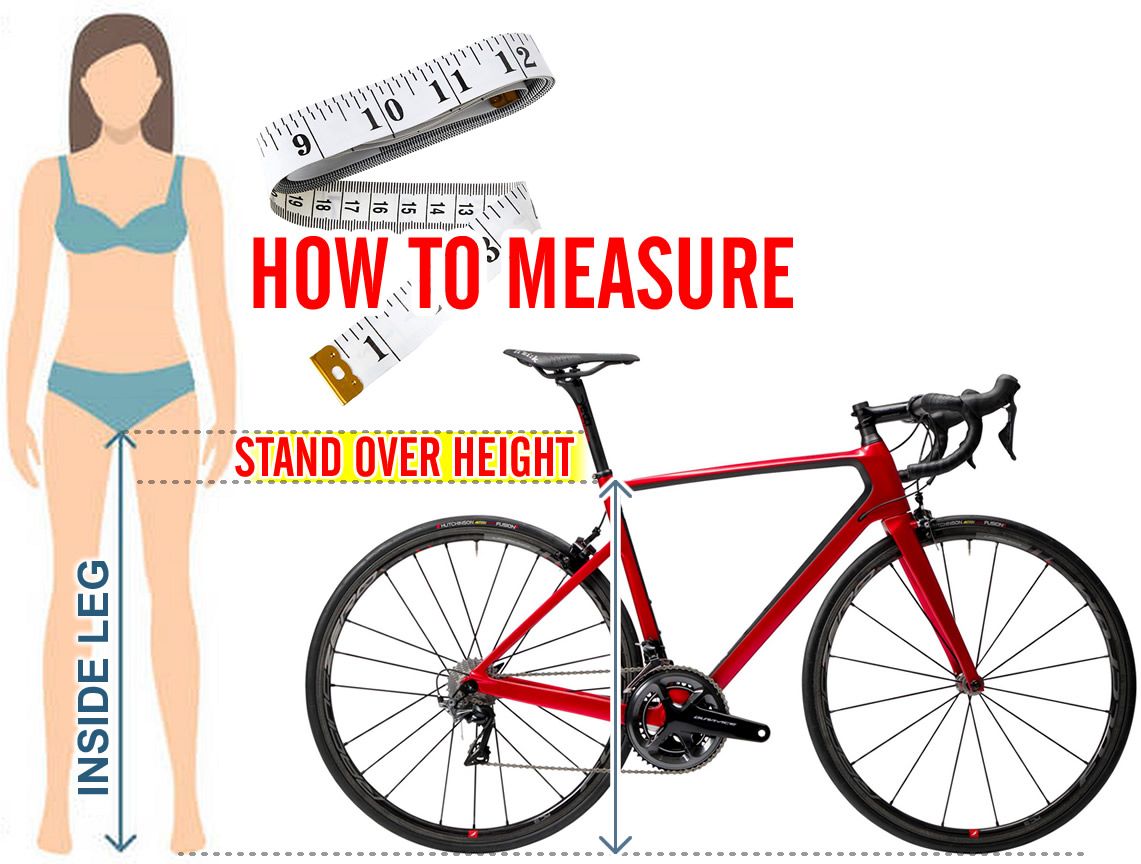
1. Choose a flat surface: Find a flat, level surface to stand on. This will ensure that your measurement is accurate and not affected by any inclines or declines.
2. Wear your cycling shoes: Wear the same shoes you plan to wear while cycling. This will ensure that your measurement takes into account the thickness of your shoes and any other factors that may affect your standover height.
3. Stand over the bike: Stand over the bike with your feet flat on the ground and your legs straight. Make sure the bike is on a level surface and the tires are inflated to the recommended pressure.
4. Measure the distance: Measure the distance from the ground to the top tube of the bike. This is the standover height. You can use a ruler or a measuring tape to take the measurement.
5. Take multiple measurements: Take multiple measurements to ensure accuracy. Stand over the bike several times and take the measurement each time. This will help you get an average measurement and ensure that your standover height is accurate.
6. Record your measurement: Record your standover height measurement and use it to determine the correct bike size. You can use a bike size chart or consult with a professional bike fitter to ensure the best fit.
Some common mistakes to avoid when measuring standover height include using the wrong measurement method or ignoring other important bike fit factors. For example, some riders may measure their standover height from the center of the bottom bracket instead of the top tube. This can result in an inaccurate measurement and a poor bike fit.
Additionally, it’s essential to consider other factors that can affect standover height, such as bike design, tire size, and suspension type. These factors can impact the standover height and affect the overall bike fit.
In the next section, we will explore the relationship between standover height and bike size, including how to choose the right bike size based on standover height.
The Relationship Between Standover Height and Bike Size
When it comes to choosing the right bike size, standover height plays a crucial role. A bike that is too small or too large can lead to discomfort, poor handling, and increased risk of injury. To ensure a proper fit, it’s essential to consider the relationship between standover height and bike size.
Most bike manufacturers provide a size chart that correlates standover height with bike size. For example, the Trek FX series has a size chart that recommends a standover height of 29.5 inches for a medium-sized bike. Similarly, the Specialized Sirrus series recommends a standover height of 30.5 inches for a medium-sized bike.
However, it’s essential to note that these size charts are only a guideline. Other factors, such as inseam length, arm length, and riding style, can also impact the ideal bike size. Additionally, some bike models may have a more upright riding position, which can affect the standover height.
To choose the right bike size based on standover height, follow these steps:
1. Check the manufacturer’s size chart: Look up the size chart for your desired bike model and find the recommended standover height for your height.
2. Consider your inseam length: If you have a longer or shorter inseam than average, you may need to adjust the bike size accordingly.
3. Think about your riding style: If you prefer a more upright riding position, you may want to choose a bike with a slightly larger standover height.
4. Test ride the bike: Once you’ve narrowed down your options, test ride the bike to ensure a comfortable fit.
By considering the relationship between standover height and bike size, you can find a bike that fits you perfectly and provides a comfortable and safe riding experience.
In the next section, we’ll explore the various factors that can affect standover height, including bike design, tire size, and suspension type.
Factors Affecting Standover Height: A Deep Dive
Standover height is not just a simple measurement; it’s influenced by a variety of factors that can impact the overall bike fit. In this section, we’ll delve into the various factors that can affect standover height, including bike design, tire size, and suspension type.
Bike Design: The design of the bike can significantly impact standover height. For example, a bike with a sloping top tube will have a lower standover height than a bike with a horizontal top tube. Additionally, bikes with a more upright riding position, such as hybrid or comfort bikes, may have a higher standover height than road bikes or mountain bikes.
Tire Size: The size of the tires can also affect standover height. Larger tires can increase the standover height, while smaller tires can decrease it. This is because the tire size affects the overall height of the bike, including the height of the bottom bracket and the top tube.
Suspension Type: The type of suspension used on a bike can also impact standover height. For example, a bike with a full-suspension system may have a higher standover height than a bike with a hardtail or rigid suspension. This is because the suspension system can affect the overall height of the bike, including the height of the bottom bracket and the top tube.
Other Factors: Other factors that can affect standover height include the type of brakes used, the size of the wheels, and the type of pedals. For example, a bike with disc brakes may have a higher standover height than a bike with rim brakes, due to the increased height of the brake calipers.
Understanding these factors can help you make informed decisions when choosing a bike or adjusting your existing bike to optimize standover height. By considering these factors, you can ensure a comfortable and safe riding experience.
In the next section, we’ll explore common mistakes to avoid when determining standover height, including using the wrong measurement method or ignoring other important bike fit factors.

Common Mistakes to Avoid When Determining Standover Height
When determining standover height, there are several common mistakes to avoid. These mistakes can lead to an incorrect standover height, which can result in a poor bike fit and decreased comfort and safety.
Using the Wrong Measurement Method: One of the most common mistakes is using the wrong measurement method. Some people may measure their standover height from the center of the bottom bracket instead of the top tube. This can result in an incorrect standover height and a poor bike fit.
Ignoring Other Important Bike Fit Factors: Another common mistake is ignoring other important bike fit factors, such as inseam length, arm length, and riding style. These factors can all impact the ideal standover height and should be considered when determining the correct standover height.
Not Considering Bike Design: Bike design can also impact standover height. For example, a bike with a sloping top tube will have a lower standover height than a bike with a horizontal top tube. Not considering bike design can result in an incorrect standover height and a poor bike fit.
Not Measuring Standover Height Accurately: Measuring standover height accurately is crucial. Using a tape measure or a ruler to measure standover height can result in an incorrect measurement. It’s essential to use a precise measurement method, such as a standover height gauge, to ensure an accurate measurement.
Not Adjusting for Tire Size: Tire size can also impact standover height. Not adjusting for tire size can result in an incorrect standover height and a poor bike fit.
By avoiding these common mistakes, you can ensure an accurate standover height and a comfortable and safe riding experience.
In the next section, we’ll explore real-world examples of how standover height can impact bike fit, including case studies or testimonials from cyclists who have experienced the benefits of proper standover height.
Real-World Examples: How Standover Height Impacts Bike Fit
Standover height is a critical component of bike fit, and its impact can be seen in real-world examples. Here are a few case studies that demonstrate the importance of proper standover height:
Case Study 1: The Commuter Cyclist
A 35-year-old commuter cyclist, Sarah, was experiencing discomfort and pain in her lower back and knees after riding her bike to work. After consulting with a professional bike fitter, it was determined that her standover height was too low, causing her to stretch and strain her back and knees. By adjusting her bike to optimize her standover height, Sarah was able to eliminate her discomfort and pain, and enjoy a more comfortable and safe ride.
Case Study 2: The Competitive Cyclist
A 28-year-old competitive cyclist, John, was looking to improve his performance and efficiency on the bike. After consulting with a professional bike fitter, it was determined that his standover height was too high, causing him to lose power and efficiency in his pedal stroke. By adjusting his bike to optimize his standover height, John was able to improve his performance and efficiency, and achieve his goals in competition.
Case Study 3: The Recreational Cyclist
A 45-year-old recreational cyclist, Emily, was experiencing discomfort and pain in her neck and shoulders after riding her bike on the weekends. After consulting with a professional bike fitter, it was determined that her standover height was too low, causing her to hunch over and strain her neck and shoulders. By adjusting her bike to optimize her standover height, Emily was able to eliminate her discomfort and pain, and enjoy a more comfortable and safe ride.
These case studies demonstrate the importance of proper standover height in achieving a comfortable and safe ride. By optimizing standover height, cyclists can improve their performance, efficiency, and overall riding experience.
In the next section, we’ll provide tips and advice on how to adjust your bike to optimize standover height, including seat height adjustment, handlebar height, and other tweaks.

Adjusting Your Bike to Optimize Standover Height
Once you have determined your ideal standover height, you can adjust your bike to optimize it. Here are some tips and advice on how to adjust your bike:
Seat Height Adjustment: The seat height is one of the most critical adjustments to make when optimizing standover height. To adjust the seat height, loosen the seatpost clamp and slide the seatpost up or down to the desired height. Make sure to tighten the clamp securely to prevent the seatpost from moving during riding.
Handlebar Height Adjustment: The handlebar height can also impact standover height. To adjust the handlebar height, loosen the stem clamp and slide the handlebars up or down to the desired height. Make sure to tighten the clamp securely to prevent the handlebars from moving during riding.
Other Tweaks: In addition to seat height and handlebar height adjustments, there are other tweaks you can make to optimize standover height. These include adjusting the saddle fore-and-aft position, adjusting the cleat position on your shoes, and adjusting the brake lever position.
Professional Bike Fitting: If you are unsure about how to adjust your bike to optimize standover height, consider consulting a professional bike fitter. A professional bike fitter can help you determine your ideal standover height and make the necessary adjustments to your bike.
By adjusting your bike to optimize standover height, you can improve your comfort, safety, and performance on the bike. Remember to always follow proper safety precautions when adjusting your bike, and consult a professional bike fitter if you are unsure about any adjustments.
In the next section, we’ll summarize the importance of standover height in bike fitting and provide a final checklist for readers to ensure they find the perfect standover height for their bike.

Conclusion: Finding the Perfect Standover Height for Your Bike
Standover height is a critical component of bike fitting, and finding the perfect standover height for your bike is essential for a comfortable and safe riding experience. By understanding the importance of standover height, measuring your standover height accurately, and adjusting your bike to optimize standover height, you can improve your overall bike handling and reduce the risk of injury.
To ensure you find the perfect standover height for your bike, follow this final checklist:
1. Measure your standover height accurately using the step-by-step guide provided in this article.
2. Consider the relationship between standover height and bike size and choose the right bike size based on your standover height.
3. Adjust your bike to optimize standover height by adjusting the seat height, handlebar height, and other tweaks as needed.
4. Avoid common mistakes when determining standover height, such as using the wrong measurement method or ignoring other important bike fit factors.
5. Consult a professional bike fitter if you are unsure about how to adjust your bike to optimize standover height.
By following these steps and considering the factors that affect standover height, you can find the perfect standover height for your bike and enjoy a comfortable and safe riding experience.
