
The Significance of Cycling Posture on a Road Bike
Maintaining the correct cycling posture on a road bike is crucial for several reasons. Firstly, a proper posture allows for improved power output, as it ensures that the rider’s muscles are engaged and working efficiently. This results in a more powerful and efficient pedal stroke, ultimately leading to faster speeds and better performance.
Secondly, a correct cycling posture reduces the risk of injury. Poor posture can lead to a variety of issues, including back pain, neck pain, and knee pain. By maintaining the correct posture, riders can minimize the risk of these injuries and enjoy a more comfortable riding experience.
Finally, a proper cycling posture on a road bike increases comfort during long rides. A comfortable riding position reduces fatigue and allows riders to stay in the saddle for longer periods of time. This is especially important for endurance riders and racers, who often spend several hours in the saddle at a time.
In summary, the significance of cycling posture on a road bike cannot be overstated. Proper posture leads to improved power output, reduced risk of injury, and increased comfort during long rides. By understanding the key elements of cycling posture and making the necessary adjustments, riders can maximize their performance and enjoyment on the bike.

Click Image to Find eBike Products

Understanding the Basics: Key Elements of Cycling Posture
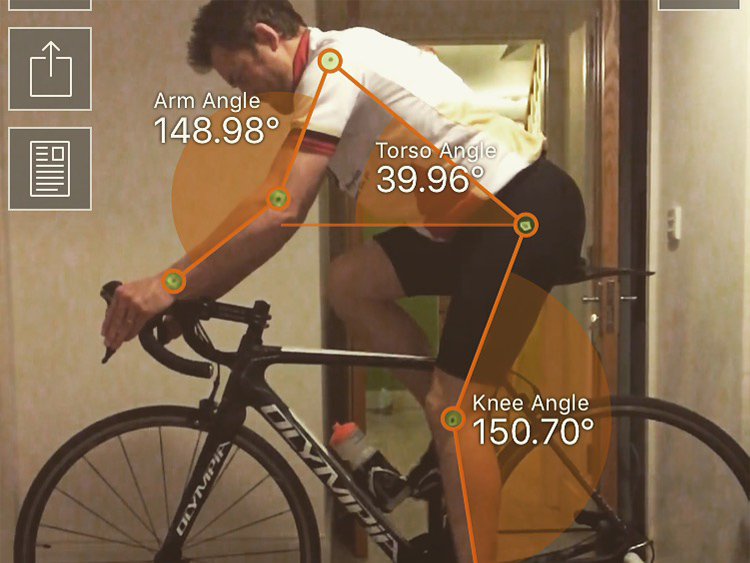
To achieve the perfect cycling posture on a road bike, it’s essential to understand the fundamental elements that contribute to a comfortable and efficient riding position. These elements include saddle height, handlebar reach, and handlebar drop.
Saddle height is the distance between the top of the saddle and the pedal at its lowest point. A proper saddle height allows for a full extension of the leg during the pedal stroke, maximizing power output and reducing strain on the knee joint.
Handlebar reach is the distance between the saddle and the handlebars. A proper handlebar reach allows for a comfortable and sustainable riding position, with the rider’s arms slightly bent and shoulders relaxed.
Handlebar drop is the difference in height between the saddle and the handlebars. A proper handlebar drop allows for a comfortable and aerodynamic riding position, with the rider’s torso slightly inclined forward.
These elements work together to create a comfortable and efficient riding position, allowing for improved power output, reduced risk of injury, and increased comfort during long rides. By understanding the relationship between these elements, riders can make the necessary adjustments to achieve the perfect cycling posture on a road bike.

How to Adjust Saddle Height for Optimal Power and Comfort
To adjust saddle height for optimal power and comfort on a road bike, follow these steps:
Start by setting the saddle level, ensuring it is parallel to the ground.
With the pedal at its lowest point, position your heel on the pedal. Your leg should be fully extended, with a slight bend in the knee.
Move your foot to the ball of your foot, ensuring your knee remains in the same position. This is the correct saddle height for optimal power output and comfort.
To confirm the saddle height, clip in and pedal a few times. Your knee should be slightly bent at the bottom of the pedal stroke.
Common mistakes to avoid include setting the saddle too high or too low, which can lead to knee pain, reduced power output, and discomfort.
Tips for individual riders:
Riders with longer legs may need to set the saddle slightly higher for optimal power output.
Riders with shorter legs may need to set the saddle slightly lower for optimal comfort and knee alignment.
By adjusting saddle height for optimal power and comfort, riders can improve their performance, reduce the risk of injury, and increase comfort during long rides.

Achieving the Ideal Handlebar Reach for Maximum Control and Comfort
Handlebar reach is the distance between the saddle and the handlebars, and it plays a crucial role in achieving the perfect cycling posture on a road bike. A proper handlebar reach allows for a comfortable and sustainable riding position, with the rider’s arms slightly bent and shoulders relaxed.
To adjust handlebar reach, follow these steps:
Measure the distance between the saddle and the handlebars. This distance should be approximately 80-90% of the rider’s inseam length.
If the handlebar reach is too long, consider moving the saddle forward or using a shorter stem. If the handlebar reach is too short, consider moving the saddle back or using a longer stem.
Ensure that the handlebars are at the correct height. A proper handlebar height allows for a comfortable and aerodynamic riding position, with the rider’s torso slightly inclined forward.
The benefits of a proper handlebar reach include improved control, increased comfort, and reduced risk of injury. An incorrect handlebar reach can lead to shoulder and neck pain, as well as reduced power output and control.
By achieving the ideal handlebar reach, riders can maximize their performance and comfort on a road bike. Regular adjustments and maintenance are important to ensure that the handlebar reach remains optimal for individual riders.
Minimizing Handlebar Drop for Improved Breathing and Comfort
Handlebar drop is the difference in height between the saddle and the handlebars, and it plays a crucial role in achieving the perfect cycling posture on a road bike. Minimizing handlebar drop can improve breathing and comfort during long rides, as well as reduce strain on the neck and back.
To adjust handlebar drop, follow these steps:
Measure the distance between the saddle and the handlebars. This distance should be approximately 1-2 inches less than the rider’s inseam length.
If the handlebar drop is too great, consider raising the handlebars or using a stem with a greater angle. If the handlebar drop is too small, consider lowering the handlebars or using a stem with a smaller angle.
Ensure that the handlebars are at the correct height. A proper handlebar height allows for a comfortable and aerodynamic riding position, with the rider’s torso slightly inclined forward.
Minimizing handlebar drop can provide several benefits, including improved breathing, reduced strain on the neck and back, and increased comfort during long rides. However, it is important to note that handlebar drop is also a matter of personal preference, and some riders may prefer a more aggressive riding position.
For triathlon or time trial events, aerobars can be used to further minimize handlebar drop and improve aerodynamics. Aerobars are handlebar extensions that allow the rider to assume a more aerodynamic position, with their elbows resting on pads and their hands gripping the bars. However, it is important to note that aerobars should only be used by experienced riders, as they can limit control and visibility.
By minimizing handlebar drop, riders can improve their breathing and comfort on a road bike. Regular adjustments and maintenance are important to ensure that handlebar drop remains optimal for individual riders.

The Role of Core Strength in Maintaining Proper Cycling Posture
Core strength plays a crucial role in maintaining proper cycling posture on a road bike. The core muscles, which include the muscles of the abdomen, lower back, and hips, help to stabilize the body and support the upper body while riding.
A strong core can help to improve cycling posture in several ways. First, it can help to prevent slouching or hunching over the handlebars, which can lead to discomfort and reduced power output. A strong core helps to keep the upper body in a stable and neutral position, allowing for more efficient pedaling and better control of the bike.
Second, a strong core can help to reduce strain on the lower back and neck muscles. When the core muscles are weak, other muscles must compensate, leading to fatigue and discomfort. By strengthening the core muscles, riders can reduce the strain on these other muscles and prevent pain and injury.
To improve core strength for cycling, consider incorporating the following exercises and stretches into your routine:
Plank: Hold a plank position for 30-60 seconds, focusing on keeping the body in a straight line and engaging the core muscles.
Bicycle crunches: Lie on your back with your hands behind your head and alternate bringing each elbow to the opposite knee, engaging the oblique muscles.
Russian twists: Sit on the floor with your knees bent and feet flat, holding a weight or medicine ball and twist your torso from side to side.
Glute bridges: Lie on your back with your knees bent and feet flat, lifting your hips off the ground and squeezing your glutes.
Cat-cow stretch: Start on your hands and knees, arching your back and looking up towards the ceiling, then rounding your back and tucking your chin towards your chest.
By improving core strength and stability, riders can maintain proper cycling posture on a road bike, reducing the risk of injury and improving performance and comfort. Regular exercise and stretching can help to build and maintain a strong core, leading to a more enjoyable and efficient riding experience.
Common Cycling Posture Mistakes and How to Correct Them
Maintaining proper cycling posture on a road bike is crucial for optimal performance and comfort. However, there are several common mistakes that riders make that can lead to discomfort, injury, and reduced power output. Here are some of the most common cycling posture mistakes and how to correct them:
1. Rounded shoulders
Rounded shoulders can lead to discomfort and reduced power output. To correct this mistake, focus on keeping your shoulders down and back, and engage your upper back muscles. You can also try stretching your chest muscles to help open up your shoulders.
2. Overreaching
Overreaching can lead to strain on the neck, shoulders, and arms. To correct this mistake, adjust your handlebars so that they are at the correct height and distance from the saddle. A proper handlebar reach allows for a comfortable and sustainable riding position, with the rider’s arms slightly bent and shoulders relaxed.
3. Slouching
Slouching can lead to lower back pain and reduced power output. To correct this mistake, focus on keeping your back straight and engaging your core muscles. You can also try adjusting your saddle height and handlebar reach to help maintain a more upright position.
4. Hunched back
A hunched back can lead to discomfort and reduced power output. To correct this mistake, focus on keeping your back straight and engaging your upper back muscles. You can also try stretching your chest muscles to help open up your shoulders and improve your posture.
5. Improper cleat position
Improper cleat position can lead to knee pain and reduced power output. To correct this mistake, make sure that your cleats are positioned correctly, with the ball of your foot over the pedal axle. You can also try adjusting your saddle height and fore/aft position to help optimize your pedaling motion.
6. Over-gripping the handlebars
Over-gripping the handlebars can lead to strain on the hands, wrists, and arms. To correct this mistake, focus on keeping a relaxed grip on the handlebars and avoid clenching your fists. You can also try adjusting your handlebar reach and drop to help reduce the strain on your upper body.
7. Improper saddle position
Improper saddle position can lead to discomfort, knee pain, and reduced power output. To correct this mistake, make sure that your saddle is at the correct height, angle, and fore/aft position. You can also try adjusting your handlebar height and reach to help optimize your riding position.
8. Neglecting core strength
Neglecting core strength can lead to poor posture and reduced power output. To correct this mistake, focus on building your core strength with exercises such as planks, bicycle crunches, and Russian twists. A strong core can help to improve your posture, reduce strain on your upper body, and improve your power output.
9. Ignoring discomfort
Ignoring discomfort can lead to injury and reduced performance. If you experience discomfort while riding, take the time to address the issue and make adjustments as needed. This may include adjusting your saddle height, handlebar reach, or cleat position, or taking breaks to stretch and move your body.
10. Failing to maintain regular adjustments and maintenance
Failing to maintain regular adjustments and maintenance can lead to poor posture and reduced performance over time. To correct this mistake, make sure to regularly check and adjust your bike fit, and perform regular maintenance on your bike to ensure that it is in good working order.
Conclusion
Maintaining proper cycling posture on a road bike is crucial for optimal performance and comfort. By avoiding common mistakes and focusing on proper positioning, riders can improve their power output, reduce their risk of injury, and enjoy a more comfortable riding experience. Regular adjustments and maintenance, as well as a strong core, can also help to optimize riding posture and improve overall performance.

Maximizing Performance and Comfort: Putting it All Together
Congratulations! You have now learned about the key elements of cycling posture on a road bike and how to adjust them for optimal power output, comfort, and control. By following the guidelines and tips provided in this comprehensive guide, you are well on your way to achieving the perfect cycling posture for your individual body and riding style.
It is important to remember that achieving the perfect cycling posture is not a one-time task, but rather an ongoing process that requires regular adjustments and maintenance. As your body changes and adapts to cycling, your bike fit may also need to be adjusted to ensure continued comfort and efficiency. We recommend working with a professional bike fitter who can provide individualized advice and recommendations based on your unique needs and goals.
In addition to regular adjustments and maintenance, building and maintaining a strong core can also help to optimize your cycling posture and improve your overall performance on the bike. Incorporating core strengthening exercises and stretches into your training routine can help to improve your stability, balance, and power output, allowing you to ride faster, longer, and more comfortably.
By following the guidelines and tips provided in this comprehensive guide, you can maximize your performance and comfort on the bike, reduce your risk of injury, and enjoy a more enjoyable and fulfilling cycling experience. Remember to always listen to your body, make adjustments as needed, and prioritize your comfort and safety above all else. Happy cycling!
