
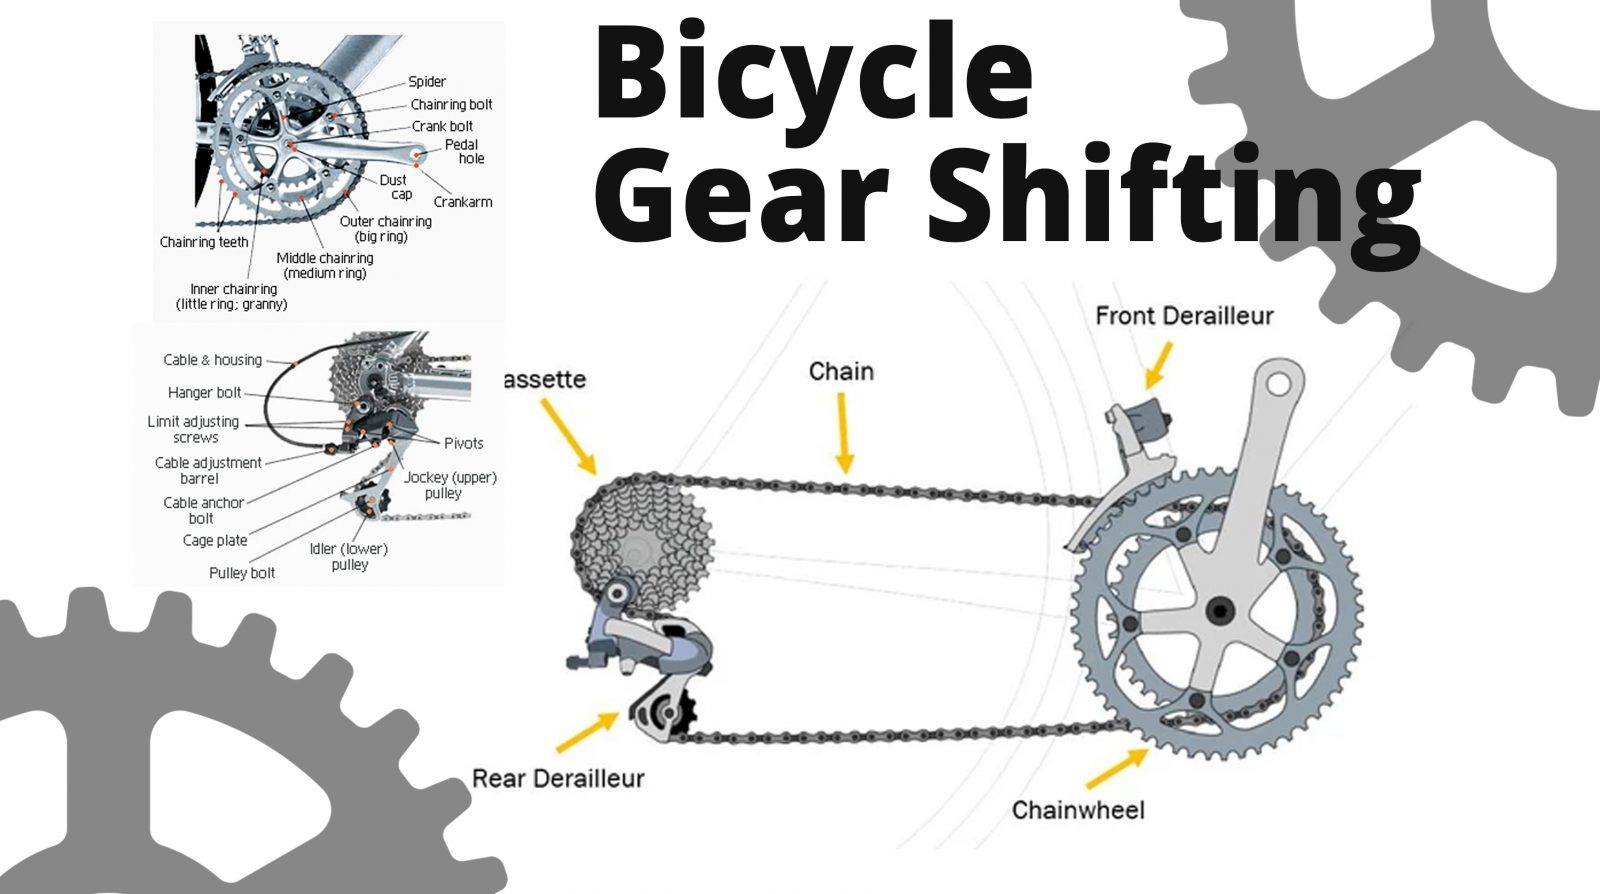
Understanding Your Bike’s Gear System
A bike’s gear system is a complex mechanism that enables riders to adjust their pedaling effort to suit various terrain and conditions. At its core, the gear system consists of derailleurs, gear hubs, and cassettes, which work in harmony to provide a smooth riding experience. Derailleurs, for instance, are responsible for shifting the chain between different gears, while gear hubs and cassettes provide the necessary range of gears to tackle different terrain.

Click Image to Find eBike Products
There are several types of gear systems available, including derailleur-based systems, internal gear hubs, and single-speed systems. Derailleur-based systems are the most common type, featuring a front derailleur, rear derailleur, and a cassette. Internal gear hubs, on the other hand, feature a gear system enclosed within the rear hub, providing a more compact and low-maintenance option. Single-speed systems, as the name suggests, feature a single gear ratio, ideal for flat terrain and casual riding.
When it comes to adjusting bike gears, understanding how the gear system works is crucial. By knowing how the derailleurs, gear hubs, and cassettes interact, riders can make informed adjustments to optimize their pedaling effort and riding experience. In the next section, we’ll explore the importance of proper gear adjustment and the consequences of incorrect adjustment.
Why Proper Gear Adjustment is Crucial
Proper gear adjustment is essential for optimal bike performance, efficiency, and safety. When gears are not adjusted correctly, it can lead to poor performance, increased wear and tear, and even safety hazards. For instance, if the derailleurs are not properly aligned, it can cause the chain to skip gears, leading to a loss of momentum and control. Similarly, if the cable tension is not adjusted correctly, it can cause the gears to shift erratically, leading to a rough ride and potential damage to the bike’s components.
On the other hand, correct gear adjustment can significantly improve a bike’s performance and efficiency. By adjusting the gears to the optimal setting, riders can achieve a smoother ride, improved pedaling efficiency, and increased speed. Additionally, proper gear adjustment can also help to reduce wear and tear on the bike’s components, leading to a longer lifespan and reduced maintenance costs.
Furthermore, proper gear adjustment is also crucial for safety reasons. If the gears are not adjusted correctly, it can lead to a loss of control, particularly when riding in challenging terrain or conditions. By ensuring that the gears are properly adjusted, riders can maintain control and stability, reducing the risk of accidents and injuries.
In the next section, we’ll discuss the importance of pre-adjustment checks to ensure a smooth ride and optimal performance. By following these checks, riders can identify and address any potential issues before adjusting the gears, ensuring a safe and efficient ride.
Pre-Adjustment Checks: Ensuring a Smooth Ride
Before adjusting your bike’s gears, it’s essential to perform a series of pre-adjustment checks to ensure a smooth ride and optimal performance. These checks will help you identify any potential issues that may affect the gear adjustment process, such as worn-out components or misaligned derailleurs.
Here’s a checklist of pre-adjustment checks to perform:
- Inspect the chain for wear and damage. Check for any signs of rust, corrosion, or excessive wear on the chain links.
- Check the cables for fraying, corrosion, or damage. Make sure the cables are properly seated in their respective housings.
- Inspect the derailleurs for misalignment or damage. Check that the derailleurs are properly attached to the frame and that the limit screws are not loose.
- Check the cassette and chainrings for wear and damage. Look for any signs of excessive wear on the teeth or any damage to the cassette or chainrings.
- Make sure the bike is properly lubricated. Check the chain, derailleurs, and other moving parts to ensure they are well-lubricated and free from corrosion.
By performing these pre-adjustment checks, you’ll be able to identify any potential issues that may affect the gear adjustment process. This will help you make the necessary adjustments to ensure a smooth ride and optimal performance.
In the next section, we’ll provide a step-by-step guide on how to adjust the front derailleur, including how to set the limit screws, adjust the cable tension, and test the shifting.
Adjusting the Front Derailleur: A Step-by-Step Guide
Adjusting the front derailleur is a crucial step in ensuring proper gear shifting and optimal performance. Here’s a step-by-step guide on how to adjust the front derailleur:
Step 1: Set the Limit Screws
The limit screws are used to set the maximum and minimum limits of the front derailleur’s movement. To set the limit screws, follow these steps:
- Shift the chain into the smallest chainring and the smallest cog on the cassette.
- Loosen the limit screws by turning them counterclockwise.
- Shift the chain into the largest chainring and the largest cog on the cassette.
- Tighten the limit screws by turning them clockwise until they stop.
Step 2: Adjust the Cable Tension
The cable tension is critical in ensuring proper gear shifting. To adjust the cable tension, follow these steps:
- Shift the chain into the smallest chainring and the smallest cog on the cassette.
- Loosen the cable tension by turning the barrel adjuster counterclockwise.
- Shift the chain into the largest chainring and the largest cog on the cassette.
- Tighten the cable tension by turning the barrel adjuster clockwise until the chain shifts smoothly.
Step 3: Test the Shifting
Once you’ve adjusted the limit screws and cable tension, test the shifting to ensure it’s smooth and proper. Shift the chain through all the gears, checking for any skipping or hesitation.
By following these steps, you’ll be able to adjust the front derailleur and ensure proper gear shifting. In the next section, we’ll provide tips and tricks for adjusting the rear derailleur.

Adjusting the Rear Derailleur: Tips and Tricks
Adjusting the rear derailleur is a critical step in ensuring proper gear shifting and optimal performance. Here are some tips and tricks to help you adjust the rear derailleur:
Setting the Limit Screws
The limit screws on the rear derailleur control the maximum and minimum limits of the derailleur’s movement. To set the limit screws, follow these steps:
- Shift the chain into the smallest cog on the cassette.
- Loosen the limit screws by turning them counterclockwise.
- Shift the chain into the largest cog on the cassette.
- Tighten the limit screws by turning them clockwise until they stop.
Adjusting the Cable Tension
The cable tension on the rear derailleur is critical in ensuring proper gear shifting. To adjust the cable tension, follow these steps:
- Shift the chain into the smallest cog on the cassette.
- Loosen the cable tension by turning the barrel adjuster counterclockwise.
- Shift the chain into the largest cog on the cassette.
- Tighten the cable tension by turning the barrel adjuster clockwise until the chain shifts smoothly.
Troubleshooting Common Issues
Common issues with the rear derailleur include skipping gears, ghost shifting, and uneven shifting. To troubleshoot these issues, try the following:
- Check the cable tension and adjust as necessary.
- Check the limit screws and adjust as necessary.
- Check the derailleur alignment and adjust as necessary.
By following these tips and tricks, you’ll be able to adjust the rear derailleur and ensure proper gear shifting. In the next section, we’ll discuss common gear adjustment issues and provide troubleshooting tips.

Troubleshooting Common Gear Adjustment Issues
Despite proper adjustment, gear adjustment issues can still arise. Here are some common issues and troubleshooting tips to help you resolve them:
Skipping Gears
Skipping gears is a common issue that can occur when the derailleur is not properly aligned or when the cable tension is not set correctly. To troubleshoot skipping gears, try the following:
- Check the derailleur alignment and adjust as necessary.
- Check the cable tension and adjust as necessary.
- Check the chain for wear and damage, and replace if necessary.
Ghost Shifting
Ghost shifting is a phenomenon where the chain shifts into a gear that is not intended. This can occur when the derailleur is not properly adjusted or when the cable tension is not set correctly. To troubleshoot ghost shifting, try the following:
- Check the derailleur alignment and adjust as necessary.
- Check the cable tension and adjust as necessary.
- Check the chain for wear and damage, and replace if necessary.
Uneven Shifting
Uneven shifting can occur when the derailleur is not properly adjusted or when the cable tension is not set correctly. To troubleshoot uneven shifting, try the following:
- Check the derailleur alignment and adjust as necessary.
- Check the cable tension and adjust as necessary.
- Check the chain for wear and damage, and replace if necessary.
By following these troubleshooting tips, you’ll be able to resolve common gear adjustment issues and ensure smooth shifting. In the next section, we’ll discuss the importance of final checks and fine-tuning.

Final Checks and Fine-Tuning
After adjusting the front and rear derailleurs, it’s essential to perform final checks and fine-tuning to ensure smooth shifting and optimal performance. Here are some steps to follow:
Test the Shifting
Test the shifting by riding the bike and shifting through all the gears. Check for any skipping gears, ghost shifting, or uneven shifting.
Adjust the Cable Tension
Adjust the cable tension as necessary to ensure smooth shifting. Check the cable tension by shifting through the gears and feeling for any resistance or hesitation.
Make Any Necessary Adjustments
Make any necessary adjustments to the derailleurs, limit screws, or cable tension to ensure smooth shifting and optimal performance.
Check the Chain
Check the chain for wear and damage, and replace if necessary. A worn-out chain can cause shifting problems and affect the overall performance of the bike.
By performing these final checks and fine-tuning, you’ll be able to ensure smooth shifting and optimal performance. In the next section, we’ll discuss the importance of maintenance and upkeep in keeping your bike’s gears in top condition.
Maintenance and Upkeep: Keeping Your Gears in Top Condition
Regular maintenance and upkeep are crucial to keeping your bike’s gears in top condition. Here are some tips to help you maintain and upkeep your bike’s gears:
Clean and Lubricate the Chain
Regularly clean and lubricate the chain to prevent wear and tear. Use a chain cleaner and lubricant specifically designed for bike chains.
Inspect the Cables and Derailleurs
Regularly inspect the cables and derailleurs for wear and damage. Check for any signs of fraying, corrosion, or damage, and replace if necessary.
Schedule Regular Tune-Ups
Schedule regular tune-ups with a professional bike mechanic to ensure your bike’s gears are properly adjusted and maintained.
Check the Gear System
Regularly check the gear system for any signs of wear and tear. Check the derailleurs, chainrings, and cassettes for any signs of damage or wear, and replace if necessary.
By following these tips, you’ll be able to keep your bike’s gears in top condition and ensure smooth shifting and optimal performance. Remember to always refer to your bike’s manual for specific maintenance and upkeep instructions.
