
Identifying the Need for Handlebar Adjustments
Cycling is a popular activity enjoyed by many, but it can sometimes lead to discomfort or pain, especially if the bike is not properly adjusted. One area that often requires attention is the handlebar height. Adjusting the handlebars can significantly improve comfort, alleviate back pain, and enhance control, leading to a more enjoyable and safer cycling experience. So, how do you raise the handlebars on a bike? Let’s explore the reasons for making this adjustment and the importance of a proper bike fit.

Click Image to Find eBike Products
Tools and Components Required for Handlebar Adjustments
To raise the handlebars on a bike, you will need several tools and components. These include Allen keys, a torque wrench, a handlebar stem, and spacers. Here’s a brief overview of each:
- Allen keys: These are L-shaped tools with hexagonal sockets used to tighten and loosen bolts on bicycles. Different sizes of Allen keys are required for different bolts, so it’s essential to have a set on hand.
- Torque wrench: This tool measures and applies a specific amount of torque to bolts, ensuring they are tightened to the manufacturer’s recommended specifications. Over-tightening bolts can damage bike components, while under-tightening can lead to safety issues.
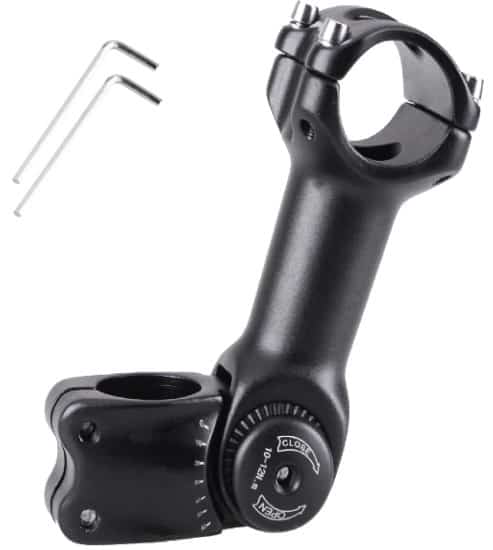
- Handlebar stem: The stem connects the handlebars to the bike’s fork and steerer tube. Stems come in various lengths, angles, and materials, allowing for customization based on the rider’s needs and preferences.
- Spacers: These are small cylindrical components that sit between the stem and the steerer tube. Spacers can be added or removed to adjust the height of the handlebars.
When using these tools and components, always follow safety precautions. Wear protective eyewear and gloves, and work in a well-ventilated area. Before making any adjustments, ensure the bike is properly supported to prevent damage or injury. Finally, always double-check that all bolts are tightened to the recommended torque before riding.
Assessing Your Current Handlebar Height
To determine if your handlebars need adjusting, you’ll first need to measure the current handlebar height. Here’s how to do it:
- Place the bike on a level surface and ensure the wheels are properly aligned.
- Measure the distance from the ground to the top of the handlebars, where they meet the stem. Record this measurement in millimeters or inches.
- Compare your measurement to recommended guidelines for your specific cycling style and preferences. For example, touring bikes typically have higher handlebars than road bikes, while mountain bikes often have the lowest handlebars.
- Consider balancing the handlebar height with the saddle height and position. A general rule of thumb is that the handlebars should be about shoulder height or slightly below when standing next to the bike. However, this can vary depending on the rider’s flexibility, strength, and riding style.
If your handlebars are significantly lower or higher than recommended guidelines, or if they are causing discomfort or pain, it may be time to consider adjusting them. Remember that a proper bike fit is essential for a comfortable and safe cycling experience, so take the time to assess your current handlebar height and make any necessary adjustments.

Selecting the Right Handlebar Stem
When selecting a handlebar stem, there are several factors to consider, including stem length, angle, and material. Here’s a closer look at each factor:
- Stem length: The stem length affects the reach to the handlebars. A longer stem increases the reach, while a shorter stem decreases it. Consider your riding style and flexibility when selecting a stem length. For example, touring cyclists may prefer a shorter stem for a more upright position, while road cyclists may opt for a longer stem for a more aerodynamic position.
- Stem angle: The stem angle affects the handlebar height and tilt. A positive angle (upward) raises the handlebars, while a negative angle (downward) lowers them. Some stems allow for adjustable angles, providing even more customization options.
- Material: Handlebar stems are typically made from aluminum or carbon fiber. Aluminum stems are more affordable and durable, while carbon fiber stems are lighter and more expensive. Consider your budget and performance goals when selecting a stem material.
There are two main types of handlebar stems: quill stems and threadless stems. Quill stems are older and use a threaded system to attach to the steerer tube. Threadless stems, on the other hand, use a clamp system and are more common on modern bikes. When selecting a stem, make sure to choose the right type for your bike. A professional bike mechanic can help determine the correct stem type and size for your bike.

Raising Handlebars: Step-by-Step Instructions
To raise the handlebars on your bike, follow these steps:
- Gather the necessary tools and components, including Allen keys, a torque wrench, the new handlebar stem, and spacers if needed. Ensure that the new stem is the correct type and size for your bike.
- Remove the front wheel of the bike to make it easier to work with the handlebars. Secure the bike in a bike stand or prop it up against a wall.
- Loosen the stem bolts using an Allen key. There are usually two bolts, one at the front and one at the back of the stem. Be sure to hold the handlebars steady while loosening the bolts to prevent them from turning.
- Slide the handlebars up or down the steerer tube to the desired height. If using spacers, add or remove them as needed to achieve the correct height. Be sure to leave enough space between the top of the stem and the handlebars to ensure proper steering and control.
- Once the handlebars are at the desired height, tighten the stem bolts to the recommended torque using a torque wrench. This is typically between 4-6 Nm for threadless stems and 6-8 Nm for quill stems. Over-tightening can damage the stem or steerer tube, while under-tightening can lead to safety issues.
- Reattach the front wheel and ensure that the bike’s geometry and handlebar alignment are correct. The front wheel should be centered in the fork, and the handlebars should be aligned with the rear wheel.
- Test the new handlebar height by taking the bike for a short ride. Make any necessary adjustments for optimal comfort and control.
Remember to always follow safety precautions when working on your bike. Wear protective eyewear and gloves, and work in a well-ventilated area. If you are unsure about any of the steps or require additional assistance, consult with a professional bike mechanic.
Testing and Fine-Tuning Your New Handlebar Height
After raising the handlebars on your bike, it’s essential to test the new height and fine-tune it for optimal comfort and control. Here’s how to do it:
- Take the bike for a short ride on a flat, smooth surface. Pay attention to how the bike handles and how comfortable you feel. Make note of any discomfort or areas that need improvement.
- Gradually increase your riding distance and intensity, paying attention to any changes in comfort or control. It may take some time to adjust to the new handlebar height, so be patient and give yourself time to adapt.
- If you experience any discomfort or handling issues, make small adjustments to the handlebar height or stem angle. Loosen the stem bolts, adjust the handlebars or stem as needed, and then tighten the bolts to the recommended torque.
- Consider consulting with a professional bike fitter or mechanic for personalized advice and recommendations. They can help ensure that your bike fit is optimized for your specific body type, riding style, and preferences.
- Remember to maintain your adjusted handlebars by regularly cleaning, lubricating, and inspecting the stem bolts and bearings. Look out for any signs of wear or damage, and seek professional help if necessary.
By testing and fine-tuning your new handlebar height, you can ensure a more comfortable and safer cycling experience. Remember to always prioritize safety and seek professional advice if necessary.
Maintaining Your Adjusted Handlebars
Maintaining your adjusted handlebars is essential to ensure a safe and comfortable cycling experience. Here are some tips on how to maintain your adjusted handlebars:
- Regular cleaning: Wipe down your handlebars and stem with a damp cloth to remove dirt and grime. This will help prevent rust and wear on the components.
- Lubrication: Apply a light lubricant to the stem bolts and bearings to ensure smooth movement and prevent seizing. Be sure to follow the manufacturer’s instructions for lubrication.
- Inspection: Regularly inspect the stem bolts and bearings for signs of wear or damage. Look for any cracks, rust, or other damage that could compromise the safety of the component.
- Professional help: If you notice any signs of wear or damage, or if you are unsure about how to maintain your adjusted handlebars, seek professional help. A professional bike mechanic can ensure that your handlebars are properly maintained and safe to use.
Remember, maintaining your adjusted handlebars is an essential part of bike maintenance. By regularly cleaning, lubricating, and inspecting your handlebars, you can ensure a safer and more comfortable cycling experience. Don’t hesitate to seek professional help if necessary.

Additional Considerations for Handlebar Adjustments
When adjusting your handlebars, there are several additional considerations to keep in mind. Here are some factors to consider:
- Bike handling: Raising the handlebars can affect the bike’s handling, particularly when cornering or descending. Be sure to test the new handlebar height gradually and adjust as necessary to ensure safe and comfortable handling.
- Aerodynamics: Raising the handlebars can also impact the bike’s aerodynamics, as a higher handlebar height can create more wind resistance. Consider your cycling goals and preferences when adjusting the handlebars, and be aware of any changes in aerodynamics.
- Accessories: Adjusting the handlebars can affect the placement of accessories, such as bike computers or lights. Be sure to adjust the placement of any accessories as necessary to ensure safe and convenient use.
- Professional advice: If you are unsure about how to adjust your handlebars or have any concerns about bike fit or safety, consider consulting with a professional bike fitter or mechanic. They can provide personalized advice and recommendations based on your specific body type, cycling style, and goals.
By considering these additional factors, you can ensure a safer and more comfortable cycling experience. Remember, a proper bike fit is essential for safe and enjoyable cycling, so don’t hesitate to seek professional advice if necessary.