The Benefits of Tubeless Tires and Common Issues
When it comes to cycling, tubeless tires have become a popular choice among riders. The advantages of tubeless tires are numerous, including improved traction, reduced risk of pinch flats, and a smoother ride. However, like any other type of tire, they are not immune to problems. Punctures and leaks can still occur, and it’s essential to know how to identify and address these issues to get back on the road quickly. Understanding how to repair a tubeless bike tire is crucial to minimizing downtime and ensuring a safe ride. In this article, we will guide you through the process of troubleshooting and fixing a flat tubeless bike tire, so you can enjoy the benefits of tubeless tires with confidence.

Click Image to Find eBike Products
Identifying the Source of the Leak: A Step-by-Step Guide
To effectively repair a flat tubeless bike tire, it’s crucial to identify the source of the leak. This step is often overlooked, but it’s essential to ensure a proper repair. Start by inspecting the tire’s sidewalls, tread, and rim for signs of damage or wear. Look for any cuts, tears, or abrasions that could be causing the leak. Check the tire’s bead area, where the tire meets the rim, as this is a common spot for leaks to occur. Next, inspect the rim itself, paying attention to any sharp edges or burrs that could be causing the tire to leak. By carefully examining the tire and rim, you’ll be able to pinpoint the source of the leak and take the necessary steps to repair it. Remember, understanding how to repair a tubeless bike tire requires patience and attention to detail, but with practice, you’ll be able to fix a flat tire in no time.

How to Remove the Tire from the Rim
Once you’ve identified the source of the leak, it’s time to remove the tire from the rim. This process requires some care and attention to detail to avoid damaging the tire or rim. Start by deflating the tire completely, then use tire levers to pry the tire away from the rim. Work your way around the tire, using multiple levers to loosen the tire from the rim. Be careful not to pinch or fold the tire’s sidewalls, as this can cause further damage. If the tire is particularly stubborn, you can use a bit of lubricant, such as soap or silicone spray, to help it come off more easily. When removing the tire, take note of the direction of the tire’s rotation, as this will help you reinstall it correctly later. Remember, understanding how to repair a tubeless bike tire requires patience and practice, so don’t be discouraged if it takes a few attempts to get it right.

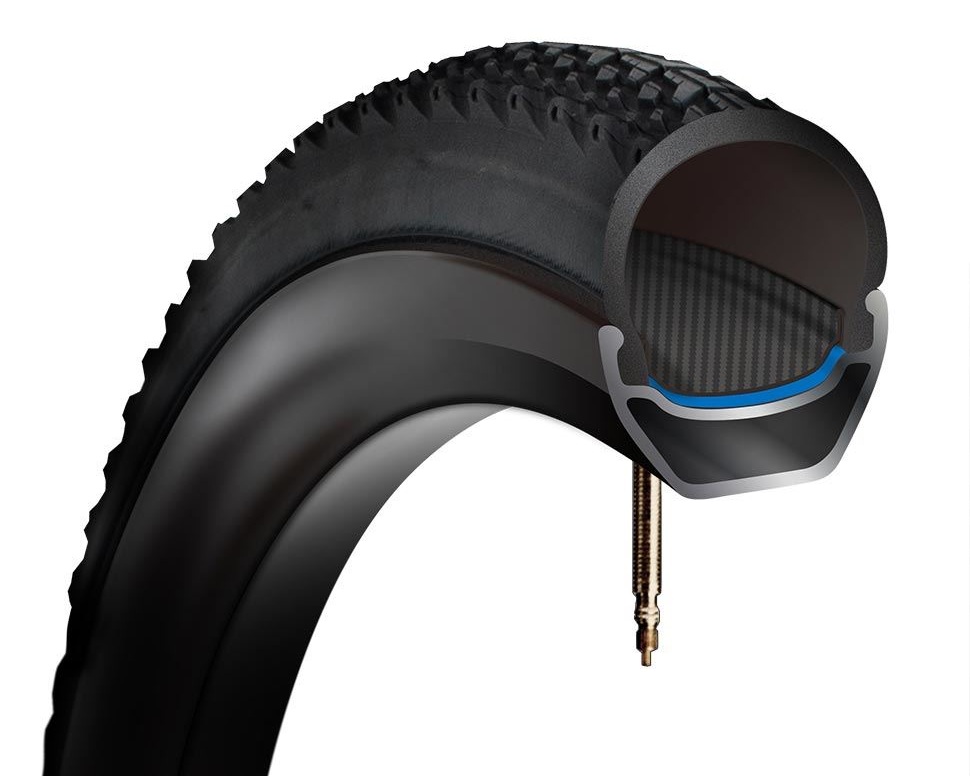
Inspecting and Cleaning the Rim and Tire
Before repairing the puncture, it’s essential to inspect and clean the rim and tire to ensure a proper seal. Start by removing any debris, dirt, or old sealant from the rim and tire. Use a soft-bristled brush or a clean cloth to wipe away any dirt or grime. Next, inspect the rim for any sharp edges or burrs that could be causing the tire to leak. Use a file or sandpaper to smooth out any rough spots. The tire itself should also be inspected for any signs of damage or wear, such as cuts, tears, or excessive wear on the tread or sidewalls. Cleaning and inspecting the rim and tire is a crucial step in the repair process, as it ensures a proper seal and helps prevent future flats. By taking the time to properly clean and inspect the rim and tire, you’ll be able to successfully repair the puncture and get back on the road. When learning how to repair a tubeless bike tire, it’s essential to pay attention to these details to ensure a successful repair.

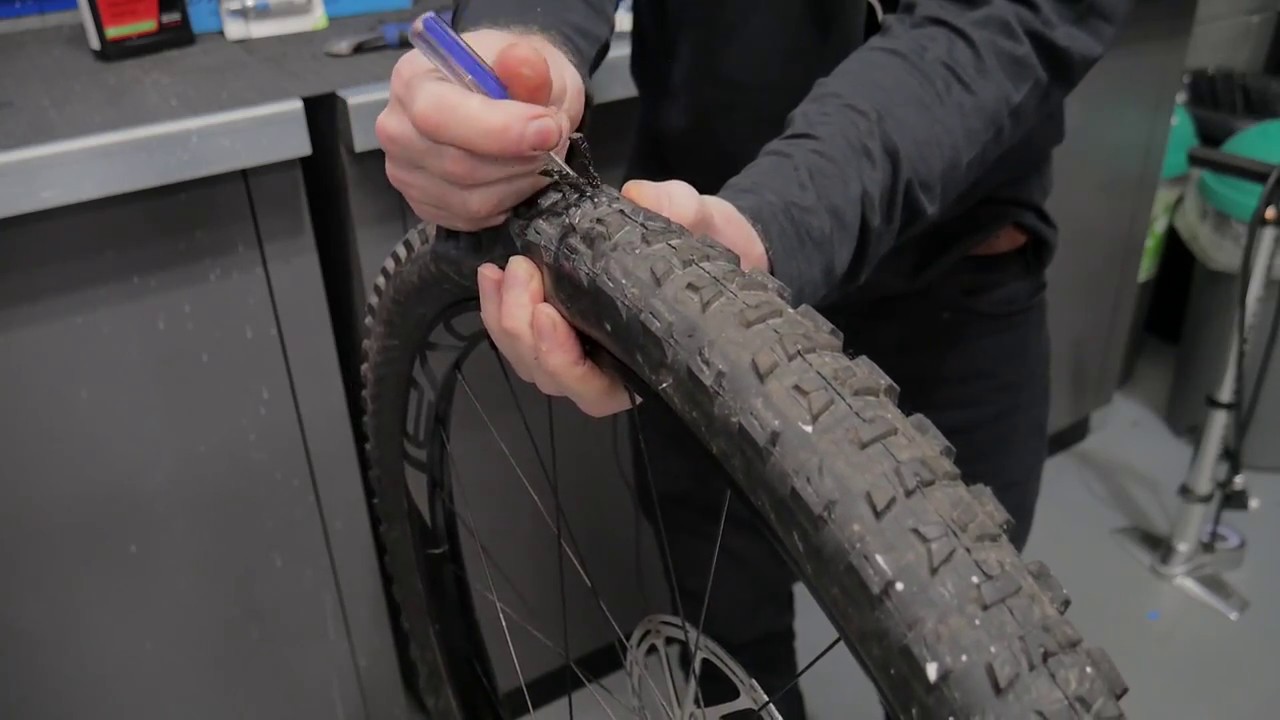
Repairing Punctures with Tire Plugs or Sealant
Once the tire is removed and the rim and tire are clean, it’s time to repair the puncture. There are two common methods for repairing punctures in tubeless tires: using tire plugs or tire sealant. Tire plugs are small, rubbery inserts that are pushed into the puncture from the outside of the tire, effectively plugging the hole. They are a good option for larger punctures or those in the sidewall of the tire. Tire sealant, on the other hand, is a liquid or gel-like substance that is injected into the tire through the valve stem. It coats the inside of the tire and rim, sealing any small punctures or leaks. There are different types of tire sealants available, including latex-based and non-latex-based options, each with their own advantages and disadvantages. When learning how to repair a tubeless bike tire, it’s essential to understand the different repair options available and choose the best one for the specific puncture. By using tire plugs or sealant, you can effectively repair punctures and get back on the road quickly and safely.
Reinstalling the Tire and Ensuring a Proper Seal
Once the puncture is repaired, it’s time to reinstall the tire and ensure a proper seal. Start by applying a thin layer of tire sealant to the rim and tire bead. This will help create a strong bond between the two and prevent future leaks. Next, carefully place the tire back onto the rim, making sure it is properly seated and centered. Use a tire lever to ensure the tire is securely attached to the rim. Inflate the tire to the recommended pressure, as specified by the manufacturer. Finally, inspect the tire for any signs of leaks, using a soap solution or tire pressure gauge to detect any air escaping. By following these steps, you can ensure a proper seal and get back on the road with confidence. Remember, when learning how to repair a tubeless bike tire, it’s essential to pay attention to the details, as a proper seal is crucial for safety and performance. By taking the time to properly reinstall the tire and ensure a proper seal, you can enjoy a smooth and worry-free ride.
Tips for Preventing Future Flats and Maintaining Your Tubeless Tires
To minimize the risk of future flats and ensure optimal performance from your tubeless tires, it’s essential to adopt a regular maintenance routine. One of the most critical steps is to inspect your tires regularly, looking for signs of wear, damage, or excessive wear on the tread or sidewalls. Additionally, maintaining proper tire pressure is crucial, as under-inflated tires are more susceptible to punctures and damage. Using tire sealant can also help prevent future flats by coating the inside of the tire and rim, sealing any small punctures or leaks. Furthermore, consider installing tire inserts or rim strips to provide an extra layer of protection against punctures. By following these tips and staying on top of tire maintenance, you can reduce the likelihood of future flats and enjoy a smooth, worry-free ride. Remember, learning how to repair a tubeless bike tire is only half the battle – preventing future flats is just as important. By taking proactive steps to maintain your tires, you can ensure a safe and enjoyable ride.
Conclusion: Getting Back on the Road with Confidence
By following the steps outlined in this guide, you should now be equipped with the knowledge and skills to troubleshoot and fix a flat tubeless bike tire. Remember, learning how to repair a tubeless bike tire is a crucial aspect of bike maintenance, and with practice, you’ll become more confident and proficient in your abilities. Proper tire maintenance and repair are essential for a safe and enjoyable ride, and by taking the time to inspect, clean, and repair your tires, you can minimize the risk of future flats and ensure a smooth ride. So, get back on the road with confidence, knowing that you have the skills and knowledge to tackle any tire-related issues that may arise. With regular maintenance and repair, you can enjoy a worry-free ride and focus on what matters most – the thrill of the ride.