
Why You Might Need to Remove Your Bike Pedals
Removing bike pedals is a crucial process that many cyclists need to undertake at some point. Whether it’s for maintenance, repair, or replacement, knowing how to take off your bike pedals can save you time and money in the long run. But why do you need to remove your bike pedals in the first place? There are several scenarios where pedal removal is necessary.

Click Image to Find eBike Products
One common reason is to perform routine maintenance. Over time, pedals can become worn out, and removing them allows you to clean and lubricate the threads, ensuring smooth pedaling and preventing damage to the crankset. Additionally, if you’re experiencing issues with your pedals, such as clicking or grinding noises, removing them can help you diagnose and fix the problem.
Another reason to remove your bike pedals is to replace them with new ones. Whether you’re upgrading to a different type of pedal or simply replacing worn-out ones, knowing how to remove the old pedals is essential. Furthermore, if you’re planning to store your bike for an extended period, removing the pedals can help prevent damage and corrosion.
Lastly, removing bike pedals can be necessary when transporting your bike. If you need to pack your bike in a car or on a plane, removing the pedals can help prevent damage to the bike and other objects. By knowing how to remove your bike pedals, you can ensure a safe and secure transportation process.
As you can see, removing bike pedals is an essential skill for any cyclist. In the next section, we’ll discuss the tools and equipment needed to remove bike pedals, making it easier for you to tackle this process with confidence.
Tools and Equipment Needed for Pedal Removal
Before you start removing your bike pedals, it’s essential to have the right tools and equipment for the job. Having the correct tools will make the process much easier and help prevent damage to your bike. So, what do you need to remove bike pedals?
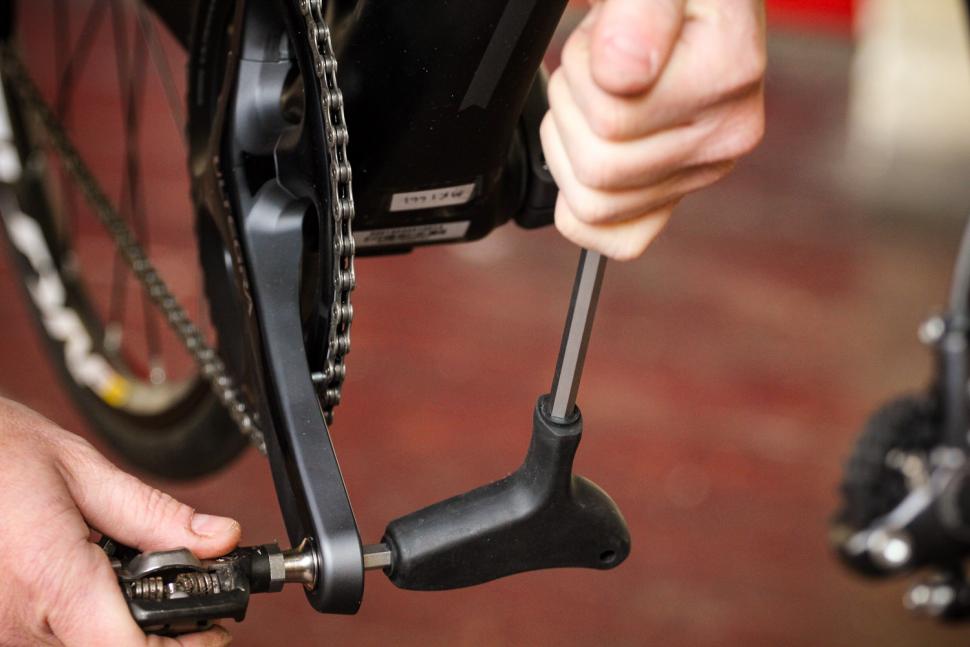
A pedal wrench is the most critical tool for removing bike pedals. A pedal wrench is a long, T-handled wrench that fits onto the pedal axle and provides the necessary leverage to loosen the pedals. There are different types of pedal wrenches available, including those with a built-in Allen wrench or those that require a separate Allen wrench.
In addition to a pedal wrench, you may also need an Allen wrench, depending on the type of pedals you have. Some pedals require an Allen wrench to loosen the pedal washers, while others may require a separate tool. It’s essential to check your pedal type before starting the removal process.
Other tools that may be helpful when removing bike pedals include a rag, some lubricant, and a pair of gloves. A rag can help protect your hands from dirt and grime, while lubricant can help loosen any stuck parts. Gloves can provide extra grip and protection for your hands.
When choosing a pedal wrench, consider the following factors:
- Length: A longer pedal wrench provides more leverage, making it easier to loosen the pedals.
- Material: A pedal wrench made from durable materials, such as steel or aluminum, will last longer and provide better performance.
- Adjustability: An adjustable pedal wrench can accommodate different pedal sizes and types.
By having the right tools and equipment, you’ll be able to remove your bike pedals with ease and confidence. In the next section, we’ll discuss the importance of preparation before starting the removal process.
Preparation is Key: Before You Start Removing Pedals
Before you start removing your bike pedals, it’s essential to prepare the bike and the pedals to ensure a smooth and safe process. Proper preparation can help prevent damage to the bike and the pedals, and make the removal process much easier.
The first step in preparing your bike is to clean the pedals. Dirt, grime, and old lubricant can make the pedal removal process more difficult, so it’s essential to clean the pedals thoroughly before starting. Use a rag and some mild soap to wipe down the pedals, and make sure to remove any debris or dirt that may be accumulated.
Next, remove any accessories that may be attached to the pedals, such as toe clips or pedal cages. These accessories can get in the way of the pedal removal process, and removing them will give you clear access to the pedals.
Position the bike in a way that makes it easy to access the pedals. You may need to turn the bike upside down or place it on a bike stand to get a good angle. Make sure the bike is stable and secure before starting the removal process.
It’s also a good idea to check the pedal type and the crankset before starting the removal process. Some pedals may require special tools or techniques, so it’s essential to know what type of pedals you have and what tools you’ll need.
By taking the time to prepare your bike and the pedals, you’ll be able to remove the pedals safely and efficiently. In the next section, we’ll provide a step-by-step guide on how to remove bike pedals, including how to loosen the pedals, remove the pedal washers, and take out the pedals.
Step-by-Step Instructions for Removing Bike Pedals
Now that you have prepared your bike and the pedals, it’s time to start the removal process. Here’s a step-by-step guide on how to remove bike pedals:
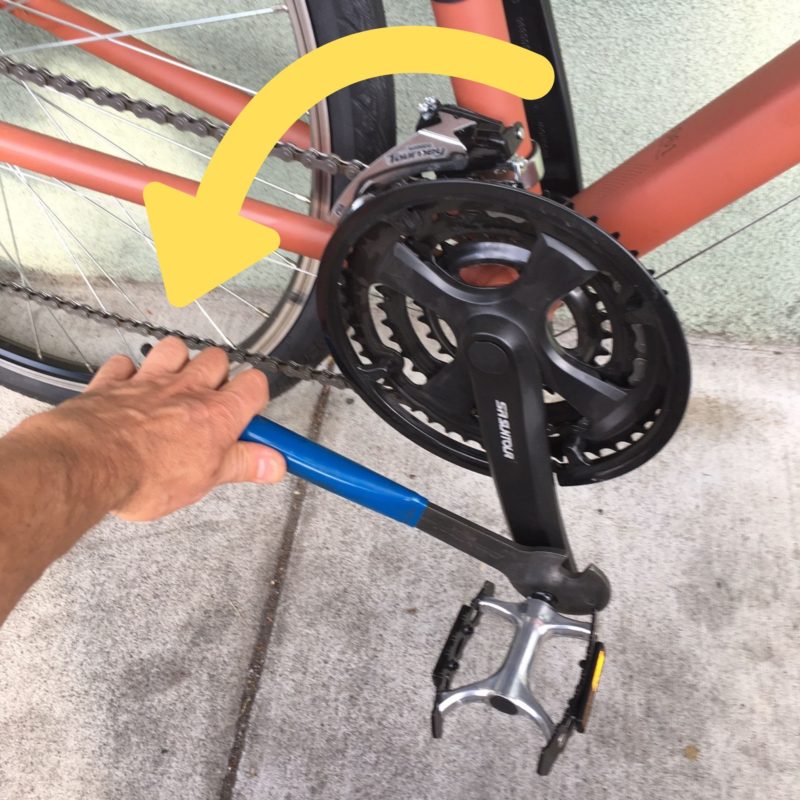
Step 1: Loosen the Pedals
Use a pedal wrench to loosen the pedals by turning them counterclockwise. Make sure to loosen the pedals on both sides of the bike. If the pedals are stuck, you can use a bit of lubricant to help loosen them.
Step 2: Remove the Pedal Washers
Once the pedals are loose, remove the pedal washers by pulling them straight off. Some pedal washers may be stuck, so be careful not to strip the threads.
Step 3: Remove the Pedals
With the pedal washers removed, you can now remove the pedals by pulling them straight off. Make sure to pull the pedals off in a straight line to avoid damaging the crankset.
Step 4: Remove any Remaining Parts
Depending on the type of pedals you have, there may be additional parts that need to be removed, such as toe clips or pedal cages. Make sure to remove these parts carefully to avoid damaging them.
Step 5: Inspect the Crankset
Once the pedals are removed, inspect the crankset for any damage or wear. Make sure to clean the crankset and apply lubricant to the threads to prevent corrosion.
By following these steps, you should be able to remove your bike pedals with ease. Remember to take your time and be careful not to damage any parts. In the next section, we’ll address common problems that may arise during pedal removal.
Troubleshooting Common Issues with Pedal Removal
While removing bike pedals can be a straightforward process, there are some common issues that may arise. In this section, we’ll address some of the most common problems and offer solutions and workarounds.
Stuck Pedals
One of the most common issues when removing bike pedals is stuck pedals. This can be caused by a variety of factors, including corrosion, dirt, and grime. To remove stuck pedals, try applying some lubricant to the threads and letting it sit for a few minutes. Then, use a pedal wrench to loosen the pedals. If the pedals are still stuck, you can try using a breaker bar or a long-handled wrench to provide extra leverage.
Stripped Threads
Another common issue when removing bike pedals is stripped threads. This can be caused by over-tightening the pedals or using the wrong tools. To avoid stripping the threads, make sure to use the correct tools and follow the manufacturer’s instructions. If the threads are already stripped, you can try using a thread repair kit to fix the damage.
Broken Pedal Wrench
If you’re using a pedal wrench to remove your bike pedals, it’s possible that the wrench may break or become damaged. To avoid this, make sure to use a high-quality pedal wrench and follow the manufacturer’s instructions. If the wrench does break, you can try using a different wrench or taking the bike to a professional mechanic.
Other Issues
Other common issues when removing bike pedals include loose pedals, damaged cranksets, and incorrect pedal installation. To avoid these issues, make sure to follow the manufacturer’s instructions and take your time when removing and reinstalling the pedals.
By being aware of these common issues and taking the necessary precautions, you can ensure a safe and successful pedal removal process. In the next section, we’ll provide guidance on how to reinstall bike pedals, including how to properly tighten the pedals and ensure they are securely in place.
Reinstalling Pedals: Tips and Tricks
Now that you have removed your bike pedals, it’s time to reinstall them. Reinstalling pedals can be a bit tricky, but with the right techniques and tools, you can ensure a safe and secure installation. Here are some tips and tricks to help you reinstall your bike pedals:
Properly Tighten the Pedals
When reinstalling your bike pedals, it’s essential to properly tighten them to ensure they are securely in place. Use a pedal wrench to tighten the pedals in a clockwise direction. Make sure to tighten the pedals evenly and avoid over-tightening, which can damage the threads.
Use the Correct Tools
Using the correct tools is crucial when reinstalling bike pedals. Make sure to use a pedal wrench that fits your pedal type, and consider using a torque wrench to ensure the pedals are tightened to the correct specification.
Check the Pedal Alignment
Before reinstalling the pedals, check the pedal alignment to ensure they are properly aligned with the crankset. Misaligned pedals can cause uneven wear and tear on the crankset and pedals.
Lubricate the Threads
Lubricating the threads on the crankset and pedals can help ensure a smooth and secure installation. Use a lubricant specifically designed for bike pedals and cranksets, and apply a small amount to the threads before reinstalling the pedals.
Test the Pedals
Once you have reinstalled the pedals, test them to ensure they are securely in place and functioning properly. Take the bike for a spin and check for any unusual noises or vibrations.
By following these tips and tricks, you can ensure a safe and secure pedal installation. Remember to always refer to your bike’s manual for specific instructions on how to reinstall your bike pedals.

Conclusion: Removing Bike Pedals Made Easy
Removing bike pedals can seem like a daunting task, but with the right tools and techniques, it can be a straightforward process. By following the steps outlined in this article, you can easily remove your bike pedals and perform maintenance, repairs, or replacements as needed.
Remember to always refer to your bike’s manual for specific instructions on how to remove your bike pedals, and to take necessary safety precautions to avoid injury or damage to your bike.
Proper pedal removal and installation are crucial for ensuring the longevity and performance of your bike. By mastering this skill, you can save time and money in the long run, and enjoy a smoother, more efficient ride.
Don’t be afraid to practice and become comfortable with the process of removing and reinstalling your bike pedals. With a little patience and practice, you’ll be able to tackle this task with ease and confidence.
By following the tips and techniques outlined in this article, you can ensure a safe and successful pedal removal and installation process. Happy cycling!

Additional Tips for Pedal Maintenance and Care
Proper maintenance and care of your bike pedals can help extend their lifespan and ensure optimal performance. Here are some additional tips to help you keep your pedals in top condition:
Clean the Pedals Regularly
Regular cleaning of the pedals can help prevent dirt and grime from building up and causing problems. Use a soft-bristled brush and mild soap to clean the pedals, and make sure to dry them thoroughly after cleaning.
Lubricate the Pedals
Lubricating the pedals can help keep them running smoothly and prevent wear and tear. Use a lubricant specifically designed for bike pedals, and apply it to the pivot points and other moving parts.
Check the Pedals for Wear and Tear
Regularly inspect the pedals for signs of wear and tear, such as cracks, dents, or excessive wear on the pivot points. If you notice any damage, replace the pedals as soon as possible to prevent further damage to the bike.
Store the Pedals Properly
When not in use, store the pedals in a dry, clean place to prevent damage and corrosion. Avoid storing the pedals in direct sunlight or extreme temperatures.
By following these tips, you can help extend the lifespan of your bike pedals and ensure optimal performance. Remember to always refer to your bike’s manual for specific instructions on how to maintain and care for your pedals.