
The Significance of Proper Bicycle Measurement
Properly measuring a bicycle is crucial for achieving a comfortable and efficient riding experience, preventing injuries, and enhancing overall performance. A well-measured bicycle ensures that the rider’s body is in the correct position, reducing strain on the back, neck, and knees. Moreover, a correctly sized bicycle can improve pedaling efficiency and power output, making it easier to ride longer distances and climb hills. Ultimately, understanding how to measure a bicycle is essential for any cyclist looking to optimize their riding experience and avoid discomfort or injury.

Click Image to Find eBike Products
Key Factors to Consider When Measuring a Bicycle
When measuring a bicycle, there are several essential factors to consider, including frame size, saddle height, handlebar reach, and crank arm length. These factors can significantly impact the fit and comfort of the bicycle, making it crucial to measure them accurately. Frame size is one of the most critical measurements to consider when measuring a bicycle. It refers to the distance between the bottom bracket and the top tube, where the rider’s legs connect to the bicycle. A properly sized frame can ensure a comfortable and efficient riding position, while a poorly sized frame can lead to discomfort and even injury.
Saddle height is another crucial factor to consider when measuring a bicycle. It refers to the distance between the top of the saddle and the center of the pedal axle. Setting the saddle height correctly can help achieve the correct knee bend and foot position while pedaling, reducing strain on the knees and back.
Handlebar reach and drop are also important measurements to consider when measuring a bicycle. Handlebar reach refers to the distance between the saddle and the handlebars, while handlebar drop refers to the difference in height between the saddle and the handlebars. Adjusting the handlebar reach and drop can help achieve a comfortable and aerodynamic riding position, reducing strain on the neck and back.
Finally, crank arm length is an essential factor to consider when measuring a bicycle. It refers to the length of the crank arms, which connect the pedals to the bicycle. The crank arm length can significantly impact pedaling efficiency and power output, making it crucial to select the right length for the rider’s leg length and riding style.

Tools and Equipment Needed for Measuring a Bicycle
Measuring a bicycle accurately requires the right tools and equipment. Here are some of the essential tools and equipment needed for measuring a bicycle:
- Measuring Tape: A measuring tape is a versatile tool that can be used to measure various parts of the bicycle, including the frame size, saddle height, handlebar reach, and crank arm length.
- Level: A level can be used to ensure that the bicycle is properly aligned and that the saddle and handlebars are at the correct angle.
- Saddle Height Gauge: A saddle height gauge is a specialized tool that can be used to measure the saddle height accurately. It is a more precise tool than a measuring tape and can help ensure that the saddle height is set correctly.
- Plumb Bob: A plumb bob can be used to measure the standover height of the bicycle, which is the distance between the top tube and the ground.
To use a measuring tape, simply measure the distance between two points on the bicycle, making sure to keep the tape taut and level. For example, to measure the frame size, measure the distance between the bottom bracket and the top tube, where the rider’s legs connect to the bicycle.
A level can be used to ensure that the bicycle is properly aligned. Place the level on the saddle or handlebars and adjust the position until the bubble is centered.
A saddle height gauge is a more specialized tool that can be used to measure the saddle height accurately. To use a saddle height gauge, place the tool on the pedal axle and adjust the saddle height until the gauge indicates the correct height.
A plumb bob can be used to measure the standover height of the bicycle. Simply hold the plumb bob against the top tube and measure the distance from the ground to the bottom of the plumb bob.
Measuring the Frame Size of a Bicycle
Measuring the frame size of a bicycle is an essential step in ensuring a comfortable and efficient riding experience. The frame size is a critical factor that affects the fit and comfort of the bicycle. Here is a detailed guide on how to measure the frame size of a bicycle:
- Standover Height: The standover height is the distance between the top tube and the ground. To measure the standover height, stand over the bicycle and measure the distance from the ground to the top tube. Make sure to wear shoes while measuring the standover height. A proper standover height ensures that the rider can safely straddle the bicycle and start and stop without hitting the top tube.
- Top Tube Length: The top tube length is the distance between the head tube and the seat tube. To measure the top tube length, measure the distance from the center of the head tube to the center of the seat tube. Make sure to measure along the top tube, not along the down tube or seat tube. A proper top tube length ensures that the rider has a comfortable reach to the handlebars and that the weight is distributed evenly between the saddle and the handlebars.
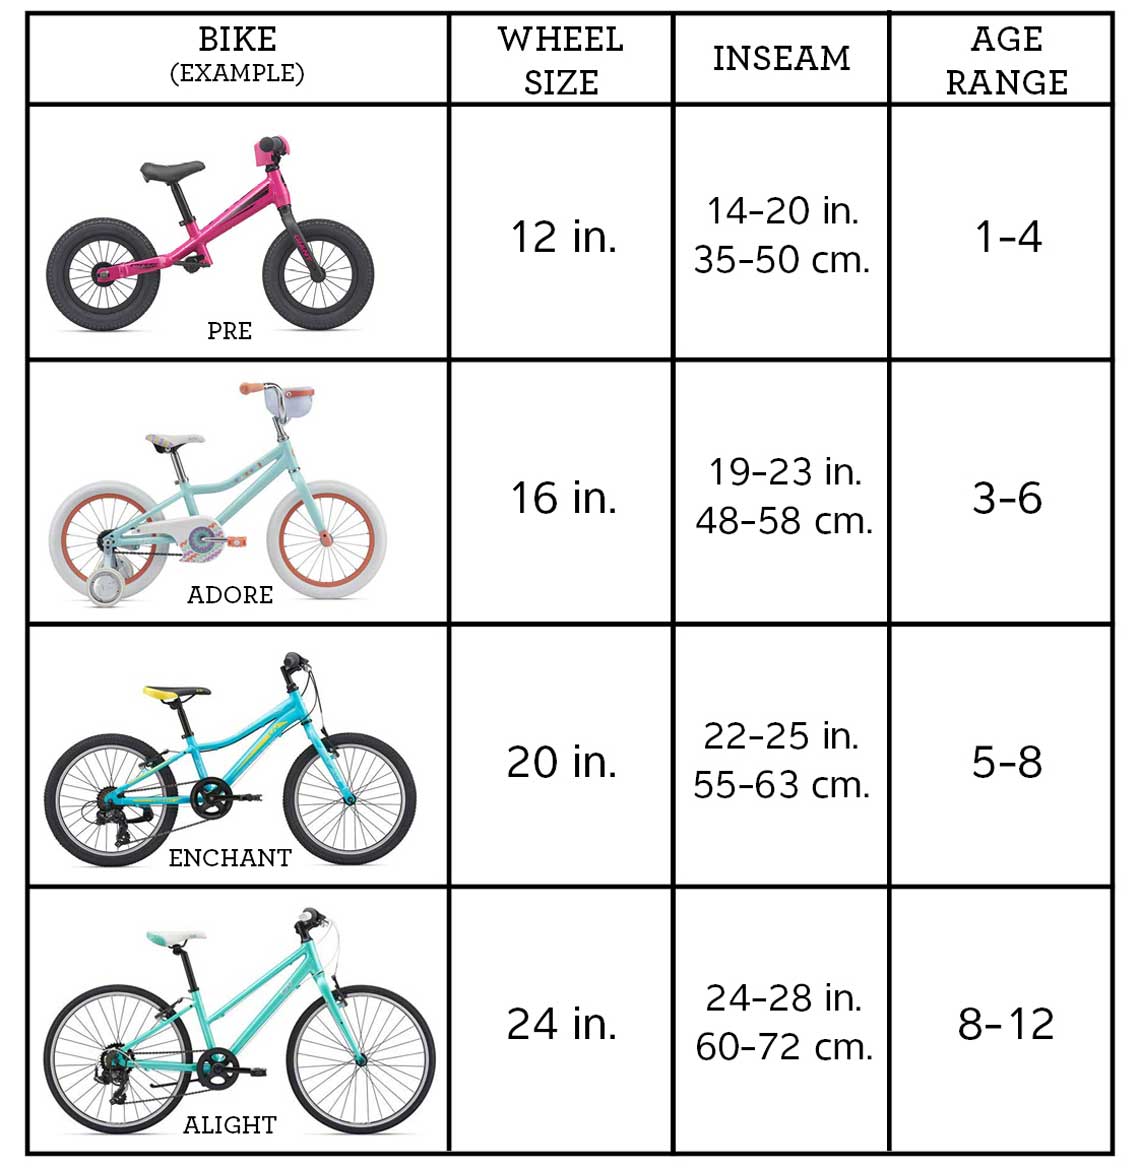
To interpret the measurements, consult the bicycle manufacturer’s size chart. The size chart will provide a range of frame sizes based on the rider’s height and inseam length. Make sure to choose a frame size that falls within the recommended range.
It is important to note that different types of bicycles have different frame size measurements. For example, mountain bikes typically have smaller frame sizes than road bikes. Therefore, it is essential to consult the manufacturer’s size chart for the specific type of bicycle being measured.
Measuring the frame size of a bicycle is a relatively simple process, but it is crucial for ensuring a comfortable and efficient riding experience. By measuring the standover height and top tube length, riders can choose a frame size that fits their body type and riding style. A properly sized bicycle can help prevent injuries, improve performance, and enhance the overall riding experience.

Setting the Saddle Height and Fore-Aft Position
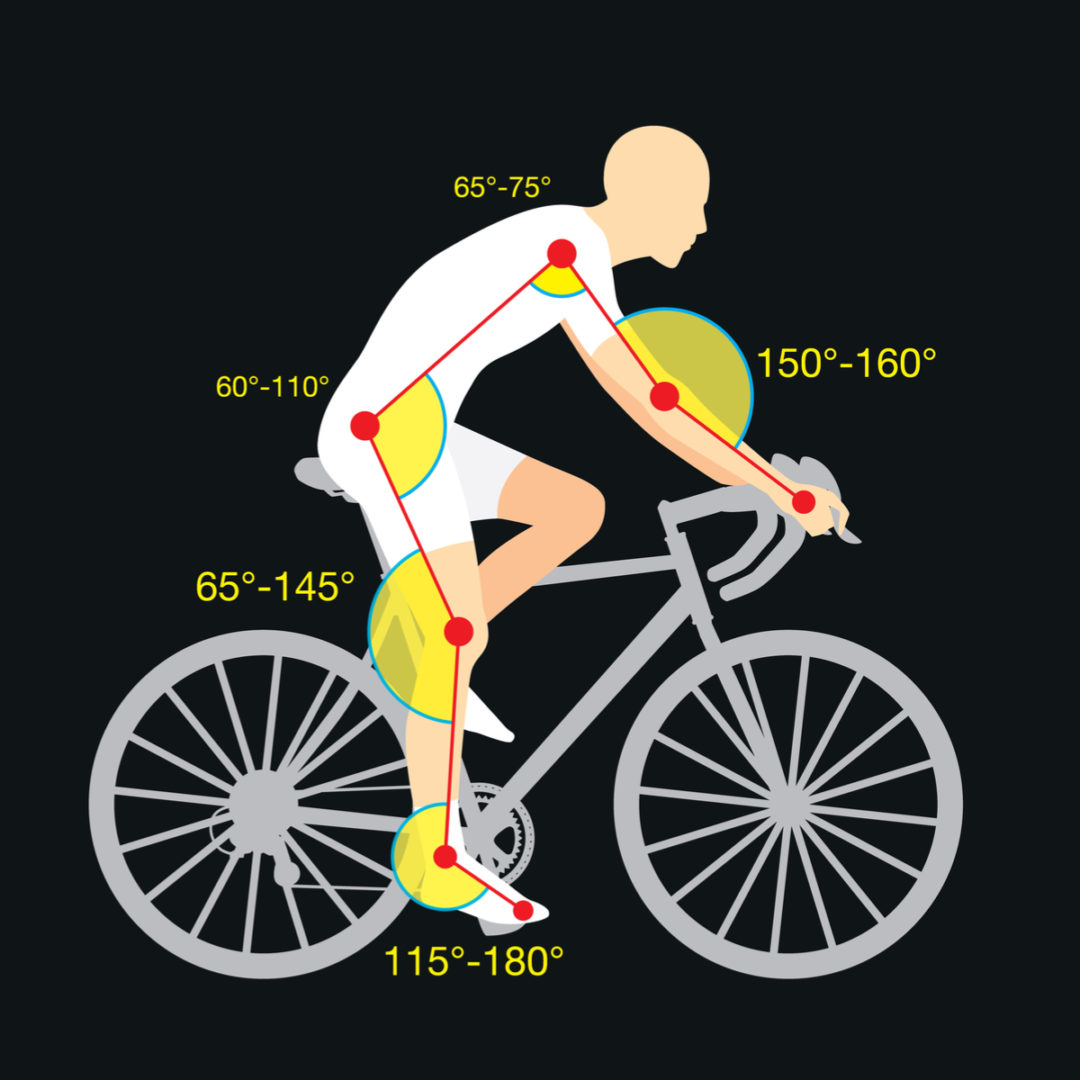
Once you have determined the correct frame size for your bicycle, the next step is to set the saddle height and fore-aft position for optimal comfort and efficiency. Here are some tips on how to achieve the correct knee bend and foot position while pedaling:
- Saddle Height: To set the saddle height, stand next to the bicycle and adjust the seat so that the top of the seat is level with your hip bone. Then, sit on the saddle and place your heel on the pedal. The pedal should be at its lowest point, and your leg should be almost fully extended. When you clip in and pedal, your knee should have a slight bend, with your pedaling motion smooth and efficient. If your knee is too bent or too straight, adjust the saddle height accordingly.
- Fore-Aft Position: To set the fore-aft position, sit on the saddle and place your foot on the pedal in the 3 o’clock position. Draw an imaginary line from the center of the kneecap to the pedal axle. This line should pass through the ball of your foot, ensuring that your foot is in the correct position while pedaling. If the line passes through the arch of your foot, move the saddle forward; if it passes through your toes, move the saddle backward.
Achieving the correct knee bend and foot position while pedaling is essential for preventing injuries and improving performance. A proper saddle height and fore-aft position can help reduce strain on the knees, hips, and back, while also improving pedaling efficiency and power output.
Regular adjustments and maintenance are also important for maintaining a comfortable and safe riding experience. As you ride your bicycle, your body will adapt to the fit and feel of the bike, and you may need to make small adjustments to the saddle height and fore-aft position over time. By fine-tuning the fit of your bicycle, you can ensure a comfortable and efficient riding experience, whether you are commuting to work or embarking on a long-distance tour.
Adjusting the Handlebar Reach and Drop
The handlebar reach and drop are important factors to consider when measuring a bicycle, as they can significantly affect the comfort and aerodynamics of your riding position. Here’s how to adjust the handlebar reach and drop for a more comfortable and efficient riding experience:
- Handlebar Reach: The handlebar reach refers to the distance between the saddle and the handlebars. To adjust the handlebar reach, you can try swapping out the stem for one with a different length or angle. A shorter stem will bring the handlebars closer to the saddle, while a longer stem will move them further away. You can also try adjusting the saddle position to find a more comfortable reach. A general rule of thumb is to have a slight bend in your elbows when your hands are on the hoods or drops, which can help reduce strain on your shoulders and neck.
- Handlebar Drop: The handlebar drop refers to the difference in height between the saddle and the handlebars. To adjust the handlebar drop, you can try swapping out the stem for one with a different rise or angle, or by using spacers to raise or lower the handlebars. A lower handlebar drop can provide a more aerodynamic riding position, while a higher handlebar drop can provide a more comfortable upright position. It’s important to find a handlebar drop that allows you to ride comfortably and efficiently, without putting undue strain on your back, shoulders, or neck.
To measure the handlebar reach and drop, you can use a measuring tape and a level. Measure the distance from the center of the saddle to the top of the handlebars, and then measure the distance from the ground to the top of the handlebars. You can also use a saddle height gauge to ensure that the saddle is at the correct height.
When adjusting the handlebar reach and drop, it’s important to make small changes and test them out over time. This can help prevent injuries and ensure that you find a comfortable and efficient riding position. It’s also important to remember that the handlebar reach and drop are just two factors to consider when measuring a bicycle. Other factors, such as saddle height and crank arm length, can also significantly affect the fit and comfort of the bicycle.

Selecting the Right Crank Arm Length
Crank arm length is an important factor to consider when measuring a bicycle, as it can significantly affect pedaling efficiency and power output. Here’s a guide on how to select the right crank arm length for the rider’s leg length and riding style:
- Leg Length: The rider’s leg length is a key factor in determining the appropriate crank arm length. As a general rule, the crank arm length should be roughly equal to the length of the rider’s leg, measured from the pedal spindle to the top of the femur. However, this is just a starting point, and other factors such as riding style and fitness level can also affect the ideal crank arm length.
- Riding Style: The rider’s riding style is another important factor to consider when selecting the right crank arm length. For example, cyclists who prioritize power output and sprinting may prefer longer crank arms, while those who prioritize endurance and climbing may prefer shorter crank arms. It’s important to choose a crank arm length that supports the rider’s preferred riding style and helps them achieve their performance goals.
To measure the crank arm length, you can use a measuring tape or a crank arm length gauge. Simply measure the distance from the center of the pedal spindle to the center of the crank arm bolt.
When selecting the right crank arm length, it’s important to consider both the rider’s leg length and riding style. While a general rule of thumb is to choose a crank arm length roughly equal to the rider’s leg length, other factors such as riding style and fitness level can also affect the ideal crank arm length.
It’s also important to note that changing the crank arm length can have a significant impact on the fit and feel of the bicycle. If you do decide to change the crank arm length, be sure to make other adjustments to the bicycle fit as needed, such as adjusting the saddle height and fore-aft position.
In summary, selecting the right crank arm length is an important part of measuring a bicycle and ensuring a comfortable and efficient riding experience. By considering both the rider’s leg length and riding style, you can choose a crank arm length that supports your performance goals and helps you enjoy a more comfortable and enjoyable ride.

Tips for Fine-Tuning the Bicycle Fit
Once you have measured your bicycle and made the necessary adjustments to the frame size, saddle height, handlebar reach, and crank arm length, there are still a few additional steps you can take to fine-tune the fit and ensure a comfortable and safe riding experience. Here are some tips and tricks to keep in mind:
- Adjust the Tire Pressure: The tire pressure can have a significant impact on the comfort and performance of your bicycle. Make sure to check the recommended tire pressure for your specific tires and adjust accordingly. A lower tire pressure can provide a more comfortable ride, while a higher tire pressure can improve efficiency and speed.
- Use Spacers: If you find that the handlebar height or stem length is not quite right, you can use spacers to make small adjustments. Spacers are thin plastic or metal pieces that can be added or removed to adjust the height and length of the stem.
- Experiment with Saddle and Handlebar Positions: Don’t be afraid to experiment with different saddle and handlebar positions to find what works best for you. You may find that moving the saddle forward or backward slightly, or adjusting the handlebar angle, can make a big difference in your comfort and efficiency.
It’s important to remember that the fit of your bicycle can change over time, so be sure to make regular adjustments and maintenance a part of your routine. This can help prevent injuries and ensure that you continue to enjoy a comfortable and efficient riding experience.
In summary, fine-tuning the fit of your bicycle is an ongoing process that requires regular adjustments and maintenance. By adjusting the tire pressure, using spacers, and experimenting with different saddle and handlebar positions, you can ensure a comfortable and safe riding experience. Remember to make regular adjustments and prioritize maintenance to keep your bicycle in top shape and prevent injuries over time.
