
Why Proper Brake Adjustment is Crucial for Safe Cycling
Proper brake adjustment is essential for safe cycling, as poorly maintained brakes can lead to accidents and injuries. According to the National Highway Traffic Safety Administration (NHTSA), brake failure is a common cause of bicycle crashes. Regular brake adjustments can help prevent such incidents by ensuring that the brakes are functioning correctly. When brakes are not adjusted properly, they can cause the bicycle to pull to one side, leading to loss of control and increased stopping distance.

Click Image to Find eBike Products
In addition to safety concerns, proper brake adjustment can also improve the overall performance of the bicycle. Well-adjusted brakes can provide smoother and more consistent braking, allowing cyclists to ride with confidence. Furthermore, regular brake maintenance can help extend the life of the brake components, reducing the need for costly repairs.
Learning how to adjust brakes on a bicycle is a valuable skill for any cyclist. By understanding the basics of brake adjustment, cyclists can ensure that their brakes are always in good working condition. This knowledge can also help cyclists to identify potential problems before they become major issues, reducing the risk of accidents and injuries.
Proper brake adjustment involves a combination of technical knowledge and practical skills. Cyclists need to understand the different types of brake systems, including rim brakes, disc brakes, and hydraulic brakes. They also need to know how to inspect and maintain the brake components, including the brake pads, cables, and calipers.
By following the proper procedures for brake adjustment, cyclists can ensure that their brakes are always functioning correctly. This includes regular inspections, cleaning, and lubrication of the brake components. By taking these steps, cyclists can enjoy safe and confident riding, knowing that their brakes are in good working condition.

Understanding Your Bicycle’s Brake System
Before learning how to adjust brakes on a bicycle, it’s essential to understand the different types of brake systems found on bicycles. There are three main types of brake systems: rim brakes, disc brakes, and hydraulic brakes. Each system has its unique components and requires specific adjustment techniques.
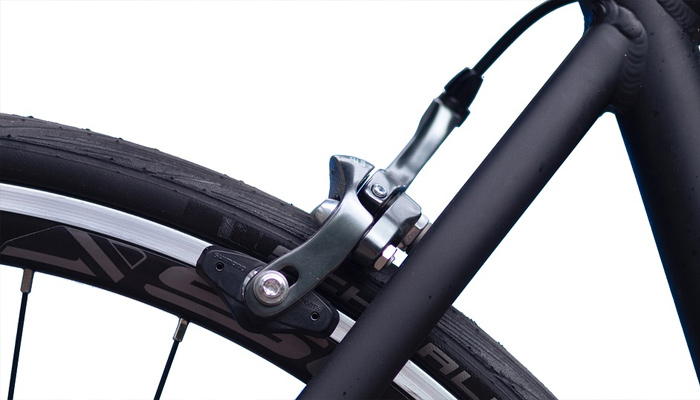
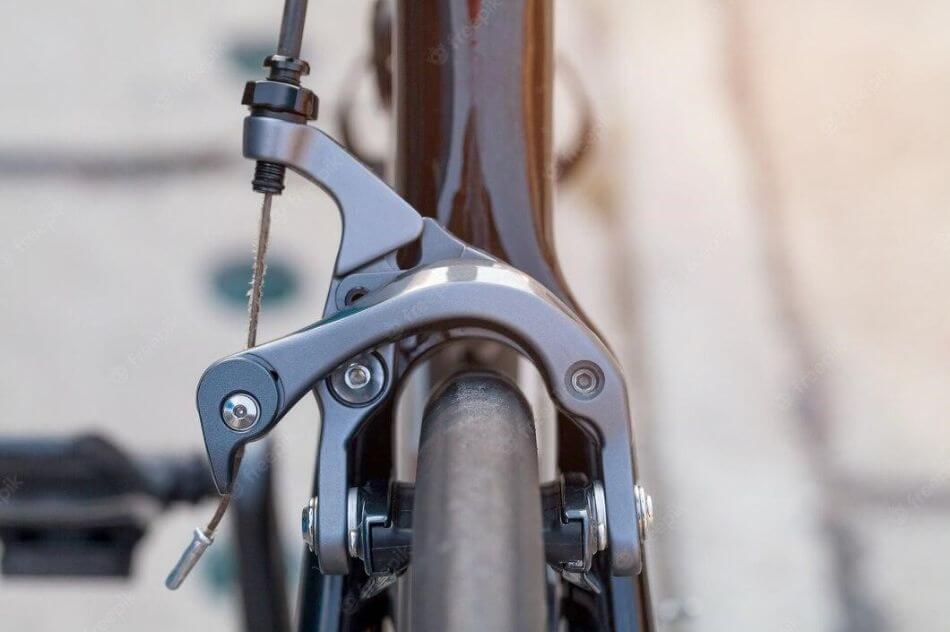
Rim brakes are the most common type of brake system found on bicycles. They consist of a brake caliper, brake pads, and a brake cable. The brake caliper is attached to the frame or fork of the bicycle and houses the brake pads. The brake pads are made of a friction material that rubs against the rim of the wheel to slow or stop the bicycle. The brake cable connects the brake lever to the brake caliper and transmits the braking force.
Disc brakes, on the other hand, use a rotor attached to the hub of the wheel and a caliper that houses the brake pads. The brake pads rub against the rotor to slow or stop the bicycle. Disc brakes are more common on mountain bikes and provide better braking performance in wet and muddy conditions.
Hydraulic brakes use a hydraulic fluid to transmit the braking force from the brake lever to the brake caliper. They are more common on high-end mountain bikes and provide better braking performance and modulation.
Understanding the components of each brake system is crucial for proper brake adjustment. For example, rim brakes require adjusting the brake caliper and brake pads to ensure proper clearance and alignment. Disc brakes require adjusting the brake caliper and rotor to ensure proper alignment and clearance. Hydraulic brakes require bleeding the brake system to remove air and ensure proper brake function.
By understanding the different types of brake systems and their components, cyclists can better appreciate the importance of proper brake adjustment and maintenance. Regular brake maintenance can help prevent brake failure and ensure safe and confident riding.
Pre-Adjustment Checks: Ensuring Your Brakes are Ready for Tuning
Before adjusting your brakes, it’s essential to perform a series of pre-adjustment checks to ensure that your brakes are ready for tuning. These checks will help you identify any potential issues that may affect the adjustment process and ensure that your brakes are functioning properly.
First, inspect the brake pads for wear or damage. Check the pad thickness and look for any signs of excessive wear, such as uneven wear patterns or cracks. If the pads are worn out, replace them with new ones before proceeding with the adjustment.
Next, inspect the brake cables for any signs of wear or damage. Check the cable housing for any cracks or frays, and make sure that the cables are properly seated in the cable guides. If the cables are damaged, replace them with new ones before proceeding with the adjustment.
Then, inspect the brake calipers for any signs of wear or damage. Check the caliper arms for any signs of excessive wear, and make sure that the calipers are properly aligned with the brake pads. If the calipers are damaged, replace them with new ones before proceeding with the adjustment.
Finally, check the brake rotors (if applicable) for any signs of wear or damage. Check the rotor surface for any signs of excessive wear, and make sure that the rotors are properly aligned with the brake calipers. If the rotors are damaged, replace them with new ones before proceeding with the adjustment.
By performing these pre-adjustment checks, you can ensure that your brakes are ready for tuning and that the adjustment process will be successful. Remember to always refer to your bicycle’s owner’s manual for specific instructions on how to adjust your brakes, and consider seeking the help of a professional mechanic if you’re unsure about any part of the process.
Learning how to adjust brakes on a bicycle requires attention to detail and a thorough understanding of the brake system. By following these pre-adjustment checks, you can ensure that your brakes are functioning properly and that you’re ready to take on the adjustment process.
Step-by-Step Guide to Adjusting Rim Brakes
Adjusting rim brakes is a relatively straightforward process that can be completed with a few simple tools. Here’s a step-by-step guide on how to adjust rim brakes:
Step 1: Loosen the Brake Cable
Start by loosening the brake cable by turning the barrel adjuster counterclockwise. This will give you some slack in the cable and allow you to make adjustments to the brake caliper.
Step 2: Adjust the Brake Caliper
Next, adjust the brake caliper by turning the caliper adjustment screw. This screw is usually located on the side of the caliper and controls the distance between the brake pads and the rim. Turn the screw clockwise to move the pads closer to the rim, or counterclockwise to move them further away.
Step 3: Tighten the Brake Cable
Once you’ve adjusted the brake caliper, tighten the brake cable by turning the barrel adjuster clockwise. Make sure the cable is snug, but not too tight, as this can cause the brakes to bind.
Step 4: Center the Brake Pads
Finally, center the brake pads by adjusting the caliper alignment screw. This screw is usually located on the side of the caliper and controls the alignment of the brake pads. Turn the screw clockwise to move the pads closer to the rim, or counterclockwise to move them further away.
Step 5: Test the Brakes
Once you’ve completed the above steps, test the brakes by squeezing the brake lever and checking that the pads are contacting the rim evenly. If the brakes are still not functioning properly, you may need to make further adjustments to the caliper or cable.
By following these steps, you should be able to adjust your rim brakes and ensure that they are functioning properly. Remember to always refer to your bicycle’s owner’s manual for specific instructions on how to adjust your brakes, and consider seeking the help of a professional mechanic if you’re unsure about any part of the process.
Learning how to adjust brakes on a bicycle is an essential skill for any cyclist. By following these steps and practicing regularly, you can ensure that your brakes are always functioning properly and that you’re safe on the road.

Adjusting Disc Brakes: A Comprehensive Guide
Adjusting disc brakes is a bit more complex than adjusting rim brakes, but with the right tools and a bit of practice, it’s a task that can be accomplished by most cyclists. Here’s a comprehensive guide on how to adjust disc brakes:
Step 1: Bleed the Brake System
The first step in adjusting disc brakes is to bleed the brake system. This involves removing any air that may have entered the system and ensuring that the brake fluid is at the correct level. To bleed the brake system, you’ll need a brake bleeding kit and a set of Allen wrenches.
Step 2: Adjust the Brake Caliper
Once the brake system has been bled, the next step is to adjust the brake caliper. This involves adjusting the caliper’s position and alignment to ensure that the brake pads are properly aligned with the rotor. To adjust the caliper, you’ll need to loosen the caliper’s mounting bolts and then adjust the caliper’s position using the caliper’s adjustment screw.
Step 3: Align the Brake Rotor
After the caliper has been adjusted, the next step is to align the brake rotor. This involves ensuring that the rotor is properly aligned with the brake pads and that the rotor is not warped or damaged. To align the rotor, you’ll need to use a rotor alignment tool and a set of Allen wrenches.
Step 4: Test the Brakes
Once the brake caliper and rotor have been adjusted and aligned, the final step is to test the brakes. This involves squeezing the brake lever and checking that the brakes are functioning properly. If the brakes are not functioning properly, you may need to make further adjustments to the caliper or rotor.
By following these steps, you should be able to adjust your disc brakes and ensure that they are functioning properly. Remember to always refer to your bicycle’s owner’s manual for specific instructions on how to adjust your brakes, and consider seeking the help of a professional mechanic if you’re unsure about any part of the process.
Learning how to adjust brakes on a bicycle is an essential skill for any cyclist. By following these steps and practicing regularly, you can ensure that your brakes are always functioning properly and that you’re safe on the road.
It’s also important to note that disc brakes require regular maintenance to ensure that they are functioning properly. This includes regularly cleaning and lubricating the brake pads and rotor, as well as checking the brake fluid level and bleeding the system as needed.

Troubleshooting Common Brake Adjustment Issues
Even with proper brake adjustment, issues can still arise. Here are some common problems that may occur and troubleshooting tips to help you resolve them:
Spongy Brakes
Spongy brakes can be caused by air in the brake system, worn-out brake pads, or a faulty brake caliper. To troubleshoot spongy brakes, check the brake fluid level and bleed the system if necessary. Also, inspect the brake pads for wear and replace them if necessary.
Uneven Braking
Uneven braking can be caused by misaligned brake calipers, worn-out brake pads, or a faulty brake rotor. To troubleshoot uneven braking, check the brake caliper alignment and adjust it if necessary. Also, inspect the brake pads for wear and replace them if necessary.
Brake Squeal
Brake squeal can be caused by worn-out brake pads, a faulty brake caliper, or a misaligned brake rotor. To troubleshoot brake squeal, inspect the brake pads for wear and replace them if necessary. Also, check the brake caliper alignment and adjust it if necessary.
Other Common Issues
Other common issues that may arise during brake adjustment include brake drag, brake rub, and brake failure. To troubleshoot these issues, refer to your bicycle’s owner’s manual or consult a professional mechanic.
By following these troubleshooting tips, you can resolve common brake adjustment issues and ensure that your brakes are functioning properly. Remember to always refer to your bicycle’s owner’s manual for specific instructions on how to adjust your brakes, and consider seeking the help of a professional mechanic if you’re unsure about any part of the process.
Learning how to adjust brakes on a bicycle is an essential skill for any cyclist. By following these troubleshooting tips and practicing regularly, you can ensure that your brakes are always functioning properly and that you’re safe on the road.
Best Practices for Maintaining Your Bicycle’s Brakes
Regular maintenance is essential to ensure that your bicycle’s brakes are functioning properly. Here are some best practices to follow:
Regular Cleaning
Regular cleaning is essential to remove dirt, grime, and other contaminants that can affect brake performance. Use a soft-bristled brush to clean the brake calipers, brake pads, and brake rotors. Avoid using high-pressure washes or harsh chemicals, as they can damage the brake components.
Lubrication
Regular lubrication is essential to keep the brake components moving smoothly. Use a silicone-based lubricant to lubricate the brake calipers, brake pads, and brake rotors. Avoid using oil-based lubricants, as they can attract dirt and grime.
Inspection
Regular inspection is essential to identify any potential issues before they become major problems. Inspect the brake pads for wear, the brake calipers for proper alignment, and the brake rotors for warping or damage.
Brake Pad Replacement
Regular brake pad replacement is essential to ensure that your brakes are functioning properly. Replace the brake pads every 1,000 to 2,000 miles, or as recommended by the manufacturer.
By following these best practices, you can ensure that your bicycle’s brakes are functioning properly and that you’re safe on the road. Remember to always refer to your bicycle’s owner’s manual for specific instructions on how to maintain your brakes, and consider seeking the help of a professional mechanic if you’re unsure about any part of the process.
Learning how to adjust brakes on a bicycle is an essential skill for any cyclist. By following these best practices and practicing regularly, you can ensure that your brakes are always functioning properly and that you’re safe on the road.
Conclusion: Safe Cycling Starts with Proper Brake Adjustment
In conclusion, proper brake adjustment is crucial for safe cycling. By following the steps outlined in this article, you can ensure that your brakes are functioning properly and that you’re safe on the road. Remember to always refer to your bicycle’s owner’s manual for specific instructions on how to adjust your brakes, and consider seeking the help of a professional mechanic if you’re unsure about any part of the process.
Learning how to adjust brakes on a bicycle is an essential skill for any cyclist. By practicing regularly and following the best practices outlined in this article, you can ensure that your brakes are always functioning properly and that you’re safe on the road.
Don’t wait until it’s too late to learn how to adjust your brakes. Take the time to learn this essential skill and ensure that you’re safe on the road. With proper brake adjustment, you can ride with confidence and enjoy the many benefits of cycling.
By following the steps outlined in this article, you can master the art of bicycle brake adjustment and ensure that you’re safe on the road. Remember to always prioritize your safety and the safety of others, and never ride a bicycle with poorly maintained brakes.