
Understanding Your Bicycle’s Brake System: A Brief Overview
Bicycle brake systems are designed to provide safe and reliable stopping power, and understanding how they work is essential for proper adjustment and maintenance. There are three main types of brake systems found on bicycles: rim brakes, disc brakes, and hydraulic brakes. Each type of brake system has its own unique characteristics and requirements.

Click Image to Find eBike Products
Rim brakes are the most common type of brake system found on bicycles. They consist of a brake caliper that attaches to the frame or fork of the bike, and a brake pad that contacts the rim of the wheel. Rim brakes are relatively simple to adjust and maintain, but they can be affected by rim wear and brake pad wear.
Disc brakes, on the other hand, use a rotor attached to the hub of the wheel and a brake caliper that attaches to the frame or fork of the bike. Disc brakes provide more consistent braking power and are less affected by rim wear, but they can be more complex to adjust and maintain.
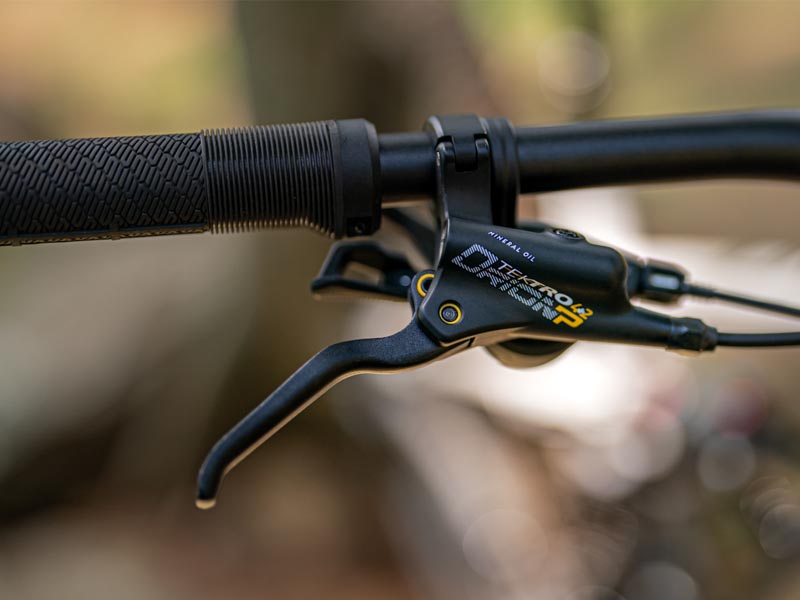
Hydraulic brakes use a hydraulic fluid to transmit pressure from the brake lever to the brake caliper, providing more consistent and reliable braking power. Hydraulic brakes are commonly found on high-end mountain bikes and are known for their excellent performance and durability.
Regardless of the type of brake system, proper adjustment and maintenance are crucial for ensuring safe and reliable braking performance. By understanding how your bicycle’s brake system works, you can take the first step towards learning how to adjust brakes on a bicycle and keeping your bike running smoothly and safely.
Gathering the Right Tools and Equipment for the Job
Before attempting to adjust your bicycle’s brakes, it’s essential to gather the right tools and equipment for the job. Having the necessary tools on hand will make the process much easier and help ensure that the job is done correctly. Here are some of the most common tools and equipment needed for adjusting bicycle brakes:
Allen wrenches: These are used to loosen and tighten the brake caliper and other components. Make sure to have a set of Allen wrenches in various sizes, as different brakes may require different sizes.
Tire levers: These are used to remove the tire from the rim, allowing access to the brake pads and other components. Tire levers can also be used to pry the brake pads away from the rim if they become stuck.
Brake pads: These are the components that contact the rim or rotor to slow the bike down. Make sure to have a set of spare brake pads on hand, as they can wear out over time.
Brake fluid: This is used to lubricate the brake system and prevent corrosion. Make sure to use the correct type of brake fluid for your bike’s brake system.
Cable cutters: These are used to cut the brake cables to the correct length. Make sure to have a pair of cable cutters on hand, as they can be used for other tasks as well.
Other tools: Depending on the type of brake system your bike has, you may need other specialized tools. For example, if your bike has hydraulic brakes, you may need a hydraulic brake bleeding kit.
By gathering the right tools and equipment, you’ll be well on your way to learning how to adjust brakes on a bicycle. Remember to always refer to your bike’s manual for specific instructions and recommendations for adjusting the brakes.
Step-by-Step Guide to Adjusting Rim Brakes
Adjusting rim brakes is a relatively straightforward process that can be done with a few basic tools. Here’s a step-by-step guide to help you learn how to adjust brakes on a bicycle with rim brakes:
Step 1: Loosen the Brake Caliper
Start by loosening the brake caliper by turning the barrel adjuster counterclockwise. This will give you clearance to adjust the brake pads.
Step 2: Remove the Tire
Remove the tire from the rim to access the brake pads. Use tire levers to pry the tire away from the rim, and then remove the tire completely.
Step 3: Inspect the Brake Pads
Inspect the brake pads for wear and damage. If the pads are worn down or damaged, replace them with new ones.
Step 4: Adjust the Brake Pads
Adjust the brake pads by turning the pad adjuster clockwise or counterclockwise. Make sure the pads are evenly spaced and not touching the rim.
Step 5: Tighten the Brake Caliper
Tighten the brake caliper by turning the barrel adjuster clockwise. Make sure the caliper is snug but not overtightened.
Step 6: Reinstall the Tire
Reinstall the tire and make sure it’s properly seated on the rim.
Step 7: Test the Brakes
Test the brakes by squeezing the brake lever and checking for proper function. Make sure the brakes are not too loose or too tight.
By following these steps, you can learn how to adjust brakes on a bicycle with rim brakes. Remember to always refer to your bike’s manual for specific instructions and recommendations for adjusting the brakes.

Adjusting Disc Brakes: A Separate Set of Considerations
Adjusting disc brakes requires a separate set of considerations compared to rim brakes. Disc brakes use a rotor attached to the hub of the wheel and a brake caliper that attaches to the frame or fork of the bike. Here are the steps to adjust disc brakes:
Step 1: Loosen the Brake Caliper
Loosen the brake caliper by turning the barrel adjuster counterclockwise. This will give you clearance to adjust the brake pads.
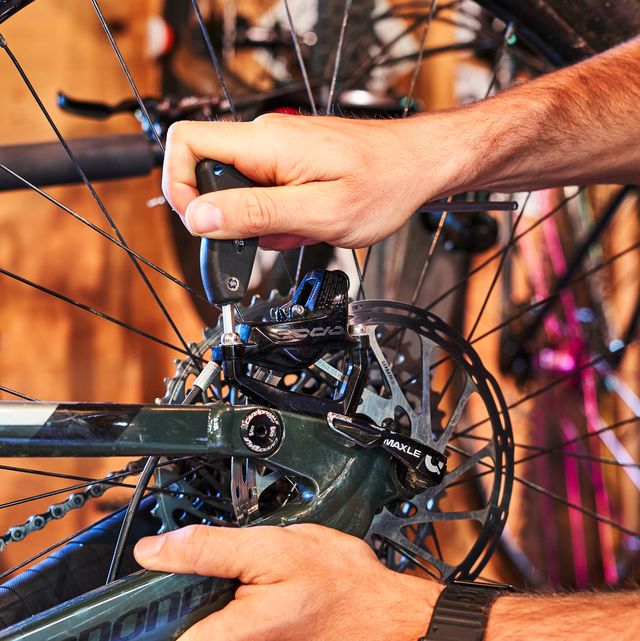
Step 2: Remove the Wheel
Remove the wheel from the bike to access the brake rotor. Use a wrench to loosen the nuts that hold the wheel in place.
Step 3: Inspect the Brake Pads
Inspect the brake pads for wear and damage. If the pads are worn down or damaged, replace them with new ones.
Step 4: Adjust the Brake Pads
Adjust the brake pads by turning the pad adjuster clockwise or counterclockwise. Make sure the pads are evenly spaced and not touching the rotor.
Step 5: Bleed the Brake System
Bleed the brake system to remove any air bubbles that may have formed. Use a brake bleeding kit to perform this step.
Step 6: Tighten the Brake Caliper
Tighten the brake caliper by turning the barrel adjuster clockwise. Make sure the caliper is snug but not overtightened.
Step 7: Reinstall the Wheel
Reinstall the wheel and make sure it’s properly seated on the hub.
Step 8: Test the Brakes
Test the brakes by squeezing the brake lever and checking for proper function. Make sure the brakes are not too loose or too tight.
By following these steps, you can learn how to adjust disc brakes on a bicycle. Remember to always refer to your bike’s manual for specific instructions and recommendations for adjusting the brakes.

Troubleshooting Common Brake Adjustment Issues
Even with proper adjustment, brake issues can still arise. Here are some common brake adjustment issues and their solutions:
Squealing Brakes:
Squealing brakes can be caused by worn-out brake pads or misaligned brake calipers. To fix this issue, try adjusting the brake pads or calipers to ensure proper alignment. If the problem persists, consider replacing the brake pads or calipers.
Spongy Brake Levers:
Spongy brake levers can be caused by air in the brake system or worn-out brake cables. To fix this issue, try bleeding the brake system or replacing the brake cables.
Uneven Brake Wear:
Uneven brake wear can be caused by misaligned brake calipers or worn-out brake pads. To fix this issue, try adjusting the brake calipers or replacing the brake pads.
Brake Drag:
Brake drag can be caused by misaligned brake calipers or worn-out brake pads. To fix this issue, try adjusting the brake calipers or replacing the brake pads.
By troubleshooting common brake adjustment issues, you can ensure that your brakes are functioning properly and safely. Remember to always refer to your bike’s manual for specific instructions and recommendations for adjusting the brakes.
Learning how to adjust brakes on a bicycle is an essential skill for any cyclist. By following the steps outlined in this article, you can ensure that your brakes are properly adjusted and functioning safely. Remember to always test your brakes after adjustment to ensure proper function.

Final Check: Ensuring Your Brakes are Safe and Functional
After adjusting your brakes, it’s essential to perform a final check to ensure they are safe and functional. This step is crucial to guarantee your safety on the road. Here’s what to do:
Test Ride:
Take your bike for a test ride to verify proper brake function. Make sure to test both the front and rear brakes separately and together. Pay attention to any unusual noises, vibrations, or sensations while braking.
Visual Inspection:
Perform a visual inspection of the brake system to ensure everything is properly aligned and secured. Check the brake pads, calipers, and cables for any signs of wear or damage.
Brake Lever Check:
Check the brake levers to ensure they are functioning correctly. Make sure they are not too loose or too tight, and that they are properly aligned with the handlebars.
Brake Pad Check:
Check the brake pads to ensure they are properly aligned and not worn down too far. Make sure they are not touching the rim or rotor, and that they are not damaged in any way.
By performing a final check, you can ensure your brakes are safe and functional, and that you’re ready to hit the road with confidence. Remember, proper brake adjustment is crucial for a safe and smooth ride, so don’t skip this step!

Maintenance and Upkeep: Keeping Your Brakes in Top Condition
Regular maintenance and upkeep are crucial to keeping your brakes in top condition. Here are some tips and recommendations to help you keep your brakes functioning properly:
Inspect Brake Pads:
Inspect your brake pads regularly to ensure they are not worn down too far. Check for signs of wear, such as thinning or cracking, and replace them as needed.
Clean and Lubricate the Brake System:
Clean and lubricate the brake system regularly to keep it functioning smoothly. Use a soft brush to remove any dirt or debris from the brake pads and calipers, and apply a small amount of lubricant to the pivot points.
Check Brake Cable Tension:
Check the brake cable tension regularly to ensure it is not too loose or too tight. Adjust the tension as needed to ensure proper brake function.
Replace Brake Fluid:
Replace the brake fluid regularly to ensure it is fresh and effective. Use a brake fluid that is compatible with your brake system, and follow the manufacturer’s instructions for replacement.
By following these tips and recommendations, you can keep your brakes in top condition and ensure they are functioning properly. Remember, regular maintenance and upkeep are key to keeping your brakes safe and functional.
Maintenance and Upkeep: Keeping Your Brakes in Top Condition
Regular maintenance and upkeep are crucial to keeping your brakes in top condition. By following these tips and recommendations, you can ensure your brakes are functioning properly and safely.
Inspect Brake Pads Regularly:
Inspect your brake pads regularly to ensure they are not worn down too far. Check for signs of wear, such as thinning or cracking, and replace them as needed.
Clean and Lubricate the Brake System:
Clean and lubricate the brake system regularly to keep it functioning smoothly. Use a soft brush to remove any dirt or debris from the brake pads and calipers, and apply a small amount of lubricant to the pivot points.
Check Brake Cable Tension:
Check the brake cable tension regularly to ensure it is not too loose or too tight. Adjust the tension as needed to ensure proper brake function.
Replace Brake Fluid:
Replace the brake fluid regularly to ensure it is fresh and effective. Use a brake fluid that is compatible with your brake system, and follow the manufacturer’s instructions for replacement.
By following these tips and recommendations, you can keep your brakes in top condition and ensure they are functioning properly. Remember, regular maintenance and upkeep are key to keeping your brakes safe and functional.
Learning how to adjust brakes on a bicycle is an essential skill for any cyclist. By following the steps outlined in this article, you can ensure your brakes are properly adjusted and functioning safely. Remember to always test your brakes after adjustment to ensure proper function.
