
The Significance of Bleeding Mountain Bike Brakes
Bleeding mountain bike brakes is an essential maintenance task that can significantly improve braking performance, safety, and component longevity. Over time, air can enter the brake system, leading to issues such as spongy or noisy brakes, reduced braking power, and inconsistent lever feel. By bleeding the brakes, you remove the air and restore the system to its optimal condition.

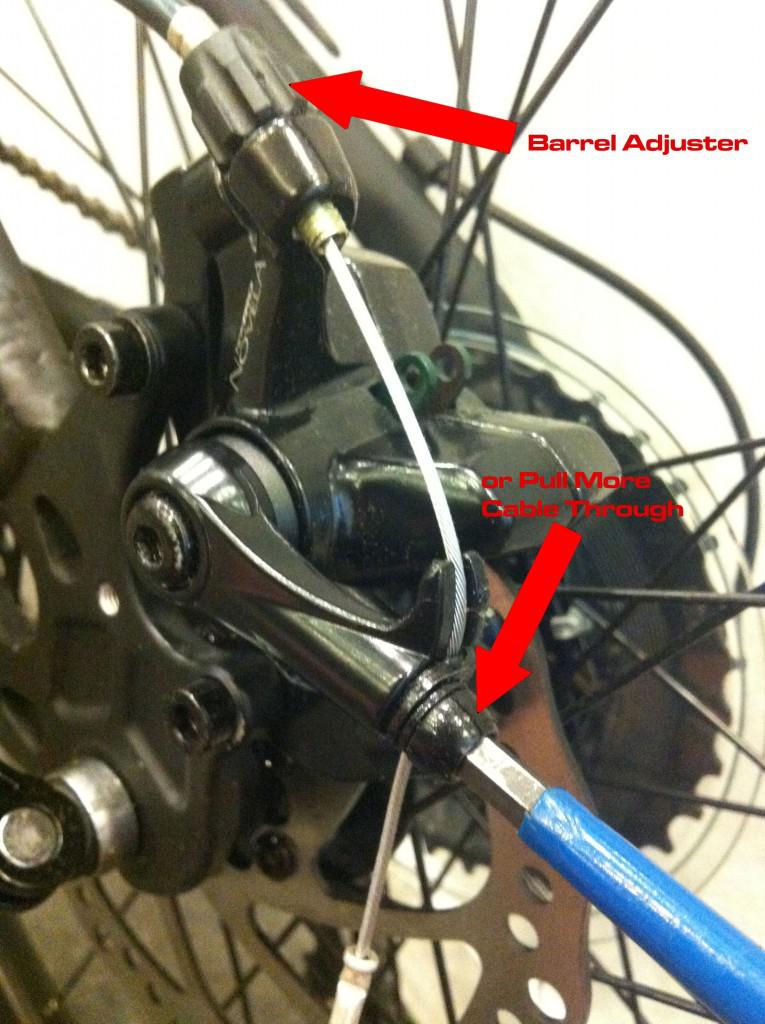
Click Image to Find eBike Products
Mountain bike brakes rely on a sealed hydraulic system to transmit force from the brake lever to the caliper, which squeezes the brake pads against the rotor to slow or stop the bike. Hydraulic fluid, which is incompressible, is responsible for transferring this force. However, air bubbles can compromise the hydraulic system’s efficiency, as air is compressible, leading to a spongy or unresponsive brake feel.
Regularly bleeding your mountain bike brakes ensures that the hydraulic system remains free of air bubbles and contaminants, allowing for consistent and reliable braking performance. This is particularly crucial for hydraulic disc brakes, which are more susceptible to air buildup due to their design. By investing time and effort into bleeding your brakes, you can enjoy improved stopping power, increased safety, and a more enjoyable riding experience.

Understanding the Components of Mountain Bike Brake Systems
Mountain bike brake systems consist of several key components that work together to provide braking power. These components include brake levers, calipers, hoses, and master cylinders. Familiarizing yourself with these parts and their functions can help you better understand the importance of bleeding mountain bike brakes and how to maintain your brakes effectively.
- Brake Levers: Brake levers are the part of the brake system that you grip and squeeze to apply braking force. They contain a mechanism that actuates the master cylinder when you apply pressure to the lever.
- Calipers: Calipers are the part of the brake system that houses the brake pads and applies pressure to the rotor to slow or stop the bike. They are typically mounted to the frame or fork of the bike and are connected to the brake lever via a hydraulic hose or cable.
- Hoses: Hoses are the flexible tubing that connects the brake lever to the caliper, allowing for movement and adjustability. Hydraulic hoses contain brake fluid, while mechanical hoses contain a cable.
- Master Cylinders: Master cylinders are the part of the brake system that converts mechanical force from the brake lever into hydraulic pressure. They contain a piston that is actuated by the brake lever, which pushes brake fluid through the system and into the caliper.
Hydraulic disc brakes are the most common type of brake system used in mountain biking. They offer superior braking power, modulation, and consistency compared to mechanical disc brakes. However, hydraulic systems are more prone to air buildup due to their design, making bleeding a critical maintenance task.
Mechanical disc brakes, on the other hand, use a cable to actuate the caliper rather than hydraulic fluid. While bleeding is not required for mechanical disc brakes, regular maintenance and adjustment are necessary to ensure optimal performance.
Gathering Essential Tools and Materials for Bleeding Mountain Bike Brakes
Bleeding mountain bike brakes is a relatively straightforward process, but it requires specific tools and materials to ensure that the job is done correctly. Investing in high-quality tools and materials can make the process easier, more efficient, and more effective. Here are the essential tools and materials you will need to bleed your mountain bike brakes:
- Brake Bleed Kit: A brake bleed kit is a specialized tool designed to make the bleeding process easier and more efficient. Most brake manufacturers offer their own brand-specific bleed kits, which are recommended for maintaining the integrity of the brake system.
- High-Quality Brake Fluid: Using high-quality, brand-specific brake fluid is crucial for maintaining the performance and longevity of your brake system. It is essential to use the correct type of brake fluid for your specific brake system, as specified by the manufacturer.
- Isopropyl Alcohol and Rags: Isopropyl alcohol and rags are useful for cleaning any spills or leaks that may occur during the bleeding process. They can also be used to clean the brake caliper and rotor before reassembling the system.
- Syringe or Turkey Baster: A syringe or turkey baster can be used to remove excess brake fluid from the brake caliper or reservoir during the bleeding process.
When it comes to bleeding mountain bike brakes, it is essential to use high-quality, brand-specific tools and materials to maintain the integrity of the brake system. While it may be tempting to cut corners and use generic or lower-quality tools and materials, doing so can compromise the performance and longevity of your brakes. By investing in high-quality tools and materials, you can ensure that your brakes are bled correctly and efficiently, leading to improved braking performance, safety, and component longevity.

Preparing Your Mountain Bike for Brake Bleeding
Before you begin bleeding your mountain bike brakes, it’s essential to properly prepare your bike and gather all necessary tools and materials. Here are the steps to follow to prepare your mountain bike for brake bleeding:
- Secure Your Bike in a Stand: Securing your bike in a stand is crucial for ensuring stability and safety during the brake bleeding process. Choose a sturdy bike stand that can support the weight of your bike and keep it in place while you work.
- Remove the Wheel: Removing the wheel is necessary to access the brake caliper and rotor. Use a quick-release lever or a wrench to remove the wheel, and set it aside in a safe place.
- Inspect the Brake Pads for Wear: Inspecting the brake pads for wear is an essential step in preparing your bike for brake bleeding. Worn-out brake pads can compromise braking performance and safety, so it’s crucial to replace them if necessary before bleeding the brakes.
- Check for Leaks and Contamination: Checking for leaks and contamination in the brake system is crucial before bleeding the brakes. Look for signs of fluid leaks, dirt, or debris that could compromise the integrity of the system. If you find any leaks or contamination, it’s essential to address them before proceeding with the bleeding process.
Preparing your mountain bike for brake bleeding is a critical step in ensuring the safety and effectiveness of the process. By following these steps, you can ensure that your bike is properly prepared for bleeding, and that the process goes smoothly and efficiently. Remember to invest in high-quality tools and materials, and to seek professional assistance if you are unsure or uncomfortable performing the process yourself.

Step-by-Step Guide to Bleeding Mountain Bike Brakes
Bleeding mountain bike brakes is a relatively straightforward process that can significantly improve braking performance, safety, and component longevity. Here is a detailed, step-by-step guide to bleeding mountain bike brakes, using a Shimano XT hydraulic disc brake system as an example:
- Gather Necessary Tools and Materials: Gather all necessary tools and materials, including a brake bleed kit, high-quality, brand-specific brake fluid, isopropyl alcohol, rags, and a syringe or turkey baster.
- Prepare the Brake System: Prepare the brake system by securing the bike in a stand, removing the wheel, and inspecting the brake pads for wear. Check for leaks and contamination in the system before bleeding.
- Attach the Brake Bleed Kit: Attach the brake bleed kit to the brake system, following the manufacturer’s instructions. Make sure that the kit is securely attached and that there are no leaks.
- Open the Brake System: Open the brake system by removing the brake caliper bleed screw, using a wrench or a screwdriver. Allow any air or fluid to escape from the system.
- Add Brake Fluid: Add brake fluid to the brake system, using a syringe or turkey baster. Make sure that the fluid is high-quality, brand-specific, and free from contaminants.
- Close the Brake System: Close the brake system by tightening the brake caliper bleed screw, using a wrench or a screwdriver. Make sure that the screw is tightened securely, but not too tightly.
- Pump the Brake Lever: Pump the brake lever several times to build up pressure in the system. This will help to remove any remaining air bubbles and ensure that the brake pads are properly aligned.
- Check for Leaks: Check for leaks in the system, paying particular attention to the brake caliper and the brake line. If you find any leaks, it’s essential to address them before proceeding.
- Repeat the Process: Repeat the process several times, until you are confident that all air bubbles have been removed from the system and that the brake pads are properly aligned.
- Test Ride the Bike: Test ride the bike to ensure proper braking performance. Make any necessary adjustments to the brake system, and repeat the bleeding process if necessary.
Bleeding mountain bike brakes is a critical step in maintaining the safety and effectiveness of your bike. By following these steps, you can ensure that your brakes are properly bled, and that they provide optimal braking performance. Remember to invest in high-quality tools and materials, and to seek professional assistance if you are unsure or uncomfortable performing the process yourself.
Troubleshooting Common Issues during Brake Bleeding
Bleeding mountain bike brakes can be a straightforward process, but there are several common issues that may arise during the process. Here are some of the most common issues, along with solutions and troubleshooting tips:
Air Bubbles
Air bubbles are one of the most common issues that can arise during brake bleeding. Air bubbles can cause spongy or inconsistent brake lever feel, and can compromise braking performance. To remove air bubbles, make sure that the brake system is properly bled, and that all air bubbles are removed from the system. Use a brake bleed kit, and follow the manufacturer’s instructions carefully. If air bubbles persist, try bleeding the system again, or seek professional assistance.
Leaks
Leaks in the brake system can compromise braking performance, and can cause fluid to leak out of the system. To check for leaks, inspect the brake caliper, the brake line, and the brake fluid reservoir. If you find any leaks, it’s essential to address them before proceeding with the bleeding process. Use a high-quality, brand-specific brake fluid, and make sure that all fittings and connections are tight and secure.
Inconsistent Brake Lever Feel
Inconsistent brake lever feel can be caused by several factors, including air bubbles, contamination, or worn-out brake pads. To address inconsistent brake lever feel, make sure that the brake system is properly bled, and that all air bubbles are removed from the system. Check the brake pads for wear, and replace them if necessary. If the issue persists, try bleeding the system again, or seek professional assistance.
Troubleshooting common issues during brake bleeding is essential for ensuring the safety and effectiveness of your bike’s braking system. By following these solutions and troubleshooting tips, you can address common issues and ensure that your brakes provide optimal braking performance. Remember to invest in high-quality tools and materials, and to seek professional assistance if you are unsure or uncomfortable performing the process yourself.
Maintaining Your Mountain Bike Brakes after Bleeding
Bleeding your mountain bike brakes is an essential step in maintaining the safety and effectiveness of your bike’s braking system. However, the process doesn’t end once you’ve bled the brakes. Here are some steps to take after bleeding mountain bike brakes, to ensure optimal braking performance:
- Check for Leaks: After bleeding the brakes, check for any leaks in the system. Look for signs of fluid leakage around the brake caliper, the brake line, and the brake fluid reservoir. If you find any leaks, it’s essential to address them before riding the bike.
- Bleed Any Residual Air: Even after bleeding the brakes, there may still be some residual air in the system. To remove any remaining air, pump the brake lever several times, and then hold it down for a few seconds. This will help to bleed any remaining air from the system, and ensure that the brakes provide consistent and reliable braking performance.
- Test Ride the Bike: After bleeding the brakes, test ride the bike to ensure proper braking performance. Make sure that the brakes provide consistent and reliable braking power, and that there are no spongy or noisy brakes. If you notice any issues, repeat the bleeding process, or seek professional assistance.
- Regular Maintenance and Inspection: Regular maintenance and inspection of the brake system are essential for ensuring optimal braking performance. Check the brake pads for wear, and replace them if necessary. Inspect the brake line and the brake caliper for any signs of damage or wear. If you notice any issues, address them promptly to ensure the safety and effectiveness of your bike’s braking system.
Maintaining your mountain bike brakes after bleeding is essential for ensuring the safety and effectiveness of your bike’s braking system. By following these steps, you can ensure that your brakes provide optimal braking performance, and that your bike is safe to ride. Remember to invest in high-quality tools and materials, and to seek professional assistance if you are unsure or uncomfortable performing the process yourself.

Conclusion: Achieving Optimal Braking Performance on Your Mountain Bike
Bleeding your mountain bike brakes is a critical step in maintaining the safety and effectiveness of your bike’s braking system. By removing air and contaminants from the brake lines, you can ensure that your brakes provide consistent and reliable braking power, even in the most demanding conditions. In this comprehensive guide, we’ve covered everything you need to know to bleed your mountain bike brakes, from understanding the components of your brake system to troubleshooting common issues during the bleeding process.
When bleeding your mountain bike brakes, it’s essential to use high-quality, brand-specific tools and materials. This will help to maintain the integrity of your brake system, and ensure that your brakes provide optimal braking performance. It’s also important to be patient and attentive during the bleeding process, taking care to avoid common pitfalls and mistakes that can compromise the effectiveness of your brakes.
Regular maintenance and inspection of your brake system are essential for ensuring optimal braking performance. After bleeding your brakes, be sure to check for leaks, bleed any residual air from the system, and test ride your bike to ensure proper braking performance. By incorporating brake bleeding into a comprehensive bike maintenance schedule, you can ensure that your brakes provide consistent and reliable braking power, and that your bike is safe to ride.
If you’re unsure or uncomfortable performing the brake bleeding process yourself, don’t hesitate to seek professional assistance. Many bike shops and mechanics offer brake bleeding services, and can help you to maintain the safety and effectiveness of your bike’s braking system.
Investing in high-quality tools and materials, and seeking professional assistance when necessary, can help to ensure the safety and longevity of your mountain bike’s braking system. By following the steps outlined in this comprehensive guide, you can achieve optimal braking performance on your mountain bike, and enjoy the peace of mind that comes with knowing that your brakes will perform when you need them most.
