
Why a Proper Bike Fit Matters
A proper bike fit is crucial for any cyclist, whether you’re a casual rider or a competitive athlete. When your bike is fitted to your body, you’ll experience improved comfort, increased efficiency, and a reduced risk of injury. A well-fitting bike allows you to maintain a comfortable riding position, reducing strain on your muscles and joints. This, in turn, enables you to ride for longer periods without fatigue, making it ideal for those who enjoy long-distance cycling or commuting.

Click Image to Find eBike Products
Learning how to fit a bicycle is essential to unlock the full potential of your ride. A proper bike fit can significantly improve your cycling performance, allowing you to generate more power and speed with less effort. Additionally, it can boost your confidence and overall riding experience, making it more enjoyable and rewarding.
By understanding the importance of a proper bike fit, you’ll be able to identify areas for improvement and make adjustments to optimize your ride. Whether you’re looking to improve your comfort, increase your efficiency, or reduce your risk of injury, learning how to fit a bicycle is a crucial step in achieving your cycling goals.
Understanding Your Body Type and Riding Style
To achieve a perfect bike fit, it’s essential to understand your body type and riding style. This includes factors such as flexibility, leg length, and preferred riding position. By understanding these factors, you’ll be able to determine the optimal bike fit for your unique needs.
Flexibility plays a significant role in determining your bike fit. If you have limited flexibility, you may require a bike with a more upright riding position to accommodate your range of motion. On the other hand, if you have excellent flexibility, you may prefer a more aggressive riding position.
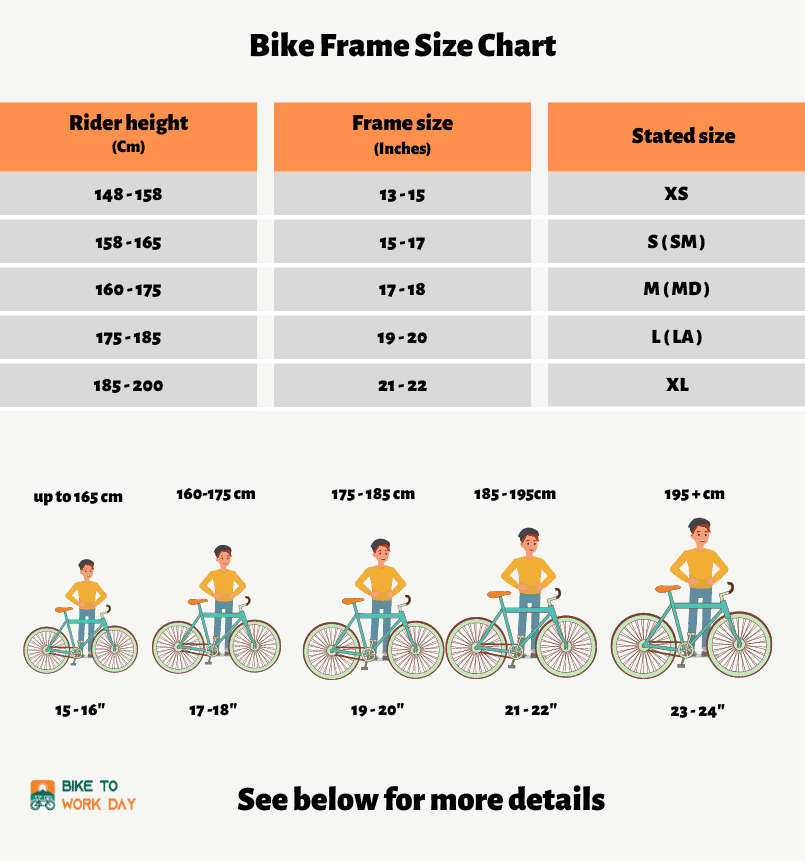
Leg length is another critical factor to consider. If you have longer legs, you may require a bike with a longer crank length to ensure proper pedaling technique. Conversely, if you have shorter legs, you may require a bike with a shorter crank length.
Your preferred riding position is also crucial in determining your bike fit. If you prefer an upright riding position, you may require a bike with a higher handlebar height. If you prefer a more aggressive riding position, you may require a bike with a lower handlebar height.
By understanding your body type and riding style, you’ll be able to learn how to fit a bicycle that meets your unique needs. This will enable you to achieve a comfortable, efficient, and injury-free ride.

Measuring Up: Taking Your Bike’s Measurements
To learn how to fit a bicycle, it’s essential to take accurate measurements of your bike. This includes measuring the seat height, handlebar height, and crank length. By taking these measurements, you’ll be able to determine the optimal bike fit for your unique needs.
To measure the seat height, place the bike on a level surface and measure the distance from the ground to the top of the saddle. This measurement should be taken with the saddle in its lowest position. Record this measurement, as it will be used to determine the optimal saddle height.
To measure the handlebar height, measure the distance from the ground to the top of the handlebars. This measurement should be taken with the handlebars in their highest position. Record this measurement, as it will be used to determine the optimal handlebar height.
To measure the crank length, measure the distance from the center of the pedal spindle to the center of the crank arm. Record this measurement, as it will be used to determine the optimal crank length.
By taking these measurements, you’ll be able to determine the optimal bike fit for your unique needs. This will enable you to achieve a comfortable, efficient, and injury-free ride. Remember, learning how to fit a bicycle is a crucial step in achieving a perfect bike fit.
Adjusting the Saddle Height: A Step-by-Step Guide
When learning how to fit a bicycle, adjusting the saddle height is a crucial step in achieving a comfortable and efficient ride. A properly adjusted saddle height can improve comfort, increase efficiency, and reduce the risk of injury.
To adjust the saddle height, follow these steps:
Step 1: Determine the optimal saddle height by measuring the distance from the ground to the top of the saddle. This measurement should be taken with the saddle in its lowest position.
Step 2: Loosen the saddle clamp by turning the bolt counterclockwise. This will allow you to adjust the saddle height.
Step 3: Raise or lower the saddle to the optimal height, ensuring that the saddle is level and parallel to the ground.
Step 4: Tighten the saddle clamp by turning the bolt clockwise, ensuring that the saddle is securely in place.
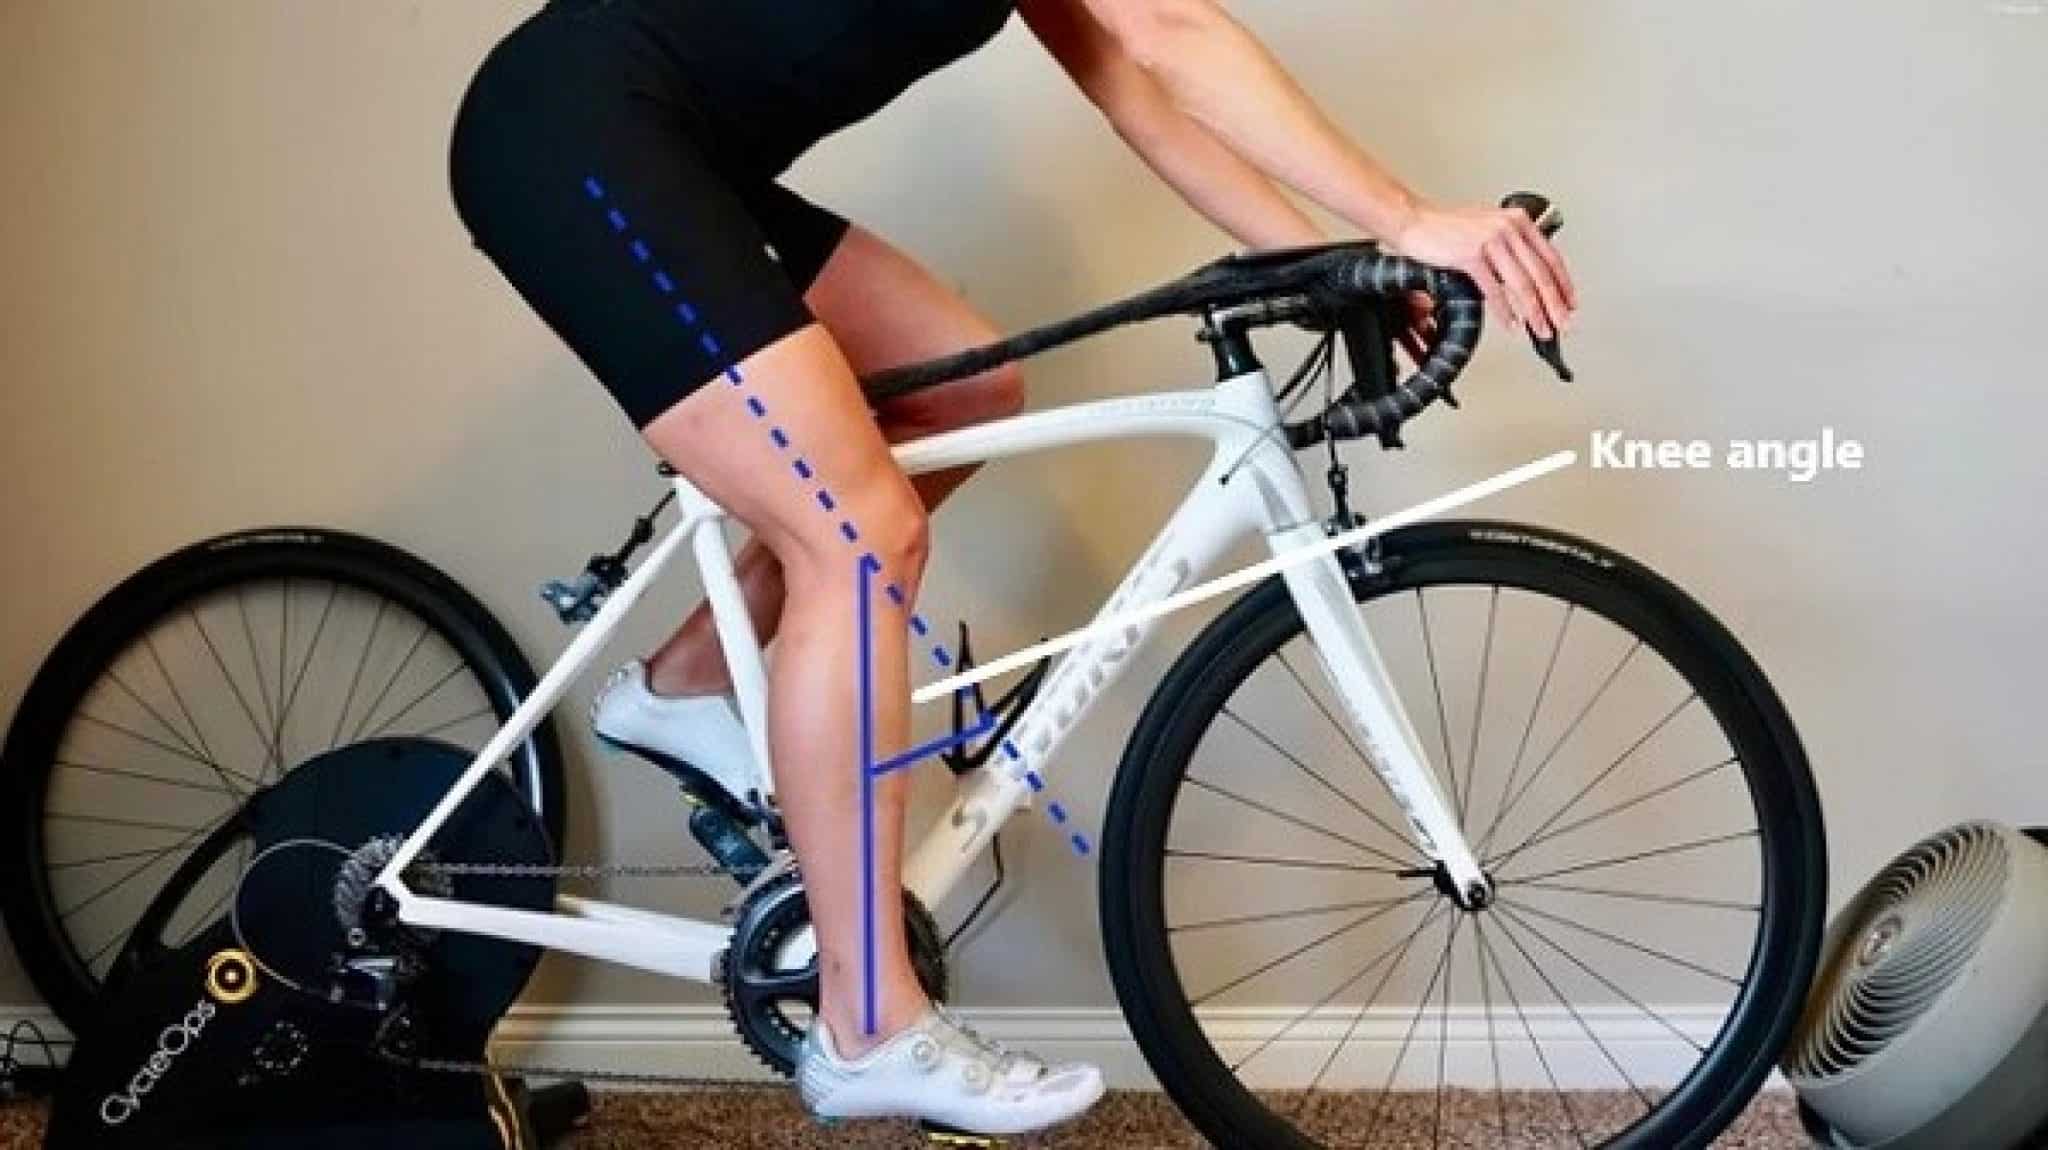
Step 5: Test the saddle height by sitting on the bike and pedaling. The saddle should be at a height that allows for a comfortable riding position, with your leg almost fully extended when the pedal is in its lowest position.
By following these steps, you’ll be able to adjust the saddle height to achieve a comfortable and efficient ride. Remember, learning how to fit a bicycle is a process that requires patience and attention to detail. By taking the time to adjust the saddle height, you’ll be able to enjoy a perfect bike fit.

Handlebar Height and Reach: Finding the Perfect Position
When learning how to fit a bicycle, adjusting the handlebar height and reach is crucial for achieving a comfortable and efficient ride. A properly adjusted handlebar height and reach can improve comfort, increase control, and reduce the risk of injury.
To adjust the handlebar height, follow these steps:
Step 1: Determine the optimal handlebar height by measuring the distance from the ground to the top of the handlebars. This measurement should be taken with the handlebars in their highest position.
Step 2: Loosen the stem clamp by turning the bolt counterclockwise. This will allow you to adjust the handlebar height.
Step 3: Raise or lower the handlebars to the optimal height, ensuring that the handlebars are level and parallel to the ground.
Step 4: Tighten the stem clamp by turning the bolt clockwise, ensuring that the handlebars are securely in place.
To adjust the handlebar reach, follow these steps:
Step 1: Determine the optimal handlebar reach by measuring the distance from the saddle to the handlebars. This measurement should be taken with the saddle and handlebars in their optimal positions.
Step 2: Loosen the stem clamp by turning the bolt counterclockwise. This will allow you to adjust the handlebar reach.
Step 3: Move the handlebars forward or backward to the optimal reach, ensuring that the handlebars are at a comfortable distance from the saddle.
Step 4: Tighten the stem clamp by turning the bolt clockwise, ensuring that the handlebars are securely in place.
By following these steps, you’ll be able to adjust the handlebar height and reach to achieve a comfortable and efficient ride. Remember, learning how to fit a bicycle is a process that requires patience and attention to detail. By taking the time to adjust the handlebar height and reach, you’ll be able to enjoy a perfect bike fit.
Stem Length and Angle: Fine-Tuning Your Bike’s Fit
When learning how to fit a bicycle, adjusting the stem length and angle is a crucial step in achieving a comfortable and efficient ride. A properly adjusted stem length and angle can improve comfort, increase control, and reduce the risk of injury.
The stem length and angle play a critical role in determining the overall fit of the bike. A stem that is too long or too short can cause discomfort and affect the bike’s handling. Similarly, a stem that is angled incorrectly can cause strain on the neck, back, and hands.
To adjust the stem length, follow these steps:
Step 1: Determine the optimal stem length by measuring the distance from the saddle to the handlebars. This measurement should be taken with the saddle and handlebars in their optimal positions.
Step 2: Loosen the stem clamp by turning the bolt counterclockwise. This will allow you to adjust the stem length.
Step 3: Move the stem forward or backward to the optimal length, ensuring that the handlebars are at a comfortable distance from the saddle.
Step 4: Tighten the stem clamp by turning the bolt clockwise, ensuring that the stem is securely in place.
To adjust the stem angle, follow these steps:
Step 1: Determine the optimal stem angle by considering your riding style and body type. A more upright stem angle is suitable for comfort-oriented riders, while a more aggressive stem angle is suitable for performance-oriented riders.
Step 2: Loosen the stem clamp by turning the bolt counterclockwise. This will allow you to adjust the stem angle.
Step 3: Tilt the stem up or down to the optimal angle, ensuring that the handlebars are at a comfortable height and angle.
Step 4: Tighten the stem clamp by turning the bolt clockwise, ensuring that the stem is securely in place.
By following these steps, you’ll be able to fine-tune your bike’s fit and achieve a comfortable and efficient ride. Remember, learning how to fit a bicycle is a process that requires patience and attention to detail. By taking the time to adjust the stem length and angle, you’ll be able to enjoy a perfect bike fit and improve your overall riding experience.

Putting it All Together: A Checklist for a Perfect Bike Fit
Now that you’ve learned how to fit a bicycle, it’s time to put it all together. A perfect bike fit requires attention to detail and a thorough understanding of your body type, riding style, and bike measurements. To ensure a perfect bike fit, follow this comprehensive checklist:
Body Type and Riding Style:
- Determine your body type and riding style, including factors such as flexibility, leg length, and preferred riding position.
- Consider your riding style, including comfort-oriented, performance-oriented, or a combination of both.
Bike Measurements:
- Take accurate measurements of your bike, including seat height, handlebar height, and crank length.
- Record your measurements to ensure accuracy and consistency.
Saddle Height and Position:
- Adjust the saddle height to the optimal position, ensuring comfort and efficiency.
- Consider the saddle position, including fore and aft adjustments.
Handlebar Height and Reach:
- Adjust the handlebar height and reach to the optimal position, ensuring comfort and control.
- Consider the handlebar angle and position, including tilt and rotation.
Stem Length and Angle:
- Adjust the stem length and angle to the optimal position, ensuring comfort and efficiency.
- Consider the stem angle, including tilt and rotation.
Final Check:
- Review all adjustments made to ensure a perfect bike fit.
- Test ride your bike to ensure comfort, efficiency, and control.
- Make fine-tuning adjustments as needed.
By following this comprehensive checklist, you’ll be able to ensure a perfect bike fit and enjoy a comfortable, efficient, and enjoyable ride. Remember, learning how to fit a bicycle is a process that requires patience and attention to detail. With practice and experience, you’ll be able to fine-tune your bike fit and take your riding to the next level.
Maintenance and Adjustments: Keeping Your Bike Fit Over Time
Once you’ve achieved a perfect bike fit, it’s essential to maintain and adjust it over time. A bike’s fit can change due to various factors, including wear and tear, changes in riding style, and physical changes. To ensure your bike remains comfortable, efficient, and safe, follow these tips:
Regularly Inspect Your Bike:
- Check your bike’s condition regularly, paying attention to wear and tear on components such as tires, brakes, and gears.
- Look for signs of damage or excessive wear, and replace components as needed.
Monitor Your Body and Riding Style:
- Pay attention to changes in your body, such as weight gain or loss, flexibility, or strength.
- Adjust your riding style as needed, including changes in your preferred riding position or technique.
Make Adjustments as Needed:
- Regularly check and adjust your bike’s fit, including saddle height, handlebar height, and stem length and angle.
- Make fine-tuning adjustments to ensure your bike remains comfortable and efficient.
Consider Professional Assistance:
- If you’re unsure about how to fit a bicycle or make adjustments, consider consulting a professional bike fitter.
- A professional bike fitter can provide personalized guidance and ensure your bike is properly fitted.
By following these tips, you’ll be able to maintain and adjust your bike’s fit over time, ensuring a comfortable, efficient, and enjoyable ride. Remember, learning how to fit a bicycle is an ongoing process that requires regular attention and adjustments. With practice and experience, you’ll be able to fine-tune your bike fit and take your riding to the next level.
