
Why a Proper Bike Fit Matters
When it comes to mountain biking, a proper bike fit is crucial for optimal performance, comfort, and safety. A well-fitting bike can make all the difference in a rider’s experience, allowing them to tackle challenging terrain with confidence and enjoy the ride. On the other hand, a poorly fitting bike can lead to discomfort, fatigue, and even injury. By understanding the importance of a proper bike fit, riders can take the first step towards optimizing their mountain bike for a perfect fit. This involves considering factors such as comfort, efficiency, and injury prevention. A bike that fits properly can improve comfort by reducing pressure points and allowing for a more natural riding position. It can also increase efficiency by enabling riders to maintain a consistent pace and conserve energy. Furthermore, a proper bike fit can reduce the risk of injury by minimizing the strain on joints and muscles. With these benefits in mind, it’s clear that learning how to fit a mountain bike is an essential skill for any serious mountain biker.

Click Image to Find eBike Products

Understanding Your Body Geometry
Before diving into the process of how to fit a mountain bike, it’s essential to understand the importance of body geometry. A rider’s body geometry plays a significant role in determining the ideal bike fit. Factors such as inseam, arm length, and riding style all impact how a bike should be fitted to ensure optimal comfort and performance. For instance, a rider with a longer inseam may require a bike with a higher seat height, while a rider with shorter arms may need a bike with a shorter reach. Additionally, a rider’s style of riding, whether it’s cross-country, downhill, or trail riding, will also influence the bike fit. By understanding these factors, riders can make informed decisions when adjusting their bike to achieve a perfect fit. This knowledge will also help riders to identify potential issues with their current bike fit and make necessary adjustments to improve their overall riding experience.
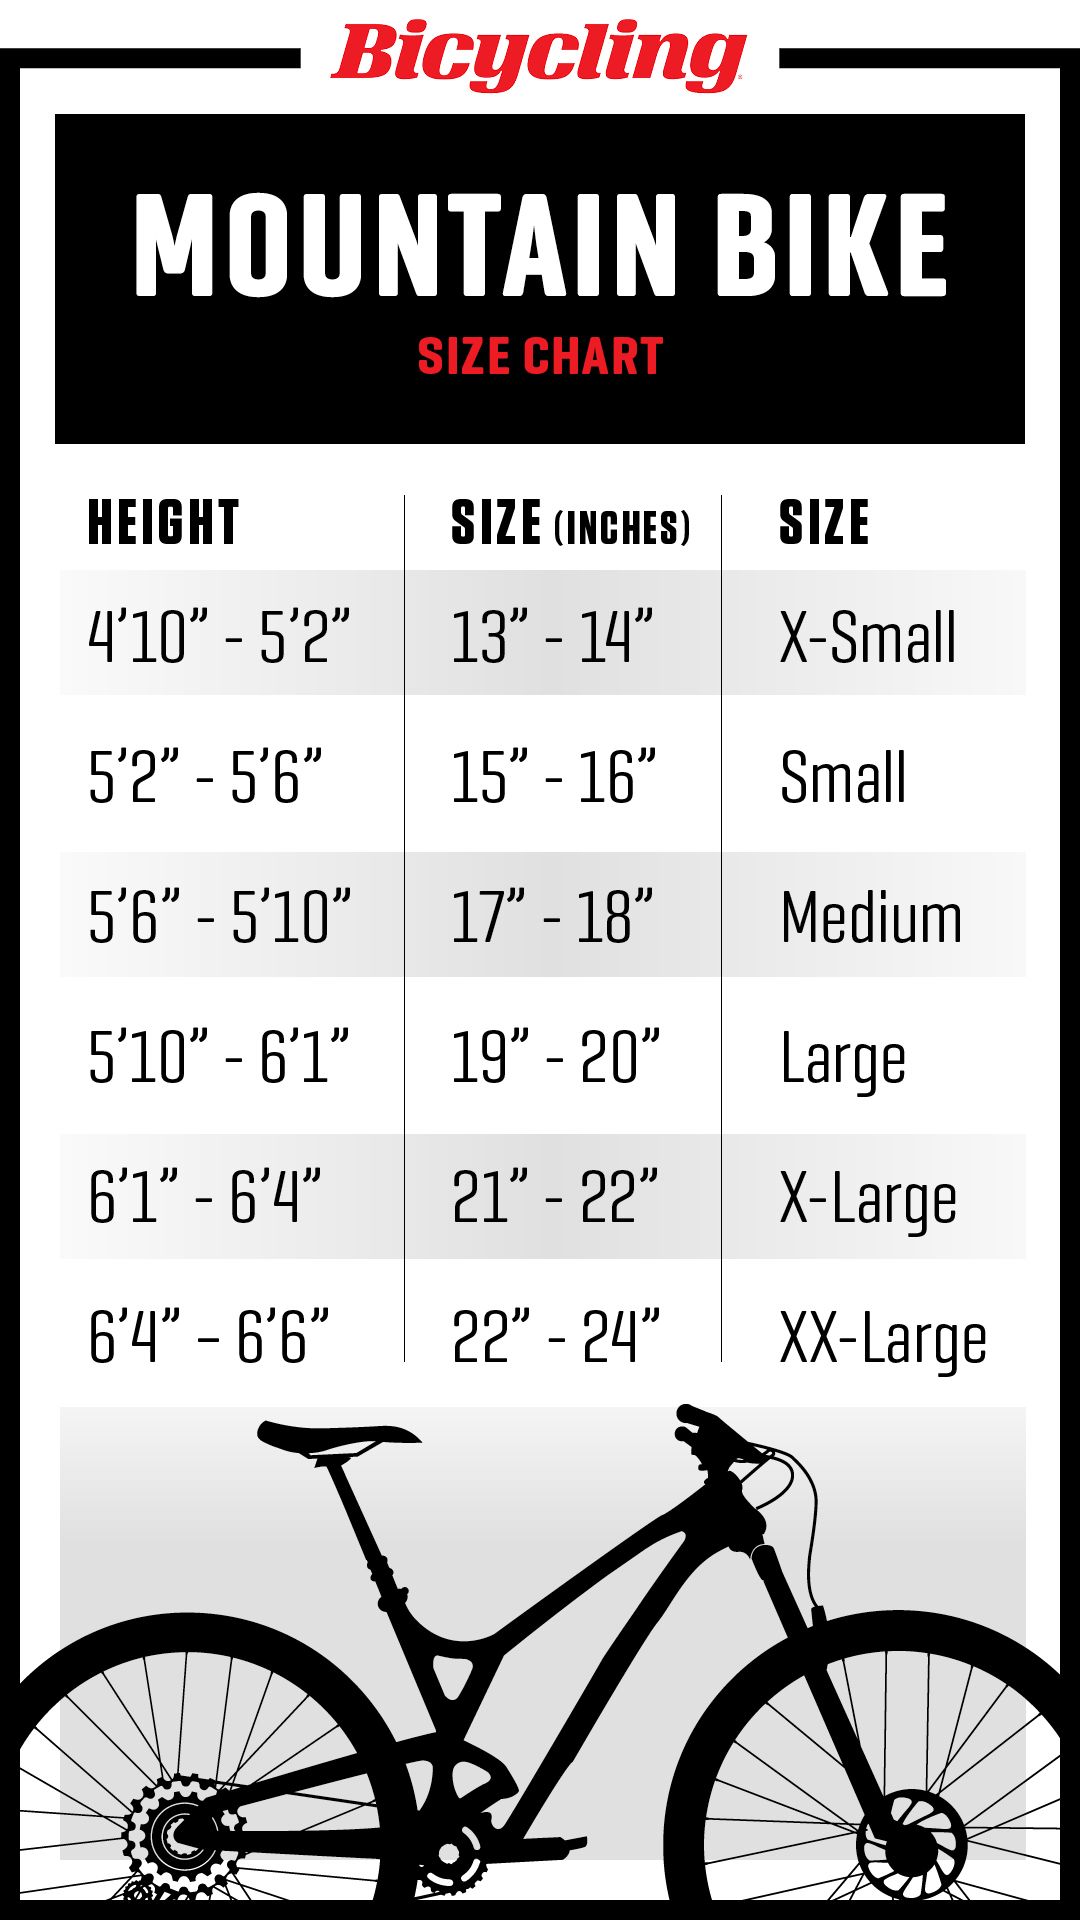
Measuring Your Mountain Bike
To learn how to fit a mountain bike, it’s essential to take precise measurements of the bike. This step is crucial in ensuring a perfect fit, as it provides a baseline for making adjustments. Here’s a step-by-step guide on how to measure your mountain bike: First, measure the seat height by placing a level on the saddle and measuring from the floor to the top of the saddle. Next, measure the handlebar height by measuring from the floor to the top of the handlebars. Finally, measure the reach by measuring from the saddle to the handlebars. It’s also important to measure the distance between the brake levers and the gear shifters, as well as the pedal position. By taking these measurements, riders can identify areas that need adjustment and make informed decisions when fine-tuning their bike fit. Remember, accurate measurements are key to achieving a perfect fit, so take your time and double-check your measurements to ensure accuracy.

Adjusting the Saddle Height
When learning how to fit a mountain bike, adjusting the saddle height is a crucial step. A properly adjusted saddle height ensures optimal comfort, efficiency, and reduces the risk of injury. To adjust the saddle height, start by using a saddle height calculator to determine the ideal saddle height based on the rider’s inseam and leg length. Next, test the saddle height by sitting on the bike with both feet flat on the ground and a slight bend in the knee. The saddle should be at a height that allows the rider to almost fully extend their leg when the pedal is in its lowest position. If the saddle is too high, the rider may experience discomfort and strain on the knee and hip joints. On the other hand, if the saddle is too low, the rider may experience difficulty pedaling efficiently. By adjusting the saddle height to the ideal position, riders can enjoy a more comfortable and efficient ride. Remember, small adjustments can make a big difference, so take the time to fine-tune the saddle height for optimal performance.
Fine-Tuning the Handlebar Height
When learning how to fit a mountain bike, fine-tuning the handlebar height is a crucial step in achieving optimal comfort and performance. The handlebar height should be adjusted based on the rider’s riding style, terrain, and personal preference. For example, cross-country riders may prefer a lower handlebar height to improve aerodynamics, while downhill riders may prefer a higher handlebar height to increase control and stability. To adjust the handlebar height, start by considering the rider’s arm length and riding style. A general rule of thumb is to position the handlebars so that the rider’s elbows are slightly bent and their hands are in a comfortable position on the grips. Next, test the handlebar height by riding the bike on various terrain and making adjustments as needed. Remember, small adjustments can make a big difference in comfort and performance, so take the time to fine-tune the handlebar height. By following these tips and techniques, riders can achieve a perfect fit and enjoy a more comfortable and efficient ride when learning how to fit a mountain bike.

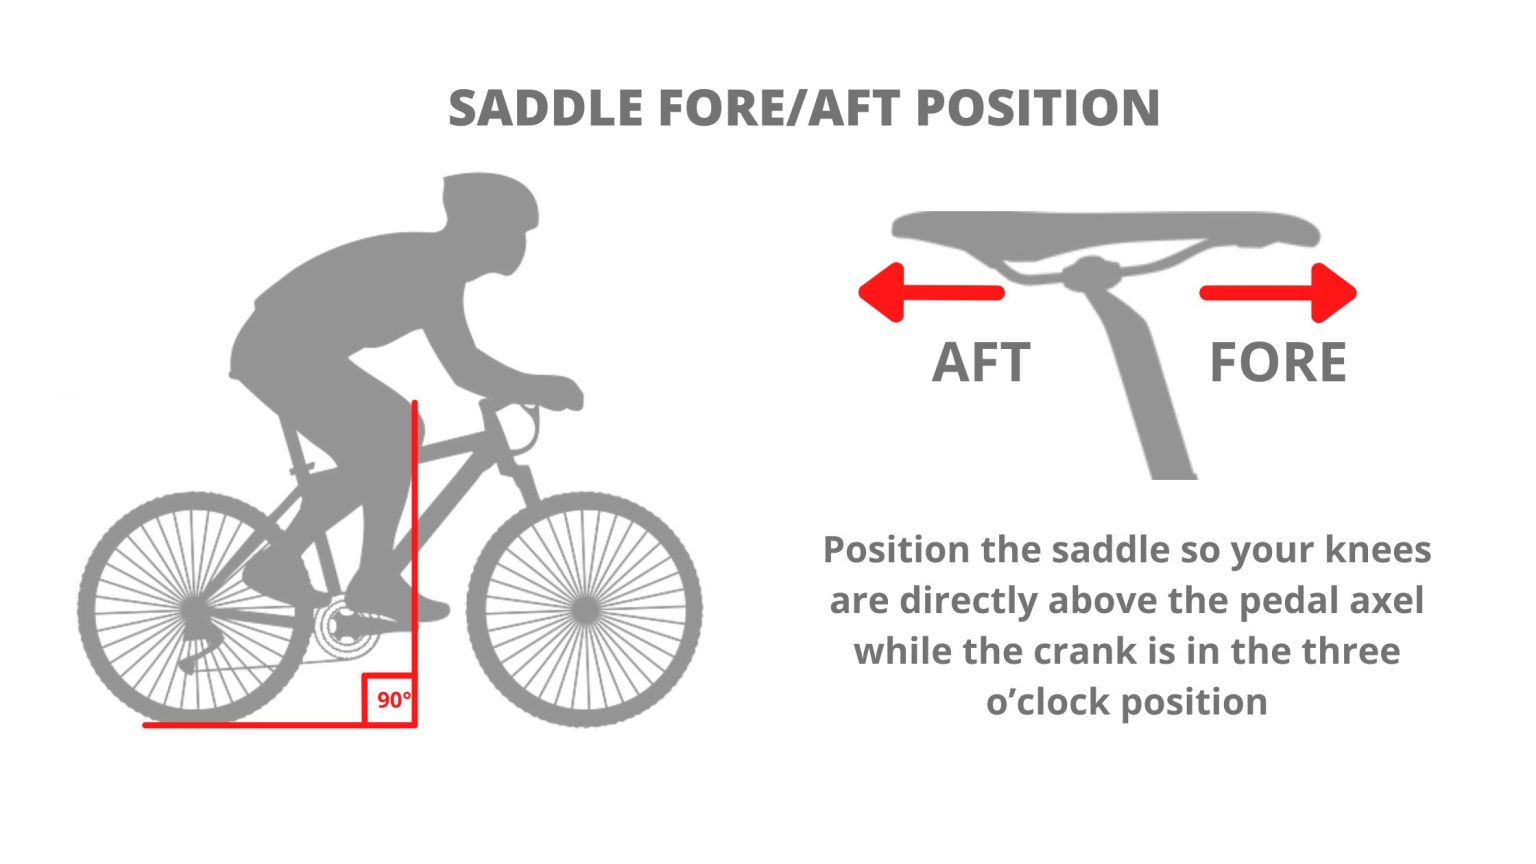
Getting the Right Reach
When learning how to fit a mountain bike, getting the right reach is crucial for optimal comfort and performance. The reach refers to the distance between the saddle and the handlebars, and it should be adjusted based on the rider’s body geometry and riding style. A proper reach ensures that the rider can maintain a comfortable riding position, with their arms slightly bent and their hands in a neutral position on the grips. To measure the reach, start by sitting on the bike with your feet flat on the ground and your hands on the grips. The reach should be adjusted so that your arms are slightly bent and your elbows are not locked out. If the reach is too long, the rider may experience discomfort and strain on the back and shoulders. On the other hand, if the reach is too short, the rider may experience difficulty controlling the bike. To adjust the reach, riders can try sliding the saddle forward or backward, or adjusting the stem length. By getting the right reach, riders can enjoy a more comfortable and efficient ride when learning how to fit a mountain bike.

Additional Tips for a Customized Fit
In addition to adjusting the saddle height, handlebar height, and reach, there are several other components that can be fine-tuned to achieve a customized fit when learning how to fit a mountain bike. One important consideration is the brake lever position. The brake levers should be positioned so that they are easily accessible and comfortable to use, with the rider’s hands in a neutral position on the grips. To adjust the brake levers, riders can try rotating them inward or outward to find a comfortable position. Another important consideration is the gear shifter position. The gear shifters should be positioned so that they are easy to use and do not interfere with the rider’s hand position on the grips. To adjust the gear shifters, riders can try sliding them forward or backward along the handlebars. Finally, the pedal position can also be adjusted to achieve a customized fit. The pedals should be positioned so that the rider’s foot is in a comfortable position, with the knee slightly bent and the ankle in a neutral position. By adjusting these components, riders can achieve a truly customized fit that is tailored to their individual needs and preferences, resulting in a more comfortable and efficient ride when learning how to fit a mountain bike.

Putting it All Together: A Step-by-Step Guide
Now that you’ve adjusted the saddle height, handlebar height, reach, brake levers, gear shifters, and pedals, it’s time to put it all together and test the bike fit. Start by sitting on the bike with your feet flat on the ground and your hands on the grips. Check that your leg is almost fully extended when the pedal is in its lowest position, and that your arm is slightly bent when holding the grips. Next, ride the bike at a slow pace to get a feel for how it handles and to identify any areas that need further adjustment. Pay attention to how your body feels on the bike, and make adjustments as needed to achieve a comfortable and efficient riding position. Remember to test the bike fit on different terrain and at different speeds to ensure that it’s comfortable and efficient in a variety of conditions. By following these steps and making adjustments as needed, you’ll be able to achieve a perfect fit and enjoy a more comfortable and efficient ride when learning how to fit a mountain bike. With a little patience and practice, you’ll be able to fine-tune your bike fit and take your riding to the next level.
