Identifying the Problem: Assessing Your Bike Pedals
When it comes to maintaining your bicycle, addressing issues with the pedals is crucial for a safe and enjoyable ride. To begin the repair process, you must first identify the root cause of the problem. Common issues with bike pedals include loose or damaged threads, worn-out bearings, and other forms of damage. A visual guide can help users identify these problems:

Click Image to Find eBike Products
- Loose or damaged threads: Check for any visible signs of damage, such as stripped or cross-threaded threads, which may require replacement or repair.
- Worn-out bearings: Inspect the pedal bearings for signs of wear, such as excessive play, roughness, or noise, which may indicate the need for replacement or servicing.
- Other forms of damage: Look for any other visible signs of damage, such as cracks, dents, or corrosion, which may affect the pedal’s functionality or safety.
By thoroughly assessing the bike pedals, you can determine the best course of action for repair and maintenance. This initial step is essential for ensuring a successful and long-lasting repair, ultimately contributing to the overall safety and performance of your bicycle.

Gathering Necessary Tools and Parts: Preparing for the Repair
Before diving into the repair process, it’s essential to gather the necessary tools and parts to ensure a smooth and efficient fix. Here’s a list of common tools and parts required for fixing bike pedals:
- Pedal wrench: A pedal wrench is a specialized tool designed to remove and install bike pedals. Choose a high-quality option with a long handle for better leverage and torque.
- Grease: Applying grease to the pedal threads and bearings can help reduce friction, prevent corrosion, and ensure a secure fit. Opt for a high-quality bicycle-specific grease for optimal results.
- New pedals: If the damage to the pedals is irreparable, consider investing in a new set of pedals that suit your riding style and preferences. Look for durable, lightweight, and comfortable options from reputable brands.
By having the right tools and parts on hand, you can confidently tackle bike pedal repair and maintenance tasks, ultimately extending the lifespan of your bicycle and enhancing your riding experience. Remember, investing in high-quality tools and parts can make a significant difference in the success and longevity of your repair efforts.
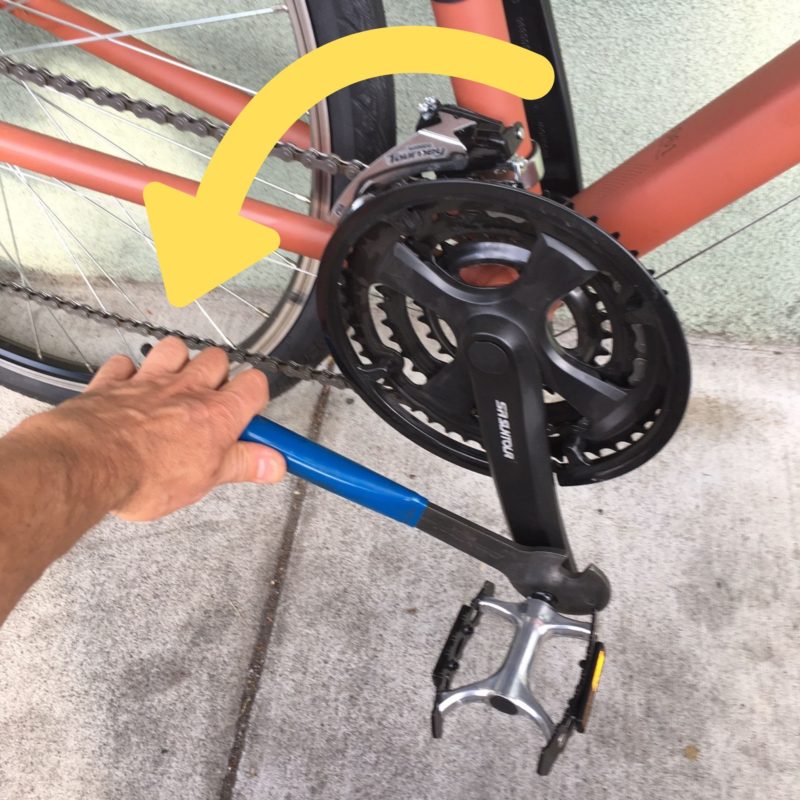
Removing the Damaged Pedal: Step-by-Step Instructions
Once you’ve identified the problem and gathered the necessary tools and parts, it’s time to remove the damaged pedal. Follow these steps to safely and effectively remove the pedal:
- Locate the pedal wrench flats: Position the pedal wrench on the flat surface of the pedal spindle, ensuring a secure and stable grip.
- Apply the appropriate force: Turn the pedal wrench counterclockwise to loosen the left pedal or clockwise for the right pedal. Use a reasonable amount of force, as excessive force may damage other components.
- Use a cheater bar (optional): If the pedal is particularly tight, consider using a cheater bar for added leverage. Attach the cheater bar to the pedal wrench, taking care not to exceed the manufacturer’s recommended torque settings.
- Remove the pedal: Continue turning the pedal wrench until the pedal is fully removed from the crank arm. Be prepared for the pedal to come loose suddenly, as this can happen when the threads are stripped or cross-threaded.
By carefully following these steps, you can successfully remove the damaged pedal without causing further damage to the bike. Remember to take your time, apply the appropriate amount of force, and use a cheater bar if necessary. Visual aids can help illustrate each step, making the process more accessible and user-friendly.

Inspecting and Cleaning the Threads: Preparing for Reinstallation
Before reinstalling the new or repaired pedal, it’s crucial to inspect and clean the pedal threads to ensure a smooth and secure fit. Follow these steps to prepare the threads for reinstallation:
- Inspect the threads: Examine the pedal threads for any signs of damage, such as stripped or cross-threaded threads. If damage is present, you may need to replace the crank arm or consult a professional mechanic.
- Clean the threads: Use a wire brush or a clean, dry cloth to remove dirt, rust, or debris from the pedal threads. Take care not to damage the threads during cleaning.
- Apply grease: Apply a thin layer of high-quality bicycle-specific grease to the pedal threads. This will help reduce friction, prevent corrosion, and ensure a secure fit.
By thoroughly inspecting, cleaning, and greasing the pedal threads, you can minimize the risk of installation issues and ensure a secure fit for the new or repaired pedal. Visual aids can help illustrate each step, making the process more accessible and user-friendly.

Reinstalling the New or Repaired Pedal: Ensuring a Secure Fit
After inspecting, cleaning, and greasing the pedal threads, you’re ready to reinstall the new or repaired pedal. Follow these steps to ensure a secure fit:
- Align the threads: Carefully align the pedal threads with the corresponding threads on the crank arm. Ensure that the pedal spindle is pointing in the correct direction (downward for the left pedal and upward for the right pedal).
- Thread the pedal: Begin threading the pedal by hand, turning it clockwise for the left pedal or counterclockwise for the right pedal. This will help prevent cross-threading and ensure a smooth installation.
- Tighten the pedal: Once the pedal is fully threaded, use a pedal wrench to tighten it to the recommended torque settings. For most pedals, a torque setting between 30 and 40 Nm is appropriate. Consult the pedal manufacturer’s instructions for specific recommendations.
By following these steps and adhering to the recommended torque settings, you can ensure a secure fit for the new or repaired pedal. Visual aids can help illustrate each step, making the process more accessible and user-friendly.

Testing the Pedals: Ensuring Proper Functionality
After successfully reinstalling the new or repaired pedal, it’s essential to test the pedals to ensure proper functionality. Follow these steps to check the alignment, smoothness, and resistance of the pedals:
- Check alignment: With the bike on a stand or securely held, spin the cranks to observe the pedal alignment. The pedals should spin freely without wobbling or rubbing against the crank arms.
- Test smoothness: Apply gentle pressure to the pedals while spinning the cranks. The pedals should spin smoothly, without any noticeable roughness or binding. If you feel any resistance or hear unusual noises, further investigation may be necessary.
- Assess resistance: Apply a moderate amount of force to the pedals while spinning the cranks. The pedals should maintain a consistent resistance, without any sudden increases or decreases in tension. If you notice inconsistent resistance, consider adjusting or lubricating the pedal bearings.
By thoroughly testing the pedals, you can identify any potential issues and address them before they become more significant problems. Visual aids can help illustrate each step, making the process more accessible and user-friendly.

Maintaining Your Bike Pedals: Preventing Future Issues
Regular maintenance is crucial for preventing future issues with bike pedals. By cleaning, lubricating, and adjusting the pedals as needed, you can extend their lifespan and ensure optimal performance. Follow these recommendations to maintain your bike pedals:
- Clean the pedals: Regularly clean the pedals with a soft brush and mild soap to remove dirt, debris, and grime. Be sure to dry the pedals thoroughly to prevent rust and corrosion.
- Lubricate the pedals: Periodically apply a high-quality bicycle lubricant to the pedal bearings to reduce friction and maintain smooth operation. Consult the pedal manufacturer’s instructions for specific lubrication recommendations.
- Adjust the pedals: Periodically check the pedal tension and adjust as necessary to ensure proper functionality. If you notice any unusual noises or resistance, consult a professional mechanic for further assistance.
By incorporating these maintenance practices into your regular bike maintenance routine, you can minimize the risk of future pedal issues and enjoy a safer, more comfortable ride. Visual aids and step-by-step instructions can help illustrate each maintenance task, making the process more accessible and user-friendly.

Troubleshooting Common Pedal Issues: Frequently Asked Questions
Below are some common questions and concerns related to bike pedal repair and maintenance. Clear and concise answers, backed by authoritative sources and expert opinions, are provided for each question.
Q: How do I tighten loose pedals?
A: To tighten loose pedals, first, ensure that the pedal threads are clean and free of debris. Apply a thin layer of grease to the threads, then use a pedal wrench to tighten the pedal to the recommended torque settings. Consult the pedal manufacturer’s instructions for specific torque recommendations.
Q: How do I replace worn-out bearings?
A: To replace worn-out bearings, first, remove the damaged pedal and clean the pedal body and spindle. Carefully inspect the bearing type and size, then purchase replacement bearings from a reputable bike shop or online retailer. Follow the manufacturer’s instructions to remove the old bearings and install the new ones, ensuring proper alignment and lubrication.
Q: How do I address creaking noises coming from my pedals?
A: Creaking noises in pedals can be caused by several factors, including loose bearings, inadequate lubrication, or damaged threads. To address creaking noises, first, clean and lubricate the pedal bearings. If the noise persists, inspect the pedal threads for damage and tighten as necessary. If the noise still cannot be resolved, consult a professional mechanic for further assistance.