What is a Bike Crankset and Why Should You Install a New One?
A bike crankset is a crucial component of a bicycle’s drivetrain, responsible for transferring pedaling power to the rear wheel via the chain and cassette. It typically consists of two crank arms, one or more chainrings, and a bottom bracket, which connects the crankset to the bike frame. Installing a new crankset can bring about several benefits, such as:
Click Image to Find eBike Products
Improved performance: A new crankset can enhance your bike’s efficiency and responsiveness, making it easier to tackle challenging terrains and climbs.
Increased durability: High-quality cranksets are built to last, offering increased resistance to wear, tear, and damage compared to older or lower-tier models.
Customization options: Upgrading your crankset allows you to tailor your bike’s performance to your specific riding style, preferences, and needs.
When considering a new crankset, it’s essential to evaluate factors like riding style, budget, and bike specifications to ensure a seamless integration and optimal performance. By investing in a high-quality crankset, you’ll not only elevate your cycling experience but also contribute to your bike’s longevity and overall value.
Understanding Crankset Components and Choosing the Right One
A bike crankset is composed of three primary components: chainrings, crank arms, and bottom brackets. Chainrings, also known as front rings or sprockets, are the toothed rings attached to the crank arms. They come in various sizes and configurations, affecting the bike’s gear ratios and overall performance. Crank arms are the metal levers that connect the pedals to the chainrings, while the bottom bracket is the bearing system that allows the crankset to rotate smoothly within the bike frame.
When selecting a new crankset, consider the following factors:
Riding style: Different riding styles require specific crankset designs. For example, road bikes typically use compact or semi-compact cranksets, while mountain bikes may feature triple chainrings or single rings for better off-road performance.
Budget: Cranksets vary in price, with entry-level models starting around $50 and high-performance options reaching upwards of $500 or more. Determine your budget before making a decision, keeping in mind that a higher-priced crankset may offer better durability and performance.
Bike specifications: Ensure the new crankset is compatible with your bike’s frame, bottom bracket standard, and drivetrain components. Common bottom bracket standards include square taper, external bearings (such as Shimano Hollowtech II or SRAM GXP), and press-fit systems (like BB30, PF30, or BB92).
By carefully evaluating these factors, you can choose a crankset that meets your needs, enhances your cycling experience, and contributes to your bike’s overall performance and aesthetics.
Tools and Equipment Needed for a Successful Crankset Installation
To install a bike crankset, you’ll need several essential tools and materials to ensure a smooth and successful process. High-quality tools can make the difference between a frustrating experience and a rewarding one. Here’s a list of necessary items:
Crank puller: A crank puller is used to remove the old crankset from the bottom bracket. There are two primary types of crank pullers: square taper and splined. Make sure to choose the correct one for your crankset design.
Bottom bracket tools: Depending on your bike’s bottom bracket standard, you may need specific tools to install or remove the bottom bracket. These tools may include a bottom bracket wrench, a Park Tool BBT-22, or a Shimano TL-FC32.
Grease: Applying grease to the bottom bracket threads, crank arm interfaces, and pedal threads helps reduce friction, prevent seizing, and extend the lifespan of your components.
Torque wrench: A torque wrench ensures that bolts and fasteners are tightened to the correct specifications, preventing overtightening or under-tightening, which can lead to damage or failure.
Chainring nut wrench: Some cranksets require a chainring nut wrench to install or remove chainrings.
Pedal wrench: A pedal wrench is used to install or remove pedals from the crank arms.
Investing in high-quality tools can make the installation process more manageable and increase the likelihood of a successful outcome. Additionally, proper care and maintenance of your tools will ensure their longevity and effectiveness for future projects.
Step-by-Step Guide to Installing a Bike Crankset
Installing a new bike crankset can be a rewarding experience, enhancing your bike’s performance and aesthetics. Follow these steps to ensure a successful installation:
Step 1: Remove the Old Crankset
Before installing the new crankset, you’ll need to remove the old one. Use a crank puller to loosen the crank arms from the bottom bracket. Once the crank arms are removed, clean the bottom bracket area and inspect for any damage or wear.
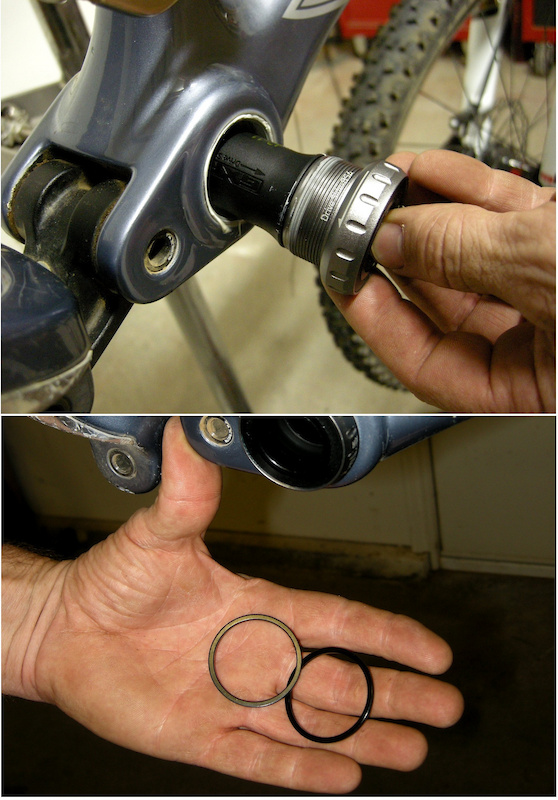
Step 2: Prepare the Bottom Bracket
If you’re reusing the existing bottom bracket, ensure it’s clean and in good condition. If necessary, apply grease to the threads before installing the new crankset. If you’re installing a new bottom bracket, follow the manufacturer’s instructions for proper installation.
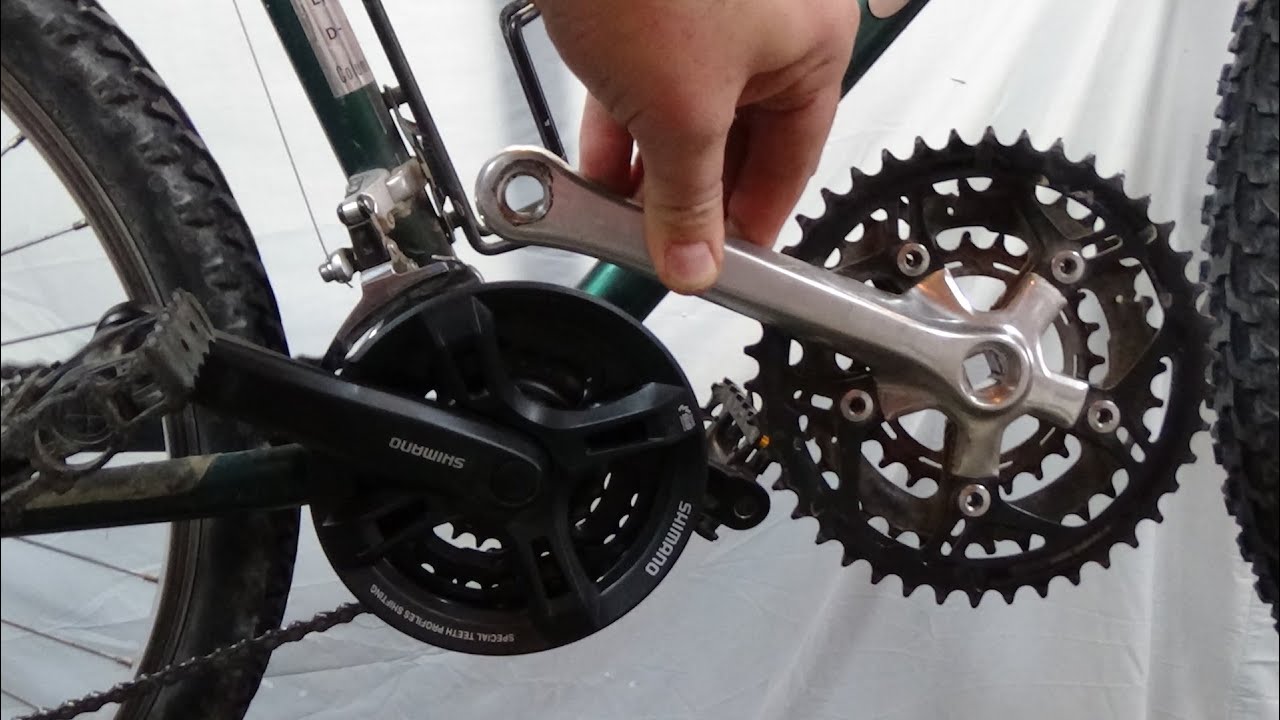
Step 3: Install the New Crankset
Troubleshooting Common Issues During Crankset Installation
While installing a bike crankset, you may encounter some challenges. Anticipating these issues and having practical solutions at hand can ensure a successful installation. Here are some common problems and ways to address them:
Difficulty Removing the Old Crankset
If you’re having trouble removing the old crankset, ensure the crank puller is properly engaged with the crank arm’s splines. You may also try applying some penetrating oil to help loosen the threads. If the crank arm still won’t budge, consider using a hammer and a punch to gently tap it free, being careful not to damage the bottom bracket shell.
Misaligned Chainrings
Misaligned chainrings can lead to poor shifting performance and increased wear on chain and cassette components. To realign chainrings, use a chainring alignment gauge or a ruler to measure the distance between the chainring teeth and the frame. Make adjustments as necessary, ensuring even spacing around the entire circumference of the chainring.
Uneven Torque Specifications
Using the correct torque specifications when tightening bolts is crucial to prevent damage or failure. If you don’t have a torque wrench, consider investing in one, as they provide precise control over bolt tension. If you’re unable to obtain a torque wrench, use a manual or beam-style torque wrench as an alternative, being mindful not to overtighten bolts.
Improper Chainline
Chainline refers to the alignment of the chainrings relative to the bike’s cassette or freewheel. Incorrect chainline can result in poor shifting performance and increased wear on chain and cassette components. To ensure proper chainline, consult the manufacturer’s instructions for your specific crankset and bottom bracket. Make any necessary adjustments before securing the crankset in place.
Tightening and Adjusting the New Crankset for Optimal Performance
Properly tightening and adjusting your new bike crankset is crucial for optimal performance and longevity. Follow these steps to ensure a successful installation:
Step 1: Check Chainline
Chainline refers to the alignment of the chainrings relative to the bike’s cassette or freewheel. Incorrect chainline can result in poor shifting performance and increased wear on chain and cassette components. To ensure proper chainline, consult the manufacturer’s instructions for your specific crankset and bottom bracket. Make any necessary adjustments before securing the crankset in place.
Step 2: Align Pedal Threads
Before installing the pedals, ensure the threads are clean and free of debris. Apply a thin layer of grease to the pedal threads to prevent seizing and make removal easier in the future. Carefully thread the pedals into the crank arms, ensuring they are tightened securely but not overtightened.
Step 3: Tighten Crank Bolts
Using a torque wrench, tighten the crank bolts to the manufacturer’s specified torque. Over-tightening can strip threads or damage components, while under-tightening can lead to creaking or instability. Always double-check the torque specifications for your specific crankset and follow them closely.
Step 4: Adjust Chainrings
After installing the crankset, double-check the chainring alignment to ensure even spacing around the entire circumference. Use a chainring alignment gauge or a ruler to measure the distance between the chainring teeth and the frame. Make adjustments as necessary to ensure proper alignment and optimal shifting performance.
Step 5: Confirm Pedal Alignment
Check that the pedals are aligned correctly with the crank arms and that they rotate smoothly without any wobble or binding. If you notice any issues, double-check the pedal threads and crank arm interfaces for damage or debris that may be causing the problem.
Maintaining Your New Bike Crankset for Long-Term Use
Regular maintenance is essential to ensure your new bike crankset performs optimally and lasts as long as possible. Follow this maintenance schedule to keep your crankset in top condition:
Weekly Maintenance
After each ride, inspect the crankset for any signs of damage, debris, or wear. Wipe down the chainrings and crank arms with a clean, dry cloth to remove dirt and grime. If necessary, use a soft-bristled brush to gently scrub away stubborn debris.
Monthly Maintenance
Once a month, clean the crankset more thoroughly using a degreaser and a brush. Rinse with water and dry completely. Inspect the chainrings for signs of wear, such as sharp or hooked teeth, and replace them if necessary. Check the crank bolts and pedal threads for tightness, and re-tighten if needed.
Quarterly Maintenance
Every three months, lubricate the chain and chainrings using a high-quality bicycle lubricant. This will help protect the components from wear and corrosion. Additionally, inspect the bottom bracket for any signs of play or roughness, which may indicate the need for servicing or replacement.
Annual Maintenance
Once a year, have your bike professionally serviced by a certified mechanic. They can perform a comprehensive inspection of your crankset and other drivetrain components, identifying and addressing any potential issues before they become serious problems. This annual service will help ensure your bike remains safe, reliable, and enjoyable to ride.
Enhancing Your Cycling Experience with a New Bike Crankset
Installing a new bike crankset can significantly improve your cycling experience, offering benefits such as enhanced performance, increased durability, and customization options tailored to your riding style. By following our comprehensive guide, you’ll be well on your way to enjoying a smoother, more efficient ride.
A new crankset can make a considerable difference in your bike’s overall feel and performance. High-quality cranksets often feature lighter materials, reducing the overall weight of your bicycle and making it easier to accelerate and maintain speed. Additionally, new chainrings can offer improved shifting performance and quieter operation, making your rides more enjoyable and hassle-free.
Customization options abound when selecting a new crankset. From different chainring configurations to various materials and colors, you can choose a crankset that perfectly matches your bike and riding preferences. Installing a new crankset also provides an opportunity to upgrade your bike’s aesthetics, giving it a fresh, modern look that is sure to turn heads on the road or trail.
By investing in a new bike crankset and following our installation guide, you’ll be taking an important step towards optimizing your bike’s performance and enhancing your cycling experience. Don’t hesitate to share your own experiences and insights in the comments below, and feel free to explore additional resources to continue learning and growing as a cyclist.