Why Proper Frame Size Matters for a Comfortable Ride
When it comes to cycling, a proper bike frame size is essential for a comfortable and enjoyable ride. A bike that fits your body correctly can make all the difference in your cycling experience, providing improved comfort, reduced risk of injury, and enhanced performance. On the other hand, a bike that is too small or too large can lead to discomfort, fatigue, and even injury. This is why learning how to measure a bike’s frame size is crucial for any cyclist, whether you’re a seasoned pro or just starting out.

Click Image to Find eBike Products
A bike that fits your body correctly will allow you to maintain a comfortable riding position, with your back straight, shoulders relaxed, and legs able to extend fully. This will not only reduce the risk of injury but also improve your overall performance, allowing you to ride longer and more efficiently. Additionally, a proper bike frame size will also improve your handling and control, making it easier to navigate tight corners and rough terrain.
Furthermore, a bike that fits your body correctly will also reduce the risk of long-term injuries, such as back and neck strain, and even chronic conditions like carpal tunnel syndrome. This is especially important for cyclists who plan to ride regularly, as a poorly fitting bike can lead to cumulative strain and injury over time.
So, how do you ensure that your bike fits your body correctly? The first step is to learn how to measure a bike’s frame size, which involves taking your height, inseam, and arm length into account. By using a bike frame size chart and considering your riding style and preferences, you can find a bike that fits your body perfectly, providing a comfortable and enjoyable ride.

Understanding Bike Frame Sizes: A Beginner’s Guide
Bike frame sizes can be a bit overwhelming, especially for beginners. With various types of frames, measurements, and size charts, it’s essential to understand the basics to ensure a proper fit. When it comes to bike frame sizes, there are three main types: road, mountain, and hybrid. Each type of frame is designed for a specific riding style and terrain, and understanding the differences will help you choose the right size.
Road bike frames are designed for speed and efficiency on paved roads. They typically have a more aggressive geometry, with a lower standover height and a longer top tube. Mountain bike frames, on the other hand, are designed for off-road riding and have a more relaxed geometry, with a higher standover height and a shorter top tube. Hybrid bike frames combine elements of both road and mountain bikes, making them suitable for commuting, touring, and recreational riding.
Bike frame sizes are typically measured in inches or centimeters, and can be categorized into three main sizes: small, medium, and large. However, frame sizes can vary between manufacturers, so it’s essential to check the manufacturer’s size chart to ensure a proper fit. Some manufacturers also offer custom frame sizes, which can be tailored to an individual’s specific measurements.
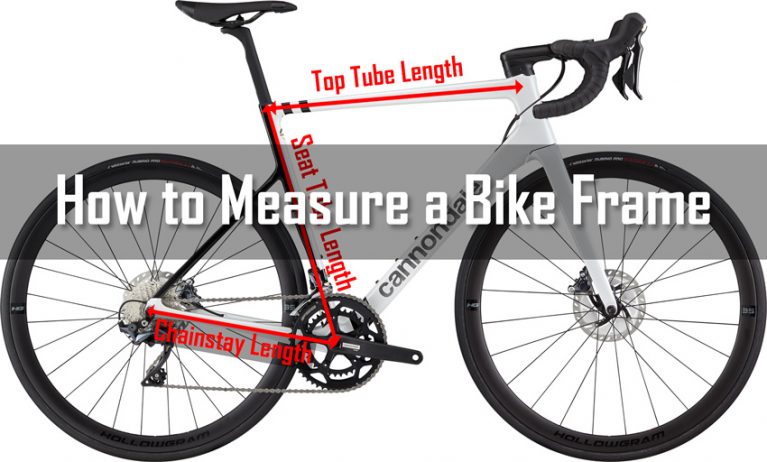
When measuring a bike frame size, there are a few key factors to consider. The standover height, which is the distance between the ground and the top tube, is a critical measurement. A general rule of thumb is to have at least 1-2 inches of clearance between the top tube and your inseam. The top tube length, which is the distance between the head tube and the seat tube, is also important, as it affects the bike’s overall geometry and handling.
Understanding bike frame sizes is crucial when learning how to measure a bike’s frame size. By knowing the different types of frames, measurements, and size charts, you can ensure a proper fit and enjoy a comfortable and enjoyable ride.

How to Take Your Measurements: A Step-by-Step Guide
To determine your ideal bike frame size, you’ll need to take a few key measurements. Don’t worry, it’s easier than you think With a tape measure and a bit of patience, you can get the measurements you need to find the perfect fit. Here’s a step-by-step guide on how to take your measurements:
**Step 1: Measure Your Height**
Stand against a wall with your feet shoulder-width apart and your back straight. Measure the distance from the floor to the top of your head. This will give you your overall height. Make sure to note this measurement in inches or centimeters.
**Step 2: Measure Your Inseam**
Stand against a wall with your feet shoulder-width apart and your back straight. Measure the distance from the floor to the crotch seam of your pants. This will give you your inseam measurement. Again, note this measurement in inches or centimeters.
**Step 3: Measure Your Arm Length**
Hold your arm straight out to the side, with your palm facing downwards. Measure the distance from the center of your back to the tip of your middle finger. This will give you your arm length measurement.
**Step 4: Measure Your Leg Length**
Stand against a wall with your feet shoulder-width apart and your back straight. Measure the distance from the floor to the top of your thigh, just above the knee. This will give you your leg length measurement.
Once you have these measurements, you can use them to determine your ideal bike frame size. Remember to consult a bike frame size chart to ensure the best fit. By taking these measurements, you’ll be one step closer to finding the perfect bike for your body.
Learning how to measure a bike’s frame size is an essential part of finding the right bike. By taking the time to get your measurements right, you’ll be able to enjoy a comfortable and enjoyable ride.

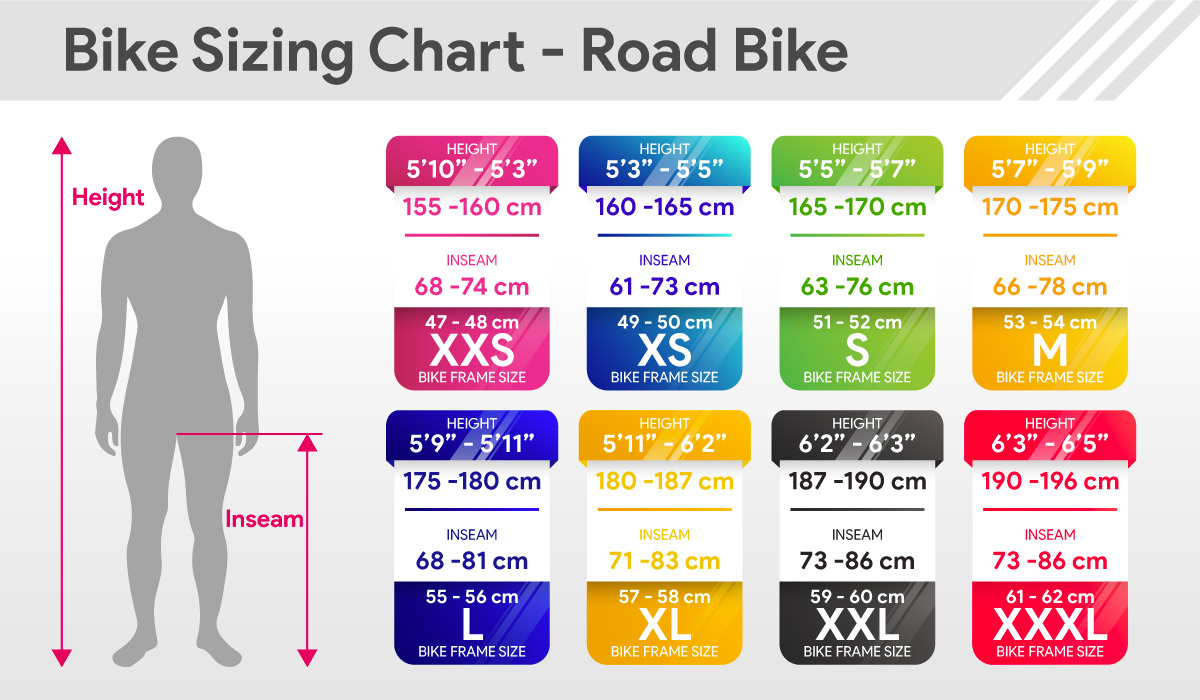
Using a Bike Frame Size Chart: A Simple and Effective Method
Once you have taken your measurements, you can use a bike frame size chart to determine your ideal frame size. A bike frame size chart is a simple and effective way to match your measurements to a specific frame size. Most bike manufacturers provide a size chart on their website or in their product catalogs.
To use a bike frame size chart, follow these steps:
1. Find the size chart for the specific bike model you are interested in.
2. Match your height, inseam, and arm length measurements to the corresponding frame size on the chart.
3. Check the recommended frame size based on your measurements.
4. Consider any additional factors that may affect the fit, such as your riding style or physical limitations.
It’s essential to note that bike frame size charts can vary between manufacturers, so make sure to use the chart provided by the manufacturer of the bike you are interested in. Additionally, some manufacturers may offer custom frame sizes, which can be tailored to your specific measurements.
Using a bike frame size chart is a straightforward way to determine your ideal frame size. By following these simple steps, you can ensure a comfortable and proper fit, and enjoy a more enjoyable ride.
Learning how to measure a bike’s frame size and using a bike frame size chart are essential steps in finding the right bike for your body. By taking the time to get your measurements right and using a size chart, you’ll be able to enjoy a comfortable and enjoyable ride.

Factors to Consider When Choosing a Bike Frame Size
When choosing a bike frame size, there are several factors to consider beyond just your measurements. Your riding style, the type of bike you’re purchasing, and any physical limitations or preferences you may have can all impact the fit and comfort of your bike.
**Riding Style**
Your riding style can greatly impact the fit of your bike. If you’re a casual rider who likes to cruise around town, a more upright riding position may be comfortable for you. However, if you’re a serious road cyclist or mountain biker, you may prefer a more aggressive riding position with a lower handlebar height.
**Type of Bike**
The type of bike you’re purchasing can also impact the fit. Road bikes, for example, typically have a more aggressive geometry than mountain bikes, which can affect the fit. Hybrid bikes, on the other hand, often have a more upright riding position, which can be comfortable for casual riders.
**Physical Limitations or Preferences**
If you have any physical limitations or preferences, such as a back injury or a preference for a more upright riding position, you’ll want to consider these when choosing a bike frame size. Some bikes may offer more adjustability than others, so it’s essential to consider your needs when selecting a bike.
By considering these factors, you can ensure a comfortable and proper fit, and enjoy a more enjoyable ride. Learning how to measure a bike’s frame size is just the first step – considering your riding style, the type of bike, and any physical limitations or preferences you may have will help you find the perfect bike for your body.
Common Mistakes to Avoid When Measuring Your Bike Frame Size
When measuring your bike frame size, there are several common mistakes to avoid. These mistakes can lead to a poor fit, discomfort, and even injury. By being aware of these mistakes, you can ensure a comfortable and proper fit, and enjoy a more enjoyable ride.
**Using Incorrect Measurements**
One of the most common mistakes is using incorrect measurements. This can happen if you don’t take the time to measure yourself accurately, or if you use the wrong measuring technique. To avoid this mistake, make sure to take your measurements carefully and use a reliable measuring method.
**Not Considering Your Riding Style**
Another mistake is not considering your riding style when choosing a bike frame size. Different riding styles require different frame sizes, so it’s essential to consider your riding style when selecting a bike. For example, if you’re a road cyclist, you may prefer a more aggressive riding position, which requires a smaller frame size.
**Neglecting to Check the Manufacturer’s Size Chart**
Finally, neglecting to check the manufacturer’s size chart is a common mistake. Each manufacturer has its own size chart, and failing to check it can lead to a poor fit. Make sure to check the manufacturer’s size chart and use it to determine your ideal frame size.
By avoiding these common mistakes, you can ensure a comfortable and proper fit, and enjoy a more enjoyable ride. Learning how to measure a bike’s frame size is an essential part of finding the right bike for your body, and by being aware of these mistakes, you can make an informed decision.

Real-World Examples: How to Apply Your Measurements to Popular Bike Models
Now that you have taken your measurements and understand how to use a bike frame size chart, let’s apply your measurements to popular bike models. We’ll use examples from well-known manufacturers such as Trek, Specialized, and Giant to demonstrate how to choose the right bike frame size.
**Example 1: Trek Road Bike**
Let’s say you’re looking for a road bike and you’ve taken your measurements. You’re 5’9″ (175 cm) tall, with an inseam of 32″ (81 cm) and an arm length of 24″ (61 cm). Using the Trek road bike size chart, you would fall into the 54cm frame size category.
**Example 2: Specialized Mountain Bike**
Now let’s say you’re looking for a mountain bike and you’ve taken your measurements. You’re 5’11” (180 cm) tall, with an inseam of 34″ (86 cm) and an arm length of 26″ (66 cm). Using the Specialized mountain bike size chart, you would fall into the Large frame size category.
**Example 3: Giant Hybrid Bike**
Finally, let’s say you’re looking for a hybrid bike and you’ve taken your measurements. You’re 5’7″ (170 cm) tall, with an inseam of 30″ (76 cm) and an arm length of 22″ (56 cm). Using the Giant hybrid bike size chart, you would fall into the Medium frame size category.
By applying your measurements to popular bike models, you can ensure a comfortable and proper fit. Remember to always check the manufacturer’s size chart and consider your riding style, the type of bike you’re purchasing, and any physical limitations or preferences you may have.
Final Check: Ensuring a Comfortable and Proper Fit
Now that you’ve determined your ideal bike frame size, it’s time to ensure a comfortable and proper fit. Here’s a final checklist to help you get the most out of your bike:
**Test Ride the Bike**
Before purchasing a bike, take it for a test ride to ensure a comfortable and proper fit. Pay attention to how the bike feels, including the saddle height, handlebar height, and pedal position.
**Check the Saddle Height**
Make sure the saddle height is correct for your leg length. When you’re sitting on the saddle, your leg should be almost fully extended, with a slight bend in the knee.
**Adjust the Handlebars and Pedals**
Adjust the handlebars and pedals to fit your body. The handlebars should be at a comfortable height, allowing you to ride with your back straight and your hands in a relaxed position. The pedals should be adjusted to fit your leg length, allowing you to pedal efficiently and comfortably.
**Check the Frame Size**
Double-check the frame size to ensure it’s the right fit for your body. Use the manufacturer’s size chart to confirm the frame size, and make any necessary adjustments.
By following this final checklist, you can ensure a comfortable and proper fit, and enjoy a more enjoyable ride. Remember, learning how to measure a bike’s frame size is just the first step – it’s also important to test ride the bike and make any necessary adjustments to ensure a comfortable and proper fit.