
Why Proper Bike Measurement Matters
Proper bike measurement is crucial for comfort, efficiency, and injury prevention. A well-fitting bike can improve overall cycling experience, allowing riders to perform at their best and enjoy the ride. When a bike is the right size, it enables riders to maintain a comfortable position, reducing the risk of discomfort, fatigue, and injury. This, in turn, can boost confidence and motivation, making cycling a more enjoyable and rewarding experience.

Click Image to Find eBike Products
Measuring a road bike correctly is essential to ensure a proper fit. A bike that is too small or too large can lead to a range of issues, including back and neck pain, numbness in the hands and feet, and decreased performance. By taking the time to measure a road bike accurately, riders can avoid these problems and enjoy a more comfortable and efficient ride.
Learning how to measure a road bike is a valuable skill for any cyclist. By understanding the key components of bike geometry and how to take precise measurements, riders can ensure a proper fit and optimize their cycling experience. Whether you’re a seasoned pro or a beginner, taking the time to measure your road bike can make a significant difference in your comfort, performance, and overall enjoyment of the ride.
In the world of cycling, a well-fitting bike is essential for achieving optimal performance and comfort. By mastering the art of measuring a road bike, cyclists can unlock their full potential and enjoy a more rewarding cycling experience. In this article, we will explore the importance of proper bike measurement and provide a comprehensive guide on how to measure a road bike for a perfect fit.

Understanding Bike Geometry: Key Components to Measure
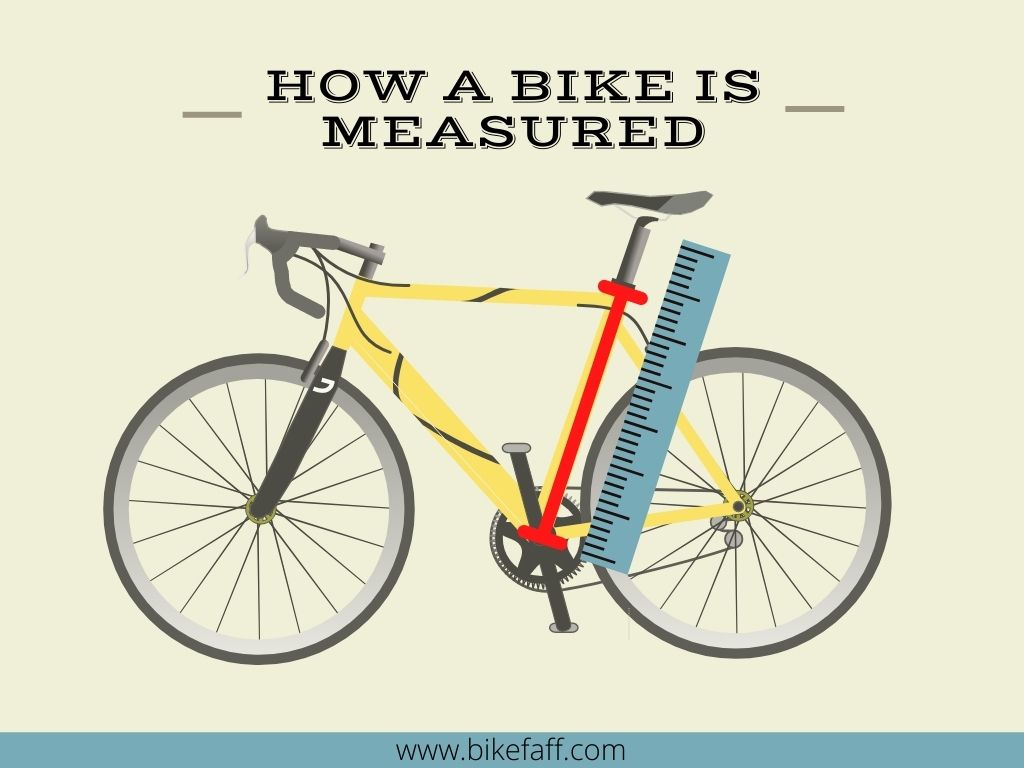
Bike geometry plays a crucial role in determining the fit and handling of a road bike. To measure a road bike accurately, it’s essential to understand the key components of bike geometry and how they affect the bike’s fit and handling. The main components of bike geometry include seat tube length, top tube length, head tube angle, and standover height.
Seat tube length is the distance from the center of the bottom bracket to the top of the seat tube. This measurement is critical in determining the bike’s fit, as it affects the rider’s position and comfort. A seat tube that is too short or too long can lead to discomfort and decreased performance.
Top tube length is the distance from the center of the head tube to the center of the seat tube. This measurement affects the bike’s handling and stability, as it determines the rider’s position and weight distribution. A top tube that is too short or too long can affect the bike’s responsiveness and maneuverability.
Head tube angle is the angle between the head tube and the ground. This measurement affects the bike’s handling and stability, as it determines the bike’s responsiveness and maneuverability. A head tube angle that is too steep or too shallow can affect the bike’s performance and comfort.
Standover height is the distance from the ground to the top of the top tube. This measurement is critical in determining the bike’s fit, as it affects the rider’s comfort and safety. A standover height that is too high or too low can lead to discomfort and decreased performance.
By understanding these key components of bike geometry, cyclists can take precise measurements of their road bike and ensure a proper fit. In the next section, we will provide a step-by-step guide on how to measure a road bike, including tips on how to use tools such as a tape measure and a protractor.

Measuring Your Road Bike: A Step-by-Step Guide
Measuring a road bike accurately requires attention to detail and the right tools. To help you get started, we’ve put together a step-by-step guide on how to measure a road bike. Follow these steps to ensure a precise measurement and a perfect fit.
Step 1: Gather the necessary tools. You’ll need a tape measure, a protractor, and a pencil. Make sure the tape measure is flexible and can be bent to fit around the bike’s components.
Step 2: Measure the seat tube length. This is the distance from the center of the bottom bracket to the top of the seat tube. Place the tape measure along the seat tube and take note of the measurement. Repeat this process several times to ensure accuracy.
Step 3: Measure the top tube length. This is the distance from the center of the head tube to the center of the seat tube. Place the tape measure along the top tube and take note of the measurement. Repeat this process several times to ensure accuracy.
Step 4: Measure the head tube angle. This is the angle between the head tube and the ground. Use a protractor to measure the angle and take note of the measurement. Repeat this process several times to ensure accuracy.
Step 5: Measure the standover height. This is the distance from the ground to the top of the top tube. Place the tape measure along the standover height and take note of the measurement. Repeat this process several times to ensure accuracy.
Step 6: Record your measurements. Take note of all the measurements you’ve taken and record them in a notebook or spreadsheet. This will help you keep track of your measurements and ensure accuracy.
By following these steps, you can accurately measure your road bike and ensure a perfect fit. Remember to take your time and be precise, as small errors can make a big difference in the fit and performance of your bike.
Learning how to measure a road bike is a valuable skill for any cyclist. By mastering this skill, you can ensure a perfect fit and optimize your cycling experience. Whether you’re a seasoned pro or a beginner, taking the time to measure your road bike can make a significant difference in your comfort, performance, and overall enjoyment of the ride.
How to Measure Your Body for a Proper Bike Fit
To ensure a proper bike fit, it’s essential to take accurate body measurements. This includes measuring your inseam, arm length, and torso length. These measurements will help you determine the ideal bike size and fit for your body.
Measuring your inseam is a crucial step in determining the correct bike size. To measure your inseam, stand against a wall with your feet shoulder-width apart. Place a book or a ruler between your legs, and measure the distance from the floor to the top of the book or ruler. This will give you your inseam measurement.
Next, measure your arm length. This is the distance from the center of your back to the tip of your middle finger. To measure your arm length, stand up straight and hold your arm straight out to the side. Measure the distance from the center of your back to the tip of your middle finger.
Finally, measure your torso length. This is the distance from the base of your neck to the top of your hip bone. To measure your torso length, stand up straight and place a ruler or a measuring tape along your spine. Measure the distance from the base of your neck to the top of your hip bone.
Once you have taken these measurements, you can use them to determine the ideal bike size and fit for your body. Most bike manufacturers provide size charts that take into account these measurements. By using these size charts, you can find a bike that fits your body perfectly and provides a comfortable and efficient ride.
It’s also important to consider your personal fit preferences when choosing a bike. For example, some riders prefer a more upright riding position, while others prefer a more aggressive position. By taking into account your personal fit preferences, you can find a bike that not only fits your body but also meets your riding style and preferences.
By measuring your body and using size charts, you can find a bike that fits you perfectly and provides a comfortable and efficient ride. Remember to take your time and be precise when taking your measurements, as small errors can make a big difference in the fit and performance of your bike.
Using Bike Size Charts: A Helpful Tool for Finding Your Perfect Fit
Bike size charts are a valuable tool for finding your perfect bike fit. Most bike manufacturers provide size charts that take into account various body measurements, such as inseam, arm length, and torso length. By using these size charts, you can find a bike that fits your body perfectly and provides a comfortable and efficient ride.
To use a bike size chart, start by taking your body measurements, including your inseam, arm length, and torso length. Then, refer to the size chart provided by the bike manufacturer to find the corresponding bike size. Make sure to check the size chart for the specific bike model you are interested in, as different models may have different size charts.
For example, Trek’s bike size chart takes into account inseam, arm length, and torso length to recommend the perfect bike size. Similarly, Specialized’s bike size chart uses a combination of body measurements to determine the ideal bike size.
When using a bike size chart, it’s essential to keep in mind that different manufacturers may have slightly different sizing standards. Therefore, it’s crucial to check the size chart for the specific manufacturer and model you are interested in.
In addition to using bike size charts, it’s also important to consider your personal fit preferences when choosing a bike. For example, some riders prefer a more upright riding position, while others prefer a more aggressive position. By taking into account your personal fit preferences, you can find a bike that not only fits your body but also meets your riding style and preferences.
By using bike size charts and considering your personal fit preferences, you can find a bike that fits you perfectly and provides a comfortable and efficient ride. Remember to take your time and be precise when taking your measurements, as small errors can make a big difference in the fit and performance of your bike.
Learning how to measure a road bike and using bike size charts can help you find the perfect bike fit. By taking the time to measure your bike and body, you can ensure a comfortable and enjoyable ride. Whether you’re a seasoned pro or a beginner, finding the perfect bike fit is essential for optimal performance and comfort.

Common Mistakes to Avoid When Measuring Your Road Bike
When measuring a road bike, it’s essential to avoid common mistakes that can lead to an incorrect fit. One of the most common mistakes is using incorrect measurement techniques. For example, using a flexible tape measure can lead to inaccurate measurements, especially when measuring the bike’s components.
Another common mistake is neglecting to consider personal fit preferences. Every rider is unique, and what works for one rider may not work for another. Failing to consider personal fit preferences can lead to a bike that is uncomfortable and inefficient.
Additionally, riders often make the mistake of not taking into account the bike’s components and how they affect the fit. For example, a bike with a long top tube may require a different fit than a bike with a shorter top tube.
Furthermore, riders may also make the mistake of not using the correct tools when measuring their bike. For example, using a protractor to measure the head tube angle can ensure accuracy and precision.
By avoiding these common mistakes, riders can ensure a proper fit and optimal performance from their road bike. It’s essential to take the time to measure the bike correctly and consider personal fit preferences to ensure a comfortable and enjoyable ride.
Learning how to measure a road bike and avoiding common mistakes can help riders achieve a perfect fit. By taking the time to measure the bike correctly and considering personal fit preferences, riders can ensure a comfortable and efficient ride.
Remember, a proper bike fit is essential for optimal performance and comfort. By avoiding common mistakes and taking the time to measure the bike correctly, riders can achieve a perfect fit and enjoy a comfortable and enjoyable ride.

Getting a Professional Bike Fit: Is it Worth the Investment?
A professional bike fit is a valuable investment for any cyclist. By getting a professional bike fit, cyclists can improve their comfort, efficiency, and overall performance on the bike. A professional bike fit can also help prevent injuries and reduce the risk of discomfort and pain.
The process of a professional bike fit typically involves a thorough analysis of the rider’s body and bike. A professional bike fitter will take precise measurements of the rider’s body, including inseam, arm length, and torso length. They will also analyze the bike’s components, including the seat tube length, top tube length, head tube angle, and standover height.
Using this information, the professional bike fitter will make adjustments to the bike to ensure a perfect fit. This may include adjusting the saddle height, handlebar height, and cleat position. The bike fitter may also recommend changes to the bike’s components, such as a different saddle or handlebar.
The benefits of a professional bike fit are numerous. By getting a professional bike fit, cyclists can improve their comfort and efficiency on the bike. They can also reduce the risk of injuries and discomfort, and improve their overall performance.
In addition to the physical benefits, a professional bike fit can also provide peace of mind. By knowing that their bike is properly fitted, cyclists can ride with confidence and enjoy their time on the bike.
While a professional bike fit may seem like a luxury, it is a valuable investment for any cyclist. By getting a professional bike fit, cyclists can improve their comfort, efficiency, and overall performance on the bike.
Learning how to measure a road bike is an important step in achieving a perfect fit. However, for those who want to take their fit to the next level, a professional bike fit is the way to go. By investing in a professional bike fit, cyclists can ensure a comfortable and enjoyable ride.

Conclusion: Finding Your Perfect Bike Fit for a Comfortable Ride
Proper bike measurement and fit are crucial for a comfortable and enjoyable ride. By taking the time to measure your bike and body, you can ensure a perfect fit and optimize your cycling experience. Whether you’re a seasoned pro or a beginner, finding the right bike fit can make a significant difference in your comfort, efficiency, and overall performance.
Remember, a well-fitting bike can improve your comfort, efficiency, and overall performance. By following the steps outlined in this guide, you can learn how to measure a road bike and find your perfect fit. Don’t be afraid to take the time to measure your bike and body, and don’t hesitate to seek professional help if needed.
By investing in a proper bike fit, you can enjoy a more comfortable and enjoyable ride. Whether you’re commuting to work, training for a competition, or simply enjoying a leisurely ride, a well-fitting bike can make all the difference.
So, take the time to measure your bike and body, and find your perfect fit. Your body – and your bike – will thank you.
