
The Significance of a Proper Road Bike Fit
Achieving the right road bike fit is crucial for cyclists who seek enhanced comfort, efficiency, and injury prevention. A well-fitted bike allows riders to maintain a natural and sustainable position, minimizing strain and fatigue during long rides. Moreover, a proper fit ensures optimal power transfer and handling, ultimately improving overall performance. Conversely, an ill-fitting bike can lead to discomfort, inefficiency, and increased risk of injury. Therefore, measuring correctly is the essential first step in attaining a perfect road bike fit.

Click Image to Find eBike Products

Assessing Your Body Measurements
To ensure a perfect road bike fit, it is essential to know your body measurements accurately. Key dimensions include height, inseam, and arm length. Here’s how to measure them:
- Height: Stand against a wall and measure from the floor to the top of your head using a measuring tape or a leveled ruler. Make sure you are wearing shoes during this process.
- Inseam: Stand straight with your back against a wall and place a book between your legs, simulating the saddle position. Measure the distance from the top of the book to the floor. This measurement will help determine the appropriate saddle height and crank length.
- Arm length: Measure the distance from the acromion process (the bony point at the top of your shoulder) to the tip of your middle finger. This measurement will help you determine the ideal handlebar reach and height.
By accurately measuring these body dimensions, you can make informed decisions when selecting a road bike frame size and adjusting the bike components for a comfortable and efficient riding position.
Choosing the Right Frame Size
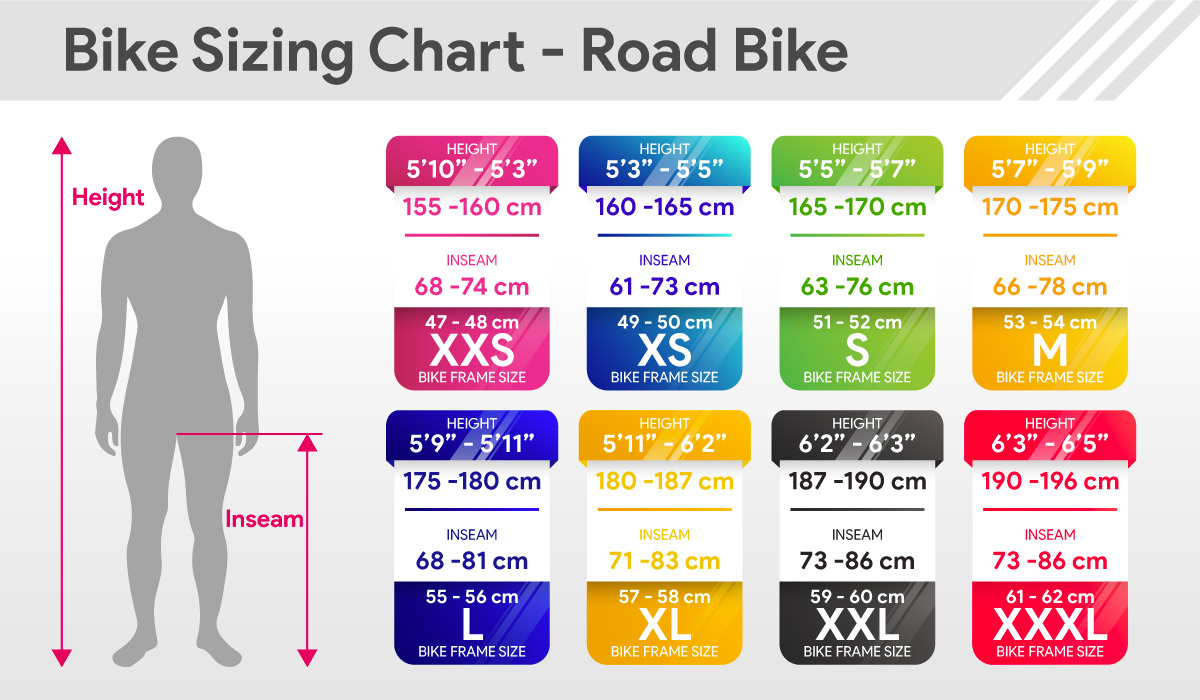
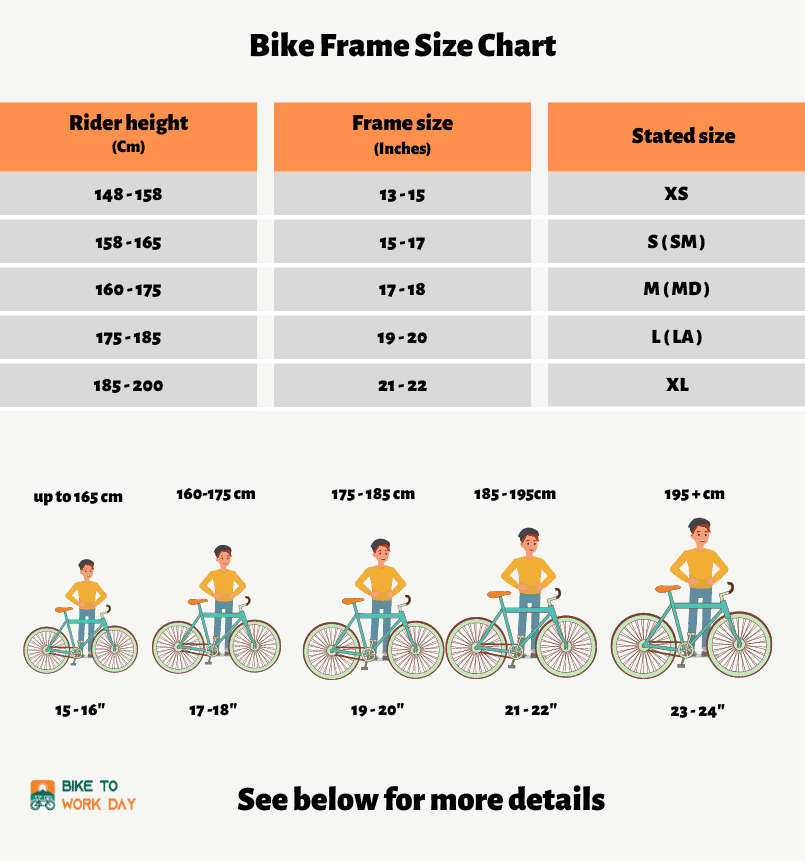
Once you have gathered your body measurements, you can use them to determine the ideal road bike frame size. The primary measurements to consider are height, inseam, and arm length. Here’s a general guideline:
- X-Small (47-50 cm): Ideal for riders under 5’1″ (155 cm) tall.
- Small (50-53 cm): Suitable for riders between 5’1″ and 5’5″ (155-165 cm) tall.
- Medium (53-56 cm): Recommended for riders between 5’5″ and 5’11” (165-180 cm) tall.
- Large (56-59 cm): Best for riders between 5’11” and 6’2″ (180-188 cm) tall.
- X-Large (59-62 cm): Designed for riders over 6’2″ (188 cm) tall.
However, these are general guidelines, and individual preferences and flexibility can influence the ideal frame size. To ensure a perfect fit, consider consulting with a professional bike fitter. They can help you make adjustments based on your body measurements and riding style.
Measuring Your Reach and Stack
Reach and stack are crucial measurements for achieving a comfortable and efficient road bike fit. Reach refers to the horizontal distance from the center of the bottom bracket to the center of the handlebar, while stack is the vertical distance from the center of the bottom bracket to the top of the head tube.
- Reach: A longer reach generally results in a more aggressive, aerodynamic riding position. To measure your reach, follow these steps:
- Place the bike in a trainer or on a level surface.
- Measure the horizontal distance from the center of the bottom bracket to the center of the handlebar.
- Record the measurement in millimeters.
- Stack: A taller stack contributes to a more upright riding position. To measure your stack, follow these steps:
- Place the bike in a trainer or on a level surface.
- Measure the vertical distance from the center of the bottom bracket to the top of the head tube.
- Record the measurement in millimeters.
By measuring your reach and stack, you can determine if your bike’s cockpit dimensions suit your body and riding style. If necessary, adjust the stem length and angle, or swap to a different stem or handlebar to fine-tune your bike fit.

Selecting the Appropriate Saddle Height
Saddle height plays a critical role in determining pedaling efficiency and knee health during road cycling. A proper saddle height allows for a smooth, powerful pedal stroke while minimizing stress on the knee joints. Here’s a simple method to measure and adjust your saddle height:
- Measurement: Start by measuring the length of your inseam. Stand barefoot with your back against a wall and place a hardcover book between your legs, simulating the saddle position. Measure from the floor to the top of the book. Multiply this number by 0.883 to estimate your ideal saddle height in millimeters.
- Adjustment: With your bike on a level surface, use a spirit level or a smartphone app to ensure the saddle is parallel to the ground. Next, adjust the seatpost so that the saddle height matches the measurement obtained from the inseam calculation. Make sure to tighten the seatpost clamp securely.
- Test ride: Once the saddle height is adjusted, perform a test ride to ensure the new setting feels comfortable. While pedaling, your knee should be slightly bent at the bottom of the pedal stroke, and your hips should remain level. If you feel discomfort or excessive strain in your knees, make small adjustments to the saddle height as needed.
Regularly reassessing your saddle height is essential, as changes in flexibility, strength, and riding style can impact your ideal position. By following this simple method, you can optimize your saddle height for improved comfort, efficiency, and knee health.

Fine-Tuning Handlebar Adjustments
Handlebar adjustments, such as height, reach, and angle, can significantly impact riding comfort and control. By making small adjustments to these dimensions, you can achieve your desired riding position and optimize your performance on a road bike. Here’s how to measure and make these adjustments:
- Handlebar height: The handlebar height affects your riding posture and comfort. To measure the handlebar height, use a spirit level or a smartphone app to ensure the handlebars are parallel to the ground. If you prefer a more aerodynamic position, lower the handlebars. For a more upright, comfortable position, raise the handlebars. Make sure to maintain a slight bend in your elbows to absorb road vibrations and reduce strain on your shoulders and arms.
- Handlebar reach: Handlebar reach refers to the horizontal distance from the saddle to the handlebars. To measure the reach, use a measuring tape to measure the distance from the center of the saddle to the furthest point on the handlebars. Adjust the reach by swapping stem lengths or angles. A shorter reach results in a more upright riding position, while a longer reach promotes a more aggressive, aerodynamic stance.
- Handlebar angle: The handlebar angle affects your wrist position and comfort. To measure the handlebar angle, use a protractor to determine the angle between the horizontal plane and the top of the handlebars. Adjust the angle by loosening the handlebar clamp and rotating the handlebars to your desired position. Ensure your wrists remain in a neutral position to avoid strain and discomfort.
By fine-tuning your handlebar adjustments, you can create a personalized fit that enhances your comfort, control, and overall road cycling experience. Regularly reassess your bike fit as your flexibility, strength, and riding style change over time.
Considering Personal Preferences and Flexibility
Individual preferences and flexibility can significantly influence the road bike fitting process. While there are general guidelines for bike fit based on body measurements, riders should also consider their unique needs and adaptations. Here’s how to make subjective adjustments to achieve your desired riding position and comfort level:
- Riding style: Your preferred riding style can impact your bike fit. For example, sprinters may prefer a more aggressive, aerodynamic position, while endurance riders might opt for a more upright, comfortable stance. Adjust your handlebar height, reach, and angle to accommodate your riding style.
- Flexibility: Flexibility can affect your ability to maintain certain positions on the bike. Riders with limited flexibility may need to raise the handlebars or use a shorter stem to avoid overextending their backs and shoulders. Regular stretching and flexibility exercises can help improve your range of motion and enable a more aggressive bike fit over time.
- Core strength: A strong core can contribute to better bike control and comfort. Strengthening your core muscles can help maintain a more aerodynamic position and reduce strain on your back and arms. Incorporate core exercises into your training routine to improve your bike fit and overall cycling performance.
- Saddle comfort: The saddle is a highly personal component of a road bike. Riders should consider factors such as saddle shape, width, and padding when selecting a saddle. Some saddle brands offer fit systems or professional bike fitters can help determine the best saddle for your anatomy and riding style.
By considering personal preferences and flexibility, riders can create a customized bike fit that enhances comfort, control, and overall cycling experience. Regularly reassess your bike fit as your flexibility, strength, and riding style change over time.

Re-Evaluating and Adjusting Your Bike Fit Over Time
As your cycling experience and physical condition evolve, it’s crucial to re-evaluate and adjust your road bike fit regularly. Periodic adjustments ensure continued comfort, efficiency, and injury prevention. Here’s when and how to reassess your bike fit:
- After long periods: Re-evaluate your bike fit every six months to a year, depending on your riding frequency and any changes in your body measurements or flexibility. Regular reassessments help maintain a comfortable and efficient riding position.
- When experiencing discomfort: If you experience pain, numbness, or discomfort during or after rides, it’s essential to address these issues promptly. Discomfort can indicate an incorrect bike fit or the need for adjustments due to changes in your body or riding style.
- After injuries: If you’ve suffered an injury that affects your mobility or flexibility, consult a professional bike fitter to adjust your bike accordingly. A proper bike fit can help prevent re-injury and support your recovery.
- When upgrading components: Changes in handlebars, stems, or saddles can impact your bike fit. After upgrading components, reassess your bike fit to ensure continued comfort and efficiency.
When re-evaluating your bike fit, consider consulting with a professional bike fitter. They can provide expert guidance, specialized tools, and years of experience to help optimize your bike fit. By staying proactive in reassessing and adjusting your bike fit, you can enjoy a safer, more comfortable, and more enjoyable road cycling experience.