Why Handlebar Diameter Matters
A proper handlebar fit is essential for comfort, control, and overall riding experience. One of the critical aspects of handlebar fit is the diameter, which can significantly impact the rider’s comfort and performance. A handlebar with the wrong diameter can lead to discomfort, fatigue, and even injury. For instance, a handlebar that is too small or too large can cause strain on the hands, wrists, and arms, leading to pain and discomfort during long rides. Moreover, an incorrect handlebar diameter can affect the bike’s overall handling and stability, making it more difficult to control. On the other hand, a handlebar with the correct diameter can provide a comfortable riding experience, improve control, and enhance overall performance. To achieve this perfect fit, it is crucial to know how to measure handlebar diameter accurately. By doing so, cyclists can ensure a comfortable and enjoyable ride, while also improving their overall performance.

Click Image to Find eBike Products

Understanding Handlebar Types and Materials
When it comes to choosing the right handlebar, there are several factors to consider, including the type of handlebar and the material it’s made of. Different types of handlebars, such as road, mountain, and hybrid bars, are designed to cater to specific riding styles and preferences. Road handlebars, for instance, are typically designed for speed and efficiency, with a more aggressive drop and a narrower width. Mountain handlebars, on the other hand, are designed for control and maneuverability, with a wider width and a more upright riding position. Hybrid handlebars, as the name suggests, offer a combination of both road and mountain handlebar features.
In addition to the type of handlebar, the material used can also impact the overall performance and comfort of the bike. Aluminum handlebars, for example, are lightweight and durable, but may not offer the same level of comfort as carbon fiber handlebars, which are known for their vibration-dampening properties. Steel handlebars, on the other hand, are strong and durable, but may be heavier than other materials. Understanding the different types of handlebars and materials available can help cyclists make an informed decision when choosing the right handlebar for their bike. By considering factors such as riding style, comfort, and performance, cyclists can find the perfect handlebar to suit their needs, and ultimately, learn how to measure handlebar diameter accurately to ensure a perfect fit.

How to Measure Handlebar Diameter: A Step-by-Step Guide
Measuring handlebar diameter is a crucial step in finding the perfect fit for your bike. To ensure accurate measurements, it’s essential to have the right tools and follow a step-by-step approach. Here’s a comprehensive guide on how to measure handlebar diameter:
Tools needed:
- Calipers or a ruler
- A measuring tape or string
- A calculator (optional)
Step 1: Identify the Measurement Point
Determine the point on the handlebar where you want to take the measurement. This is usually at the grip area, where your hands rest while riding. Make sure the area is clean and free of any obstructions.
Step 2: Take the Measurement
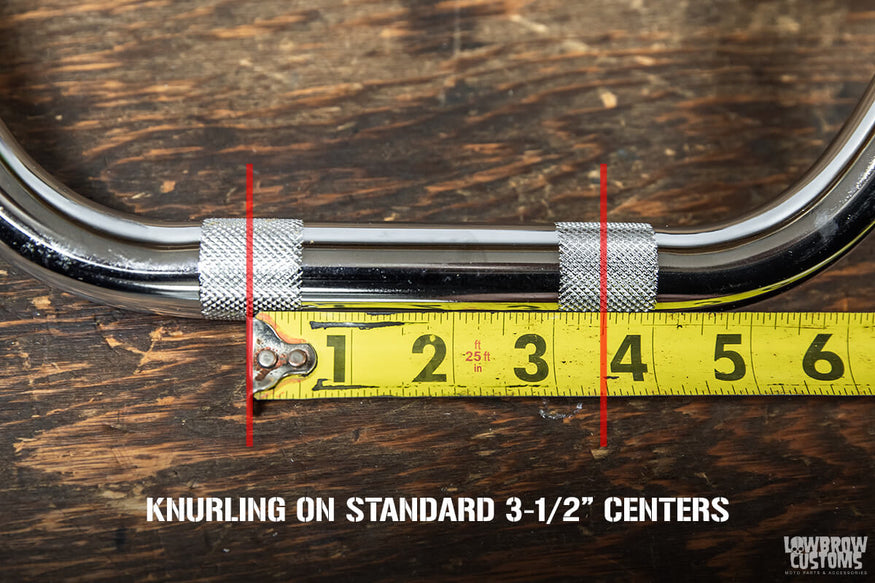
Wrap a measuring tape or string around the handlebar at the identified point, making sure it’s level and parallel to the ground. Take note of the circumference of the handlebar. Alternatively, you can use calipers to measure the diameter directly.
Step 3: Calculate the Diameter (Optional)
If you measured the circumference, you’ll need to calculate the diameter using the formula: diameter = circumference / π (pi). You can use a calculator to make the calculation easier.
Tips for Accurate Measurements:
- Take multiple measurements to ensure accuracy
- Use a consistent measurement point for all handlebars
- Avoid measuring over any obstructions, such as grips or bar tape
By following these steps and tips, you’ll be able to accurately measure your handlebar diameter and find the perfect fit for your bike. Remember, how to measure handlebar diameter is crucial in ensuring a comfortable and enjoyable ride. Take the time to get it right, and you’ll be rewarded with improved performance and comfort.

Measuring for Drop Bars, Flat Bars, and Riser Bars
When it comes to measuring handlebar diameter, different types of handlebars require specific considerations. In this section, we’ll explore how to measure for drop bars, flat bars, and riser bars, and provide examples of popular handlebars in each category.
Drop Bars:
Drop bars, commonly used on road bikes, have a distinctive curved shape that allows riders to adopt an aerodynamic position. When measuring for drop bars, it’s essential to take into account the diameter at the grip area, as well as the diameter at the drop. This is because the diameter can vary significantly between these two points. To measure, wrap a measuring tape or string around the handlebar at the grip area and at the drop, taking note of the circumference. Then, use a calculator to calculate the diameter.
Popular drop bars include the Specialized S-Works Shallow Drop Handlebar and the Zipp Service Course SL-70 Ergo Handlebar.
Flat Bars:
Flat bars, often used on mountain bikes and hybrid bikes, have a straight or slightly curved shape. Measuring for flat bars is relatively straightforward, as the diameter remains consistent throughout the handlebar. Simply wrap a measuring tape or string around the handlebar at the grip area, taking note of the circumference, and calculate the diameter.
Popular flat bars include the Easton EA50 Flat Handlebar and the Ritchey WCS Trail Flat Handlebar.
Riser Bars:
Riser bars, commonly used on mountain bikes and hybrid bikes, have a curved shape that rises upward from the stem. When measuring for riser bars, it’s essential to take into account the diameter at the grip area, as well as the diameter at the rise. This is because the diameter can vary significantly between these two points. To measure, wrap a measuring tape or string around the handlebar at the grip area and at the rise, taking note of the circumference. Then, use a calculator to calculate the diameter.
Popular riser bars include the Truvativ Riser Handlebar and the FSA Gradient Riser Handlebar.
By understanding the specific measurement considerations for different types of handlebars, cyclists can ensure accurate measurements and find the perfect fit for their bike. Remember, how to measure handlebar diameter is crucial in achieving optimal comfort, control, and performance.
Converting Between Measurement Units: A Handy Guide
When measuring handlebar diameter, it’s essential to understand how to convert between different measurement units. This is because handlebars can be measured in various units, including inches, millimeters, and centimeters. In this section, we’ll provide a handy guide on how to convert between these units, ensuring accurate measurements and a perfect fit.
Conversion Chart:
| Inches | Millimeters | Centimeters |
|---|---|---|
| 0.5 | 12.7 | 1.27 |
| 0.75 | 19.05 | 1.905 |
| 1 | 25.4 | 2.54 |
| 1.25 | 31.75 | 3.175 |
Using the conversion chart above, cyclists can easily convert between inches, millimeters, and centimeters. For example, if a handlebar measures 25.4mm in diameter, it’s equivalent to 1 inch or 2.54cm.
Tips for Accurate Conversions:
- Always use a reliable conversion chart or calculator to ensure accurate conversions
- Double-check calculations to avoid errors
- Consider using a digital caliper or micrometer for precise measurements
By understanding how to convert between different measurement units, cyclists can ensure accurate measurements and find the perfect handlebar fit. Remember, how to measure handlebar diameter is crucial in achieving optimal comfort, control, and performance.

Common Mistakes to Avoid When Measuring Handlebar Diameter
Measuring handlebar diameter may seem like a straightforward process, but there are common mistakes that can lead to inaccurate measurements and a poor fit. In this section, we’ll discuss the most common mistakes to avoid when measuring handlebar diameter, ensuring cyclists get it right the first time.
Incorrect Measurement Tools:
- Using a ruler or tape measure instead of a digital caliper or micrometer, which can lead to inaccurate readings
- Failing to zero-out the measurement tool, resulting in incorrect measurements
Incorrect Measurement Methods:
- Measuring the handlebar diameter at the wrong location, such as at the grip or brake lever
- Failing to account for the handlebar’s taper or flare, leading to incorrect measurements
Other Common Mistakes:
- Failing to consider the handlebar’s material and how it affects the measurement
- Not double-checking measurements to ensure accuracy
- Not consulting the manufacturer’s specifications or recommendations
Tips to Avoid These Mistakes:
- Always use a digital caliper or micrometer for precise measurements
- Consult the manufacturer’s specifications and recommendations
- Double-check measurements to ensure accuracy
- Consider seeking professional help if unsure about how to measure handlebar diameter
By being aware of these common mistakes and taking the necessary precautions, cyclists can ensure accurate measurements and find the perfect handlebar fit. Remember, how to measure handlebar diameter is crucial in achieving optimal comfort, control, and performance.
Handlebar Diameter and Bike Fit: How They Relate
The relationship between handlebar diameter and bike fit is crucial in achieving optimal comfort, control, and performance. A handlebar that is too small or too large can affect the rider’s reach, drop, and overall riding comfort, leading to discomfort, fatigue, and even injury.
Reach and Drop:
- A handlebar with a larger diameter can increase the reach, making it more difficult for riders with shorter arms to comfortably grasp the handlebars
- A handlebar with a smaller diameter can decrease the reach, making it more suitable for riders with shorter arms
- The drop, or the distance between the handlebar and the saddle, is also affected by handlebar diameter, with larger diameters typically resulting in a longer drop
Riding Comfort:
- A handlebar that is too small can cause riders to lean forward, putting pressure on their hands and wrists
- A handlebar that is too large can cause riders to sit back, putting pressure on their lower back and shoulders
- A handlebar with the correct diameter can provide optimal riding comfort, allowing riders to maintain a neutral spine and reduce fatigue
Adjusting Handlebar Diameter for Optimal Bike Fit:
- Riders can adjust the handlebar diameter by switching to a different handlebar or using spacers or shims to increase or decrease the diameter
- Consulting with a professional bike fitter or taking a bike fit assessment can help riders determine the optimal handlebar diameter for their bike
- Remember, how to measure handlebar diameter is crucial in achieving optimal bike fit, so take the time to measure accurately and find the perfect fit for your bike
By understanding the relationship between handlebar diameter and bike fit, riders can make informed decisions about their handlebar choice and achieve optimal comfort, control, and performance.
.jpg)
Conclusion: Finding the Perfect Handlebar Fit
In conclusion, measuring handlebar diameter is a crucial step in achieving optimal comfort, control, and performance on a bike. By understanding the importance of proper handlebar fit, the different types of handlebars and materials, and how to measure handlebar diameter accurately, riders can make informed decisions about their handlebar choice.
Remember, how to measure handlebar diameter is not a one-size-fits-all approach. Different types of handlebars, such as drop bars, flat bars, and riser bars, require specific measurement considerations. Additionally, the relationship between handlebar diameter and bike fit is critical in achieving optimal riding comfort.
By taking the time to measure handlebar diameter accurately and considering the specific needs of their bike and riding style, riders can find the perfect fit for their bike. This can lead to improved comfort, reduced fatigue, and enhanced overall riding experience.
Don’t settle for a poorly fitting handlebar. Take the time to learn how to measure handlebar diameter and find the perfect fit for your bike. With the right handlebar, you’ll be able to ride longer, stronger, and more comfortably than ever before.