Why Frame Size Matters for Mountain Bikers
A well-fitting mountain bike is crucial for a comfortable, efficient, and safe ride. Proper frame size plays a significant role in achieving this perfect fit, as it directly impacts comfort, performance, and safety. A bike that is too small or too large can lead to discomfort, fatigue, and decreased performance, ultimately affecting the overall riding experience. Moreover, an ill-fitting bike can increase the risk of injury, making it essential to understand how to measure mountain bicycle frame size accurately. By selecting the correct frame size, mountain bikers can optimize their riding experience, improve their skills, and enjoy the thrill of the ride.

Click Image to Find eBike Products

Understanding Your Body Measurements: A Key to Accurate Sizing
To determine the ideal frame size for your mountain bike, it’s essential to take accurate body measurements. This includes measuring your inseam, arm length, and torso length. Start by measuring your inseam, which is the distance from the floor to the top of your inner thigh. This can be done by standing against a wall with your feet shoulder-width apart and a book or ruler between your legs. Record the measurement in inches or centimeters. Next, measure your arm length from the center back of your neck, over your shoulder, and down to your wrist. Finally, measure your torso length from the base of your neck to your natural waistline. Having these measurements will provide a solid foundation for selecting the correct frame size and ensuring a comfortable, efficient ride. By understanding how to measure mountain bicycle frame size and combining it with your body measurements, you’ll be well on your way to finding the perfect fit.

How to Measure Your Mountain Bike Frame: A Step-by-Step Guide
Measuring a mountain bike frame is a crucial step in determining the correct size for your needs. To ensure accuracy, follow this step-by-step guide on how to measure mountain bicycle frame size. Start by measuring the seat tube, which is the vertical tube that connects the saddle to the bottom bracket. Measure from the center of the bottom bracket to the top of the seat tube. Next, measure the top tube, which is the horizontal tube that connects the seat tube to the handlebars. Measure from the center of the head tube to the center of the seat tube. Finally, measure the standover height, which is the distance from the ground to the top tube. This measurement is crucial, as it determines the clearance between the rider’s leg and the bike. To measure standover height, place the bike on a level surface and measure from the ground to the top tube. By following these steps and combining the measurements with your body measurements, you’ll be able to determine the ideal frame size for your mountain bike.
Deciphering Mountain Bike Frame Sizes: A Breakdown of Small, Medium, and Large
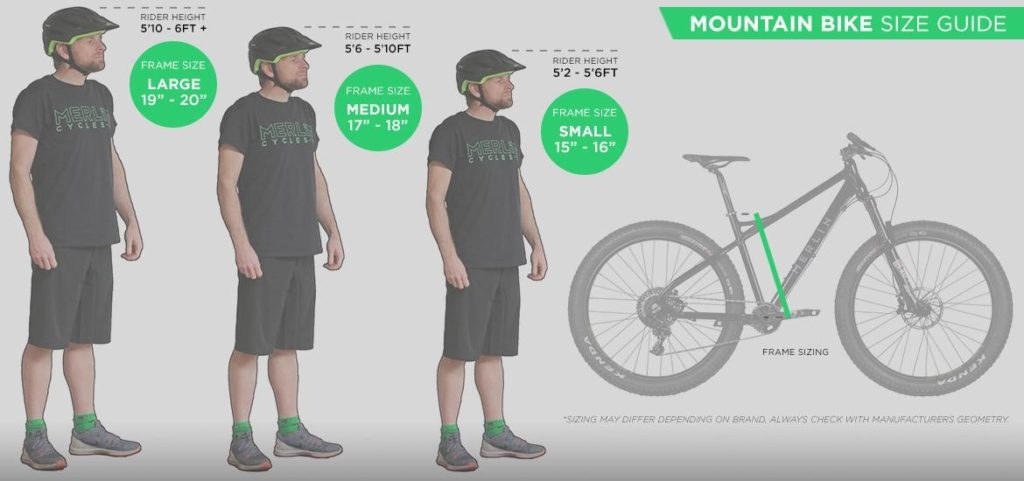
When it comes to mountain bike frame sizes, understanding the differences between small, medium, and large is crucial. Each size is designed to accommodate riders of specific heights and inseam measurements. Small frames typically cater to riders between 5’2″ and 5’6″ (157 cm to 168 cm) with an inseam of 27″ to 30″ (69 cm to 76 cm). Medium frames are designed for riders between 5’7″ and 5’11” (170 cm to 180 cm) with an inseam of 30″ to 33″ (76 cm to 84 cm). Large frames are suitable for riders above 6’0″ (183 cm) with an inseam of 33″ or more (84 cm or more). Keep in mind that these are general guidelines, and individual manufacturers may have slightly different size charts. By understanding how to measure mountain bicycle frame size and combining it with your body measurements, you’ll be able to determine the ideal frame size for your mountain bike. Remember to consider other factors, such as riding style and terrain, to ensure the perfect fit.
Factors to Consider Beyond Frame Size: Sizing for Riding Style and Terrain
While frame size is a crucial aspect of finding the perfect fit, it’s not the only factor to consider. Riding style and terrain can significantly impact frame size selection, and neglecting to consider these factors can lead to a poor fit. For instance, cross-country riders who prioritize efficiency and speed may prefer a smaller frame size with a more aggressive geometry, while downhill riders who require more stability and control may opt for a larger frame size with a slacker head angle. Additionally, terrain can play a significant role in frame size selection. Riders who frequent technical, tight trails may prefer a smaller frame size for improved maneuverability, while those who ride open, high-speed trails may prefer a larger frame size for added stability. Other factors to consider include suspension travel, wheel size, and handlebar height. By understanding how to measure mountain bicycle frame size and combining it with an awareness of these additional factors, riders can make informed decisions when selecting a frame size that meets their specific needs. This holistic approach ensures a perfect fit, leading to improved comfort, performance, and safety on the trails.

Real-World Examples: How to Choose the Right Frame Size for Your Next Mountain Bike
Now that you understand the importance of proper frame size and how to measure your mountain bike frame, let’s apply these principles to real-world examples. We’ll explore popular mountain bike models, including the Trek Fuel EX, Specialized Stumpjumper, and Giant TCX, to illustrate how to choose the right frame size for your next mountain bike. For instance, the Trek Fuel EX is a versatile trail bike that comes in four frame sizes: small, medium, large, and extra-large. To determine the ideal frame size, you would measure your inseam and compare it to Trek’s size chart. If your inseam is 29″ (74 cm), you would fall into the medium frame size category. Similarly, the Specialized Stumpjumper is a high-performance trail bike that offers five frame sizes. By understanding how to measure mountain bicycle frame size and consulting Specialized’s size chart, you can determine the perfect fit for your riding style and preferences. The Giant TCX, a cross-country bike, also offers a range of frame sizes to accommodate different rider heights and inseam measurements. By applying the principles outlined in this guide, you can confidently choose the right frame size for your next mountain bike, ensuring a comfortable, high-performance ride.

Common Mistakes to Avoid When Measuring Your Mountain Bike Frame
When measuring a mountain bike frame, it’s essential to avoid common mistakes that can lead to an ill-fitting bike. One of the most critical errors is using incorrect measurement techniques. For instance, measuring the seat tube incorrectly can result in a frame size that’s too small or too large. To avoid this, ensure you measure from the center of the bottom bracket to the top of the seat tube. Another mistake is neglecting to consider other important sizing factors, such as standover height, top tube length, and wheel size. Failing to account for these factors can lead to a bike that’s uncomfortable, difficult to handle, or even unsafe to ride. Additionally, riders should avoid relying solely on manufacturer-provided size charts, as these can be inaccurate or misleading. Instead, take the time to measure your mountain bike frame accurately, using the techniques outlined in this guide, and consult with a professional if necessary. By avoiding these common mistakes, you can ensure a perfect fit and enjoy a comfortable, high-performance ride. Remember, understanding how to measure mountain bicycle frame size is crucial to finding the ideal bike for your needs, so take the time to get it right.

Getting the Perfect Fit: Tips for Test Riding and Fine-Tuning Your Mountain Bike
Once you’ve determined the ideal frame size for your mountain bike, it’s essential to test ride the bike to ensure a proper fit. This involves more than just hopping on the bike and taking it for a spin. To get the perfect fit, follow these tips: Start by adjusting the saddle height to a comfortable position, allowing for a slight bend in the knee when the pedal is in its lowest position. Next, adjust the handlebar position to a comfortable height, allowing for a relaxed riding position with a slight bend in the elbows. Finally, pay attention to your pedal stroke, ensuring that your leg is almost fully extended when the pedal is in its lowest position. By fine-tuning these elements, you can achieve optimal comfort and performance on your mountain bike. Additionally, consider factors like suspension travel, wheel size, and handlebar height, as these can impact the overall fit and feel of the bike. By combining accurate frame size measurement with careful test riding and fine-tuning, you can ensure a perfect fit and enjoy a comfortable, high-performance ride. Remember, understanding how to measure mountain bicycle frame size is just the first step in finding the ideal bike for your needs – test riding and fine-tuning are crucial to getting the perfect fit.