Why Accurate Measurements Matter
Proper mountain bike frame measurement is crucial for a comfortable, high-performance, and safe riding experience. When a bike fits correctly, riders can maintain an optimal riding position, generate more power, and enjoy improved control and handling. On the other hand, incorrect measurements can lead to discomfort, fatigue, and even increased risk of injury. For instance, a frame that is too small or too large can cause riders to compromise their riding position, leading to discomfort, pain, and potentially, injuries. Moreover, a poorly fitting bike can affect a rider’s confidence, making them more hesitant to push their limits or tackle challenging terrain. By understanding the importance of accurate measurements, riders can take the first step towards unlocking the perfect fit for their mountain bike. In this guide, we’ll explore how to measure a mountain bike frame, providing riders with the knowledge and skills necessary to achieve a comfortable, high-performance, and safe riding experience.

Click Image to Find eBike Products

Understanding Mountain Bike Frame Geometry
Mountain bike frame geometry plays a critical role in determining the bike’s overall performance, handling, and comfort. To accurately measure a mountain bike frame, it’s essential to understand the key components that make up the frame’s geometry. The seat tube length, top tube length, head tube angle, and wheelbase are all crucial elements that interact to affect the bike’s behavior on the trail. The seat tube length, for instance, affects the rider’s position on the bike, while the top tube length influences the bike’s overall reach and handling. The head tube angle, on the other hand, determines the bike’s steering characteristics, and the wheelbase affects the bike’s stability and maneuverability. By grasping the intricacies of mountain bike frame geometry, riders can better understand how to measure their frame and make informed decisions when purchasing a new bike or adjusting their current one. In the following sections, we’ll delve into the specifics of how to measure a mountain bike frame, providing riders with a comprehensive guide to achieving the perfect fit.
Measuring Your Mountain Bike Frame: A Step-by-Step Guide
To accurately measure a mountain bike frame, riders will need a few simple tools, including a tape measure, a level, and a calculator. Here’s a step-by-step guide on how to measure a mountain bike frame:
1. Seat Tube Length: Measure the length of the seat tube from the center of the bottom bracket to the top of the seat tube. This measurement is crucial in determining the correct frame size.
2. Top Tube Length: Measure the length of the top tube from the center of the head tube to the center of the seat tube. This measurement affects the bike’s overall reach and handling.
3. Head Tube Angle: Measure the angle of the head tube in degrees. This measurement determines the bike’s steering characteristics and affects its overall handling.
4. Wheelbase: Measure the distance from the center of the front wheel to the center of the rear wheel. This measurement affects the bike’s stability and maneuverability.
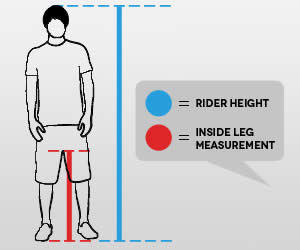
5. Standover Height: Measure the distance from the ground to the top of the top tube. This measurement is essential in determining the correct frame size and ensuring a comfortable riding position.
By following these steps and taking accurate measurements, riders can ensure a perfect fit and optimal performance from their mountain bike. Remember to take your time, and if you’re unsure about any of the measurements, consider seeking the help of a professional bike fitter or frame builder. In the next section, we’ll explore how to interpret the measurements taken and determine the correct frame size.

Interpreting Your Measurements: What Do They Mean?
Once you’ve taken the necessary measurements, it’s essential to interpret them correctly to determine the correct frame size and ensure a perfect fit. Here’s a breakdown of what each measurement means and how to use them to adjust the bike to fit the rider’s body:
Seat Tube Length: This measurement determines the correct frame size and affects the rider’s position on the bike. A longer seat tube length generally indicates a larger frame size, while a shorter length indicates a smaller frame size.
Top Tube Length: This measurement affects the bike’s overall reach and handling. A longer top tube length can provide more stability, while a shorter length can improve maneuverability.
Head Tube Angle: This measurement determines the bike’s steering characteristics and affects its overall handling. A steeper head tube angle can improve responsiveness, while a slacker angle can provide more stability.
Wheelbase: This measurement affects the bike’s stability and maneuverability. A longer wheelbase can provide more stability, while a shorter wheelbase can improve agility.
By analyzing these measurements, riders can determine the correct frame size and make adjustments to the bike to fit their body. For example, if the rider has a longer inseam, they may require a larger frame size with a longer seat tube length. Conversely, if the rider has a shorter inseam, they may require a smaller frame size with a shorter seat tube length.
Additionally, riders can use these measurements to adjust the bike’s components, such as the handlebars, saddle, and pedals, to fit their body. By taking the time to interpret the measurements correctly, riders can ensure a perfect fit and optimal performance from their mountain bike.

Common Mistakes to Avoid When Measuring Your Mountain Bike Frame
When measuring a mountain bike frame, it’s essential to avoid common mistakes that can lead to inaccurate measurements and a poor fit. Here are some common mistakes to watch out for:
Incorrect Measurement Techniques: One of the most common mistakes is using the wrong measurement technique. For example, measuring the seat tube length from the top of the seat tube to the bottom bracket instead of from the center of the bottom bracket to the top of the seat tube.
Failing to Account for Sag: Sag, or the compression of the suspension, can affect the bike’s geometry and measurements. Failing to account for sag can result in inaccurate measurements and a poor fit.
Not Considering the Rider’s Body Type: Riders with a longer inseam or torso may require a larger frame size, while riders with a shorter inseam or torso may require a smaller frame size. Failing to consider the rider’s body type can result in a poor fit and discomfort.
Not Double-Checking Measurements: It’s essential to double-check measurements to ensure accuracy. A single mistake can result in a poor fit and discomfort.
Not Seeking Professional Help: If you’re unsure about how to measure your mountain bike frame or interpret the measurements, it’s essential to seek professional help from a bike fitter or frame builder. They can provide expert guidance and ensure a perfect fit.
By avoiding these common mistakes, riders can ensure accurate measurements and a perfect fit for their mountain bike. Remember, measuring a mountain bike frame is a crucial step in ensuring a comfortable and safe riding experience. Take the time to do it correctly, and don’t hesitate to seek professional help if needed.

Measuring for a Custom Fit: Tips and Tricks
For riders who want a truly bespoke fit, measuring for a custom mountain bike frame is a crucial step. Here are some tips and tricks to help you get it right:
Work with a Frame Builder or Bike Fitter: A professional frame builder or bike fitter can help you design a custom frame that fits your body perfectly. They will take precise measurements of your body and riding style to create a frame that is tailored to your needs.
Take Detailed Measurements: When measuring for a custom frame, it’s essential to take detailed measurements of your body, including your inseam, arm length, and torso length. This will help the frame builder or bike fitter create a frame that fits you perfectly.
Consider Your Riding Style: Your riding style and preferences will also affect the design of your custom frame. For example, if you’re a cross-country rider, you may want a frame with a steeper head tube angle and a shorter wheelbase. If you’re a downhill rider, you may want a frame with a slacker head tube angle and a longer wheelbase.
Choose the Right Materials: The materials used to build your custom frame will also affect its performance and durability. For example, carbon fiber frames are lightweight and responsive, while steel frames are strong and durable.
Be Patient: Measuring for a custom frame takes time and patience. Don’t rush the process, and be prepared to make adjustments as needed.
By following these tips and tricks, riders can create a custom mountain bike frame that fits their body perfectly and provides optimal performance. Remember, measuring for a custom frame is a crucial step in creating a bike that is tailored to your needs and riding style.
Conclusion: Finding the Perfect Fit for Your Mountain Bike
In conclusion, accurate mountain bike frame measurement is crucial for a comfortable, high-performance, and safe riding experience. By following the steps outlined in this guide, riders can ensure a perfect fit and unlock the full potential of their mountain bike.
Remember, measuring a mountain bike frame is not a one-time task. As riders grow, change, and adapt to new riding styles, their frame measurements may need to be adjusted. By regularly checking and adjusting their frame measurements, riders can maintain optimal performance and comfort.
If you’re new to measuring your mountain bike frame, don’t be discouraged if it takes some time to get it right. With practice and patience, you’ll become proficient in how to measure mountain bike frame and be able to fine-tune your bike to fit your body perfectly.
For riders who want a truly bespoke fit, working with a frame builder or bike fitter can provide a custom solution tailored to their unique needs and riding style. By investing in a custom fit, riders can experience a new level of comfort, performance, and confidence on the trails.
In the end, finding the perfect fit for your mountain bike is a journey worth taking. By taking the time to measure your frame correctly and adjust it to fit your body, you’ll be able to ride longer, stronger, and more comfortably. So why wait? Get out there and start measuring your mountain bike frame today!
Final Check: Double-Checking Your Measurements
Before hitting the trails, it’s essential to double-check your measurements to ensure a perfect fit and optimal performance from your mountain bike. Here’s a final checklist to review:
Seat Tube Length: Verify that the seat tube length aligns with your inseam and riding style. A correctly sized seat tube will provide comfort and support during long rides.
Top Tube Length: Confirm that the top tube length is proportional to your arm length and riding position. A well-fitting top tube will improve your bike’s handling and responsiveness.
Head Tube Angle: Check that the head tube angle is suitable for your riding style and terrain. A correctly angled head tube will enhance your bike’s stability and control.
Wheelbase: Verify that the wheelbase is appropriate for your riding style and terrain. A well-proportioned wheelbase will improve your bike’s stability and maneuverability.
Standover Height: Ensure that the standover height is comfortable and allows for easy mounting and dismounting.
By following this final checklist, riders can ensure that their mountain bike frame is perfectly sized and adjusted for optimal performance and comfort. Remember, accurate measurement is key to unlocking the full potential of your mountain bike. Take the time to measure your frame correctly, and you’ll be rewarded with a riding experience like no other.