Why Accurate Bike Height Measurement Matters
Proper bike height measurement is crucial for optimal comfort, performance, and safety. When a bike is not fitted correctly to the rider, it can lead to discomfort, injury, or poor riding technique. Incorrect measurements can put unnecessary strain on the rider’s body, particularly in the back, neck, and legs. This can result in fatigue, pain, and decreased performance. Furthermore, a poorly fitted bike can also affect the rider’s ability to control the vehicle, increasing the risk of accidents. Therefore, it is essential to understand how to measure the height of a bike accurately to ensure a comfortable and safe riding experience.

Click Image to Find eBike Products
In addition to comfort and safety, accurate bike height measurement is also important for performance. A bike that is fitted correctly to the rider can improve pedaling efficiency, reduce energy expenditure, and enhance overall cycling performance. This is particularly important for competitive cyclists who require optimal performance to gain a competitive edge. By understanding how to measure the height of a bike, riders can ensure that their vehicle is tailored to their specific needs, allowing them to perform at their best.
Fortunately, measuring the height of a bike is a relatively straightforward process that can be done with a few simple tools. By following a few basic steps and understanding the key measurements involved, riders can ensure that their bike is fitted correctly and optimize their riding experience. In the following sections, we will explore the key measurements involved in bike height, including standover height, saddle height, and handlebar height, and provide a step-by-step guide on how to measure these critical dimensions.
Understanding Bike Height Terminology: What You Need to Know
When it comes to measuring the height of a bike, there are several key terms to understand. These terms include standover height, saddle height, and handlebar height. Each of these measurements plays a critical role in determining the overall fit and comfort of the bike.
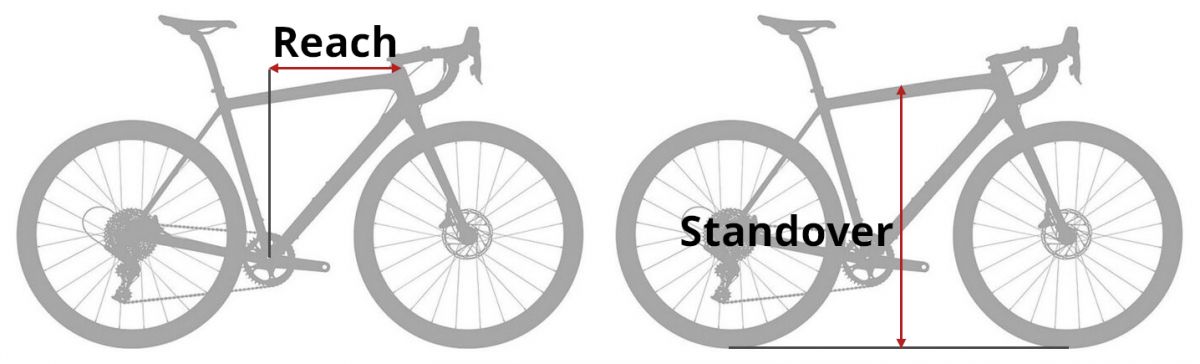
Standover height refers to the distance between the ground and the top tube of the bike frame. This measurement is important because it determines the minimum height requirement for the rider. A bike with a standover height that is too high can be difficult to mount and dismount, while a bike with a standover height that is too low can be unstable and prone to tipping.
Saddle height, on the other hand, refers to the distance between the saddle and the pedal. This measurement is critical because it determines the rider’s pedaling position and comfort. A saddle height that is too high can cause the rider to overstretch and lose control, while a saddle height that is too low can cause the rider to feel cramped and uncomfortable.
Handlebar height refers to the distance between the handlebars and the saddle. This measurement is important because it determines the rider’s riding position and comfort. A handlebar height that is too high can cause the rider to feel upright and uncomfortable, while a handlebar height that is too low can cause the rider to feel stretched out and lose control.
Understanding these key terms is essential for determining the perfect fit for your bike. By knowing how to measure and adjust these critical dimensions, you can ensure a comfortable and safe riding experience. Whether you’re riding a road bike, mountain bike, or hybrid bike, understanding bike height terminology is crucial for optimal performance and comfort.
For example, road bikes typically require a more aggressive riding position, with a lower handlebar height and a longer reach. Mountain bikes, on the other hand, require a more upright riding position, with a higher handlebar height and a shorter reach. By understanding these differences, you can choose a bike that is tailored to your specific needs and preferences.
How to Measure Your Bike’s Standover Height
Measuring the standover height of your bike is a crucial step in determining the perfect fit. To do this, you’ll need a few simple tools: a measuring tape, a level, and a pencil. Here’s a step-by-step guide on how to measure your bike’s standover height:
Step 1: Position the bike on a level surface. Make sure the bike is upright and the wheels are straight.
Step 2: Locate the top tube of the bike frame. This is the horizontal tube that runs from the head tube to the seat tube.
Step 3: Measure the distance from the ground to the top tube. Use a measuring tape to record the measurement. Make sure to take the measurement at the center of the top tube, directly above the bottom bracket.
Step 4: Record the measurement. Take note of the standover height and compare it to your inseam. A general rule of thumb is to have at least 1-2 inches of clearance between the top tube and your inseam.
Tips for ensuring accuracy and consistency:
Use a level to ensure the bike is perfectly upright. This will ensure that your measurement is accurate and consistent.
Take multiple measurements to ensure accuracy. Measure the standover height at different points along the top tube to ensure that your measurement is consistent.
Use a pencil to mark the measurement on the bike frame. This will help you to easily identify the standover height and make adjustments as needed.
By following these steps and tips, you can ensure that your bike’s standover height is accurate and consistent. This will help you to determine the perfect fit and ensure a comfortable and safe riding experience.
Remember, measuring the standover height is just one part of the process. You’ll also need to measure the saddle height and handlebar height to ensure a perfect fit. In the next section, we’ll discuss how to calculate your ideal saddle height.

Calculating Your Ideal Saddle Height: A Step-by-Step Guide
Calculating your ideal saddle height is a crucial step in determining the perfect fit for your bike. A saddle height that is too high or too low can lead to discomfort, pain, and poor riding technique. Here’s a step-by-step guide on how to calculate and measure your ideal saddle height:
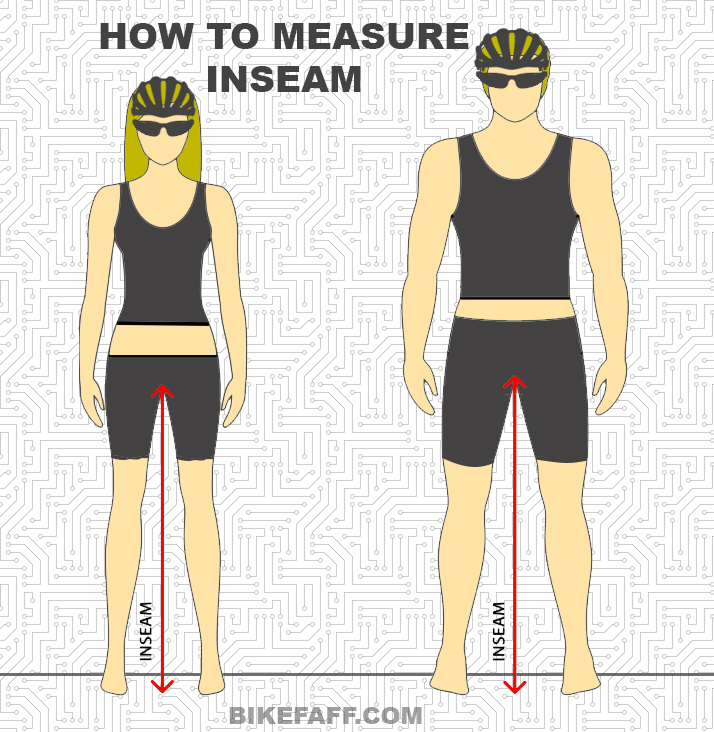
Step 1: Determine your leg length. Measure the length of your leg from the top of your thigh to your ankle. This will give you a baseline measurement to work with.
Step 2: Use the heel-to-pedal method. Place the ball of your foot on the pedal and your heel on the ground. The distance between your heel and the pedal should be approximately 1-2 inches. This will give you a rough estimate of your ideal saddle height.
Step 3: Use the inseam method. Measure the length of your inseam (the distance between the top of your thigh and the bottom of your ankle). A general rule of thumb is to set your saddle height to 1.09 times your inseam.
Step 4: Use a saddle height calculator. There are many online tools and calculators that can help you determine your ideal saddle height based on your leg length, inseam, and other factors.
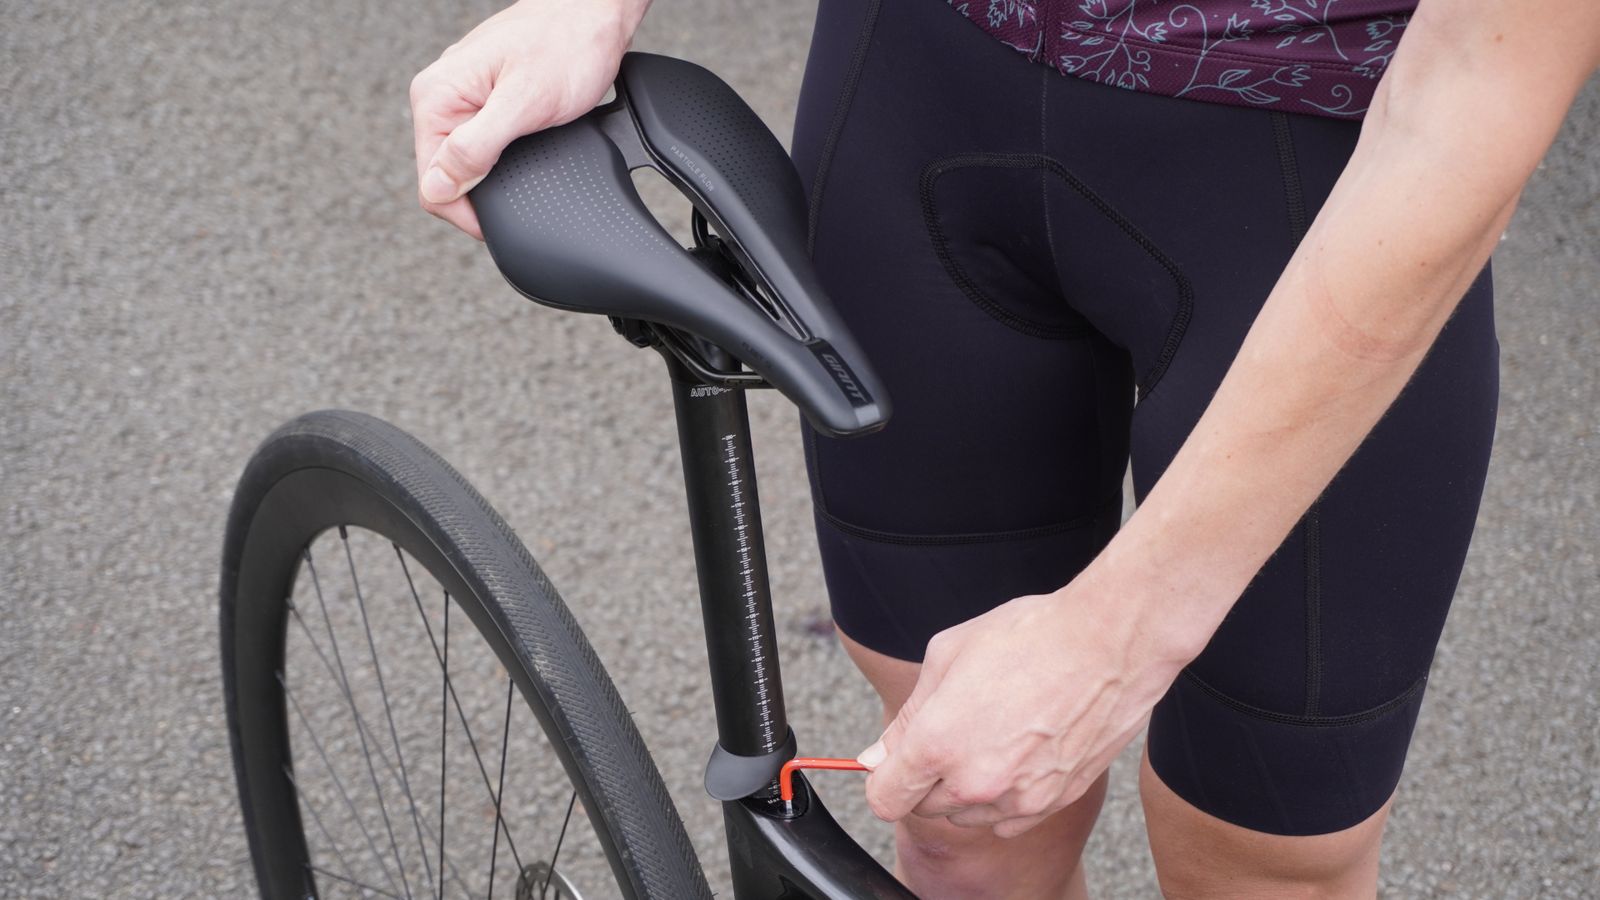
Step 5: Measure and adjust. Once you have calculated your ideal saddle height, measure it against your bike’s saddle height. Make adjustments as needed to achieve optimal comfort and performance.
Formulas for determining ideal saddle height:
Heel-to-pedal method: Saddle height = (leg length x 0.65) + 1-2 inches
Inseam method: Saddle height = (inseam x 1.09)
Remember, these formulas are just a starting point. The best way to determine your ideal saddle height is to experiment and find what works best for you.
By following these steps and using these formulas, you can calculate and measure your ideal saddle height and achieve a perfect fit for your bike.
Measuring Handlebar Height: Tips and Considerations
Measuring handlebar height is a crucial step in determining the perfect fit for your bike. Handlebar height affects the rider’s comfort, control, and overall riding experience. Here are some tips and considerations to keep in mind when measuring handlebar height:
Riding style: Different riding styles require different handlebar heights. For example, road bikes typically require a lower handlebar height to achieve an aerodynamic position, while mountain bikes require a higher handlebar height for better control and maneuverability.
Bike type: Different types of bikes have varying handlebar height requirements. For example, hybrid bikes and commuter bikes often have a higher handlebar height than road bikes or mountain bikes.
Personal preference: Ultimately, handlebar height is a matter of personal preference. Some riders prefer a more upright riding position, while others prefer a more aggressive position.
Measuring handlebar height: To measure handlebar height, use a measuring tape to measure the distance from the center of the handlebars to the top of the saddle. Make sure to take the measurement at the center of the handlebars, directly above the stem.
Adjusting handlebar height: To adjust handlebar height, loosen the stem bolts and slide the handlebars up or down to the desired position. Make sure to tighten the stem bolts securely to ensure the handlebars are stable and secure.
Tips for achieving optimal comfort and control:
Experiment with different handlebar heights to find what works best for you.
Consider using a handlebar with a adjustable height to achieve optimal comfort and control.
Make sure to check the handlebar height regularly to ensure it remains at the optimal position.
By considering these factors and following these tips, you can achieve optimal comfort and control by measuring and adjusting your handlebar height.

Using Online Tools and Bike Size Charts: A Helpful Alternative
Measuring the height of a bike can be a daunting task, especially for those who are new to cycling. Fortunately, there are online tools and bike size charts that can help make the process easier and more accurate. In this section, we’ll explore how to use these resources to determine bike height and provide examples of popular online tools and bike size charts.
Online bike size calculators: There are several online bike size calculators available that can help determine the ideal bike size based on the rider’s height, inseam, and other factors. These calculators use complex algorithms to provide a recommended bike size and can be a helpful alternative to manual measurements.
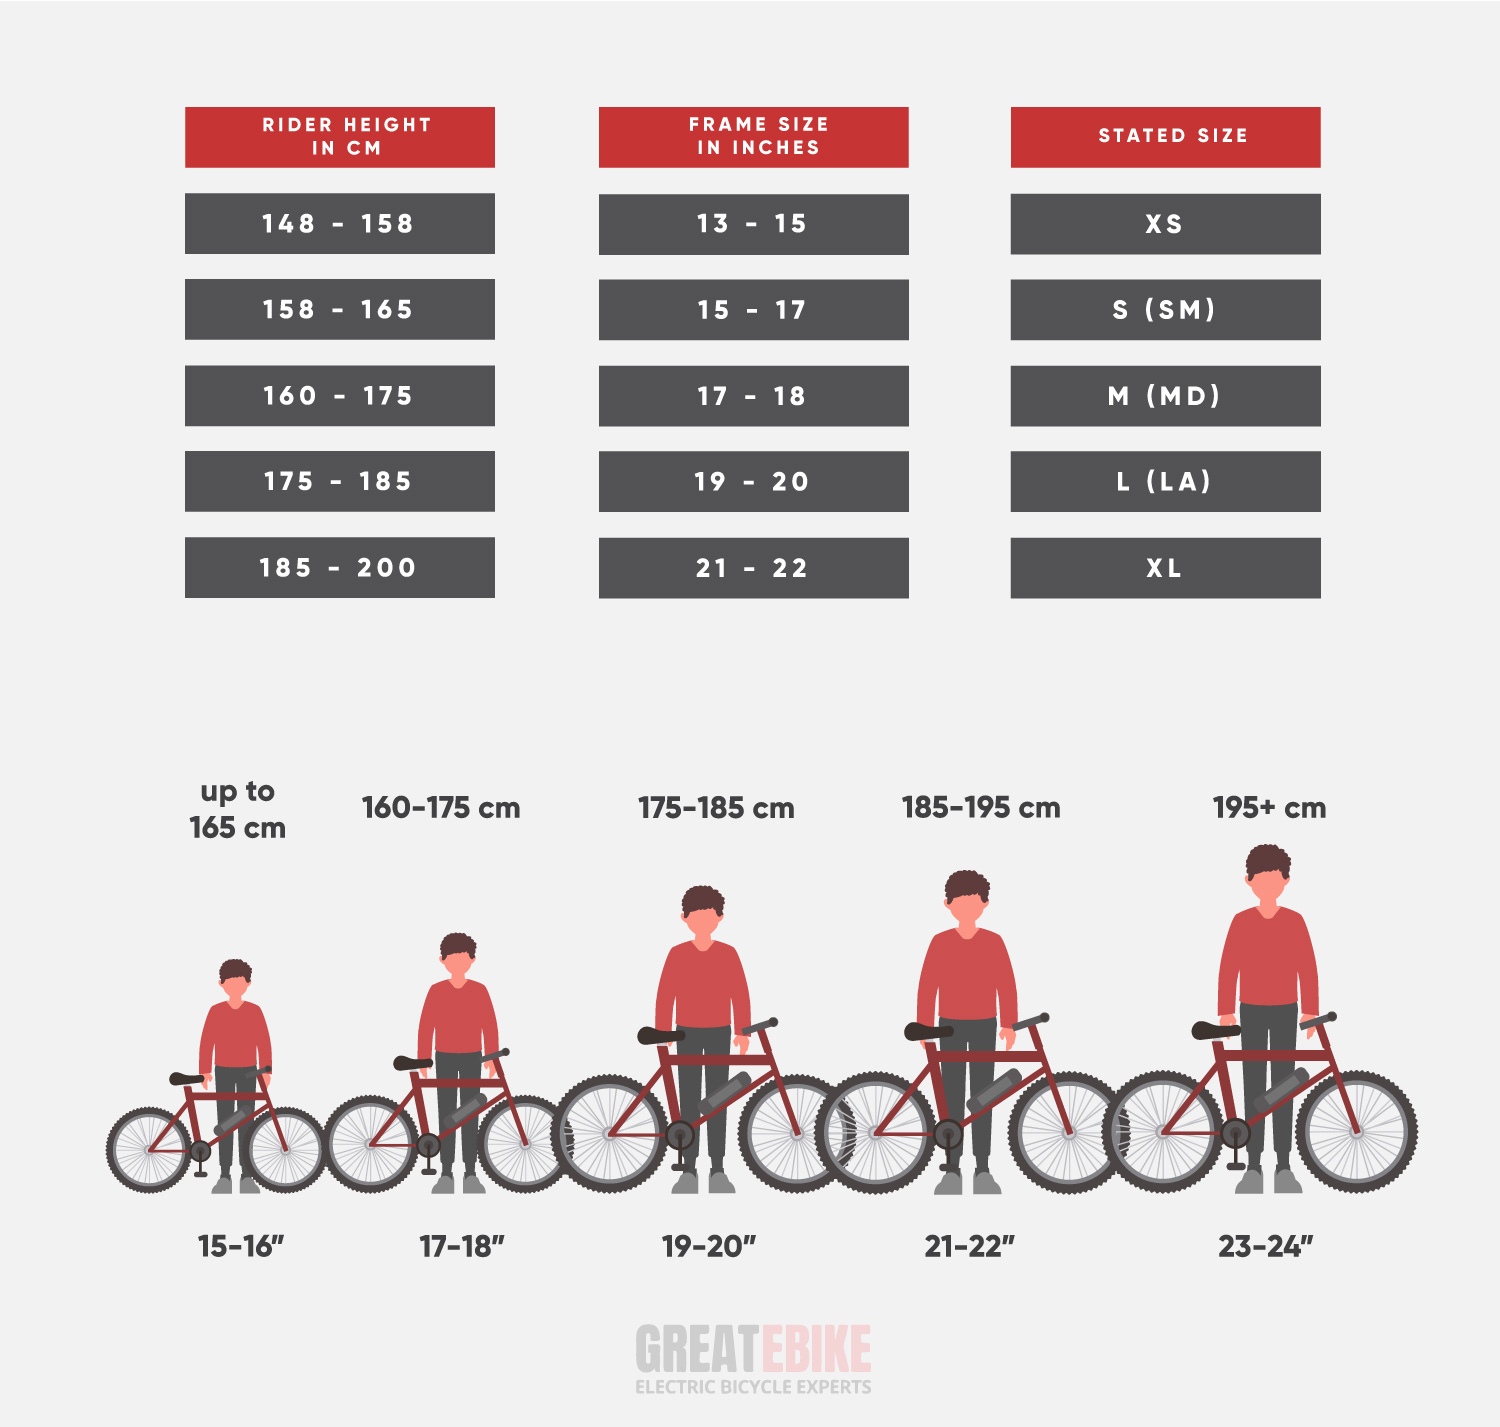
Bike size charts: Bike size charts are another useful resource for determining bike height. These charts provide a range of measurements for different bike sizes and can be used to determine the ideal bike size based on the rider’s height and inseam.
Examples of popular online tools and bike size charts:
BikeRadar’s Bike Size Calculator: This online calculator uses a complex algorithm to provide a recommended bike size based on the rider’s height, inseam, and other factors.
Sheldon Brown’s Bike Size Chart: This bike size chart provides a range of measurements for different bike sizes and can be used to determine the ideal bike size based on the rider’s height and inseam.
Trek’s Bike Size Calculator: This online calculator uses a simple and intuitive interface to provide a recommended bike size based on the rider’s height and inseam.
Using online tools and bike size charts can be a helpful alternative to manual measurements. By providing a recommended bike size based on the rider’s height and inseam, these resources can help ensure a perfect fit and optimal comfort and performance.
Common Mistakes to Avoid When Measuring Bike Height
Measuring bike height can be a complex process, and there are several common mistakes that people make when trying to determine the perfect fit. In this section, we’ll highlight some of the most common mistakes to avoid and provide advice on how to ensure accurate measurements.
Incorrect positioning: One of the most common mistakes people make when measuring bike height is incorrect positioning. Make sure to position the bike on a level surface and ensure that the wheels are straight and the saddle is level.
Incorrect measurement techniques: Another common mistake is using incorrect measurement techniques. Make sure to use a measuring tape or other accurate measurement tool to take precise measurements.
Not considering bike type: Different types of bikes have varying height requirements. Make sure to consider the type of bike you are measuring and adjust your measurements accordingly.
Not considering riding style: Riding style can also impact bike height. Make sure to consider your riding style and adjust your measurements accordingly.
Not double-checking measurements: Finally, one of the most common mistakes people make when measuring bike height is not double-checking their measurements. Make sure to double-check your measurements to ensure accuracy and avoid mistakes.
Advice for avoiding mistakes:
Take your time and be patient when measuring bike height.
Use accurate measurement tools and techniques.
Consider the type of bike and riding style when taking measurements.
Double-check your measurements to ensure accuracy.
By avoiding these common mistakes, you can ensure accurate measurements and achieve a perfect fit for your bike.

Final Check: Verifying Your Measurements for a Perfect Fit
Once you have taken all the necessary measurements, it’s essential to double-check them to ensure a perfect fit. In this section, we’ll provide a checklist of key measurements to verify and offer tips for making adjustments to achieve optimal comfort and performance.
Checklist of key measurements to verify:
Standover height: Verify that the standover height is correct and that you have enough clearance between the top tube and your inseam.
Saddle height: Verify that the saddle height is correct and that you have the optimal leg extension and knee bend.
Handlebar height: Verify that the handlebar height is correct and that you have the optimal riding position and comfort.
Tips for making adjustments:
Make small adjustments: Make small adjustments to the measurements and test the bike to ensure a perfect fit.
Use a bike fit calculator: Use a bike fit calculator to help you make adjustments and ensure a perfect fit.
Consult a professional: If you’re unsure about any of the measurements or adjustments, consult a professional bike fitter for guidance.
By following this checklist and making adjustments as needed, you can ensure a perfect fit and achieve optimal comfort and performance on your bike.
Remember, measuring the height of a bike is a process that requires patience and attention to detail. By taking the time to get it right, you can enjoy a more comfortable and efficient ride.