
Why Proper Bike Sizing Matters
Proper bike sizing is essential for a comfortable, efficient, and safe ride. A bike that fits well can make all the difference in your overall cycling experience. When learning how to measure your bike size, it’s crucial to understand the importance of proper bike sizing. A bike that’s too small or too large can lead to discomfort, fatigue, and even injury.

Click Image to Find eBike Products
One of the primary benefits of proper bike sizing is improved comfort. When your bike fits you well, you’ll be able to maintain a comfortable riding position, reducing the risk of discomfort, pain, and fatigue. This is especially important for long rides or frequent cycling. Additionally, a properly sized bike can increase your efficiency, allowing you to ride longer and faster with less effort.
Another critical aspect of proper bike sizing is reduced risk of injury. A bike that’s too small or too large can put unnecessary strain on your muscles and joints, leading to injuries such as back pain, neck strain, and knee problems. By ensuring your bike is the right size, you’ll be able to reduce your risk of injury and enjoy a safer ride.
Understanding Your Body Measurements
When learning how to measure your bike size, it’s essential to take accurate body measurements. These measurements will serve as the foundation for determining your ideal bike size. The three key body measurements needed to determine bike size are inseam, arm length, and torso length.
Inseam measurement is crucial, as it determines the correct seat height and leg extension. To take an accurate inseam measurement, stand against a wall with your feet shoulder-width apart. Place a book or ruler between your legs, parallel to the floor, and measure the distance from the top of the book or ruler to the floor. This measurement should be taken in inches or centimeters.
Arm length measurement is also important, as it affects the handlebar height and overall comfort of the bike. To measure arm length, stand against a wall with your arms relaxed by your sides. Measure the distance from the top of your shoulder to your wrist. This measurement should also be taken in inches or centimeters.
Torso length measurement is critical, as it determines the correct bike size and riding position. To measure torso length, stand against a wall with your feet shoulder-width apart. Measure the distance from the base of your neck to your hip bone. This measurement should be taken in inches or centimeters.
When taking these measurements, it’s essential to ensure accuracy and consistency. Take multiple measurements to ensure accuracy, and consider having a friend or family member assist you to ensure the measurements are taken correctly.
How to Take Your Bike Measurements
When learning how to measure your bike size, it’s essential to take accurate measurements of your bike. This will ensure a proper fit and optimal riding experience. The three key bike measurements needed to determine bike size are seat height, handlebar height, and wheel size.
To measure the seat height, locate the seat post and measure from the center of the bottom bracket to the top of the seat. This measurement should be taken in inches or centimeters. It’s crucial to ensure the seat height is correct, as it affects the rider’s leg extension and overall comfort.
To measure the handlebar height, locate the stem and measure from the center of the handlebar to the top of the stem. This measurement should also be taken in inches or centimeters. The handlebar height affects the rider’s arm extension and overall comfort.
To measure the wheel size, locate the wheel and measure the diameter from the center of the wheel to the outer rim. This measurement should be taken in inches or centimeters. The wheel size affects the bike’s overall size and riding characteristics.
When taking these measurements, it’s essential to ensure accuracy and consistency. Take multiple measurements to ensure accuracy, and consider having a friend or family member assist you to ensure the measurements are taken correctly. Additionally, consult your bike’s manual or manufacturer’s website for specific measurement instructions, as different bikes may have unique measurement requirements.
By taking accurate body measurements and bike measurements, you’ll be able to determine your ideal bike size using a bike size chart. Remember, learning how to measure your bike size is a crucial step in finding your perfect fit and enjoying a comfortable, efficient, and safe ride.

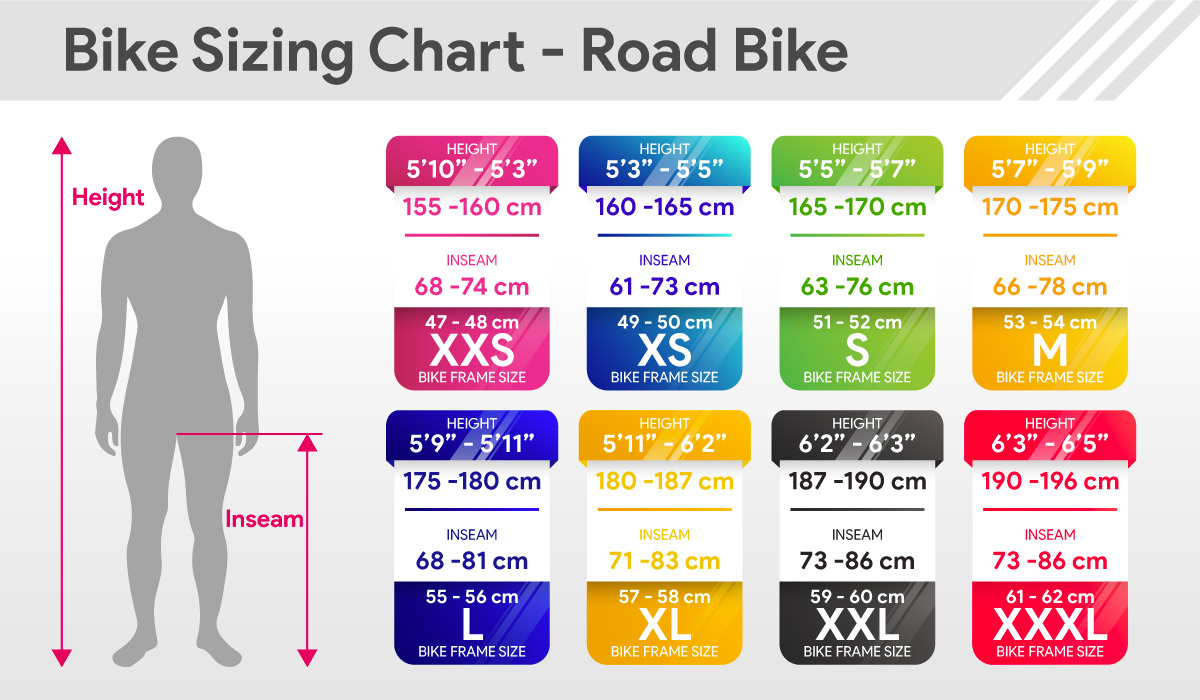
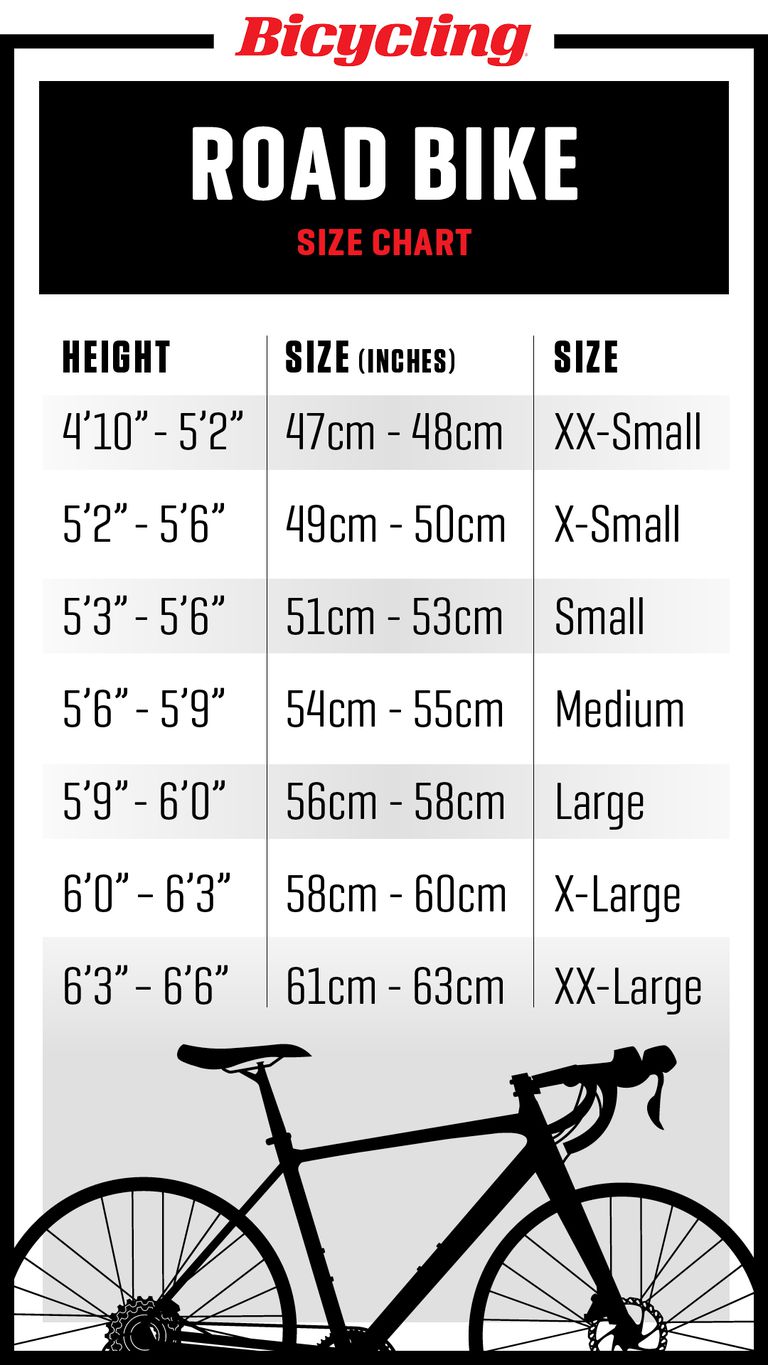
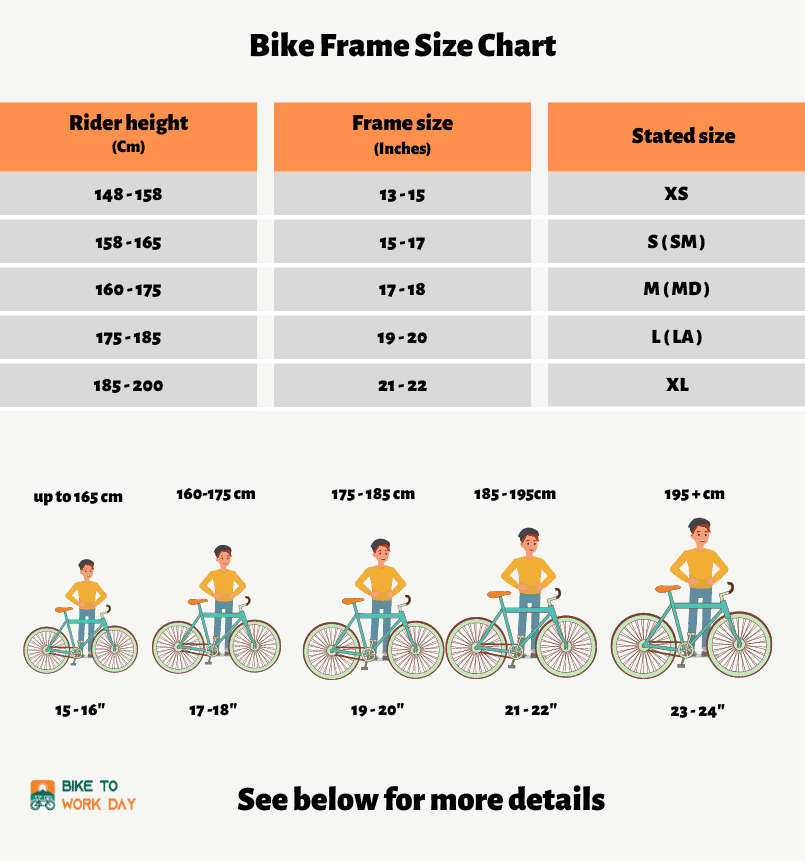
Using a Bike Size Chart: A Step-by-Step Guide
Once you have taken your body measurements and bike measurements, it’s time to use a bike size chart to determine the correct bike size. A bike size chart is a valuable tool that helps match your body measurements to the corresponding bike size. In this section, we will provide a step-by-step guide on how to use a bike size chart to find your perfect bike size.
Step 1: Choose a Bike Size Chart
There are various bike size charts available, and it’s essential to choose one that corresponds to your bike type, such as road bike, mountain bike, or hybrid bike. You can find bike size charts on the manufacturer’s website, bike shop websites, or online cycling resources.
Step 2: Match Your Body Measurements
Using your body measurements, match them to the corresponding columns on the bike size chart. Typically, bike size charts have columns for inseam, arm length, and torso length. Ensure you match your measurements to the correct columns to get an accurate bike size.
Step 3: Determine Your Bike Size
Once you have matched your body measurements, the bike size chart will indicate your corresponding bike size. Bike sizes are usually represented by a letter (e.g., S, M, L) or a numerical value (e.g., 52, 54, 56). Make sure to note the recommended bike size and any additional fit recommendations.
Step 4: Consider Additional Factors
In addition to your body measurements, consider other factors that may affect your bike size selection, such as riding style, terrain, and personal preference. For example, if you’re a aggressive rider, you may prefer a smaller bike size for better maneuverability.
By following these steps and using a bike size chart, you’ll be able to determine your correct bike size and ensure a comfortable, efficient, and safe ride. Remember, learning how to measure your bike size is a crucial step in finding your perfect fit, and using a bike size chart is a valuable tool to help you achieve that.
Factors to Consider When Choosing a Bike Size
When choosing a bike size, it’s essential to consider additional factors beyond body measurements and bike measurements. These factors can significantly impact the comfort, efficiency, and overall riding experience. In this section, we will discuss the key factors to consider when selecting a bike size.
Riding Style
Your riding style plays a significant role in determining the ideal bike size. For example, if you’re an aggressive rider who enjoys cornering and descending, a smaller bike size may be preferred for better maneuverability. On the other hand, if you’re a casual rider who prioritizes comfort, a larger bike size may be more suitable.
Terrain
The terrain you ride on can also affect your bike size selection. For instance, if you ride on rough, technical trails, a smaller bike size with a lower standover height may be preferred for better control and stability. Conversely, if you ride on smooth, flat roads, a larger bike size with a higher standover height may be more suitable.
Personal Preference
Ultimately, personal preference plays a significant role in choosing a bike size. Some riders may prefer a more upright riding position, while others may prefer a more aggressive, aerodynamic position. Consider your personal preferences and riding goals when selecting a bike size.
Other Factors to Consider
Additional factors to consider when choosing a bike size include the type of bike, the rider’s flexibility and mobility, and any physical limitations or injuries. For example, riders with back or neck injuries may prefer a bike size with a more upright riding position to reduce strain on the affected area.
By considering these additional factors, you can ensure that you find a bike size that not only fits your body but also meets your riding needs and preferences. Remember, learning how to measure your bike size is just the first step in finding your perfect fit – considering these additional factors is crucial to achieving optimal comfort, efficiency, and performance.

Common Mistakes to Avoid When Measuring Your Bike Size
Measuring your bike size can be a straightforward process, but it’s easy to make mistakes that can lead to an ill-fitting bike. In this section, we will identify common mistakes to avoid when measuring your bike size, ensuring that you get the perfect fit.
Incorrect Body Measurements
One of the most common mistakes is taking inaccurate body measurements. This can lead to a bike size that is either too small or too large. To avoid this mistake, make sure to take your measurements carefully, using a flexible tape measure and following the guidelines outlined in the “Understanding Your Body Measurements” section.
Misinterpreting Bike Size Charts
Another common mistake is misinterpreting bike size charts. Bike size charts can be complex, and it’s easy to misread them. To avoid this mistake, take your time when reading the chart, and make sure to match your body measurements to the correct columns. If you’re still unsure, consider consulting with a professional bike fitter.
Not Considering Additional Factors
Some riders may not consider additional factors that can affect bike size selection, such as riding style, terrain, and personal preference. Failing to consider these factors can lead to a bike size that is not optimal for your riding needs. To avoid this mistake, make sure to consider these factors when choosing a bike size.
Not Double-Checking Measurements
Finally, it’s essential to double-check your measurements to ensure accuracy. This includes re-taking your body measurements and re-measuring your bike to ensure that you have the correct bike size.
By avoiding these common mistakes, you can ensure that you get the perfect bike size, providing a comfortable, efficient, and enjoyable riding experience. Remember, learning how to measure your bike size is a crucial step in finding your perfect fit, and avoiding these mistakes is key to achieving optimal results.
Getting a Professional Fit: When to Seek Expert Help
While learning how to measure your bike size is an essential step in finding your perfect fit, there are situations where seeking professional help from a bike fitter is necessary. A bike fitter is a trained professional who can provide a custom fit, ensuring that your bike is tailored to your unique body measurements and riding style.
Custom Fit Requirements
In some cases, a custom fit is required to ensure a proper bike size. For example, riders with unique body shapes or sizes, such as those with exceptionally long or short legs, may require a custom fit. Additionally, riders with physical limitations or injuries may need a custom fit to accommodate their specific needs.
Discomfort or Pain While Riding
If you’re experiencing discomfort or pain while riding, it may be a sign that your bike size is not optimal. In this case, seeking professional help from a bike fitter can help identify the issue and provide a solution. A bike fitter can assess your riding position and make adjustments to your bike to alleviate discomfort and improve performance.
Benefits of a Professional Fit
A professional fit can provide numerous benefits, including improved comfort, increased efficiency, and enhanced performance. A bike fitter can also provide valuable insights and tips on how to optimize your riding position and technique, helping you to get the most out of your bike.
When to Seek Expert Help
If you’re unsure about how to measure your bike size or need a custom fit, it’s essential to seek expert help from a bike fitter. Additionally, if you’re experiencing discomfort or pain while riding, a bike fitter can help identify the issue and provide a solution. By seeking professional help, you can ensure that you find your perfect bike size and enjoy a comfortable, efficient, and enjoyable riding experience.

Conclusion: Finding Your Perfect Bike Size
In conclusion, finding your perfect bike size is a crucial step in ensuring a comfortable, efficient, and enjoyable riding experience. By understanding the importance of proper bike sizing, taking accurate body and bike measurements, and using a bike size chart, you can determine the correct bike size for your needs.
Remember to consider additional factors such as riding style, terrain, and personal preference when choosing a bike size, and avoid common mistakes that can lead to an ill-fitting bike. If you’re unsure or require a custom fit, don’t hesitate to seek professional help from a bike fitter.
To ensure you’ve found your perfect bike size, follow this final checklist:
- Take accurate body measurements, including inseam, arm length, and torso length.
- Measure your bike, including seat height, handlebar height, and wheel size.
- Use a bike size chart to determine the correct bike size based on your measurements.
- Consider additional factors such as riding style, terrain, and personal preference.
- Avoid common mistakes, including incorrect body measurements and misinterpreting bike size charts.
- Seek professional help from a bike fitter if necessary.
By following these steps and considering the importance of proper bike sizing, you’ll be well on your way to finding your perfect bike size and enjoying a comfortable, efficient, and enjoyable riding experience. Remember, learning how to measure your bike size is a crucial step in finding your perfect fit, and with these tips and guidelines, you’ll be able to do so with confidence.
