
Why Pedal Removal is a Crucial Bike Maintenance Task
Regular pedal removal is essential for maintaining a safe and efficient ride. By learning how to remove a bicycle pedal, cyclists can ensure their pedals are clean, lubricated, and functioning smoothly. Neglecting pedal maintenance can lead to safety issues, such as pedals coming loose while riding, and affect overall bike performance. A well-maintained pedal system can improve pedaling efficiency, reduce fatigue, and enhance the overall riding experience. Furthermore, regular pedal removal allows cyclists to inspect for wear and tear, replacing pedals before they become a safety hazard. By incorporating pedal removal into their regular maintenance routine, cyclists can enjoy a safer, more enjoyable ride.

Click Image to Find eBike Products
Understanding Pedal Types and Their Removal Mechanisms
When it comes to learning how to remove a bicycle pedal, it’s essential to understand the different types of pedals and their unique removal mechanisms. There are three primary types of pedals: platform, clipless, and toe-clip pedals. Each type requires specific tools and techniques for removal. Platform pedals, commonly used on casual or comfort bikes, typically have a simple axle design and can be removed using a pedal wrench. Clipless pedals, popular among road and mountain bikers, feature a more complex mechanism and require a specific clipless pedal wrench for removal. Toe-clip pedals, often used on vintage or retro bikes, have a unique strap and buckle system that needs to be released before removal. Understanding the specific removal mechanism for each pedal type is crucial for a successful and efficient pedal removal process.
Gathering the Essential Tools for Pedal Removal
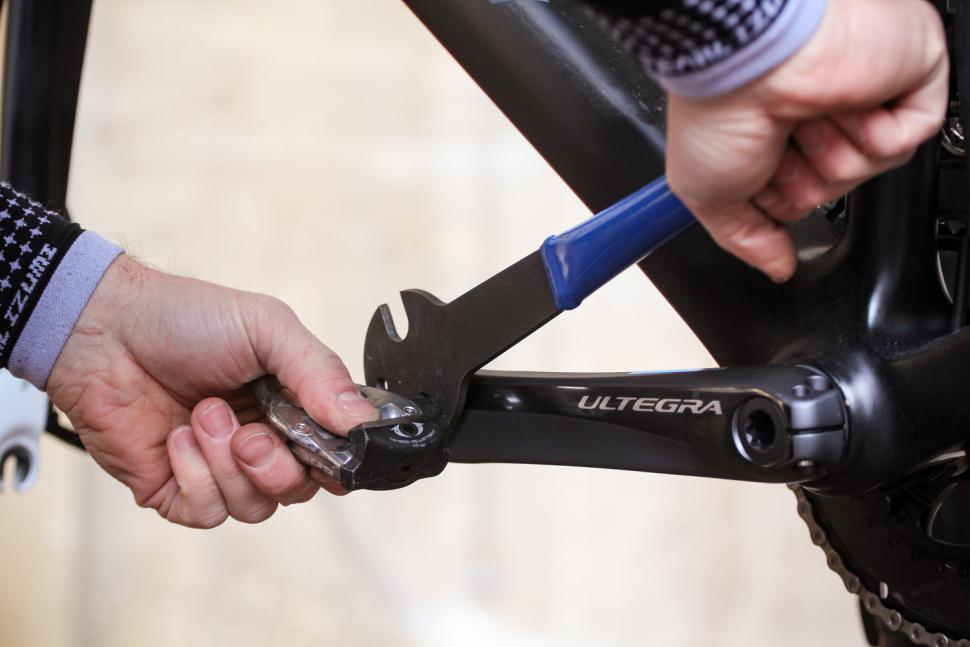
Before learning how to remove a bicycle pedal, it’s crucial to gather the necessary tools to ensure a smooth and efficient process. The essential tools for pedal removal include pedal wrenches, Allen wrenches, and pliers. A pedal wrench is a must-have for removing the pedal axle, while an Allen wrench is required for clipless pedals. Pliers can be useful for gripping and twisting the pedal body. When choosing the right tools for the job, consider the type of pedal and the specific removal mechanism required. Ensure that the tools are in good condition, clean, and well-lubricated to prevent damage to the pedal or surrounding components. Additionally, consider investing in a pedal removal tool kit, which typically includes a combination of wrenches and pliers specifically designed for pedal removal. With the right tools, cyclists can confidently tackle the task of removing their pedals and perform essential maintenance tasks.

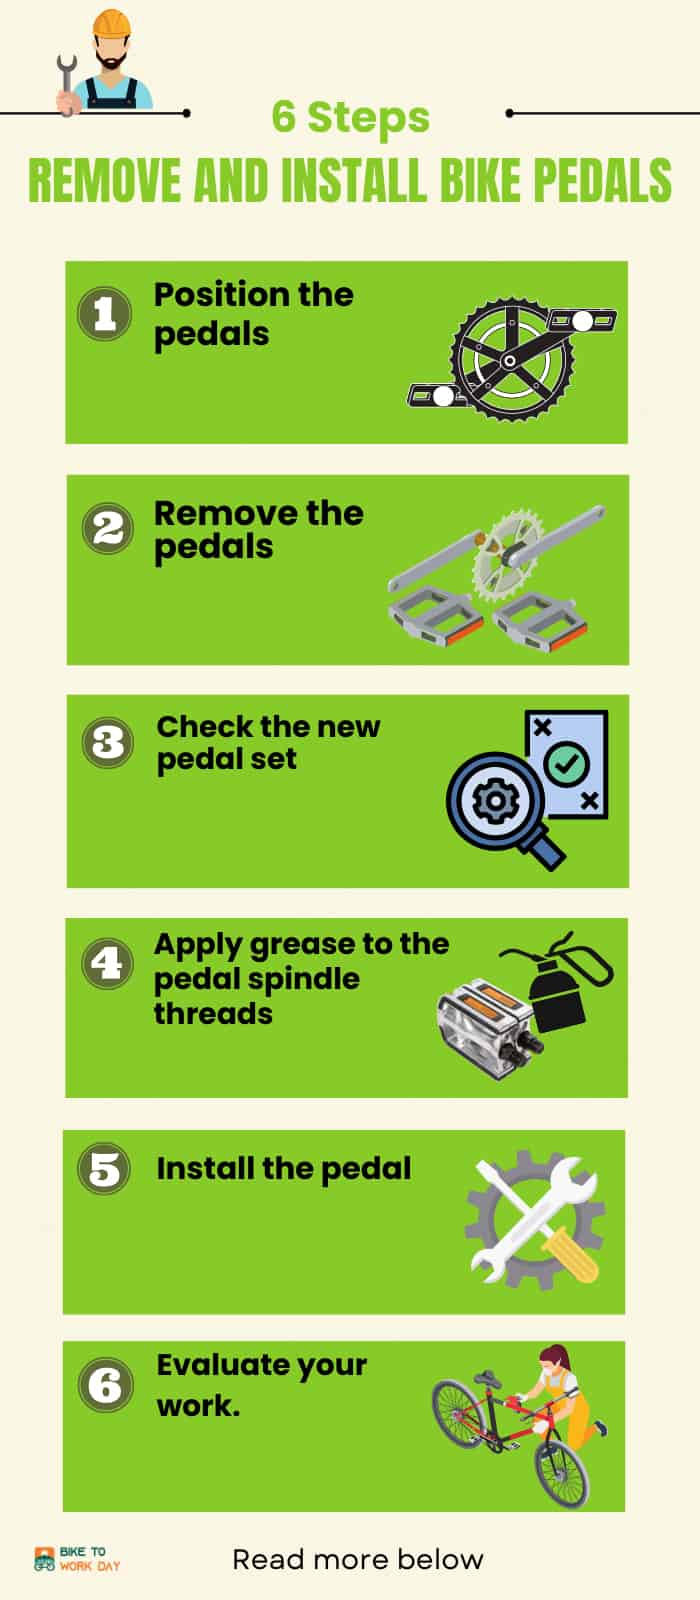
Step-by-Step Pedal Removal Instructions
Now that you have the necessary tools and understand the unique removal mechanisms for each pedal type, it’s time to learn how to remove a bicycle pedal. Follow these step-by-step instructions to ensure a smooth and efficient pedal removal process:
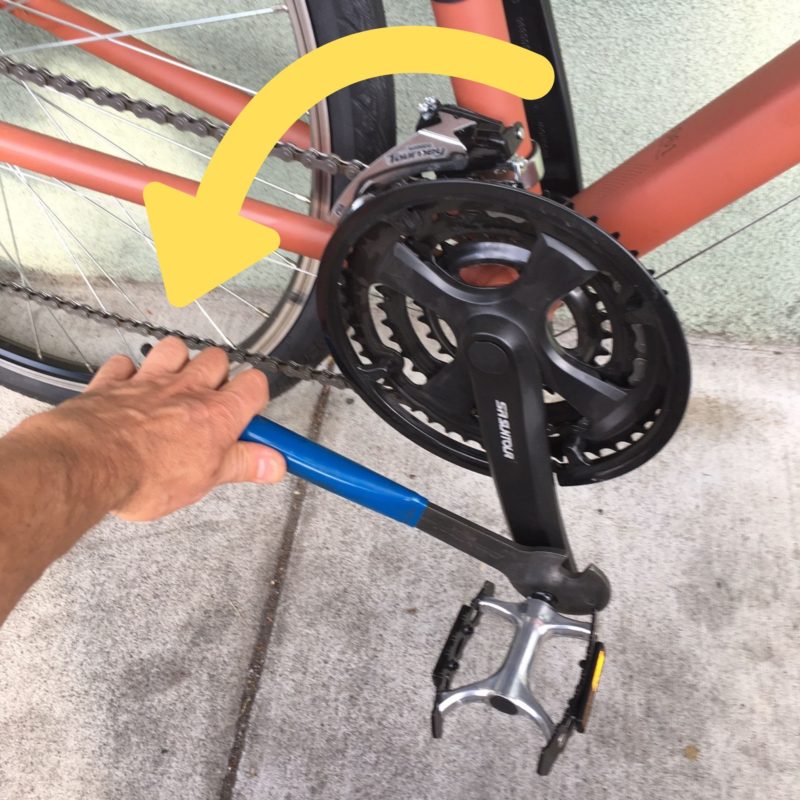
Step 1: Loosen the Pedal Axle – Using a pedal wrench, loosen the pedal axle by turning it counterclockwise. Apply gentle pressure to avoid damaging the threads or surrounding components.
Step 2: Remove the Pedal Body – Once the pedal axle is loose, remove the pedal body by pulling it away from the crank arm. For clipless pedals, release the tension on the cleat and pull the pedal body away from the crank arm.
Step 3: Extract the Pedal Spindle – With the pedal body removed, extract the pedal spindle from the crank arm. Use a gentle twisting motion to avoid damaging the threads or surrounding components.
By following these steps, cyclists can successfully remove their pedals and perform essential maintenance tasks, such as cleaning, lubricating, and replacing worn-out components. Remember to always refer to the manufacturer’s instructions for specific pedal removal procedures, as some pedals may require unique removal mechanisms. With practice and patience, learning how to remove a bicycle pedal becomes a straightforward process, ensuring a safer and more enjoyable ride.
Troubleshooting Common Pedal Removal Issues
While learning how to remove a bicycle pedal can seem straightforward, cyclists may encounter common issues that can make the process more challenging. Being prepared to troubleshoot these problems can save time and frustration, ensuring a smoother pedal removal experience.
Stuck Pedals: If the pedal is stuck due to corrosion or wear, apply penetrating oil to the threads and let it sit for a few hours. Then, use a pedal wrench to gently loosen the pedal axle. Avoid using excessive force, as this can damage the threads or surrounding components.
Stripped Threads: If the threads are stripped, use a thread repair kit to restore the threads. This will ensure a secure fit when reinstalling the pedal. Alternatively, consider replacing the crank arm or pedal axle if the damage is severe.
Broken Pedal Axles: If the pedal axle is broken, replace it with a new one. Ensure the new axle is compatible with the pedal and crank arm, and follow the manufacturer’s instructions for installation.
Other common issues include worn-out pedal bearings, damaged pedal bodies, and misaligned pedal spindles. By being aware of these potential problems and knowing how to address them, cyclists can overcome obstacles and successfully remove their pedals. Remember to always refer to the manufacturer’s instructions for specific troubleshooting guidance, as some pedals may require unique solutions.

Reinstalling Your Pedals: Tips and Precautions
After successfully removing the pedal, it’s essential to reinstall it correctly to ensure a smooth and safe ride. Improper pedal reinstallation can lead to safety issues, affect bike performance, and even cause damage to the pedal or crank arm.
Correct Thread Engagement: When reinstalling the pedal, ensure the threads are properly engaged to avoid stripping or damaging the threads. Apply a small amount of grease or lubricant to the threads to facilitate smooth installation.
Tightening the Pedal Axle: Tighten the pedal axle in a star pattern to avoid damaging the threads or surrounding components. Use a pedal wrench to apply the recommended torque, taking care not to overtighten.
Testing the Pedal: Once the pedal is reinstalled, test it for smooth rotation and proper function. Check for any signs of wear or damage, and address any issues promptly to prevent further damage.
Additional Precautions: When reinstalling the pedal, ensure the pedal body is properly aligned with the crank arm, and the pedal spindle is securely seated. Avoid mixing up the left and right pedals, as this can affect bike performance and safety.
By following these tips and precautions, cyclists can ensure a safe and smooth ride after pedal removal and reinstallation. Remember to always refer to the manufacturer’s instructions for specific guidance on pedal reinstallation, as some pedals may require unique procedures.

Maintenance and Inspection After Pedal Removal
After successfully removing the pedal, it’s crucial to inspect and maintain the pedal area to ensure a smooth and safe ride. Neglecting this step can lead to premature wear, corrosion, and safety issues.
Cleaning the Pedal Axle: Use a soft-bristled brush or cloth to remove any dirt, grime, or debris from the pedal axle. This will prevent corrosion and ensure smooth pedal rotation.
Lubricating the Threads: Apply a small amount of lubricant, such as grease or silicone spray, to the threads of the pedal axle. This will reduce friction and prevent corrosion, making future pedal removal easier.
Inspecting for Wear and Tear: Inspect the pedal area for signs of wear and tear, such as worn-out bearings, damaged threads, or corrosion. Address any issues promptly to prevent further damage.
Checking the Crank Arm: Inspect the crank arm for signs of wear, damage, or corrosion. Ensure the crank arm is securely attached to the bike and functioning properly.
By following these maintenance and inspection steps, cyclists can ensure a safe and smooth ride after pedal removal. Regular maintenance can also help extend the life of the pedal and surrounding components, reducing the need for frequent replacements.
Remember, regular pedal removal and maintenance are essential for a safer, more enjoyable ride. By mastering the art of pedal removal, cyclists can enjoy a smoother, more efficient ride, and reduce the risk of safety issues and bike damage.
Conclusion: Mastering Pedal Removal for a Smoother Ride
In conclusion, mastering the art of pedal removal is a crucial skill for any cyclist. By following the step-by-step guide outlined in this article, cyclists can confidently remove their pedals for cleaning, lubrication, and replacement. Regular pedal removal and maintenance can significantly improve bike performance, reduce the risk of safety issues, and extend the life of the pedal and surrounding components.
Remember, how to remove a bicycle pedal is a skill that requires patience, practice, and the right tools. By understanding the different types of pedals, gathering the essential tools, and following the troubleshooting tips, cyclists can overcome common pedal removal issues and ensure a smoother ride.
By incorporating pedal removal into their regular bike maintenance routine, cyclists can enjoy a safer, more enjoyable ride. Whether you’re a seasoned cyclist or just starting out, mastering pedal removal is an essential skill that will pay dividends in the long run.
So, next time you need to remove your pedals, don’t be intimidated. Follow the steps outlined in this article, and you’ll be well on your way to becoming a pedal removal pro. Happy cycling!
