
Why Removing a Bike Chain is a Crucial Skill for Cyclists
Knowing how to remove a bike chain is an essential skill for any cyclist, whether you’re a seasoned pro or a beginner. Regular maintenance is key to ensuring your bike runs smoothly and efficiently, and removing the chain is a crucial part of this process. By learning how to remove a bike chain, you’ll be able to troubleshoot common issues, prevent accidents, and keep your bike in top condition.

Click Image to Find eBike Products
A stuck chain can lead to a range of problems, from minor annoyances to serious safety hazards. If your chain becomes stuck, it can cause your bike to malfunction, leading to accidents and damage to the bike. By knowing how to remove the chain, you’ll be able to identify and fix problems before they become major issues.
In addition to safety and maintenance, knowing how to remove a bike chain can also save you money in the long run. By performing regular maintenance tasks, you’ll be able to extend the life of your bike and its components, reducing the need for costly repairs and replacements.
Furthermore, learning how to remove a bike chain is a valuable skill that can be applied to a range of situations. Whether you’re commuting to work, riding for recreation, or competing in events, knowing how to remove a bike chain can give you peace of mind and confidence on the road.
So, why is removing a bike chain so important? It’s simple: by learning this essential skill, you’ll be able to take control of your bike’s maintenance, prevent accidents, and keep your bike running smoothly and efficiently. In the next section, we’ll explore the essential tools and safety precautions you’ll need to remove a bike chain.
Preparing for the Task: Essential Tools and Safety Precautions
Before attempting to remove a bike chain, it’s essential to gather the necessary tools and take safety precautions to protect yourself and your bike. The right tools will make the process easier and safer, while also preventing damage to your bike’s components.
The following tools are required to remove a bike chain:
- Gloves: to protect your hands from grease and grime
- Chain breaker: a specialized tool used to break the chain
- Rag: to wipe away any dirt or grime that may be accumulated on the chain
- Chain whip (optional): a tool used to hold the cassette in place while removing the chain
In addition to the tools, it’s also important to take safety precautions to prevent accidents and injuries. Make sure to wear gloves to protect your hands from cuts and abrasions, and work in a well-ventilated area to avoid inhaling any fumes from the chain lube.
It’s also important to note that removing a bike chain can be a messy process, so make sure to cover your work surface with a rag or old cloth to prevent any damage. Additionally, if you’re working with a particularly stubborn chain, it may be helpful to have a pair of safety glasses on hand to protect your eyes from any flying debris.
By having the right tools and taking the necessary safety precautions, you’ll be able to remove your bike chain with confidence and ease. In the next section, we’ll provide a step-by-step guide on how to remove a bike chain, including how to locate the master link and use a chain breaker.
Step-by-Step Guide to Removing a Bike Chain
Removing a bike chain can seem like a daunting task, but with the right tools and a little practice, it’s a process that can be mastered by anyone. Here’s a step-by-step guide on how to remove a bike chain:
Step 1: Locate the Master Link
The master link is the link that connects the two ends of the chain together. It’s usually marked with an arrow or a small pin. To locate the master link, follow the chain around the bike until you find the link with the arrow or pin.
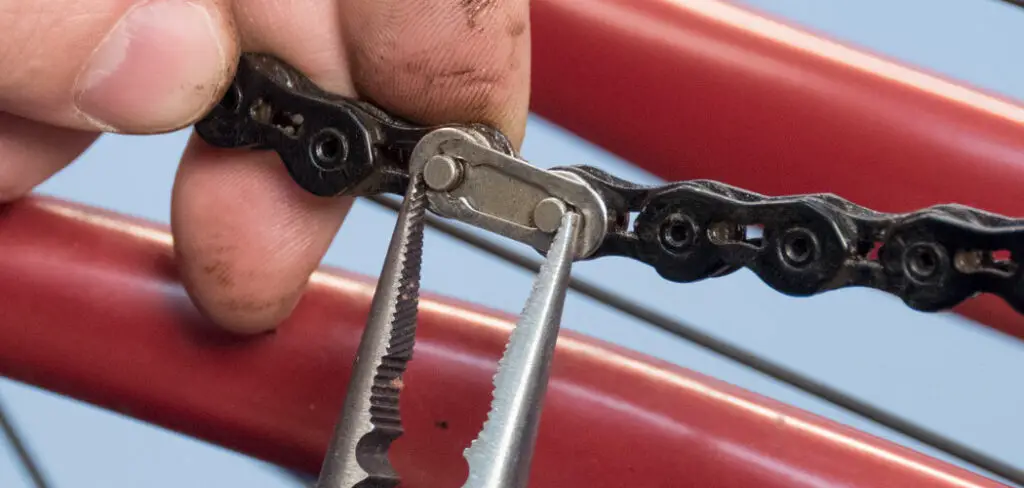
Step 2: Use a Chain Breaker
A chain breaker is a specialized tool used to break the chain. To use a chain breaker, place the tool on the master link and turn the handle until the link is broken. Be careful not to apply too much pressure, as this can damage the chain or the tool.
Step 3: Remove the Chain from the Bike
Once the master link is broken, you can remove the chain from the bike. Start by lifting the chain off the chainrings and then pulling it away from the bike. Be careful not to touch any of the bike’s components with the chain, as this can cause damage.
Step 4: Remove the Chain from the Cassette
Next, remove the chain from the cassette. To do this, lift the chain off the cassette and then pull it away from the bike. Be careful not to touch any of the bike’s components with the chain, as this can cause damage.
Step 5: Inspect the Chain
Once the chain is removed, inspect it for any damage or wear. Check for any broken links, rust, or corrosion. If you find any damage, it’s best to replace the chain to ensure optimal performance and safety.
By following these steps, you can easily remove a bike chain and perform any necessary maintenance or repairs. Remember to always use the right tools and to be careful when handling the chain to avoid any damage or injury.

Common Challenges and Solutions: Overcoming Stuck Chains and Master Links
When removing a bike chain, you may encounter some common challenges, such as stuck chains and master links. These issues can be frustrating, but there are solutions to overcome them.
Stuck Chains:
A stuck chain can be caused by a variety of factors, including dirt, grime, and rust. To overcome a stuck chain, try using penetrating oil to loosen the links. Apply the oil to the affected area and let it sit for a few minutes before attempting to remove the chain. If the chain is still stuck, you can try using a chain breaker to break the link.
Master Links:
A master link is a specialized link that connects the two ends of the chain together. If the master link is stuck, it can be difficult to remove the chain. To overcome a stuck master link, try using a master link tool to loosen the link. If the link is still stuck, you can try using a chain breaker to break the link.
Specialized Tools:
In some cases, you may need to use specialized tools to remove a stuck chain or master link. These tools can include chain breakers, master link tools, and chain whips. These tools can be purchased at most bike shops or online.
Tips and Tricks:
Here are some additional tips and tricks for overcoming stuck chains and master links:
- Use penetrating oil to loosen stuck links
- Use a chain breaker to break stuck links
- Use a master link tool to loosen stuck master links
- Use a chain whip to hold the cassette in place while removing the chain
By following these tips and tricks, you can overcome common challenges and successfully remove your bike chain.
Cleaning and Maintaining Your Bike Chain for Optimal Performance
Cleaning and maintaining your bike chain is crucial for optimal performance and longevity. A dirty chain can lead to poor shifting, reduced efficiency, and increased wear on other components. In this section, we’ll discuss the importance of cleaning and maintaining your bike chain, and provide tips on how to do it effectively.
Cleaning the Chain:
To clean the chain, use a soft-bristled brush or a chain cleaner to remove any dirt, grime, or old lubricant. Be sure to clean the entire chain, including the chainrings and cassette. Use a rag to wipe away any excess dirt or grime.
Lubricating the Chain:
After cleaning the chain, apply a new layer of lubricant. Use a high-quality chain lube that is designed for your type of bike and riding conditions. Apply the lube to the entire chain, making sure to cover all the links and rollers.
Preventing Rust:
Rust can be a major problem for bike chains, especially in wet or humid conditions. To prevent rust, apply a rust-inhibiting coating to the chain after lubricating it. You can also use a chain lube that contains rust-inhibiting properties.
Tips and Tricks:
Here are some additional tips and tricks for cleaning and maintaining your bike chain:
- Clean the chain regularly to prevent dirt and grime from building up
- Use a high-quality chain lube that is designed for your type of bike and riding conditions
- Apply a rust-inhibiting coating to the chain to prevent rust
- Use a chain cleaner to remove old lubricant and dirt
By following these tips and tricks, you can keep your bike chain clean and well-maintained, ensuring optimal performance and longevity.
Reinstalling the Chain: Tips for a Smooth and Secure Reattachment
Reinstalling the bike chain can be a bit tricky, but with the right techniques and precautions, you can ensure a smooth and secure reattachment. Here are some tips to help you reinstall your bike chain:
Aligning the Chain:
Before reinstalling the chain, make sure to align it properly with the chainrings and cassette. Use a chain alignment tool to ensure the chain is properly seated on the chainrings and cassette.
Using the Master Link:
The master link is a crucial component of the chain, and it’s essential to use it correctly when reinstalling the chain. Make sure to insert the master link into the correct position on the chain, and then use a chain breaker to secure it in place.
Tightening the Chain:
Once the chain is properly aligned and the master link is in place, tighten the chain by turning the pedals in a clockwise direction. Make sure to check the chain tension regularly to ensure it’s not too loose or too tight.
Checking the Chain Tension:
Proper chain tension is essential for optimal performance and longevity. Use a chain tension gauge to check the chain tension, and adjust it as needed.
Tips and Tricks:
Here are some additional tips and tricks for reinstalling the bike chain:
- Use a chain alignment tool to ensure proper alignment
- Use a chain breaker to secure the master link in place
- Check the chain tension regularly to ensure optimal performance
- Use a chain tension gauge to adjust the chain tension as needed
By following these tips and tricks, you can ensure a smooth and secure reattachment of your bike chain, and enjoy optimal performance and longevity.

Conclusion: Mastering the Art of Bike Chain Removal
Removing a bike chain can seem like a daunting task, but with the right techniques and precautions, it’s a process that can be mastered by anyone. By following the steps outlined in this article, you’ll be able to remove your bike chain with confidence and ease.
Remember to always use the right tools and safety precautions when removing a bike chain, and to take your time when reinstalling the chain to ensure proper tension and alignment. With practice and patience, you’ll be able to master the art of bike chain removal and keep your bike running smoothly and efficiently.
Final Tips and Recommendations:
Here are some final tips and recommendations for maintaining a healthy and efficient bike chain:
- Regularly clean and lubricate your bike chain to prevent wear and tear
- Check your chain tension regularly to ensure optimal performance
- Use a chain breaker to remove stubborn chains and master links
- Practice removing and reinstalling your bike chain to build confidence and skill
By following these tips and recommendations, you’ll be able to keep your bike chain in top condition and enjoy optimal performance and longevity.
Expert Tips and Tricks: Advanced Techniques for Seasoned Cyclists
For experienced cyclists, removing a bike chain can be a straightforward process. However, there are some advanced techniques and tips that can help optimize chain performance and make the process even easier.
Using Specialized Tools:
Professional mechanics and cyclists often use specialized tools to remove bike chains. These tools can include chain breakers, chain whips, and chain cleaners. By using these tools, you can make the process of removing a bike chain faster and more efficient.
Removing Stubborn Chains:
Stubborn chains can be a challenge to remove, but there are some techniques that can help. One technique is to use a chain breaker to break the chain, and then use a chain whip to remove the chain from the bike. Another technique is to use a penetrating oil to loosen the chain and make it easier to remove.
Optimizing Chain Performance:
Optimizing chain performance is crucial for experienced cyclists. One way to optimize chain performance is to use a chain cleaner to clean the chain and remove any dirt or grime. Another way is to use a chain lube to lubricate the chain and prevent rust.
Insights from Professional Mechanics:
Professional mechanics have a wealth of knowledge when it comes to removing bike chains. One tip is to always use the correct tools and techniques to avoid damaging the chain or the bike. Another tip is to regularly clean and maintain the chain to prevent wear and tear.
Conclusion:
Removing a bike chain can seem like a daunting task, but with the right techniques and tools, it can be a straightforward process. By following the tips and techniques outlined in this article, you can optimize chain performance and make the process of removing a bike chain easier and more efficient.
