Why Removing Your Cassette is Crucial for Bike Performance
Regular bike maintenance is essential to ensure optimal performance, and one of the most critical tasks is learning how to remove cassette from bike. A well-maintained cassette guarantees smooth gear shifting, reduces wear and tear on the drivetrain, and enhances overall bike efficiency. Failing to remove and clean the cassette can lead to premature wear, poor shifting, and decreased performance. By incorporating cassette removal into your regular bike maintenance routine, you can enjoy a smoother ride, improved pedaling efficiency, and reduced maintenance costs in the long run. In fact, a clean cassette can improve gear shifting by up to 30%, making it an essential task for any serious cyclist.

Click Image to Find eBike Products

Preparation is Key: Gathering Essential Tools and Supplies
Before learning how to remove cassette from bike, it’s crucial to gather the necessary tools and supplies to ensure a smooth and successful process. The essential tools required for cassette removal include a cassette removal tool, also known as a lockring tool, and a chain whip. The cassette removal tool is specifically designed to fit onto the lockring and provide the necessary leverage to loosen it, while the chain whip helps to hold the cassette in place during removal. Additionally, it’s recommended to have new cassette spacers on hand to replace any worn or damaged ones. Having these tools and supplies ready will save time and frustration during the removal process, and ensure that the job is done correctly.

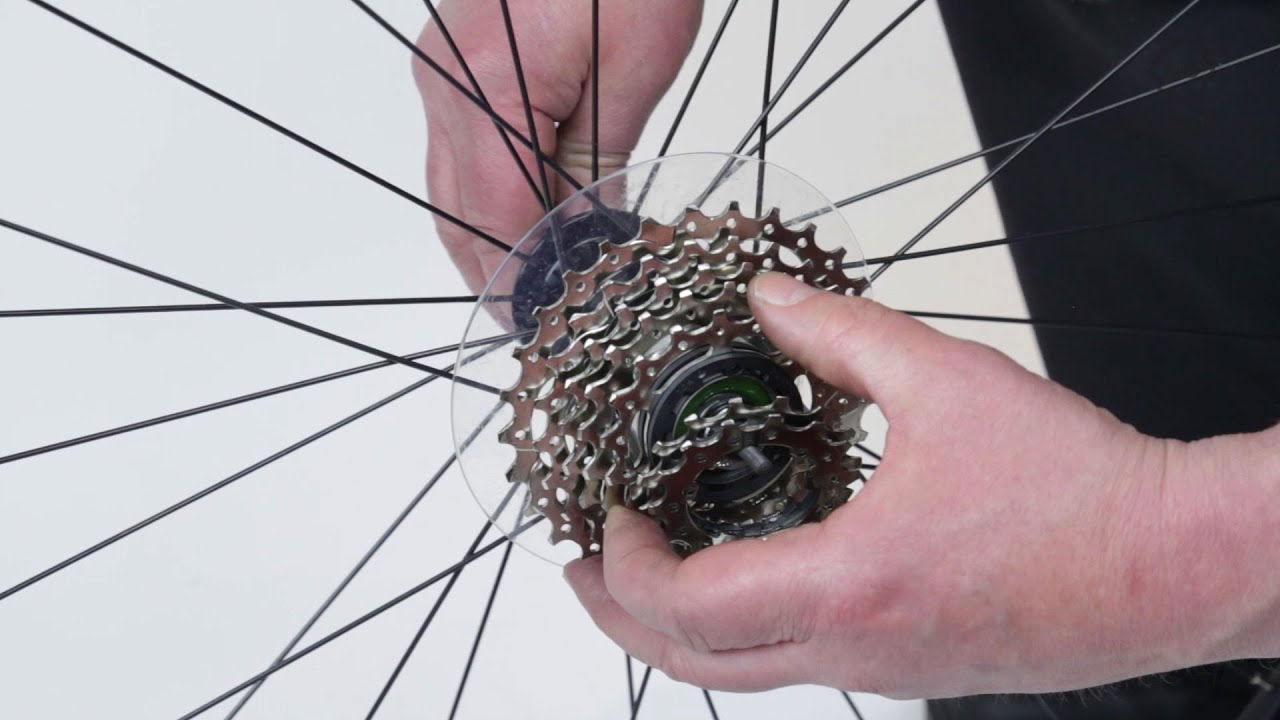
How to Remove a Cassette: A Step-by-Step Tutorial
Now that you have the necessary tools and supplies, it’s time to learn how to remove cassette from bike. Follow this step-by-step guide to ensure a smooth and successful removal process.
Step 1: Loosen the Lockring
Begin by attaching the cassette removal tool to the lockring and turning it counterclockwise. Apply gentle pressure to loosen the lockring, but do not remove it yet.
Step 2: Remove the Cassette
Once the lockring is loose, use the chain whip to hold the cassette in place. Then, remove the cassette from the freehub body by pulling it straight off.
Step 3: Clean the Freehub Body
Use a soft brush or cloth to remove any dirt, grime, or old lubricant from the freehub body. This will ensure a clean surface for the new cassette.
By following these steps, you’ll be able to successfully remove the cassette from your bike. Remember to handle the components with care and take your time to avoid damaging any parts.

Troubleshooting Common Issues: Overcoming Obstacles During Cassette Removal
While learning how to remove cassette from bike, it’s essential to be prepared for common issues that may arise during the process. By understanding these potential obstacles, you can take steps to overcome them and ensure a successful removal.
Stuck Cassettes
If the cassette is stuck to the freehub body, apply penetrating oil to the area and let it sit for a few hours. This should loosen the cassette and make it easier to remove. If the cassette is still stubborn, consider using a cassette removal tool with a longer handle for extra leverage.
Damaged Freehubs
If the freehub body is damaged, it may be necessary to replace it before reinstalling the cassette. Inspect the freehub body for any signs of wear or damage, and replace it if necessary.
Incorrect Tool Usage
Using the wrong tools or using them incorrectly can lead to damaged components or stripped threads. Always use the correct tools for the job, and follow the manufacturer’s instructions for their use.
Other common issues that may arise during cassette removal include worn or damaged cassette spacers, misaligned cassettes, and seized lockrings. By being aware of these potential issues, you can take steps to prevent them and ensure a smooth removal process.

Cassette Removal for Different Bike Types: What You Need to Know
When it comes to learning how to remove cassette from bike, it’s essential to consider the unique characteristics of different bike types. Whether you’re working with a road bike, mountain bike, or hybrid bike, there are specific challenges and considerations to keep in mind.
Road Bikes
Road bikes typically have a narrower freehub body and a more compact cassette design. This can make it more difficult to remove the cassette, as there is less clearance between the cassette and the freehub body. To overcome this, use a cassette removal tool with a longer handle to provide extra leverage.
Mountain Bikes
Mountain bikes often have a wider freehub body and a more robust cassette design. This can make it easier to remove the cassette, but also increases the risk of damaging the freehub body or cassette. Be sure to use a cassette removal tool specifically designed for mountain bikes, and take extra care when removing the cassette.
Hybrid Bikes
Hybrid bikes typically have a freehub body and cassette design that falls somewhere between road and mountain bikes. When removing the cassette from a hybrid bike, use a cassette removal tool with a medium-length handle and take care to avoid damaging the freehub body or cassette.
In addition to these bike-specific considerations, it’s also important to consider the type of cassette and freehub body used on your bike. Some cassettes and freehub bodies may have unique features or requirements that affect the removal process. Always consult your bike’s manual or manufacturer’s instructions for specific guidance on how to remove cassette from bike.

Reinstalling Your Cassette: Tips for a Smooth and Secure Refit
Once you’ve successfully removed your cassette, it’s essential to reinstall it correctly to ensure smooth gear shifting and optimal bike performance. Here are some tips to help you reinstall your cassette with confidence.
Ensure Correct Alignment
Before reinstalling the cassette, make sure it’s properly aligned with the freehub body. Misaligned cassettes can lead to poor gear shifting and premature wear on the cassette and chain. Use a cassette alignment tool to ensure the cassette is properly seated.
Tighten the Lockring
Tighten the lockring in a star pattern to ensure even pressure and prevent damage to the freehub body. Use a torque wrench to tighten the lockring to the recommended specification.
Check Gear Shifting
After reinstalling the cassette, check the gear shifting to ensure it’s smooth and accurate. Make any necessary adjustments to the derailleur or cassette to achieve optimal shifting performance.
Inspect the Cassette and Chain
Inspect the cassette and chain for any signs of wear or damage. Clean and lubricate the chain as necessary, and replace the cassette or chain if they’re excessively worn.
By following these tips, you can ensure a smooth and secure refit of your cassette, and get back to enjoying a smooth, efficient ride. Remember, regular cassette removal and maintenance is key to optimal bike performance, so be sure to make it a regular part of your bike maintenance routine.
Maintenance After Cassette Removal: Keeping Your Bike in Top Condition
After successfully removing and reinstalling your cassette, it’s essential to perform regular bike maintenance to keep your bike running smoothly and efficiently. This includes tasks that will help prevent wear and tear, improve performance, and ensure your safety on the road or trail.
Clean and Lubricate the Chain
A clean and well-lubricated chain is crucial for smooth gear shifting and to prevent premature wear on the cassette and chainrings. Use a chain cleaner and lubricant specifically designed for bike chains, and follow the manufacturer’s instructions for application.
Check Brake Pads
Worn-out brake pads can lead to poor braking performance and compromise your safety on the bike. Inspect the brake pads and replace them if they’re excessively worn. Make sure to follow the manufacturer’s instructions for brake pad replacement.
Inspect the Bike’s Overall Condition
Regularly inspect your bike’s overall condition, paying attention to any signs of wear or damage on the frame, wheels, and components. Address any issues promptly to prevent them from becoming major problems.
By incorporating these maintenance tasks into your regular bike maintenance routine, you’ll be able to enjoy a smoother, more efficient ride and extend the lifespan of your bike’s components. Remember, regular cassette removal and maintenance is a crucial part of keeping your bike in top condition, so be sure to make it a regular part of your bike maintenance routine.
By following these tips and guidelines, you’ll be able to master the process of how to remove cassette from bike and keep your bike running smoothly and efficiently. Regular cassette removal and maintenance is a crucial part of bike ownership, and by incorporating it into your regular bike maintenance routine, you’ll be able to enjoy a smoother, more efficient ride for years to come.

Conclusion: Mastering Cassette Removal for a Smoother Ride
In conclusion, mastering the process of how to remove cassette from bike is a crucial aspect of bike maintenance that can significantly improve the performance and longevity of your bike. By following the steps outlined in this guide, you’ll be able to remove and reinstall your cassette with confidence, ensuring smooth gear shifting, reduced wear and tear, and enhanced overall bike performance.
Remember, regular cassette removal and maintenance is key to keeping your bike in top condition. By incorporating this process into your regular bike maintenance routine, you’ll be able to enjoy a smoother, more efficient ride and extend the lifespan of your bike’s components.
Whether you’re a seasoned cyclist or a beginner, understanding how to remove cassette from bike is an essential skill that will pay dividends in the long run. By following the tips and guidelines outlined in this article, you’ll be able to master the process of cassette removal and take your bike maintenance skills to the next level.
So, take the first step towards a smoother ride today and learn how to remove cassette from bike with confidence. With regular maintenance and upkeep, you’ll be able to enjoy a more efficient, more enjoyable ride for years to come.