
Understanding the Basics of Tubeless Tires
Tubeless tires have revolutionized the world of cycling, offering a range of benefits over traditional tires. By eliminating the inner tube, tubeless tires provide a smoother ride, improved traction, and increased puncture resistance. However, they also require specific installation and maintenance procedures to ensure optimal performance and prevent damage.

Click Image to Find eBike Products
One of the primary advantages of tubeless tires is their ability to self-seal small punctures. This is achieved through the use of a liquid sealant, which is injected into the tire and coats the inner surface. The sealant is designed to seal small holes and cuts, allowing the tire to maintain air pressure and continue running smoothly.
Despite their benefits, tubeless tires are not immune to damage. Punctures can still occur, and improper installation or maintenance can lead to a range of issues, including tire burping, sealant leakage, and rim damage. To prevent these problems, it is essential to understand the basics of tubeless tires and follow proper installation and maintenance procedures.
When installing tubeless tires, it is crucial to ensure the rim is clean and free of debris. The tire must be properly seated on the rim, and the sealant must be injected in the correct amount. Failure to follow these procedures can lead to a range of issues, including poor tire performance and increased risk of punctures.
Regular maintenance is also critical to ensure the longevity of tubeless tires. This includes checking sealant levels, inspecting the tire and rim for damage, and cleaning the tire to prevent the buildup of debris. By following these procedures, cyclists can enjoy the benefits of tubeless tires while minimizing the risk of punctures and damage.
For those looking to learn how to repair tubeless bicycle tires, understanding the basics of tubeless tires is essential. By grasping the fundamental principles of tubeless tire design and function, cyclists can better appreciate the importance of proper installation and maintenance. This knowledge will also provide a solid foundation for learning more advanced repair techniques, allowing cyclists to confidently tackle even the most complex punctures and damage.
Essential Tools and Materials for Tubeless Tire Repair
When it comes to repairing tubeless bicycle tires, having the right tools and materials is crucial. The correct equipment can make all the difference in ensuring a successful repair and getting back on the road quickly. In this section, we will discuss the essential tools and materials needed for tubeless tire repair.
Tire levers are a must-have for any tubeless tire repair. These levers are designed to pry the tire off the rim, allowing for easy removal and inspection. Look for tire levers made from durable materials, such as metal or high-quality plastic, and consider a set with multiple levers of different sizes.
Sealant is another critical component of tubeless tire repair. This liquid sealant is designed to coat the inside of the tire and seal small punctures. When choosing a sealant, consider the type of riding you will be doing and the conditions you will be riding in. Some sealants are designed for specific types of terrain or weather conditions.
Tire plugs are also an essential tool for tubeless tire repair. These small plugs are designed to seal larger punctures and can be used in conjunction with sealant. Look for tire plugs made from durable materials, such as rubber or plastic, and consider a set with multiple plugs of different sizes.
Other essential tools and materials for tubeless tire repair include a rim cleaner, a tire boot, and a pump or compressor. A rim cleaner is used to clean the rim of any debris or old sealant, while a tire boot is used to reinforce the tire in the event of a large puncture. A pump or compressor is necessary for inflating the tire to the recommended pressure.
When choosing tools and materials for tubeless tire repair, consider the quality and durability of the products. Look for tools and materials made from high-quality materials and designed specifically for tubeless tire repair. By having the right tools and materials, you can ensure a successful repair and get back on the road quickly.
For those looking to learn how to repair tubeless bicycle tires, having the right tools and materials is just the first step. By understanding the basics of tubeless tires and having the correct equipment, you can begin to learn more advanced repair techniques and become proficient in tubeless tire repair.
Identifying and Diagnosing Punctures and Damage
When it comes to repairing tubeless bicycle tires, identifying and diagnosing punctures and damage is crucial. By understanding the common types of punctures and damage that can occur, cyclists can take the necessary steps to repair their tires and get back on the road quickly.
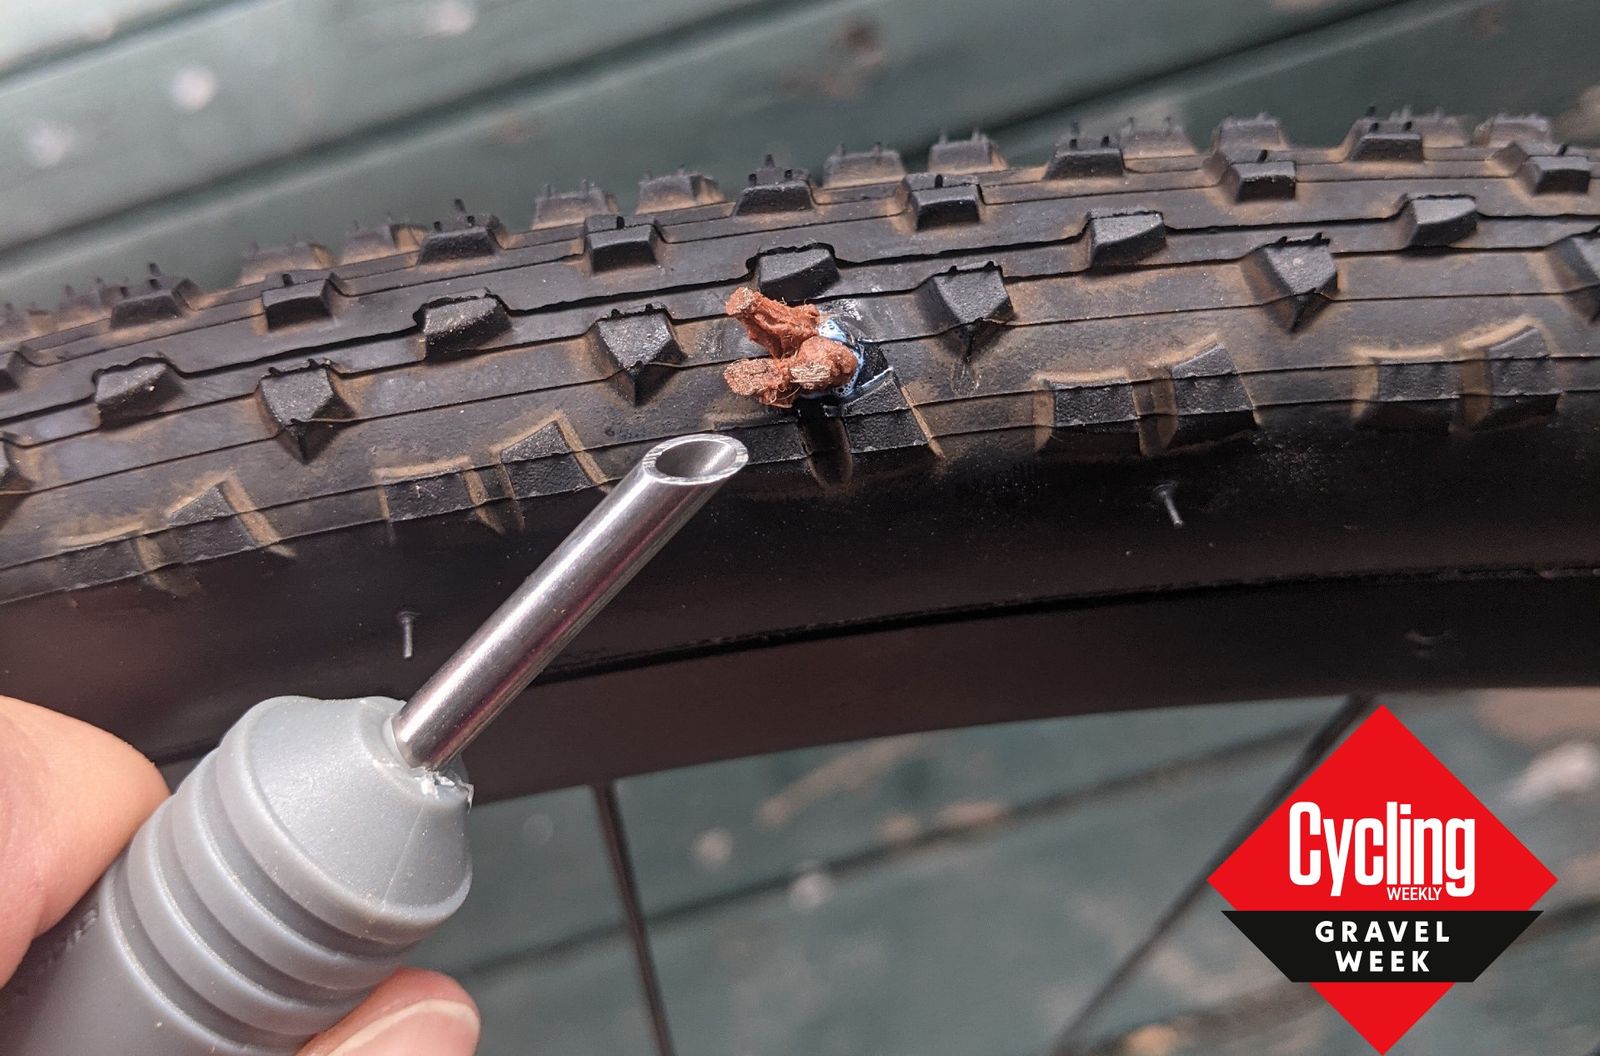
One of the most common types of punctures that can occur on tubeless tires is a cut or tear. This can happen when the tire comes into contact with a sharp object, such as a rock or a piece of glass. To identify a cut or tear, inspect the tire for any signs of damage, such as a hole or a gash. If the damage is minor, it may be possible to repair the tire with sealant or a tire plug.
Bead damage is another common issue that can occur on tubeless tires. This can happen when the tire is not properly seated on the rim, or when the rim is damaged. To identify bead damage, inspect the tire and rim for any signs of damage, such as cracks or dents. If the damage is minor, it may be possible to repair the tire by re-seating the bead or replacing the rim.
Other common types of punctures and damage that can occur on tubeless tires include pinch flats, snake bites, and rim damage. Pinch flats occur when the tire is pinched between the rim and an object, such as a rock. Snake bites occur when the tire is punctured by a sharp object, such as a thorn. Rim damage can occur when the rim is damaged, such as when it is bent or cracked.
To diagnose punctures and damage, it is essential to inspect the tire and rim carefully. Look for any signs of damage, such as holes, gashes, or cracks. Check the tire for any signs of wear, such as worn-down tread or damaged sidewalls. Check the rim for any signs of damage, such as dents or cracks.
Once the puncture or damage has been identified, it is essential to take the necessary steps to repair the tire. This may involve applying sealant, installing a tire plug, or replacing the tire or rim. By understanding the common types of punctures and damage that can occur on tubeless tires, cyclists can take the necessary steps to repair their tires and get back on the road quickly.
For those looking to learn how to repair tubeless bicycle tires, identifying and diagnosing punctures and damage is an essential step. By understanding the common types of punctures and damage that can occur, cyclists can take the necessary steps to repair their tires and get back on the road quickly.

Step-by-Step Guide to Repairing Tubeless Tires
Repairing a tubeless tire can seem like a daunting task, but with the right tools and a step-by-step guide, it can be a relatively straightforward process. In this section, we will walk you through the steps to repair a tubeless tire, including removing the tire from the rim, inspecting and cleaning the area, applying sealant, and reinstalling the tire.
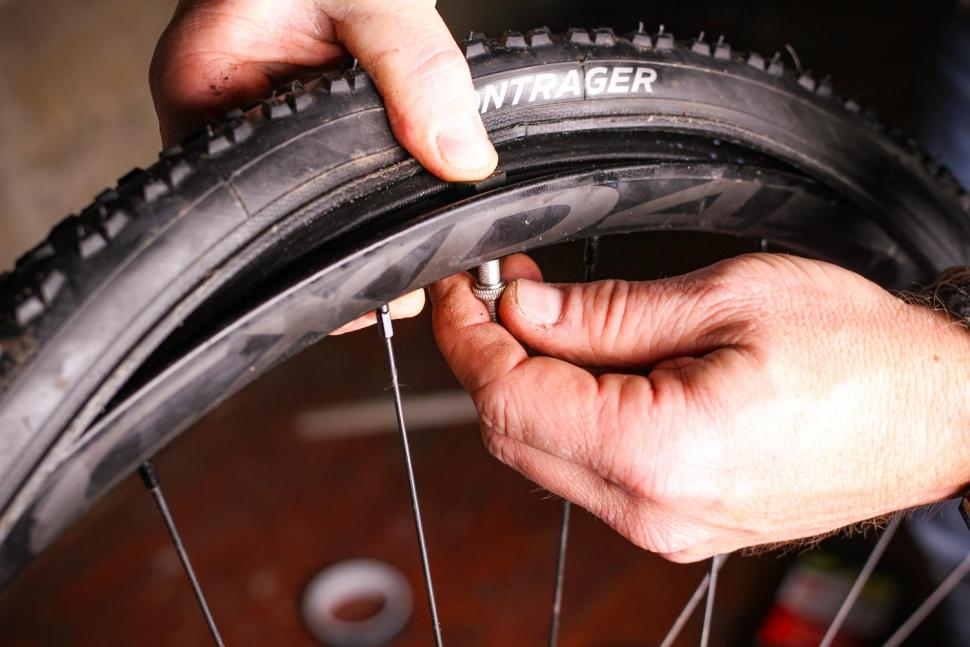
Step 1: Remove the Tire from the Rim
To begin, you will need to remove the tire from the rim. This can be done using tire levers, which are specifically designed for this purpose. Start by inserting the lever between the tire and the rim, and then work your way around the tire until it is completely removed.
Step 2: Inspect and Clean the Area
Once the tire is removed, inspect the area for any debris or sharp objects that may have caused the puncture. Clean the area thoroughly with a rag or brush to ensure that it is free from any contaminants.
Step 3: Apply Sealant
Next, apply a small amount of sealant to the affected area. This will help to seal the puncture and prevent any further air leaks. Make sure to follow the manufacturer’s instructions for the correct amount of sealant to use.
Step 4: Reinstall the Tire
Once the sealant has been applied, it’s time to reinstall the tire. Start by placing the tire back onto the rim, making sure that it is properly seated. Use tire levers to ensure that the tire is securely in place.
Step 5: Inflate the Tire
Finally, inflate the tire to the recommended pressure. Make sure to check the tire for any signs of leaks or damage before putting it back into use.
By following these steps, you should be able to successfully repair a tubeless tire. Remember to always follow proper safety precautions when working with tires, and to seek professional help if you are unsure about any part of the process.
For those looking to learn how to repair tubeless bicycle tires, this step-by-step guide should provide a comprehensive overview of the process. By following these steps, you can ensure that your tubeless tires are properly repaired and ready for use.

Using Tire Plugs and Booting for More Serious Repairs
While sealant can be effective for small punctures, more serious damage may require the use of tire plugs and booting. Tire plugs are small, rubber inserts that are designed to seal larger punctures, while booting involves applying a patch to the inside of the tire to reinforce the damaged area.
Tire plugs are a great option for punctures that are too large for sealant to seal. They are easy to install and can be used to repair a variety of punctures, including those caused by thorns, glass, and metal objects. To install a tire plug, simply insert the plug into the puncture and trim the excess material with a pair of scissors or a plug trimmer.
Booting, on the other hand, is a more involved process that requires the use of a patch kit. A patch kit typically includes a patch, a tube of cement, and a set of instructions. To apply a patch, clean the area around the puncture with a rag and apply a small amount of cement to the patch. Then, place the patch over the puncture and press it firmly into place.
Both tire plugs and booting can be effective for more serious punctures, but they require a bit more effort and expertise to install. However, with the right tools and a bit of practice, you can learn to use these techniques to repair even the most serious punctures.
When using tire plugs and booting, it’s essential to follow the manufacturer’s instructions and take the necessary safety precautions. Make sure to wear gloves and safety glasses, and work in a well-ventilated area to avoid inhaling any fumes from the cement or other materials.
For those looking to learn how to repair tubeless bicycle tires, using tire plugs and booting can be a valuable skill to have. By mastering these techniques, you can ensure that your tires are properly repaired and ready for use, even in the event of a serious puncture.
Remember to always follow proper safety precautions when working with tire plugs and booting, and to seek professional help if you are unsure about any part of the process. With a bit of practice and patience, you can become proficient in the use of tire plugs and booting and be back on the road in no time.

Reinstalling and Inflating the Tire
Once the repair is complete, it’s time to reinstall the tire on the rim and inflate it to the recommended pressure. This is a critical step in the repair process, as improper installation can lead to further damage or punctures.
To reinstall the tire, start by placing the tire back onto the rim, making sure that it is properly seated. Use tire levers to ensure that the tire is securely in place, and make sure that the valve stem is pointing in the correct direction.
Next, inflate the tire to the recommended pressure. This can be done using a pump or a compressor, and it’s essential to follow the manufacturer’s instructions for the correct pressure. Make sure to check the tire for any signs of leaks or damage before putting it back into use.
When reinstalling the tire, it’s also important to ensure that the tire is properly seated on the rim. This can be done by checking the tire’s bead for any signs of damage or wear, and making sure that the tire is properly centered on the rim.
Additionally, it’s essential to check the tire’s pressure regularly to ensure that it is at the recommended level. This can help to prevent further punctures or damage, and ensure that the tire is running smoothly and efficiently.
For those looking to learn how to repair tubeless bicycle tires, reinstalling and inflating the tire is a critical step in the process. By following the manufacturer’s instructions and taking the necessary precautions, you can ensure that your tire is properly installed and ready for use.
Remember to always follow proper safety precautions when working with tires, and to seek professional help if you are unsure about any part of the process. With a bit of practice and patience, you can become proficient in the art of tubeless tire repair and be back on the road in no time.
Troubleshooting Common Issues with Tubeless Tire Repair
While tubeless tire repair can be a relatively straightforward process, there are some common issues that can arise. In this section, we will discuss some of the most common problems that can occur during tubeless tire repair, and provide troubleshooting tips and solutions to these problems.
One of the most common issues that can occur during tubeless tire repair is sealant not sealing. This can be caused by a variety of factors, including using the wrong type of sealant, not applying enough sealant, or not allowing the sealant to dry properly. To troubleshoot this issue, try reapplying sealant and allowing it to dry for a longer period of time.
Another common issue that can occur during tubeless tire repair is the tire not holding air. This can be caused by a puncture that is too large for the sealant to seal, or by a faulty valve stem. To troubleshoot this issue, try inspecting the tire for any signs of damage or wear, and replacing the valve stem if necessary.
Rim damage is another common issue that can occur during tubeless tire repair. This can be caused by a variety of factors, including using the wrong type of rim tape, not applying enough rim tape, or not allowing the rim tape to dry properly. To troubleshoot this issue, try reapplying rim tape and allowing it to dry for a longer period of time.
By following these troubleshooting tips and solutions, you can overcome common issues that can arise during tubeless tire repair and ensure that your tire is properly repaired and ready for use.
For those looking to learn how to repair tubeless bicycle tires, troubleshooting common issues is an essential part of the process. By understanding the common problems that can occur and how to solve them, you can become more confident and proficient in your ability to repair tubeless tires.
Remember to always follow proper safety precautions when working with tires, and to seek professional help if you are unsure about any part of the process. With a bit of practice and patience, you can become proficient in the art of tubeless tire repair and be back on the road in no time.

Maintenance and Prevention for a Puncture-Free Ride
Regular maintenance and inspection are crucial to preventing punctures and damage to tubeless tires. By following a few simple tips, you can help ensure that your tires remain in good condition and provide a puncture-free ride.
One of the most important things you can do to maintain your tubeless tires is to check the sealant levels regularly. Sealant is what helps to seal punctures and prevent air leaks, so it’s essential to make sure that there is enough sealant in the tire. Check the sealant levels every few weeks, and top them off as needed.
In addition to checking sealant levels, it’s also important to inspect the tire and rim regularly. Look for any signs of damage or wear, such as cuts, tears, or cracks. If you notice any damage, make sure to address it promptly to prevent further damage or punctures.
Another important thing you can do to maintain your tubeless tires is to avoid hazards on the road. Try to avoid riding over sharp objects, such as rocks or glass, and avoid riding in areas with a lot of debris. By avoiding hazards, you can help reduce the risk of punctures and damage to your tires.
Finally, make sure to follow the manufacturer’s instructions for maintaining and repairing your tubeless tires. Different manufacturers may have different recommendations for maintenance and repair, so it’s essential to follow their guidelines to ensure that your tires remain in good condition.
By following these tips, you can help ensure that your tubeless tires remain in good condition and provide a puncture-free ride. Regular maintenance and inspection are key to preventing punctures and damage, so make sure to stay on top of it.
For those looking to learn how to repair tubeless bicycle tires, maintenance and prevention are essential parts of the process. By understanding how to maintain and prevent punctures, you can become more confident and proficient in your ability to repair tubeless tires.
