Recognizing the Need for a New Bicycle Chain
Over time, bike chains endure wear and tear, leading to signs that indicate it’s time for a replacement. Excessive wear can result in poor shifting performance, increased noise, and even damage to other bike components. Recognizing these signs and addressing them promptly is crucial for maintaining your bike’s overall health and longevity. Regular maintenance and timely replacement of the bike chain can prevent costly repairs and extend the lifespan of other drivetrain components. In fact, a well-maintained chain can contribute to the smooth operation of the entire drivetrain, ensuring an enjoyable and efficient riding experience.
To determine if your bike chain needs replacement, consider the following indicators:

Click Image to Find eBike Products
- Stretch: A worn-out chain will stretch, leading to inaccurate gear shifts and increased wear on cassette and chainring teeth.
- Noise: A noisy chain, especially when pedaling under load, can signal excessive wear or insufficient lubrication.
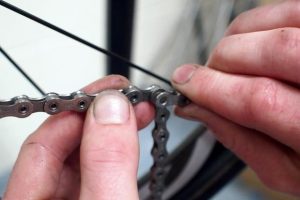
- Visual Inspection: Examine the chain for signs of wear, such as elongated or misshapen chain links. A chain wear indicator tool can help quantify the extent of chain wear.
- Shifting Performance: Poor shifting performance, especially when changing gears, can indicate that the chain is worn out or in need of lubrication.
By staying vigilant and addressing these signs early, you can ensure a safer, more enjoyable ride while preserving the lifespan of your bike’s drivetrain components.

Gathering the Necessary Tools and Parts
Before embarking on the task of replacing a bike chain, it’s essential to gather the necessary tools and parts to ensure a smooth and efficient process. Here’s a list of essential items and considerations for various drivetrain systems:
- New Bike Chain: Choose a chain compatible with your drivetrain, such as Shimano, SRAM, or Campagnolo. For optimal performance, consider purchasing a chain from the same manufacturer as your drivetrain components.
- Chain Removal Tool: This tool is designed to remove the bike chain’s connecting pin or rivet, allowing for easy chain removal. Ensure that the chain removal tool matches your chain’s width for a secure and accurate grip.
- Chain Link Pliers: These pliers are helpful for disconnecting and reconnecting chains with a master link. They can also assist in the removal of stubborn chain links that refuse to separate using the chain removal tool.
- Master Link (if applicable): Some chains come with a master link, which simplifies the chain installation process. If your chain does not include a master link, you may need to rejoin the chain using a chain tool.
By gathering these essential tools and parts beforehand, you can streamline the bike chain replacement process and minimize potential complications. Preparation is key to successfully replacing a bike chain and ensuring the longevity of your drivetrain components.

Preparing the Bike for Chain Removal
Before removing the old bike chain, it’s crucial to prepare the bike to minimize potential damage and ensure a smooth chain replacement process. Follow these steps to prepare your bike for chain removal:
- Shift the bike into the smallest chainring and smallest rear cog. This position allows for easier chain removal and minimizes the risk of damaging the derailleur or other components.
- Securely support the bike. Using a bike stand or propping the bike against a wall can prevent it from tipping over during the chain removal process. Ensure the bike remains stable and safe throughout the procedure.
- Inspect the chain for any signs of damage or wear. While the chain may appear worn, it’s essential to check for any broken or damaged links that may require special attention during removal. Carefully handle the chain to avoid causing further damage to the chain or bike components.
By following these simple steps, you can adequately prepare your bike for chain removal, ensuring a safer and more efficient chain replacement process.

Removing the Old Bike Chain
Once the bike is prepared for chain removal, you can proceed to remove the old chain using a chain removal tool and chain link pliers. Follow these steps for a successful chain removal:
- Position the chain removal tool: Insert the chain removal tool into the chain link closest to the rear derailleur. Ensure the tool is properly engaged with the chain pin, providing a secure grip.
- Push the chain removal tool: While holding the bike steady, carefully push the chain removal tool handle away from the bike, causing the chain pin to gradually disengage from the chain. Stop pushing when the chain pin is almost completely removed.
- Disconnect the chain: Using chain link pliers, gently twist and separate the chain link connected to the chain pin that was partially pushed out by the chain removal tool. The old chain should now be detached from the bike.
- Handle the old chain with care: Carefully set aside the old chain, ensuring it doesn’t come into contact with the bike’s drivetrain or other components. This precaution prevents potential damage or injury.
By following these steps, you can successfully remove the old bike chain without causing damage to the bike or the chain itself.
Selecting and Sizing the New Bike Chain
Choosing the appropriate new bike chain is crucial for optimal performance and longevity. Consider the following factors when selecting a new chain:
- Chain Length: Measure the old chain’s length to determine the appropriate chain length for your bike. Typically, a new chain will be the same length as the old one, but it’s essential to double-check to ensure proper tension and alignment.
- Width: The chain width should match the width of your bike’s cassette or freewheel. Common chain widths include 1/8″ for single-speed bikes and 3/32″ or 1/12″ for multi-speed bikes. Refer to your bike’s manual or consult the manufacturer for guidance on selecting the correct chain width.
- Compatibility: Ensure the new chain is compatible with your bike’s drivetrain. Most modern bikes use a quick-link or master link system, which simplifies chain installation and removal. If your bike has a different system, consult the manufacturer’s recommendations for chain compatibility.
Sizing the New Bike Chain
To size the new bike chain, follow these steps:
- Thread the new chain through the bike’s derailleur and chainrings, but do not connect the ends yet. Ensure the chain is not twisted or kinked during this process.
- With the rear wheel in its normal position, pull the chain taut and align the ends. The chain should be long enough to allow for proper tension and alignment, but not so long that it sags or becomes loose.
- Connect the new chain using a master link or by rejoining the chain with a chain tool. Ensure the connection is secure and properly aligned before proceeding.
By carefully selecting and sizing the new bike chain, you can ensure optimal performance and longevity for your bike’s drivetrain.

Installing the New Bike Chain
Once you’ve selected and sized the new bike chain, you can proceed with the installation process. Here’s a step-by-step guide to installing the new bike chain:
- Connect the new chain to the rear derailleur: Engage the new chain with the cogset by connecting the chain to the rear derailleur’s jockey wheel. Ensure the chain is properly aligned and not twisted.
- Thread the chain through the derailleur and chainrings: Carefully thread the new chain through the derailleur and chainrings, ensuring it is not twisted or kinked. Maintain tension on the chain as you thread it through to prevent it from becoming too loose or too tight.
- Connect the new chain: If your new chain includes a master link, follow the manufacturer’s instructions to connect the chain using the master link. If your chain does not include a master link, use a chain tool to rejoin the chain. Align the chain ends and carefully push the chain tool pin through the connecting link, ensuring a secure connection.
- Check chain tension and alignment: Once the new chain is installed, double-check the chain tension and alignment. The chain should be taut but not overly tight, and it should run smoothly through the derailleur and chainrings without any twists or kinks.
By carefully following these steps, you can successfully install your new bike chain and ensure optimal performance and longevity for your bike’s drivetrain.

Fine-Tuning the Bike’s Derailleur and Shifting
After installing a new bike chain, it’s essential to fine-tune the derailleur and shifting system to ensure smooth and accurate shifting. Here’s how to adjust the limit screws and cable tension:
Limit Screws
Limit screws control the extremes of your derailleur’s movement. There are typically two limit screws on a rear derailleur, one for the high gear (smallest cog) and one for the low gear (largest cog). To adjust the limit screws:
- Locate the limit screws: The high gear screw is usually marked ‘H’ or ‘+’, while the low gear screw is marked ‘L’ or ‘-‘.
- Test the shifting: Shift through the gears to identify any issues. If the chain won’t shift onto the smallest or largest cog, or if it’s rubbing against the cog, you’ll need to adjust the corresponding limit screw.
- Adjust the limit screws: Using a screwdriver, turn the limit screws in small increments. Test the shifting after each adjustment until the chain shifts smoothly onto every cog without rubbing.
Cable Tension
Cable tension affects the shifting performance throughout the cassette. To adjust the cable tension:
- Locate the cable tension screw: This screw is usually found on the back of the derailleur, near the cable anchor point. It may be marked with an ‘M’ or ‘T’ for ‘tension’.
- Test the shifting: Shift through the gears to identify any issues. If the chain is slow to shift or skips gears, you may need to adjust the cable tension.
- Adjust the cable tension: Using a screwdriver, turn the cable tension screw in small increments. Test the shifting after each adjustment until the chain shifts smoothly and accurately.
By fine-tuning the limit screws and cable tension, you can ensure optimal shifting performance and extend the lifespan of your bike’s drivetrain components.

Performing a Test Ride and Maintenance Check
After successfully installing your new bike chain and fine-tuning the derailleur and shifting system, it’s time to hit the road or trail for a test ride. A test ride allows you to verify the proper functioning of the new bike chain and overall drivetrain. Follow these steps to ensure a successful test ride and maintenance check:
- Conduct a visual inspection: Before your test ride, double-check that the chain is properly tensioned and aligned. Ensure that the chainrings, cassette, and derailleur components are free from debris and damage.
- Perform a test ride: Ride your bike on a familiar route, paying close attention to the shifting performance and chain engagement. Test the bike in various gear combinations to ensure smooth and accurate shifting. Listen for any unusual noises, such as creaking or squeaking, which could indicate improper installation or maintenance issues.
- Maintenance check: After the test ride, inspect the chain and drivetrain components for wear or damage. Check for proper chain lubrication, ensuring that the chain is neither too dry nor too greasy. Inspect the cassette, chainrings, and derailleur pulleys for signs of wear or damage, such as bent or chipped teeth.
- Regular maintenance: Establish a regular maintenance schedule for your bike, including chain cleaning and lubrication, to ensure optimal performance and longevity of the drivetrain components.
By following these steps, you can ensure a smooth and enjoyable riding experience while maintaining the longevity of your bike’s drivetrain components.