
Why Regular Brake Maintenance is Crucial for Your Safety
Regular brake maintenance is essential to ensure your safety on the road. Worn-out brakes can lead to accidents, injuries, and even fatalities. Failing to replace disc brakes and rotors can result in brake failure, which can have devastating consequences. In fact, according to the National Highway Traffic Safety Administration (NHTSA), brake-related issues are a leading cause of vehicle crashes. By learning how to replace disc brakes and rotors, you can significantly reduce the risk of brake failure and ensure your vehicle is safe to drive. Moreover, regular brake maintenance can also improve fuel efficiency, reduce wear on other vehicle components, and save you money in the long run. Don’t wait until it’s too late, take control of your vehicle’s safety and learn how to replace disc brakes and rotors today.

Click Image to Find eBike Products
Preparing for the Job: Essential Tools and Safety Precautions
Before diving into the process of replacing disc brakes and rotors, it’s crucial to prepare yourself with the necessary tools and safety precautions. Having the right tools and safety gear can make a significant difference in the outcome of the job and ensure your safety throughout the process. To get started, you’ll need a few essential tools, including a lug wrench, caliper piston compressor, brake pad wear gauge, and a torque wrench. Additionally, make sure you have a pair of gloves, safety glasses, and a face mask to protect yourself from debris and harsh chemicals. It’s also important to ensure you have a well-ventilated workspace and a hydraulic floor jack to lift the vehicle safely. By having the right tools and safety precautions in place, you’ll be well on your way to successfully learning how to replace disc brakes and rotors.
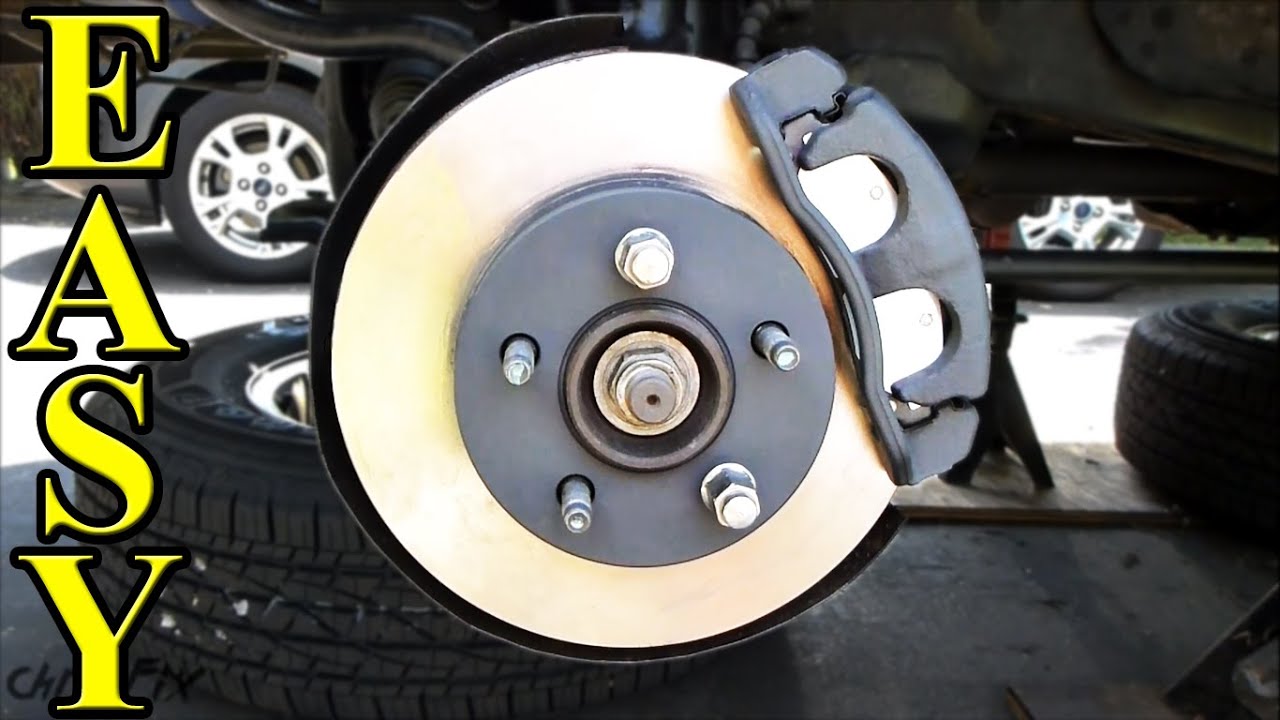
How to Remove the Wheels and Access the Brake System
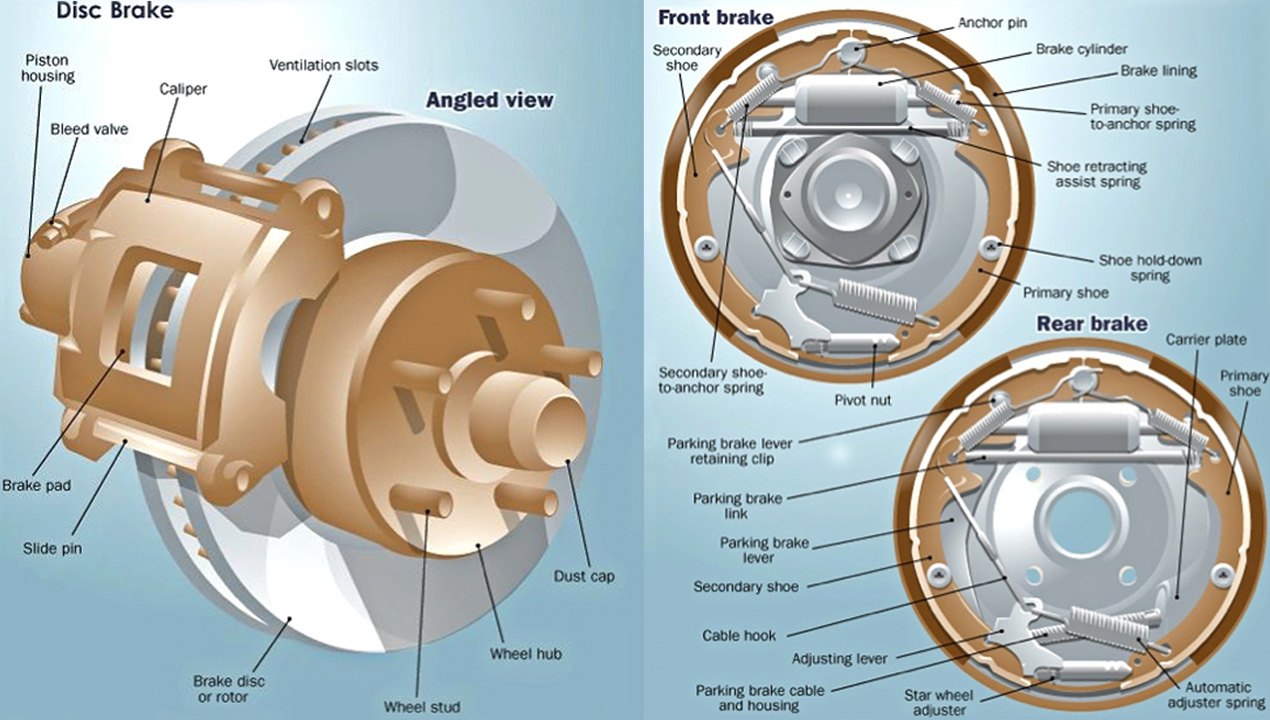
Before you can start replacing the disc brakes and rotors, you need to remove the wheels and access the brake system. This step is crucial in learning how to replace disc brakes and rotors, as it allows you to inspect and replace the worn-out components. To begin, loosen the lug nuts on the wheel using a lug wrench, but do not remove them yet. Next, raise the vehicle using a hydraulic floor jack, making sure it is securely supported by jack stands. Now, you can remove the lug nuts and take off the wheel. This will give you access to the brake system, including the caliper, rotor, and brake pads. Take note of the brake system’s components and their condition, as this will help you identify what needs to be replaced. By following these steps, you’ll be able to successfully remove the wheels and access the brake system, paving the way for a successful disc brake and rotor replacement.

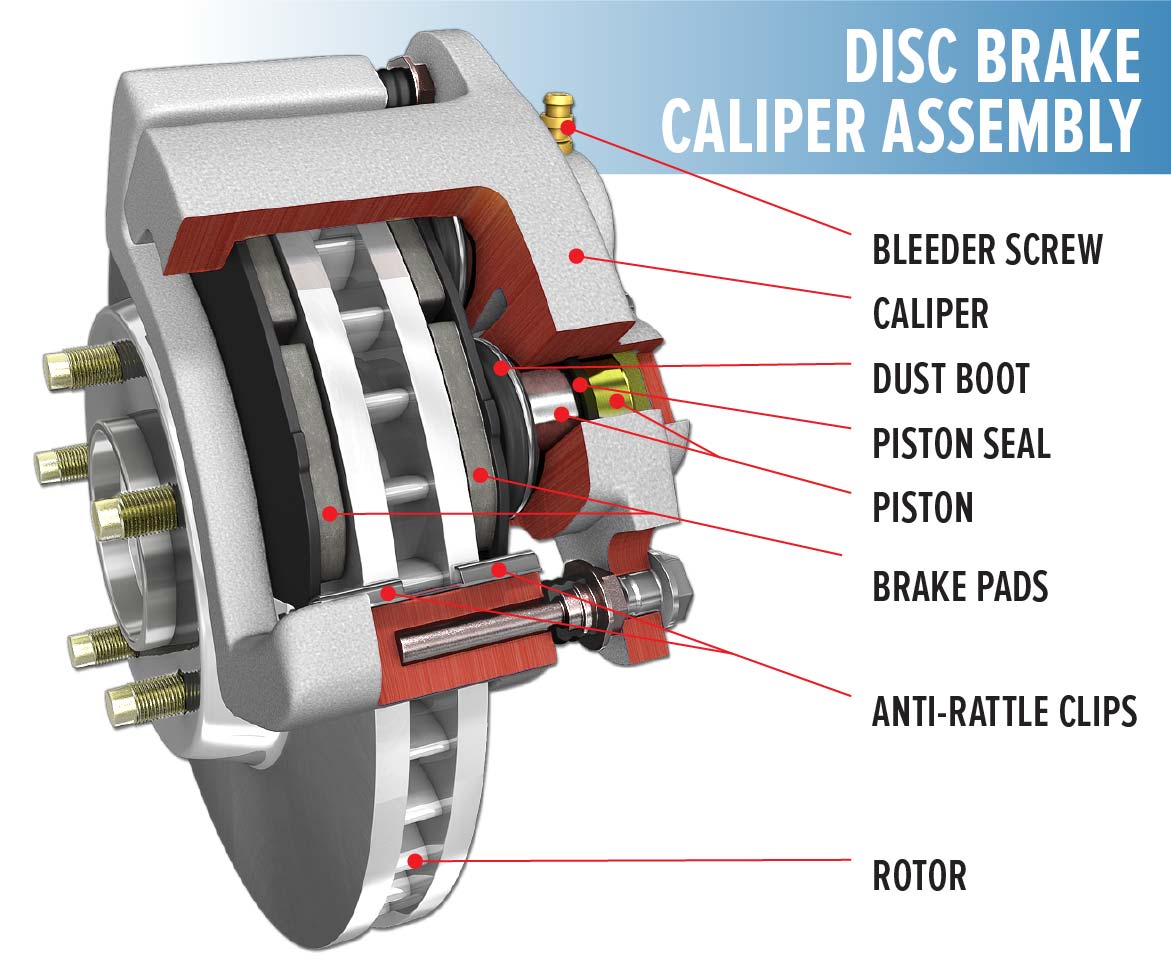
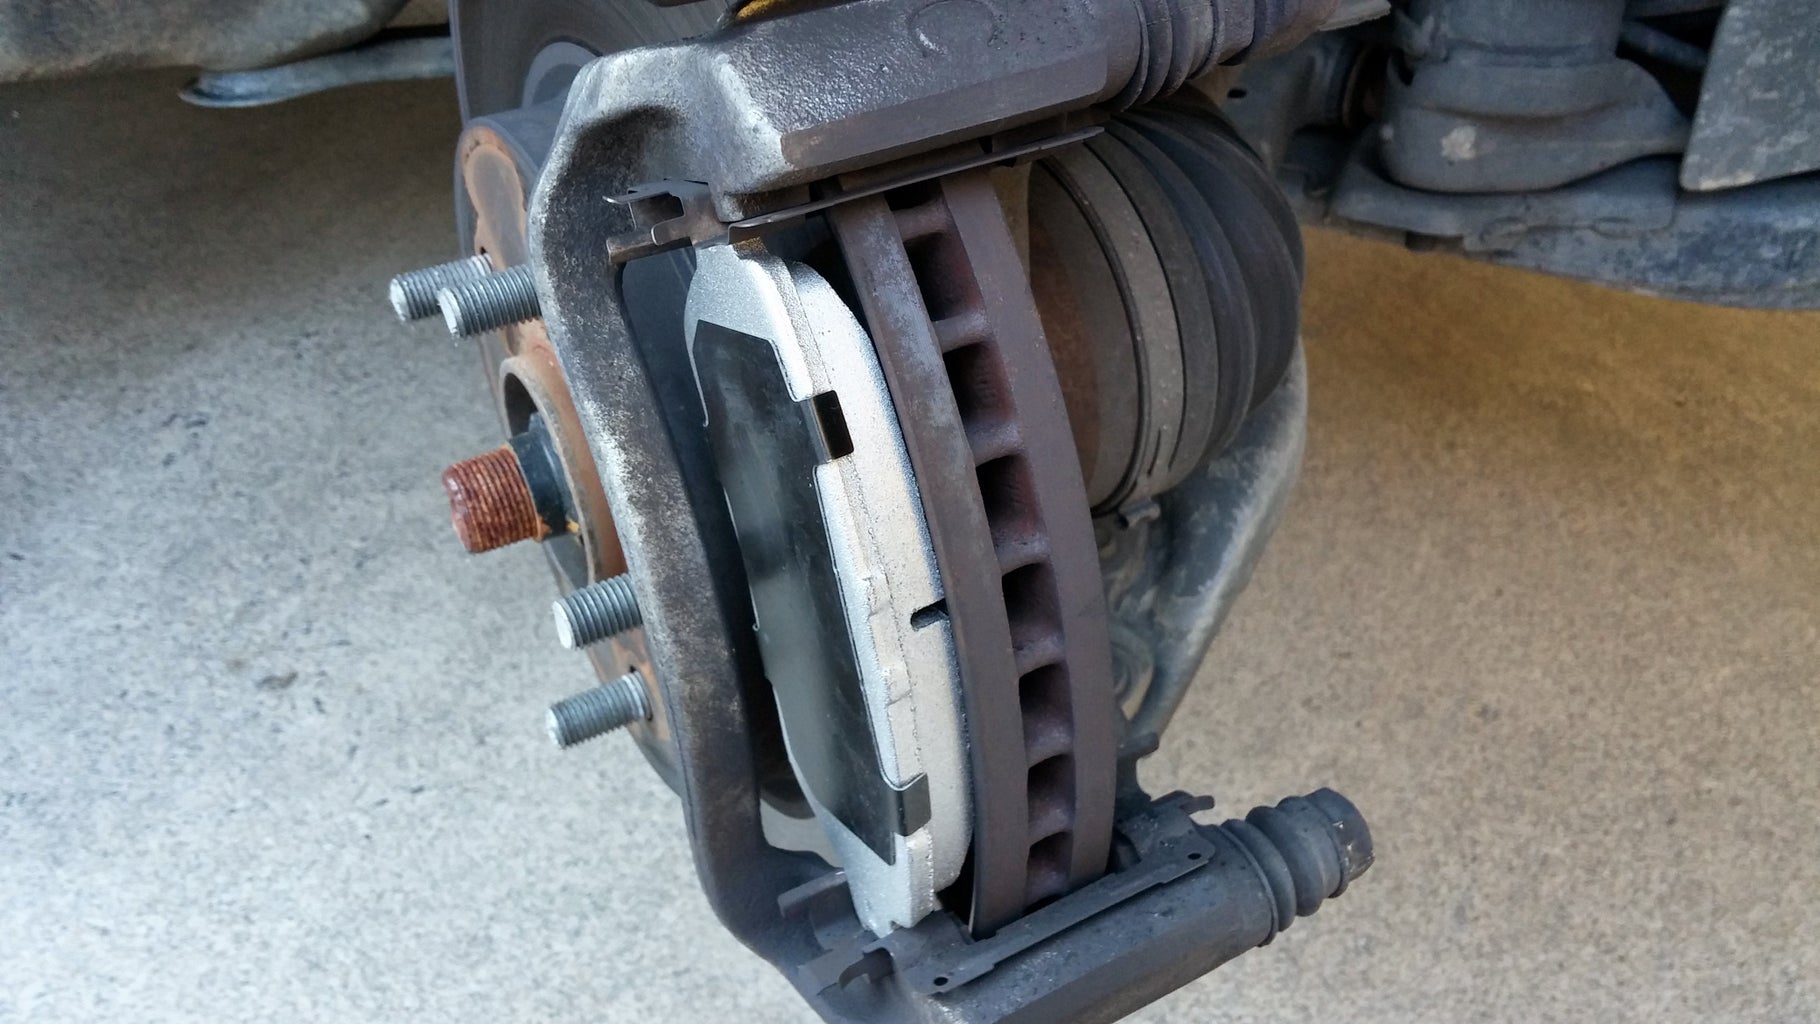
Inspecting and Removing the Old Brake Rotors and Pads
Now that you have access to the brake system, it’s time to inspect and remove the old brake rotors and pads. This step is critical in learning how to replace disc brakes and rotors, as it allows you to identify worn-out components and replace them with new ones. Start by inspecting the brake rotors for signs of wear, such as scoring, warping, or excessive rust. Check the brake pads for wear indicators, such as wear sensors or visual wear marks. If you find any worn-out components, make a note of them and prepare to replace them. To remove the old brake rotors, loosen the rotor screws or bolts and pull the rotor off the hub. For the brake pads, remove the caliper bolts and slide the caliper off the rotor. Take care when handling the old components, as they may be heavy or sharp. Once you’ve removed the old brake rotors and pads, safely dispose of them according to local regulations and guidelines. By following these steps, you’ll be able to successfully inspect and remove the old brake rotors and pads, paving the way for the installation of new components.
Installing the New Brake Rotors and Pads: A Step-by-Step Process
With the old brake rotors and pads removed, it’s time to install the new ones. This step is crucial in learning how to replace disc brakes and rotors, as it requires attention to detail and proper technique. Start by cleaning the brake hub and rotor mounting surface to ensure a smooth installation. Next, install the new brake rotor, making sure it’s properly aligned and secured with the recommended torque specifications. For the brake pads, apply a thin layer of brake lubricant to the back of the pads and install them in the caliper. Make sure the pads are properly seated and the caliper is securely fastened. Once the new brake rotors and pads are installed, perform a bedding-in procedure to ensure proper brake function. This involves driving the vehicle at moderate speeds and applying gentle brake pressure to help the pads and rotors mate together. By following these steps, you’ll be able to successfully install the new brake rotors and pads, ensuring your vehicle’s brakes are functioning properly and safely. Remember, when learning how to replace disc brakes and rotors, attention to detail and proper technique are key to a successful installation.
Bleeding the Brake System: Removing Air and Ensuring Proper Function
Bleeding the brake system is a critical step in learning how to replace disc brakes and rotors, as it ensures that the brakes function properly and safely. Air can enter the brake system during the replacement process, causing spongy brake pedals, reduced braking power, and increased stopping distances. To bleed the brake system, you’ll need a brake bleeding kit, which typically includes a bleeding pump, hoses, and fittings. Start by attaching the bleeding pump to the brake master cylinder and pumping the brake pedal several times to remove any air from the system. Next, attach the bleeding hose to the brake caliper and open the bleeder valve. Pump the brake pedal again to force the brake fluid through the system, removing any air bubbles. Repeat this process for each brake caliper, making sure to bleed the system in the correct order. Once the bleeding process is complete, check the brake fluid level and top it off as needed. By bleeding the brake system, you’ll ensure that your vehicle’s brakes are functioning properly and safely, giving you peace of mind on the road. Remember, when learning how to replace disc brakes and rotors, attention to detail and proper technique are key to a successful installation.

Reassembling the Brake System and Testing the Brakes
With the new brake rotors and pads installed, and the brake system bled, it’s time to reassemble the brake system and test the brakes. Start by reinstalling the wheels, making sure they are properly tightened in a star pattern to avoid warping the brake rotors. Next, reconnect the brake caliper bolts and tighten them to the recommended torque specification. Once the brake system is reassembled, test the brakes by pumping the brake pedal several times to prime the system. Then, drive the vehicle at moderate speeds and apply gentle brake pressure to test the brakes. Check for any unusual noises, vibrations, or spongy brake pedals, which can indicate air in the system or improper installation. If everything feels normal, congratulations You have successfully learned how to replace disc brakes and rotors. Remember to always test the brakes after replacement to ensure proper function and safety on the road. By following these steps, you’ll be able to confidently replace your vehicle’s disc brakes and rotors, knowing that you’ve done the job correctly and safely.
Troubleshooting Common Issues and Maintenance Tips
When learning how to replace disc brakes and rotors, it’s essential to be prepared for common issues that may arise during the replacement process. One common issue is air in the brake system, which can cause spongy brake pedals and reduced braking power. To troubleshoot this issue, bleed the brake system again, making sure to remove any air from the lines. Another common issue is uneven brake pad wear, which can cause vibrations and noise when braking. To troubleshoot this issue, inspect the brake pads and rotors for any signs of uneven wear, and adjust the brake caliper as needed. Additionally, make sure to follow proper maintenance tips to extend the life of the new brake components. This includes regularly inspecting the brake pads and rotors, cleaning the brake components, and lubricating the brake caliper slides. By following these troubleshooting tips and maintenance tips, you’ll be able to identify and fix common issues that may arise during the replacement process, and ensure that your vehicle’s brakes are functioning properly and safely. Remember, when it comes to learning how to replace disc brakes and rotors, attention to detail and proper technique are key to a successful installation.