
Understanding the Basics of Bike Cassette Removal
Removing a bike cassette is an essential skill for any cyclist, whether you’re a seasoned pro or a beginner. Knowing how to take a cassette off a bike can help you perform regular maintenance, troubleshoot issues, and upgrade your bike’s components. In this article, we’ll guide you through the process of removing a bike cassette, including the benefits, tools required, and step-by-step instructions.

Click Image to Find eBike Products
Regular maintenance is crucial to extend the life of your bike’s components, including the cassette. A dirty or worn-out cassette can lead to poor shifting performance, reduced efficiency, and increased wear on other components. By removing the cassette, you can clean and inspect it, replacing it if necessary. This simple process can help prevent more costly repairs down the road.
Troubleshooting is another critical aspect of bike maintenance. If you’re experiencing issues with your bike’s shifting or braking performance, removing the cassette can help you identify the problem. By inspecting the cassette and other components, you can diagnose and fix issues before they become major problems.
Upgrading your bike’s components is also a great reason to learn how to remove a cassette. Whether you’re looking to improve your bike’s performance or simply want to try out new components, removing the cassette is often the first step. With the right tools and knowledge, you can upgrade your bike’s cassette, chainrings, or other components to take your riding to the next level.
In the following sections, we’ll provide a detailed guide on how to remove a bike cassette, including the tools required, step-by-step instructions, and troubleshooting tips. Whether you’re a DIY enthusiast or a professional mechanic, this guide will help you master the art of cassette removal and take your bike maintenance skills to the next level.
Preparing Your Bike for Cassette Removal
Before you start removing the cassette, it’s essential to prepare your bike to ensure a safe and successful process. This step is crucial in preventing any damage to your bike’s components or injury to yourself. To prepare your bike, follow these steps:
First, shift the chain into the smallest cog on the cassette. This will give you clearance to remove the cassette without any obstructions. Make sure the chain is securely seated on the cog to prevent it from coming off during the removal process.
Next, remove any accessories that may be attached to the bike, such as water bottles, pumps, or bags. This will give you clear access to the cassette and prevent any damage to these accessories.
Ensure the bike is securely positioned on a repair stand or a stable surface. This will prevent the bike from falling or moving around while you’re working on it, which could cause injury or damage to the components.
It’s also essential to wear protective gear, such as gloves and safety glasses, to prevent injury from sharp edges or flying debris. Additionally, make sure the area is well-lit and clear of any obstructions to ensure a safe working environment.
By following these steps, you’ll be able to prepare your bike for cassette removal and ensure a safe and successful process. Remember to always refer to your bike’s manual for specific instructions on how to prepare your bike for maintenance and repairs.
Now that your bike is prepared, you can move on to the next step: choosing the right tools for the job. In the next section, we’ll discuss the necessary tools for removing a bike cassette, including a cassette removal tool, a chain whip, and a rag.
Choosing the Right Tools for the Job
When it comes to removing a bike cassette, having the right tools is essential for a safe and successful process. The three main tools you’ll need are a cassette removal tool, a chain whip, and a rag. In this section, we’ll discuss the purpose of each tool and provide recommendations for high-quality options.
A cassette removal tool is a specialized tool designed specifically for removing bike cassettes. It works by fitting into the splines of the cassette and providing the necessary leverage to loosen the lockring. When choosing a cassette removal tool, look for one that is compatible with your bike’s cassette type and is made from high-quality materials, such as the Park Tool Cassette Removal Tool.
A chain whip is a long, flexible tool used to hold the cassette in place while you loosen the lockring. It’s essential for preventing the cassette from rotating while you’re working on it, which could cause damage to the surrounding components. Look for a chain whip that is made from durable materials and has a comfortable grip, such as the Pedro’s Chain Whip.
A rag is a simple but essential tool for cleaning the cassette and surrounding components. Look for a lint-free rag that won’t leave behind any fibers or residue, such as the Finish Line Rag.
When choosing tools for removing a bike cassette, it’s essential to consider the quality and compatibility of each tool. Investing in high-quality tools will make the process easier and safer, and will help prevent damage to your bike’s components. In the next section, we’ll provide a step-by-step guide on how to remove a bike cassette using these tools.

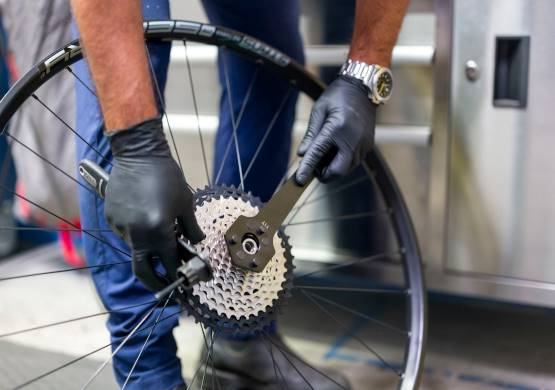
Removing the Cassette: A Step-by-Step Guide
Now that you have the necessary tools and have prepared your bike, it’s time to remove the cassette. This process requires patience and attention to detail, but with the right steps, you’ll be able to remove the cassette with ease. Here’s a step-by-step guide on how to take a cassette off a bike:
Step 1: Loosen the Lockring
Use the cassette removal tool to loosen the lockring by turning it counterclockwise. Be careful not to remove the lockring yet, as it’s still holding the cassette in place.
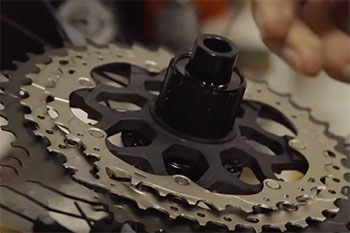
Step 2: Remove the Cassette
Use the chain whip to hold the cassette in place while you remove the lockring. Once the lockring is removed, carefully pull the cassette off the hub.
Step 3: Clean the Hub
Use a rag to clean the hub and remove any dirt or debris that may have accumulated. This will ensure a smooth installation of the new cassette.
Step 4: Inspect the Cassette
Inspect the cassette for any damage or wear. If the cassette is damaged, it’s best to replace it with a new one. If it’s just dirty, you can clean it and reinstall it.
Tips and Tricks:
Use a torque wrench to ensure the lockring is tightened to the correct specification.
Apply lubricant to the hub and cassette to ensure smooth installation and operation.
Use a clean rag to wipe down the cassette and hub to prevent dirt and debris from accumulating.
By following these steps and tips, you’ll be able to remove the cassette with ease and ensure a smooth installation of the new one. In the next section, we’ll address common issues that may arise during cassette removal and provide solutions and workarounds.
Troubleshooting Common Issues with Cassette Removal
While removing a bike cassette can be a straightforward process, there are some common issues that may arise. In this section, we’ll address some of the most common problems and provide solutions and workarounds.
Stuck Lockring:
If the lockring is stuck, it can be difficult to remove the cassette. To solve this problem, try applying heat to the lockring using a hair dryer or heat gun. This will help loosen the lockring and make it easier to remove. Alternatively, you can try using a lockring removal tool, such as the Park Tool Lockring Removal Tool.
Damaged Cassette:
If the cassette is damaged, it may be difficult to remove or reinstall. To solve this problem, try inspecting the cassette for any damage or wear. If the cassette is damaged, it’s best to replace it with a new one. If the cassette is just dirty, you can clean it and reinstall it.
Stripped Threads:
If the threads on the hub are stripped, it can be difficult to reinstall the cassette. To solve this problem, try using a thread repair kit, such as the Park Tool Thread Repair Kit. This will help repair the threads and make it easier to reinstall the cassette.
Other Issues:
Other common issues that may arise during cassette removal include a loose or damaged chain, a misaligned derailleur, or a faulty cassette. To solve these problems, try inspecting the chain and derailleur for any damage or wear. If the chain or derailleur is damaged, it’s best to replace it with a new one. If the cassette is faulty, try reinstalling it or replacing it with a new one.
By following these troubleshooting tips, you’ll be able to overcome common obstacles and successfully remove and reinstall your bike cassette. Remember to always be patient and persistent, and don’t be afraid to seek help if you’re unsure about any part of the process.

Reinstalling the Cassette: Best Practices
Once you’ve removed the cassette, it’s time to reinstall it. This process requires attention to detail and proper technique to ensure optimal performance and safety. Here are the best practices for reinstalling a bike cassette:
Applying Lubricant:
Before reinstalling the cassette, apply a small amount of lubricant to the hub and cassette. This will help reduce friction and prevent wear on the components.
Tightening the Lockring:
Use a torque wrench to tighten the lockring to the recommended specification. Make sure the lockring is securely tightened to prevent it from coming loose while riding.
Adjusting the Derailleur:
Adjust the derailleur to ensure proper alignment and shifting. Make sure the derailleur is properly secured to the frame and the limit screws are adjusted correctly.
Inspecting the Cassette:
Inspect the cassette for any damage or wear. Make sure the cassette is properly seated on the hub and the chain is properly aligned.
Testing the Cassette:
Test the cassette by shifting through the gears and checking for proper shifting and alignment. Make sure the cassette is properly secured and there are no signs of wear or damage.
By following these best practices, you’ll be able to reinstall your bike cassette with confidence and ensure optimal performance and safety. Remember to always refer to your bike’s manual for specific instructions on how to reinstall the cassette.
Maintenance and Upkeep: Keeping Your Cassette in Top Condition
Regular maintenance and upkeep are crucial to extending the life of your bike cassette and preventing common problems. Here are some tips for keeping your cassette in top condition:
Cleaning the Cassette:
Regularly clean the cassette and chain to prevent dirt and grime from building up. Use a soft-bristled brush and mild soap to clean the cassette, and make sure to rinse it thoroughly with water.
Lubricating the Cassette:
Apply lubricant to the cassette and chain to reduce friction and prevent wear. Use a high-quality lubricant specifically designed for bike chains and cassettes.
Inspecting the Cassette:
Regularly inspect the cassette for signs of wear or damage. Check for worn-out teeth, bent or broken cogs, and excessive wear on the chain.
Replacing the Cassette:
If the cassette is worn out or damaged, it’s time to replace it. Use a high-quality cassette that is compatible with your bike’s drivetrain and follow the manufacturer’s instructions for installation.
Tips for Extending the Life of Your Cassette:
Use a chain cleaner and lubricant regularly to prevent dirt and grime from building up.
Avoid riding in extreme weather conditions, such as heavy rain or snow, which can cause excessive wear on the cassette.
Use a cassette with a durable coating or treatment to reduce wear and corrosion.
By following these tips, you’ll be able to keep your bike cassette in top condition and extend its life. Remember to always refer to your bike’s manual for specific instructions on how to maintain and upkeep your cassette.

Conclusion: Mastering the Art of Cassette Removal
Removing a bike cassette can seem like a daunting task, but with the right knowledge and tools, it can be a straightforward process. By following the steps outlined in this article, you’ll be able to remove your bike cassette with ease and confidence.
Remember, knowing how to take a cassette off a bike is an essential skill for any cyclist. Whether you’re a seasoned pro or a beginner, being able to remove and reinstall your cassette can help you troubleshoot common issues, upgrade your bike’s components, and perform regular maintenance.
By mastering the art of cassette removal, you’ll be able to enjoy a smoother, more enjoyable riding experience. You’ll be able to tackle tough terrain with confidence, knowing that your bike is in top condition. And, you’ll be able to save money by performing routine maintenance and repairs yourself.
So, don’t be intimidated by the thought of removing your bike cassette. With practice and patience, you’ll become a pro in no time. And, with the right tools and knowledge, you’ll be able to tackle any cassette-related task that comes your way.
Thanks for reading, and happy cycling!
