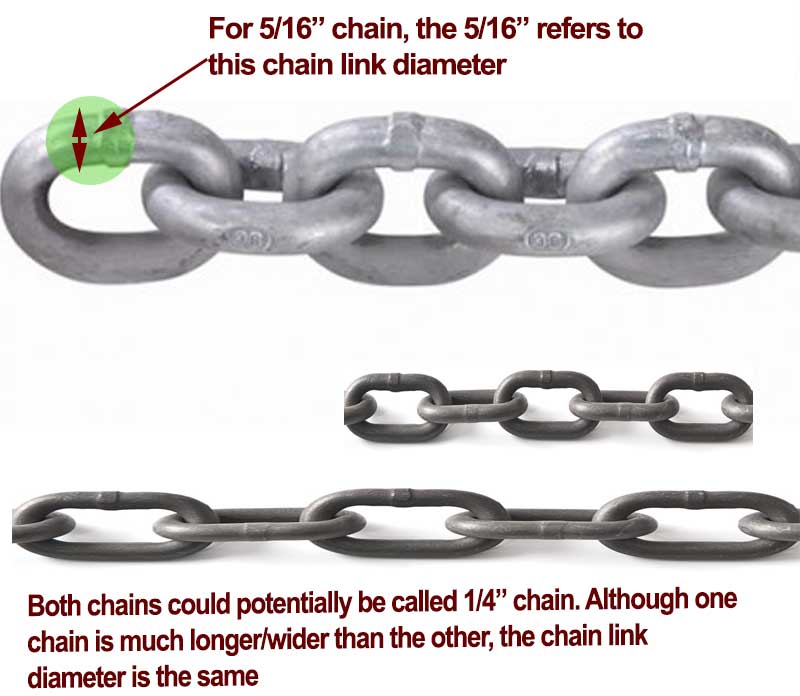
Understanding Chain Link Types: Knowing What You’re Up Against
Chain links come in various types, each with its unique characteristics and applications. To successfully remove chain links, it’s essential to understand the type of chain you’re working with. The three most common types of chain links are roller chain, leaf chain, and welded chain.

Click Image to Find eBike Products
Roller chain, also known as bush chain, is the most common type of chain link. It consists of cylindrical rollers held together by side plates and pins. Roller chain is widely used in industrial and agricultural applications, such as conveyor belts, gearboxes, and farm equipment.
Leaf chain, on the other hand, is a type of chain link that consists of flat, rectangular links connected by pins. Leaf chain is commonly used in applications where high strength and low weight are required, such as in the aerospace and automotive industries.
Welded chain, also known as fusion chain, is a type of chain link that is formed by welding the side plates and pins together. Welded chain is often used in applications where high strength and durability are required, such as in the construction and mining industries.
Before attempting to remove chain links, it’s crucial to identify the type of chain you’re working with. This will help you determine the best approach and tools to use. For example, if you’re working with a roller chain, you may need to use a chain breaker to remove the links. On the other hand, if you’re working with a leaf chain, you may need to use a punch and hammer to remove the pins.
By understanding the different types of chain links and their characteristics, you’ll be better equipped to tackle the task of removing chain links. Whether you’re a seasoned mechanic or a DIY enthusiast, knowing how to take chain links out is an essential skill that can save you time and money in the long run.
Gathering Essential Tools: What You’ll Need to Get the Job Done
When it comes to removing chain links, having the right tools is crucial. The type of tool you’ll need will depend on the type of chain you’re working with, as well as the specific task at hand. Here are some of the most common tools used for removing chain links:
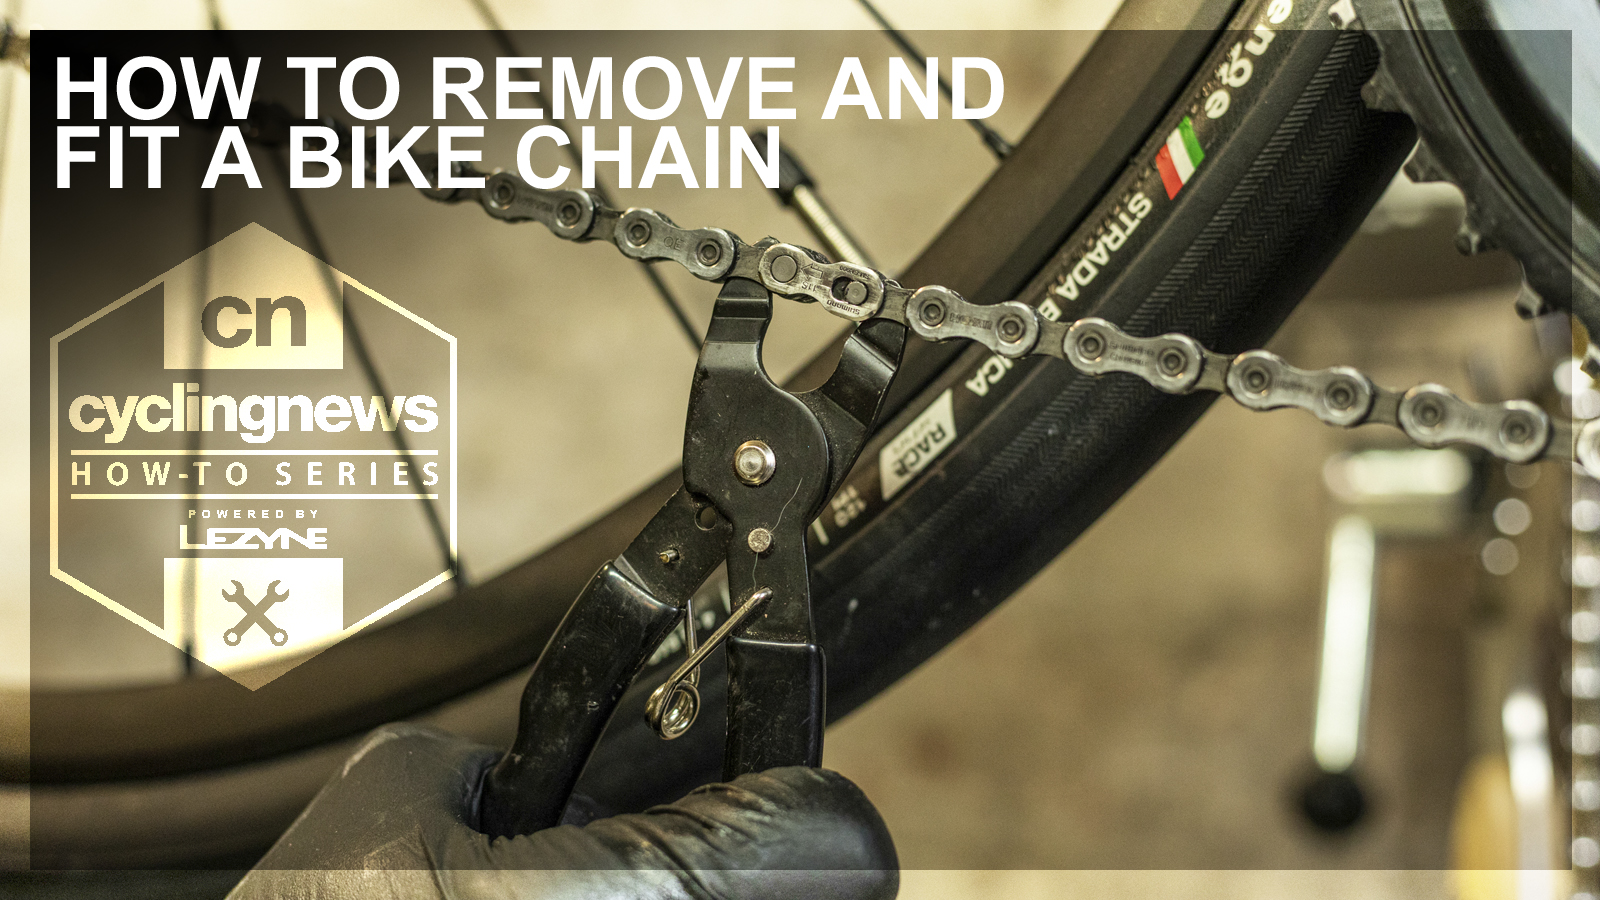
Chain breakers: These are specialized tools designed specifically for breaking chain links. They work by applying pressure to the link, causing it to break or release. Chain breakers are available in various sizes and types, so be sure to choose one that’s compatible with your chain.
Punches: A punch is a handy tool for removing pins and links from chains. It works by driving the pin out of the link, allowing you to remove the link. Punches are available in various sizes and types, including ball-peen punches and pin punches.
Hammers: A hammer is a versatile tool that can be used for a variety of tasks, including removing chain links. When using a hammer, be sure to wear safety goggles and gloves to protect yourself from flying debris.
Other tools: Depending on the type of chain you’re working with, you may also need other specialized tools, such as link extractors or chain cutters. Be sure to research the specific tools required for your chain type and task.
When choosing tools for removing chain links, be sure to consider the following factors:
Quality: Look for high-quality tools that are durable and long-lasting. Cheap tools may break or wear out quickly, causing more problems than they solve.
Compatibility: Make sure the tool is compatible with your chain type and size. Using the wrong tool can damage the chain or surrounding components.
Safety: Always prioritize safety when working with chains and tools. Wear protective gear, such as gloves and safety goggles, and follow proper safety procedures to minimize risks.
By gathering the right tools and following proper safety procedures, you’ll be well on your way to successfully removing chain links. Remember to always follow the manufacturer’s instructions and take necessary precautions to avoid damaging the chain or surrounding components.
Preparation is Key: Cleaning and Inspecting the Chain
Before attempting to remove chain links, it’s essential to prepare the chain by cleaning and inspecting it. This step is crucial in ensuring a safe and successful chain link removal process. A dirty or damaged chain can lead to accidents, injuries, or equipment damage.
Cleaning the chain: Start by removing any dirt, grime, or debris from the chain using a soft-bristled brush or a cloth. This will help prevent any dirt or debris from getting stuck in the chain links or tools. For more stubborn dirt or grime, use a mild detergent and water to clean the chain. Be sure to rinse the chain thoroughly to remove any soap residue.
Inspecting the chain: Once the chain is clean, inspect it for any signs of wear or damage. Look for worn or damaged links, rust, or corrosion. Check for any bent or twisted links, which can indicate a more serious problem. If you find any damaged or worn links, it’s best to replace them before attempting to remove chain links.
Identifying worn or damaged links: Worn or damaged links can be identified by looking for signs of wear, such as scratches, dents, or corrosion. Check for any links that are bent or twisted, which can indicate a more serious problem. If you’re unsure about the condition of a link, it’s always best to err on the side of caution and replace it.
Why cleaning and inspecting is important: Cleaning and inspecting the chain before removing links is crucial in ensuring a safe and successful process. A dirty or damaged chain can lead to accidents, injuries, or equipment damage. By taking the time to clean and inspect the chain, you can identify any potential problems and take steps to address them before they become major issues.
By following these steps, you’ll be able to properly prepare your chain for the removal process, ensuring a safe and successful outcome. Remember to always prioritize safety when working with chains and to take the necessary precautions to avoid accidents or injuries.

Removing Chain Links: A Step-by-Step Process
Now that you have prepared the chain and gathered the necessary tools, it’s time to start removing the chain links. This process requires patience and attention to detail, but with the right tools and techniques, you can successfully remove chain links. Here’s a step-by-step guide on how to remove chain links:
Step 1: Identify the link to be removed. Determine which link you want to remove and make sure it’s accessible. If the link is stuck or rusted, you may need to use a lubricant or penetrating oil to loosen it.
Step 2: Position the chain breaker. Place the chain breaker on the link you want to remove, making sure it’s centered and secure. If you’re using a punch and hammer, position the punch on the link and hold it firmly in place.
Step 3: Apply pressure. Slowly apply pressure to the chain breaker or punch, using a gentle and consistent motion. If you’re using a chain breaker, turn the handle clockwise to apply pressure. If you’re using a punch and hammer, strike the punch gently with the hammer.
Step 4: Remove the link. Once the link is broken or removed, carefully pull it out of the chain. If the link is stuck, you may need to use a lubricant or penetrating oil to loosen it.
Step 5: Repeat the process. Continue removing links until you have completed the desired length of chain. Make sure to inspect the chain regularly to ensure it’s in good condition and free of damage.
Tips and precautions: When removing chain links, it’s essential to take your time and be patient. Avoid applying too much pressure, which can damage the chain or surrounding components. Always wear protective gear, such as gloves and safety glasses, to prevent injury from flying debris or chain whip.
By following these steps and taking the necessary precautions, you can successfully remove chain links and achieve your desired outcome. Remember to always prioritize safety and take your time when working with chains and removing links.
Troubleshooting Common Issues: Overcoming Obstacles
When removing chain links, you may encounter some common issues that can hinder your progress. Don’t worry, these obstacles can be overcome with the right techniques and tools. Here are some common issues you may encounter and how to troubleshoot them:
Stuck or rusted links: If a link is stuck or rusted, it can be difficult to remove. Try applying a lubricant or penetrating oil to loosen the link. If the link is still stuck, you may need to use a chain breaker or punch to break it free.
Broken or damaged links: If a link is broken or damaged, it’s essential to replace it before attempting to remove other links. This will prevent further damage to the chain and ensure your safety.
Chain whip: Chain whip is a common issue when removing chain links. It occurs when the chain is not properly secured, causing it to whip back and forth. To prevent chain whip, make sure the chain is properly secured and use a chain breaker or punch to remove links.
Flying debris: When removing chain links, flying debris can be a hazard. To prevent this, wear protective gear such as gloves and safety glasses. Also, make sure the area is clear of any obstacles or people.
Link alignment: When reassembling the chain, it’s essential to ensure the links are properly aligned. If the links are not aligned, it can cause the chain to malfunction or break. To ensure proper alignment, use a chain alignment tool or consult the manufacturer’s instructions.
By being aware of these common issues and knowing how to troubleshoot them, you can overcome any obstacles that may arise when removing chain links. Remember to always prioritize safety and take your time when working with chains and removing links.
Reassembling the Chain: Putting it All Back Together
After removing the necessary chain links, it’s time to reassemble the chain. This process requires attention to detail and patience, but with the right techniques and tools, you can ensure a secure and functioning chain. Here’s a step-by-step guide on how to reassemble the chain:
Step 1: Align the links. Make sure the links are properly aligned and facing the correct direction. Use a chain alignment tool or consult the manufacturer’s instructions to ensure proper alignment.
Step 2: Connect the links. Use a chain breaker or punch to connect the links. Make sure the links are securely attached and not loose.
Step 3: Tighten the chain. Use a chain tensioner or wrench to tighten the chain. Make sure the chain is not too tight or too loose, as this can cause damage or malfunction.
Step 4: Inspect the chain. Inspect the chain for any signs of damage or wear. Check for any loose links or damaged components.
Tips and precautions: When reassembling the chain, make sure to follow the manufacturer’s instructions and take necessary safety precautions. Wear protective gear such as gloves and safety glasses, and ensure the area is clear of any obstacles or people.
By following these steps and taking the necessary precautions, you can ensure a secure and functioning chain. Remember to always prioritize safety and take your time when working with chains and reassembling links.

Chain Link Removal Safety Precautions: Protecting Yourself and Others
When working with chains and removing links, safety should always be the top priority. There are several potential hazards to be aware of, including flying debris, chain whip, and entanglement. Here are some safety precautions to take when removing chain links:
Wear protective gear: Always wear protective gear such as gloves, safety glasses, and a face mask when working with chains and removing links. This will help protect you from flying debris and other hazards.
Ensure proper lighting: Make sure the area is well-lit and free of any obstacles or tripping hazards. This will help you see what you’re doing and avoid accidents.
Use proper tools: Use the proper tools for the job, such as chain breakers and punches. Avoid using tools that are damaged or worn out, as they can cause accidents.
Avoid overreaching: Avoid overreaching or stretching when working with chains and removing links. This can cause you to lose your balance and fall.
Keep the area clear: Keep the area clear of any obstacles or people. This will help prevent accidents and ensure a safe working environment.
Be aware of your surroundings: Always be aware of your surroundings when working with chains and removing links. This will help you anticipate and prevent potential hazards.
By following these safety precautions, you can minimize the risks associated with removing chain links and ensure a safe working environment. Remember, safety should always be the top priority when working with chains and removing links.

Maintenance and Prevention: Keeping Your Chain in Top Condition
Regular maintenance and prevention are key to extending the life of your chain and preventing chain link issues. Here are some tips on how to maintain and prevent chain link issues in the future:
Regular cleaning and inspection: Regularly clean and inspect your chain to identify any potential issues before they become major problems. Use a soft-bristled brush or a cloth to remove dirt and debris, and inspect the chain for any signs of wear or damage.
Proper storage: Store your chain in a dry, clean environment, away from direct sunlight and moisture. Avoid storing your chain in a location where it may be exposed to chemicals or other substances that could damage the chain.
Lubrication: Regularly lubricate your chain to keep it running smoothly and prevent wear and tear. Use a lubricant specifically designed for chains, and follow the manufacturer’s instructions for application and frequency.
Develop good habits: Develop good habits when working with chains, such as always wearing protective gear and ensuring the area is clear of any obstacles or people. This will help prevent accidents and ensure a safe working environment.
By following these tips, you can help extend the life of your chain and prevent chain link issues in the future. Remember, regular maintenance and prevention are key to keeping your chain in top condition.