
What is a Crank Puller Tool and Why Do You Need One
A crank puller tool is a specialized device designed to safely and efficiently remove cranksets from bicycles. This tool is an essential component of any bike maintenance and repair kit, as it saves time and effort when working with cranksets. The crank puller tool works by applying a controlled amount of force to the crank, allowing it to be removed without damaging the surrounding components.

Click Image to Find eBike Products
When it comes to bike maintenance, having the right tools for the job is crucial. A crank puller tool is one of those must-have tools that can make a significant difference in the efficiency and effectiveness of your work. By using a crank puller tool, you can avoid damaging the crank or other components, which can lead to costly repairs or even render the bike unusable.
In addition to its practical applications, a crank puller tool is also a valuable investment for any bike enthusiast or professional mechanic. With the ability to remove cranksets quickly and easily, you can focus on more complex tasks and repairs, increasing your productivity and overall efficiency. Furthermore, a crank puller tool can help you to develop a deeper understanding of the inner workings of your bike, allowing you to perform more advanced repairs and maintenance tasks.
For those who are new to bike maintenance, a crank puller tool may seem like a luxury item. However, as you become more familiar with the process of removing cranksets, you will quickly realize the value of having a dedicated tool for the job. By incorporating a crank puller tool into your toolkit, you can take your bike maintenance skills to the next level and ensure that your bike is always running smoothly and efficiently.
When learning how to use a crank puller tool, it’s essential to understand the basics of crank removal. This process typically involves removing the pedals, chainrings, and any other components that may interfere with the removal process. With the crank puller tool, you can then apply a controlled amount of force to the crank, allowing it to be removed safely and efficiently.
By mastering the use of a crank puller tool, you can take the first step towards becoming a more confident and self-sufficient bike mechanic. With practice and patience, you can develop the skills and knowledge necessary to tackle even the most complex bike repairs and maintenance tasks.

Choosing the Right Crank Puller Tool for Your Bike
When it comes to selecting a crank puller tool, there are several options available on the market. Two of the most popular crank puller tools are Park Tool’s Crank Puller and Shimano’s Crank Extraction Tool. Both of these tools are designed to make crank removal a breeze, but they have some key differences that may make one more suitable for your needs than the other.
Park Tool’s Crank Puller is a versatile tool that can be used on a wide range of cranksets, including those with square taper, splined, and ISIS interfaces. This tool is designed to be easy to use and requires minimal force to remove the crank. It’s also a great option for those who are new to bike maintenance, as it comes with a comprehensive instruction manual.
Shimano’s Crank Extraction Tool, on the other hand, is designed specifically for use with Shimano cranksets. This tool is designed to work seamlessly with Shimano’s proprietary crank interface, making it a great option for those who ride Shimano-equipped bikes. It’s also a great option for those who are looking for a tool that is specifically designed for their bike’s crankset.
When choosing a crank puller tool, there are several factors to consider. One of the most important factors is compatibility. Make sure that the tool you choose is compatible with your bike’s crankset, as using the wrong tool can damage the crank or other components. Another factor to consider is durability. Look for a tool that is made from high-quality materials and is designed to withstand the rigors of frequent use.
In addition to compatibility and durability, you should also consider the ease of use of the tool. Look for a tool that is easy to use and requires minimal force to remove the crank. This will make the process of crank removal much easier and less likely to result in damage to the crank or other components.
Finally, consider the price of the tool. Crank puller tools can range in price from under $20 to over $100, depending on the brand and quality of the tool. While it may be tempting to go for the cheapest option, keep in mind that a high-quality tool will last longer and perform better in the long run.
By considering these factors and choosing the right crank puller tool for your bike, you can make the process of crank removal much easier and less likely to result in damage to the crank or other components. With the right tool and a little practice, you’ll be able to remove your crank with ease and get back to riding in no time.

Preparing Your Bike for Crank Removal
Before you can start using a crank puller tool, you need to prepare your bike for the process. This involves removing any components that may interfere with the crank removal process. Here’s a step-by-step guide on how to prepare your bike:
Step 1: Remove the Pedals
Start by removing the pedals from the crank arms. This will give you clear access to the crankset and allow you to remove any other components that may be in the way. To remove the pedals, simply turn them counterclockwise until they come loose.
Step 2: Remove the Chainrings
Next, remove the chainrings from the crank arms. This will give you access to the crank bolts and allow you to remove the crankset. To remove the chainrings, simply slide them off the crank arms.
Step 3: Remove Any Other Interfering Components
Depending on the type of bike you have, there may be other components that need to be removed before you can access the crankset. These may include the front derailleur, the chain guide, or any other components that may be in the way. Remove any of these components that may be interfering with the crank removal process.
Step 4: Clean the Crank Area
Once you have removed any interfering components, clean the crank area to ensure that it is free from any dirt or debris. This will help to ensure that the crank puller tool can be used effectively and that the crankset can be removed safely.
Step 5: Inspect the Crankset
Finally, inspect the crankset to ensure that it is in good condition and that there are no any signs of damage or wear. If you notice any damage or wear, it may be necessary to replace the crankset before attempting to remove it.
By following these steps, you can ensure that your bike is properly prepared for crank removal and that the process can be completed safely and effectively. Remember to always refer to your bike’s manual for specific instructions on how to prepare your bike for crank removal.
Once you have prepared your bike, you can start using a crank puller tool to remove the crankset. Make sure to follow the manufacturer’s instructions for the tool and to take any necessary safety precautions to avoid injury or damage to the bike.

Using a Crank Puller Tool: A Step-by-Step Guide
Now that you have prepared your bike for crank removal, it’s time to use a crank puller tool to remove the crankset. Here’s a step-by-step guide on how to use a crank puller tool:
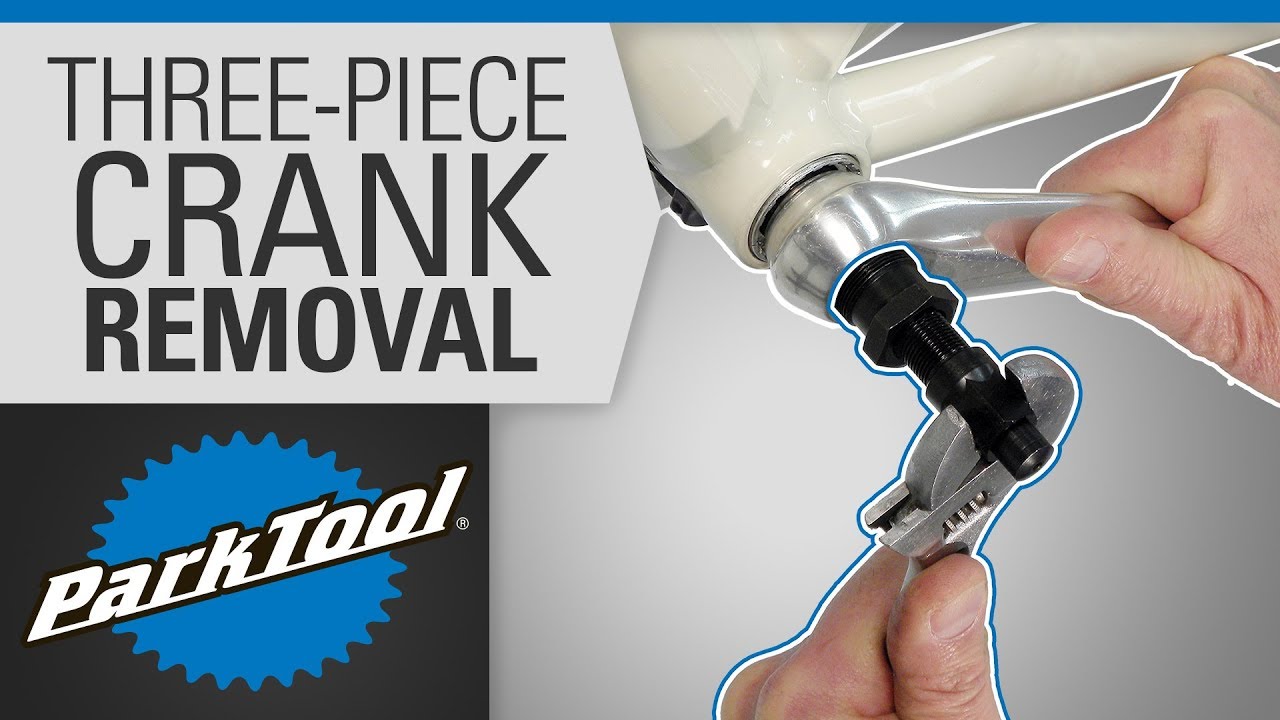
Step 1: Position the Tool
Start by positioning the crank puller tool on the crank arm. Make sure the tool is securely attached to the crank arm and that the pulling arm is in the correct position.
Step 2: Apply Force
Next, apply force to the crank puller tool by turning the handle clockwise. This will start to loosen the crank from the spindle. Be careful not to apply too much force, as this can damage the crank or the spindle.
Step 3: Remove the Crank
Once the crank is loose, you can remove it from the spindle. Simply pull the crank straight off the spindle and set it aside.
Step 4: Remove the Spindle
With the crank removed, you can now remove the spindle from the bottom bracket. Simply pull the spindle straight out of the bottom bracket and set it aside.
Step 5: Inspect the Bottom Bracket
Finally, inspect the bottom bracket to make sure it is clean and free from any debris. This will ensure that the new crankset can be installed properly.
By following these steps, you can successfully use a crank puller tool to remove a crankset from your bike. Remember to always refer to your bike’s manual for specific instructions on how to use a crank puller tool, and to take any necessary safety precautions to avoid injury or damage to the bike.
It’s also important to note that using a crank puller tool can be a bit tricky, and it may take some practice to get the hang of it. However, with patience and persistence, you can master the art of crank removal and become a more confident and self-sufficient bike mechanic.
In addition to following these steps, it’s also important to make sure you are using the correct crank puller tool for your bike. Different bikes require different types of crank puller tools, so make sure to check your bike’s manual to ensure you are using the correct tool.
Tips and Tricks for Successful Crank Removal
When using a crank puller tool, there are several tips and tricks that can help ensure successful crank removal. Here are some expert tips to keep in mind:
Tip 1: Use the Correct Tool
Make sure to use the correct crank puller tool for your bike. Different bikes require different types of crank puller tools, so be sure to check your bike’s manual to ensure you are using the correct tool.
Tip 2: Apply Even Pressure
When using a crank puller tool, apply even pressure to the crank arm. This will help prevent the crank from becoming stuck or seized.
Tip 3: Use a Breaker Bar
If the crank is particularly stubborn, consider using a breaker bar to add extra leverage to the crank puller tool. This can help make the removal process easier and less likely to result in damage to the crank or spindle.
Tip 4: Heat the Crank
If the crank is stuck or seized, try heating it with a hair dryer or heat gun. This can help loosen the crank and make it easier to remove.
Tip 5: Use Penetrating Oil
If the crank is stuck or seized, try applying penetrating oil to the area. This can help loosen the crank and make it easier to remove.
By following these tips and tricks, you can ensure successful crank removal and avoid common mistakes that can damage your bike. Remember to always refer to your bike’s manual for specific instructions on how to use a crank puller tool, and to take any necessary safety precautions to avoid injury or damage to the bike.
In addition to these tips, it’s also important to keep in mind that crank removal can be a bit tricky, and it may take some practice to get the hang of it. However, with patience and persistence, you can master the art of crank removal and become a more confident and self-sufficient bike mechanic.
By incorporating these tips and tricks into your crank removal routine, you can ensure that the process is safe, efficient, and effective. Remember to always prioritize safety and take any necessary precautions to avoid injury or damage to the bike.

Common Mistakes to Avoid When Using a Crank Puller Tool
When using a crank puller tool, there are several common mistakes to avoid in order to ensure safe and effective crank removal. Here are some of the most common mistakes to watch out for:
Mistake 1: Applying Too Much Force
One of the most common mistakes to avoid when using a crank puller tool is applying too much force. This can cause damage to the crank, spindle, or surrounding components, and can even lead to injury. Always apply gentle, consistent pressure when using a crank puller tool.
Mistake 2: Using the Wrong Tool for the Job
Another common mistake to avoid is using the wrong tool for the job. Make sure to use a crank puller tool that is specifically designed for your bike’s crankset, and that is in good working condition.
Mistake 3: Not Preparing the Bike Properly
Failing to properly prepare the bike for crank removal is another common mistake to avoid. Make sure to remove any components that may interfere with the crank removal process, such as pedals and chainrings.
Mistake 4: Not Following the Manufacturer’s Instructions
Not following the manufacturer’s instructions for the crank puller tool is another common mistake to avoid. Always read and follow the instructions carefully to ensure safe and effective crank removal.
Mistake 5: Not Inspecting the Crank and Spindle
Finally, not inspecting the crank and spindle before and after removal is another common mistake to avoid. Make sure to inspect these components for any signs of damage or wear, and to clean and lubricate them as needed.
By avoiding these common mistakes, you can ensure safe and effective crank removal using a crank puller tool. Remember to always follow the manufacturer’s instructions and to take any necessary safety precautions to avoid injury or damage to the bike.
In addition to avoiding these common mistakes, it’s also important to keep in mind that crank removal can be a bit tricky, and it may take some practice to get the hang of it. However, with patience and persistence, you can master the art of crank removal and become a more confident and self-sufficient bike mechanic.
Alternative Methods for Crank Removal
While a crank puller tool is the most common method for removing a crankset, there are alternative methods that can be used in certain situations. Here are a few examples:
Method 1: Using a Hammer and Chisel
One alternative method for removing a crankset is to use a hammer and chisel. This method involves carefully chiseling away the crank arm from the spindle, taking care not to damage the surrounding components. This method can be time-consuming and requires a great deal of patience and skill.
Method 2: Using a Crank Removal Service
Another alternative method for removing a crankset is to use a crank removal service. This method involves taking your bike to a professional mechanic who specializes in crank removal. They will use specialized tools and techniques to remove the crankset, ensuring that it is done safely and effectively.
Pros and Cons of Alternative Methods
While alternative methods for crank removal can be effective, they also have their pros and cons. Using a hammer and chisel can be time-consuming and requires a great deal of skill, but it can also be a cost-effective option. Using a crank removal service can be more expensive, but it ensures that the job is done safely and effectively by a professional.
When to Use Alternative Methods
Alternative methods for crank removal should only be used in certain situations. For example, if you are not comfortable using a crank puller tool or if you are dealing with a particularly stubborn crankset, an alternative method may be necessary. However, in most cases, a crank puller tool is the best option for removing a crankset.
In conclusion, while alternative methods for crank removal can be effective, they should only be used in certain situations. A crank puller tool is still the best option for removing a crankset, but it’s good to know that there are alternative methods available if needed.
Maintenance and Storage of Your Crank Puller Tool
To ensure that your crank puller tool continues to function properly and lasts for a long time, it’s essential to maintain and store it correctly. Here are some tips on how to do so:
Cleaning the Tool
After each use, clean the crank puller tool with a soft cloth and mild soap. This will help remove any dirt, grime, or lubricant that may have accumulated on the tool.
Lubricating the Tool
Regularly lubricate the moving parts of the crank puller tool with a silicone-based lubricant. This will help keep the tool running smoothly and prevent corrosion.
Storing the Tool
Store the crank puller tool in a dry, clean place, away from direct sunlight and moisture. Avoid storing the tool in a toolbox or container that may cause damage to the tool.
Inspection and Maintenance
Regularly inspect the crank puller tool for any signs of wear or damage. Check for any loose or damaged parts, and replace them as needed.
By following these maintenance and storage tips, you can ensure that your crank puller tool continues to function properly and lasts for a long time. Remember to always refer to the manufacturer’s instructions for specific maintenance and storage recommendations.
In addition to maintaining and storing your crank puller tool, it’s also essential to keep your bike in good working condition. Regularly check and maintain your bike’s components, including the crankset, chainrings, and pedals, to ensure that they are functioning properly.
By following these tips and maintaining your crank puller tool and bike, you can ensure that you are always ready to ride and that your bike is in good working condition.