The Anatomy of a Perfect Whistle
Whistling is a complex process that involves the coordination of multiple facial muscles, tongue placement, and airflow. To produce a loud, clear whistle, it’s essential to understand the physics behind whistling. When air passes through the narrow opening between the tongue and the roof of the mouth, it creates a high-pressure area behind the tongue and a low-pressure area in front of it. This pressure difference causes the air to vibrate, producing the characteristic whistling sound.

Click Image to Find eBike Products
The shape of the mouth, tongue, and lips also plays a crucial role in determining the pitch and volume of the whistle. A well-formed whistle requires a precise alignment of the articulatory muscles, including the orbicularis oris, buccinator, and mentalis muscles. The tongue should be positioned close to the roof of the mouth, with the tip touching the alveolar ridge. The lips should be pursed, forming a small “O” shape, to direct the airflow and amplify the sound.
Proper technique is vital for producing a loud, clear whistle. Many people struggle to whistle because they don’t use the correct tongue placement or airflow. By understanding the anatomy of a perfect whistle, individuals can adjust their technique to produce a more resonant and louder sound. Whether you’re trying to master the art of whistling for personal satisfaction or to impress others, it’s essential to focus on developing proper technique.
As you begin to learn how to whistle loud no fingers, keep in mind that it may take time and practice to develop the necessary skills. Be patient and persistent, and don’t be afraid to experiment with different techniques until you find what works best for you. With dedication and the right approach, you can master the art of whistling and produce a loud, clear sound that will impress anyone.

Preparation is Key: Getting Your Mouth Ready
Before attempting to whistle loudly without fingers, it’s essential to prepare your mouth for the task. This involves loosening up the articulatory muscles, relaxing the jaw, and positioning the tongue correctly. To achieve this, try the following exercises:
1. Lip stretches: Gently stretch your lips outward, holding for 10 seconds, and then release. Repeat this process 5-10 times. This will help loosen up the orbicularis oris muscle, which is responsible for forming the “O” shape necessary for whistling.
2. Jaw releases: Open your mouth wide and move your jaw from side to side, holding for 10 seconds. Repeat this process 5-10 times. This will help relax the masseter muscle, which can become tense and hinder whistling.
3. Tongue trills: Place the tip of your tongue behind your upper teeth, and then quickly move it back and forth, keeping your jaw relaxed. Repeat this process 5-10 times. This will help loosen up the tongue and get it into the correct position for whistling.
4. Facial relaxation: Take a few deep breaths and focus on relaxing your facial muscles. Feel the tension release from your cheeks, lips, and jaw. This will help you achieve a more relaxed state, making it easier to whistle.
By incorporating these exercises into your daily routine, you’ll be able to prepare your mouth for whistling and improve your chances of producing a loud, clear sound. Remember to be patient and consistent, as mastering the art of whistling takes time and practice. When learning how to whistle loud no fingers, it’s essential to focus on proper technique and mouth preparation to achieve the best results.
The Pucker-Up Method: A Beginner’s Approach
The pucker-up method is a simple and effective technique for producing a basic whistle. This method involves forming a small “O” shape with the lips and blowing air through to produce a sound. To try the pucker-up method, follow these steps:
1. Start by relaxing your facial muscles and taking a deep breath. This will help you get into the right mindset for whistling.
2. Pucker your lips as if you’re about to blow a kiss. Make sure your lips are relaxed and not tense, as this can affect the sound produced.
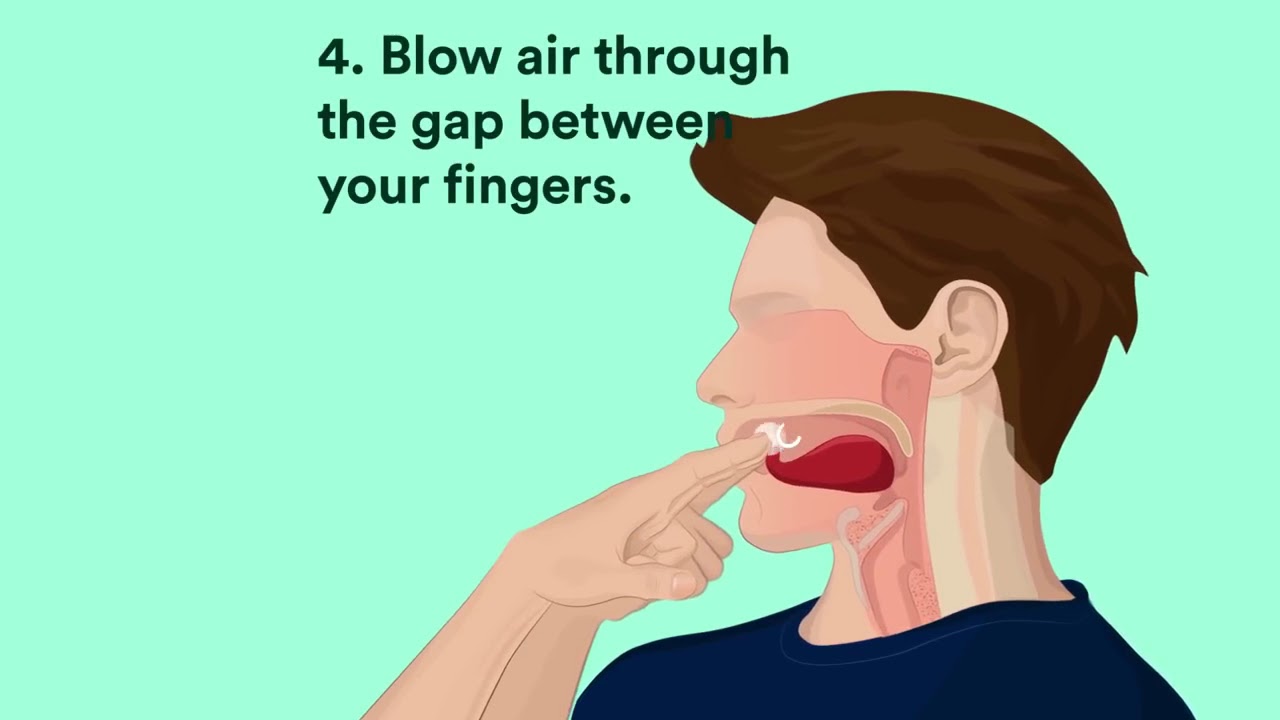
3. Place the tip of your tongue close to the roof of your mouth, just behind your top teeth. This will help direct the airflow and produce a clearer sound.
4. Blow air through your pursed lips, keeping your tongue in place. You should start to hear a faint whistling sound.
5. Adjust your lip shape and tongue position as needed to produce a louder, clearer sound. You may need to experiment with different lip shapes and tongue positions to find what works best for you.
The pucker-up method is a great way to get started with whistling, as it’s easy to learn and requires minimal practice. However, to produce a loud, clear whistle without fingers, you’ll need to refine your technique and practice regularly. Remember to focus on proper tongue placement, air control, and lip formation to achieve the best results when learning how to whistle loud no fingers.
By mastering the pucker-up method, you’ll be well on your way to producing a loud, clear whistle that will impress anyone. Just remember to be patient and persistent, as whistling takes time and practice to develop.

Advancing to the Next Level: Tongue Placement and Air Control
Once you’ve mastered the pucker-up method, it’s time to take your whistling to the next level by focusing on tongue placement and air control. These two factors are crucial in producing a louder, more resonant whistle.
Tongue placement is critical in whistling, as it helps direct the airflow and produce a clearer sound. To achieve optimal tongue placement, try the following:
1. Place the tip of your tongue close to the roof of your mouth, just behind your top teeth. This will help direct the airflow and produce a more focused sound.
2. Adjust the position of your tongue to find the “sweet spot” where the sound is clearest and loudest. This may take some experimentation, but it’s essential for producing a high-quality whistle.
Air control is also essential for producing a loud, clear whistle. To improve your air control, try the following:
1. Practice blowing air through your pursed lips in short, controlled bursts. This will help you develop the necessary air control to produce a consistent sound.
2. Experiment with different air pressures to find the optimal level for producing a loud, clear whistle. Remember to keep your tongue in the correct position and your lips relaxed.
By mastering tongue placement and air control, you’ll be able to produce a louder, more resonant whistle that will impress anyone. Remember to practice regularly and be patient, as developing these skills takes time and effort. When learning how to whistle loud no fingers, it’s essential to focus on proper technique and air control to achieve the best results.
With these advanced techniques, you’ll be well on your way to becoming a skilled whistler. Just remember to stay relaxed, focused, and patient, and you’ll be whistling like a pro in no time.

Common Mistakes to Avoid: Troubleshooting Your Whistle
When learning how to whistle loud no fingers, it’s common to encounter obstacles that can prevent you from producing a loud, clear sound. Here are some common mistakes to avoid and solutions to overcome them:
1. Incorrect tongue placement: If your tongue is not in the correct position, it can block the airflow and prevent a clear sound from being produced. To fix this, try adjusting the position of your tongue to find the “sweet spot” where the sound is clearest and loudest.
2. Inadequate air flow: If you’re not blowing enough air through your pursed lips, you may not be able to produce a loud enough sound. To fix this, try increasing the air pressure by blowing more air through your lips.
3. Poor lip formation: If your lips are not formed correctly, it can affect the sound produced. To fix this, try adjusting the shape of your lips to form a small “O” shape, and make sure they are relaxed and not tense.
4. Tension in the jaw or facial muscles: If you’re experiencing tension in your jaw or facial muscles, it can affect the sound produced. To fix this, try relaxing your jaw and facial muscles, and take a few deep breaths to calm down.
By being aware of these common mistakes and taking steps to overcome them, you can improve your whistling technique and produce a louder, clearer sound. Remember to be patient and persistent, as mastering the art of whistling takes time and practice.
Additionally, here are some troubleshooting tips to help you overcome specific issues:
• If you’re having trouble producing a clear sound, try adjusting the position of your tongue or the shape of your lips.
• If you’re having trouble producing a loud sound, try increasing the air pressure by blowing more air through your lips.
• If you’re experiencing tension in your jaw or facial muscles, try relaxing them and taking a few deep breaths to calm down.
By following these tips and practicing regularly, you can overcome common obstacles and master the art of whistling loudly without fingers.

Practice Makes Perfect: Exercises to Improve Your Whistling
Now that you’ve learned the basics of whistling, it’s time to practice and improve your technique. Here are some exercises to help you develop your whistling skills:
1. Long Tones: Start by whistling a long, steady tone. Hold the note for as long as you can, and then release. Repeat this process several times, gradually increasing the length of the tone.
2. Lip Trills: Pucker your lips and blow air through them, creating a trilling sound. Move your lips up and down to change the pitch of the trill. Repeat this process several times, gradually increasing the speed and complexity of the trill.
3. Tongue Trills: Place the tip of your tongue behind your top teeth, and then quickly move it back and forth, keeping your jaw relaxed. This will create a trilling sound. Repeat this process several times, gradually increasing the speed and complexity of the trill.
4. Whistling Scales: Whistle a scale, starting from a low note and moving up to a high note. Repeat this process several times, gradually increasing the speed and complexity of the scale.
5. Whistling Arpeggios: Whistle an arpeggio, starting from a low note and moving up to a high note, and then back down to the low note. Repeat this process several times, gradually increasing the speed and complexity of the arpeggio.
Remember to practice these exercises regularly, ideally 10-15 minutes a day. Consistency is key to improving your whistling skills. With regular practice, you’ll be able to develop your technique and produce a loud, clear whistle without fingers.
When practicing these exercises, pay attention to your posture, breathing, and embouchure (the position and shape of your lips, facial muscles, and jaw). Make sure to relax your facial muscles and maintain good posture to produce the best sound.
Additionally, try to incorporate these exercises into your daily routine, such as during your morning warm-up or before a performance. This will help you develop muscle memory and improve your overall whistling technique.
By incorporating these exercises into your practice routine, you’ll be well on your way to mastering the art of whistling loudly without fingers. Remember to be patient, persistent, and creative in your practice, and you’ll see improvement over time.

Whistling Without Fingers: The Ultimate Challenge
Whistling loudly without using fingers is a challenging task that requires a great deal of practice and patience. However, with the right techniques and exercises, it is possible to achieve a loud, clear whistle without finger assistance.
To whistle without fingers, you will need to rely on the shape of your mouth, tongue, and lips to produce the sound. This means that you will need to focus on developing a strong, consistent embouchure (the position and shape of your lips, facial muscles, and jaw) and learning how to control the airflow through your mouth.
One of the key challenges of whistling without fingers is developing the necessary air pressure to produce a loud sound. To overcome this, try practicing exercises that help you build up your lung capacity and control your breathing, such as deep breathing exercises or blowing air through a straw.
Another challenge is developing the correct tongue placement and lip formation to produce a clear, resonant sound. To overcome this, try practicing exercises that help you develop your articulatory muscles, such as tongue trills or lip trills.
Here are some tips to help you whistle loudly without fingers:
1. Practice regularly: Consistency is key when it comes to developing your whistling skills. Try to practice whistling without fingers every day, even if it’s just for a few minutes.
2. Focus on your embouchure: Developing a strong, consistent embouchure is crucial for producing a loud, clear whistle. Practice exercises that help you develop your articulatory muscles and focus on maintaining a relaxed, open mouth position.
3. Control your airflow: Learning how to control the airflow through your mouth is essential for producing a loud, clear whistle. Practice exercises that help you develop your lung capacity and control your breathing.
4. Experiment with different techniques: Don’t be afraid to try different techniques and exercises to find what works best for you. Experiment with different tongue placements, lip formations, and breathing techniques to find the combination that produces the loudest, clearest sound.
By following these tips and practicing regularly, you can develop the skills and techniques necessary to whistle loudly without fingers. Remember to be patient and persistent, as mastering the art of whistling takes time and practice.
Conclusion: Mastering the Art of Whistling Takes Time and Practice
Mastering the art of whistling loudly without fingers requires patience, persistence, and consistent practice. By following the steps outlined in this article, you can develop the skills and techniques necessary to produce a loud, clear whistle without finger assistance.
Remember that whistling is a skill that takes time to develop, and it’s essential to be patient and not get discouraged if you don’t see immediate results. With regular practice and dedication, you can improve your whistling technique and produce a loud, clear sound that will impress anyone.
In conclusion, learning how to whistle loud no fingers is a challenging but rewarding task that requires a combination of proper technique, consistent practice, and patience. By following the tips and exercises outlined in this article, you can develop the skills and techniques necessary to master the art of whistling and produce a loud, clear sound that will impress anyone.
So, don’t be afraid to give whistling a try, and remember that with practice and patience, you can achieve your goals and become a skilled whistler. Whether you’re looking to impress your friends, family, or colleagues, or simply want to develop a new skill, whistling is a fun and rewarding activity that can bring joy and excitement to your life.
Thank you for reading this article, and we hope that you have found the information and tips provided to be helpful in your journey to master the art of whistling loudly without fingers.