Why Properly Functioning Brake Pads are Crucial for Safe Cycling
Properly functioning brake pads are essential for safe cycling, as they play a critical role in ensuring the rider’s ability to stop quickly and effectively. Worn-out brake pads can lead to a range of problems, including reduced stopping power, increased risk of accidents, and damage to other components of the bike. Regular replacement of brake pads is necessary to maintain optimal braking performance and prevent these issues.

Click Image to Find eBike Products
When brake pads wear down, the metal backing plate can come into contact with the rotor or rim, causing damage and potentially leading to a loss of braking power. This can be particularly hazardous when riding in heavy traffic, descending steep hills, or navigating technical trails. Furthermore, worn-out brake pads can also cause the brake caliper to drag on the rotor or rim, leading to increased wear on these components and potentially resulting in costly repairs.
In addition to safety concerns, properly functioning brake pads are also essential for maintaining the overall performance and efficiency of the bike. When brake pads are in good condition, they provide smooth and consistent braking, allowing the rider to focus on the road or trail ahead. This is particularly important for cyclists who ride in a variety of conditions, including heavy traffic, rough roads, and technical trails.
Installing new brake pads on a bike is a relatively simple process that can be done at home with a few basic tools. However, it’s essential to choose the right brake pads for the bike’s specific needs, taking into account factors such as the type of riding, the terrain, and the bike’s components. By selecting the correct brake pads and following proper installation procedures, cyclists can ensure optimal braking performance and maintain the safety and efficiency of their bike.
Regular maintenance and inspection of brake pads are also crucial for extending their lifespan and preventing premature wear. This includes cleaning the brake pads and caliper, checking for wear and damage, and adjusting the brake caliper as needed. By following these simple steps, cyclists can help ensure their brake pads continue to function properly and maintain the overall performance and safety of their bike.
Choosing the Right Brake Pads for Your Bike
When it comes to selecting brake pads for your bike, there are several factors to consider to ensure optimal performance and safety. The type of brake pads you choose will depend on the type of riding you do, the terrain, and the components of your bike. Here are some common types of brake pads available:
Organic brake pads are made from a mixture of natural and synthetic materials, such as rubber and Kevlar. They are a good choice for casual riders who ride on smooth roads and trails. Organic pads are relatively inexpensive and provide good braking performance in dry conditions. However, they can wear out quickly and may not perform well in wet conditions.
Semi-metallic brake pads are made from a mixture of metal and synthetic materials. They are a good choice for riders who ride in a variety of conditions, including wet and dry roads and trails. Semi-metallic pads provide better braking performance than organic pads and are more durable. However, they can be noisier and may wear out the rotor or rim more quickly.
Sintered brake pads are made from a mixture of metal and ceramic materials. They are a good choice for riders who ride in extreme conditions, such as downhill mountain biking or racing. Sintered pads provide excellent braking performance and are highly durable. However, they can be more expensive than other types of pads and may require more maintenance.
In addition to the type of brake pads, you should also consider the following factors when selecting pads for your bike:
Pad thickness: Thicker pads provide more braking power, but may be more prone to wear and tear.
Pad material: Different materials provide different levels of braking performance and durability.
Pad shape: The shape of the pad can affect the braking performance and clearance of the pad.
Compatibility: Make sure the pads are compatible with your bike’s brake caliper and rotor or rim.
By considering these factors and choosing the right brake pads for your bike, you can ensure optimal braking performance and safety. Installing brake pads bike is a relatively simple process, but it’s essential to choose the right pads for your specific needs.
Tools and Materials Needed for the Job
Before starting the process of installing brake pads bike, it’s essential to gather the necessary tools and materials to ensure a smooth and successful replacement. Here’s a list of what you’ll need:
Tools:
Allen wrenches (3, 4, 5, and 6 mm)
Tire levers (2-3)
Brake pad spacers (if necessary)
Brake caliper alignment tool (if necessary)
Materials:
New brake pads ( compatible with your bike’s brake caliper and rotor or rim)
Brake pad retaining clips (if necessary)
Brake pad spacers (if necessary)
Clean rags
Brake cleaner (if necessary)
It’s also a good idea to have a repair manual or online instructions specific to your bike’s make and model, as well as a set of basic bike tools, such as a pump, tire pressure gauge, and screwdrivers.
Before starting the replacement process, make sure you have a clean and well-lit workspace, and that your bike is securely supported by a bike stand or leaned against a wall. This will ensure your safety and make the process easier to complete.
Remember to always refer to your bike’s repair manual or online instructions for specific guidance on replacing brake pads for your particular bike model. Installing brake pads bike can be a relatively simple process, but it’s essential to follow the correct procedures to ensure optimal braking performance and safety.

Step-by-Step Instructions for Replacing Brake Pads
Replacing brake pads on a bike is a relatively straightforward process that can be completed with a few basic tools. Here’s a step-by-step guide to help you replace your brake pads:
Step 1: Remove the Wheel
Start by removing the wheel from the bike. This will give you access to the brake caliper and pads. Use an Allen wrench to loosen the nuts that hold the wheel in place, then lift the wheel off the bike.
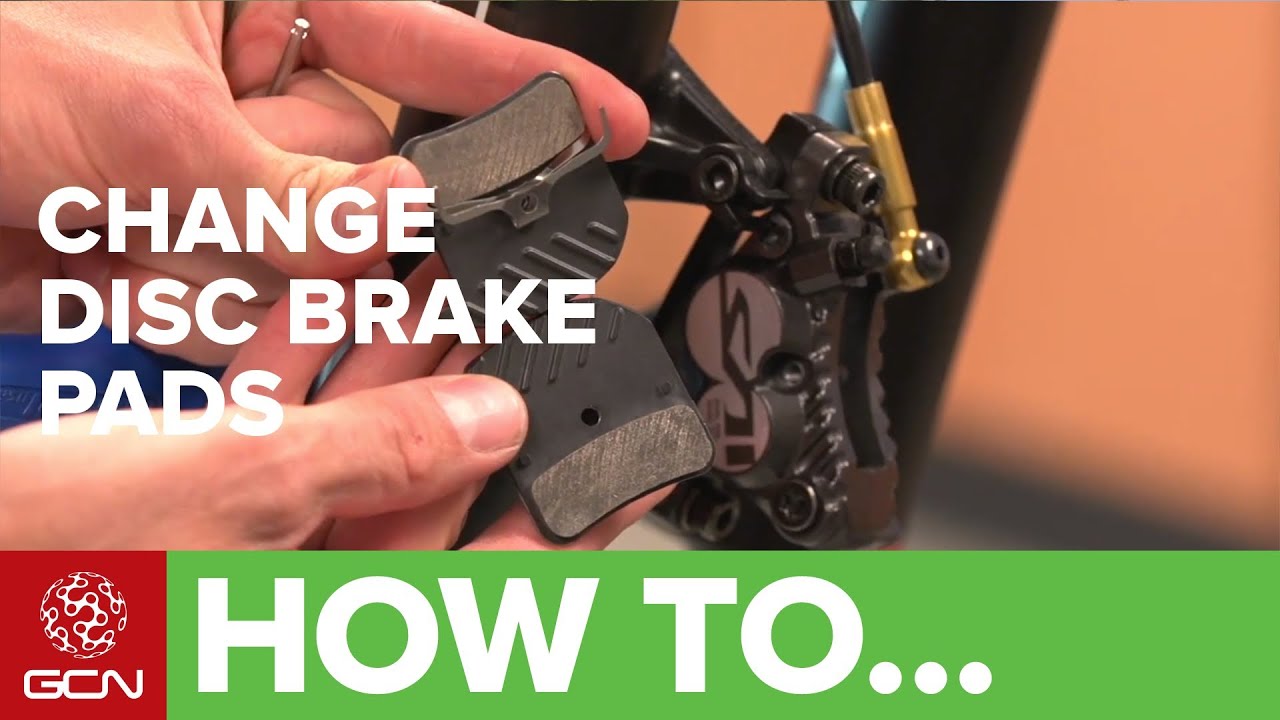
Step 2: Remove the Old Brake Pads
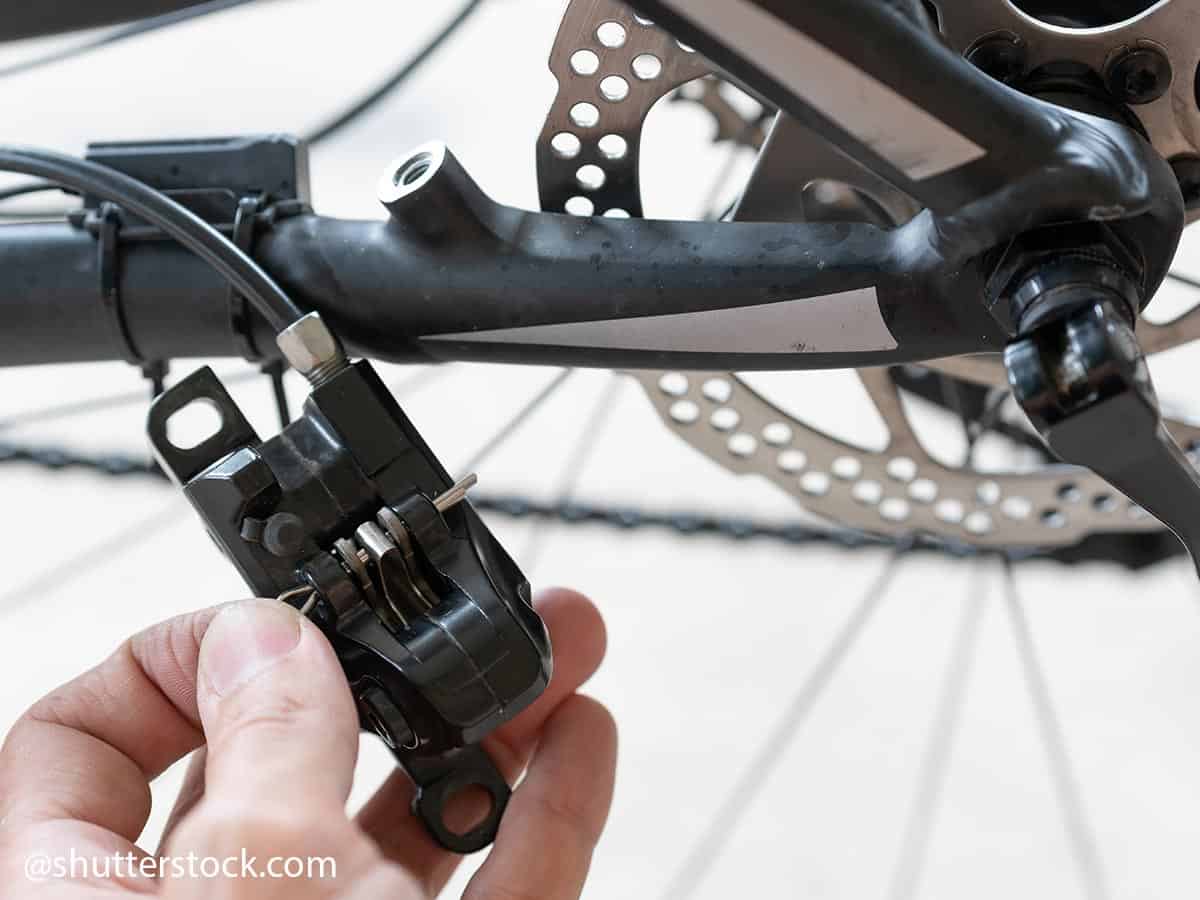
Next, remove the old brake pads from the brake caliper. Use a tire lever to pry the pads out of the caliper, taking care not to damage the caliper or the rotor.
Step 3: Inspect the Brake Caliper and Rotor
Inspect the brake caliper and rotor for any signs of wear or damage. Clean the caliper and rotor with a rag and some brake cleaner to remove any dirt or debris.
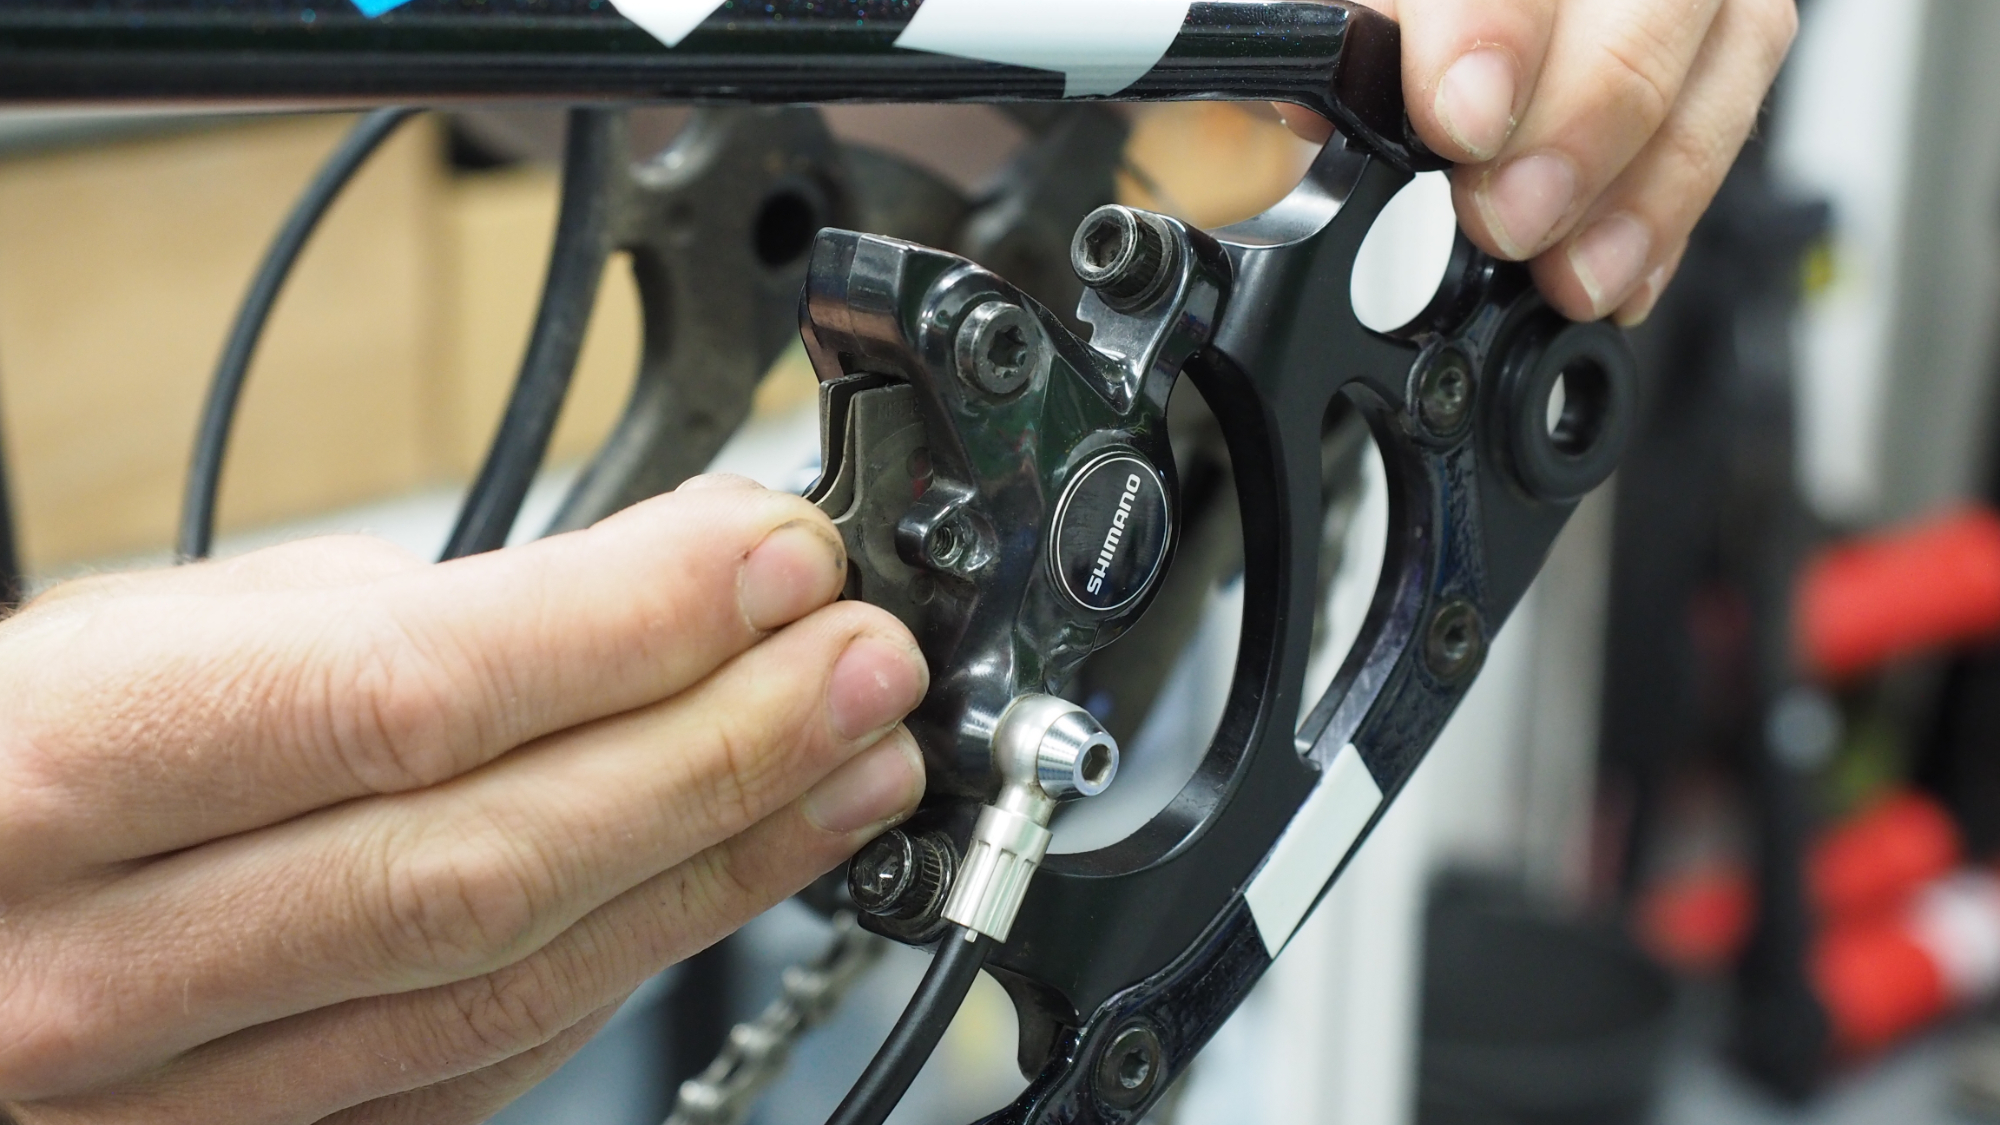
Step 4: Install the New Brake Pads
Install the new brake pads into the brake caliper. Make sure they are properly seated and aligned with the rotor.
Step 5: Reinstall the Wheel
Reinstall the wheel onto the bike, making sure it is properly secured with the nuts. Tighten the nuts in a star pattern to ensure even pressure.
Step 6: Adjust the Brake Caliper
Adjust the brake caliper to ensure proper alignment and clearance with the rotor. Use an Allen wrench to loosen the caliper bolts, then adjust the caliper as needed.
Step 7: Test the Brakes
Test the brakes to ensure they are functioning properly. Squeeze the brake lever and check for proper pad alignment and stopping power.
By following these steps, you can successfully replace your brake pads and upgrade your bike’s stopping power. Remember to always refer to your bike’s repair manual or online instructions for specific guidance on replacing brake pads for your particular bike model. Installing brake pads bike can be a relatively simple process, but it’s essential to follow the correct procedures to ensure optimal braking performance and safety.
Tips for Proper Brake Pad Alignment and Adjustment
Proper brake pad alignment and adjustment are crucial for optimal braking performance and safety. Here are some tips to help you align and adjust your brake pads correctly:
Centering the Brake Pads:
To center the brake pads, loosen the caliper bolts and slide the caliper back and forth until the pads are evenly spaced on either side of the rotor. Tighten the caliper bolts in a star pattern to ensure even pressure.
Adjusting the Brake Caliper:
Adjust the brake caliper to ensure proper clearance between the pads and the rotor. Use an Allen wrench to loosen the caliper bolts, then adjust the caliper as needed. Make sure the pads are not too close to the rotor, as this can cause excessive wear and heat buildup.
Checking Pad Alignment:
Check the pad alignment by looking through the caliper window or by using a pad alignment tool. Make sure the pads are properly seated and aligned with the rotor.
Adjusting the Brake Lever:
Adjust the brake lever to ensure proper feel and stopping power. Use an Allen wrench to loosen the lever bolts, then adjust the lever as needed. Make sure the lever is not too loose or too tight, as this can affect braking performance.
By following these tips, you can ensure proper brake pad alignment and adjustment, which is essential for optimal braking performance and safety. Remember to always refer to your bike’s repair manual or online instructions for specific guidance on brake pad alignment and adjustment for your particular bike model. Installing brake pads bike can be a relatively simple process, but it’s essential to follow the correct procedures to ensure optimal braking performance and safety.

Common Mistakes to Avoid When Replacing Brake Pads
When replacing brake pads, it’s essential to avoid common mistakes that can compromise the safety and performance of your bike’s brakes. Here are some common mistakes to avoid:
Improper Pad Alignment:
One of the most common mistakes when replacing brake pads is improper pad alignment. Make sure the pads are properly seated and aligned with the rotor. If the pads are not aligned correctly, it can cause uneven wear and reduced braking performance.
Insufficient Pad Clearance:
Another common mistake is insufficient pad clearance. Make sure the pads have enough clearance from the rotor to prevent excessive wear and heat buildup. If the pads are too close to the rotor, it can cause the pads to wear out quickly and reduce braking performance.
Neglecting to Clean the Brake Caliper:
Neglecting to clean the brake caliper is another common mistake. Make sure to clean the caliper thoroughly before installing new brake pads. If the caliper is not clean, it can cause the new pads to wear out quickly and reduce braking performance.
Using the Wrong Type of Brake Pads:
Using the wrong type of brake pads is another common mistake. Make sure to use the correct type of brake pads for your bike’s specific needs. If you use the wrong type of pads, it can cause reduced braking performance and compromise safety.
Not Following the Manufacturer’s Instructions:
Not following the manufacturer’s instructions is another common mistake. Make sure to follow the manufacturer’s instructions for replacing brake pads. If you don’t follow the instructions, it can cause reduced braking performance and compromise safety.
By avoiding these common mistakes, you can ensure a safe and successful brake pad replacement. Remember to always refer to your bike’s repair manual or online instructions for specific guidance on replacing brake pads for your particular bike model. Installing brake pads bike can be a relatively simple process, but it’s essential to follow the correct procedures to ensure optimal braking performance and safety.
How to Test Your Bike’s Brakes After Replacing the Pads
After replacing your bike’s brake pads, it’s essential to test the brakes to ensure they are functioning properly. Here’s a step-by-step guide on how to test your bike’s brakes:
Step 1: Check for Proper Pad Alignment
Check the brake pads to ensure they are properly aligned with the rotor. If the pads are not aligned correctly, it can cause uneven wear and reduced braking performance.
Step 2: Check Brake Lever Feel
Check the brake lever feel to ensure it is smooth and consistent. If the lever feel is spongy or inconsistent, it can indicate a problem with the brake pads or caliper.
Step 3: Test Stopping Power
Test the stopping power of your bike’s brakes by riding at a moderate speed and applying the brakes. Check to ensure the bike stops smoothly and consistently.
Step 4: Check for Any Leaks
Check the brake system for any leaks or damage. If you notice any leaks or damage, it’s essential to address the issue immediately to ensure safe braking performance.
Step 5: Test the Brakes in Different Conditions
Test the brakes in different conditions, such as on hills, in wet weather, and on rough terrain. This will help you ensure the brakes are functioning properly in various situations.
By following these steps, you can ensure your bike’s brakes are functioning properly after replacing the brake pads. Remember to always refer to your bike’s repair manual or online instructions for specific guidance on testing brakes for your particular bike model. Installing brake pads bike can be a relatively simple process, but it’s essential to follow the correct procedures to ensure optimal braking performance and safety.
Maintenance and Inspection Tips to Extend Brake Pad Life
To extend the life of your bike’s brake pads, regular maintenance and inspection are crucial. Here are some tips to help you keep your brake pads in good condition:
Regular Cleaning:
Regularly clean your brake pads and caliper to remove any dirt, dust, or debris that may accumulate. Use a soft brush or a clean rag to wipe away any dirt or debris.
Pad Wear Checks:
Regularly check your brake pads for wear and tear. Look for signs of wear, such as thinning or cracking, and replace the pads as needed.
Cable Adjustments:
Regularly check and adjust your brake cables to ensure they are properly tensioned. This will help to prevent wear and tear on your brake pads.
Brake Fluid Checks:
Regularly check your brake fluid levels and top off as needed. Low brake fluid levels can cause your brake pads to wear out faster.
Inspection of Brake Caliper:
Regularly inspect your brake caliper for any signs of wear or damage. Look for signs of wear, such as scoring or pitting, and replace the caliper as needed.
By following these maintenance and inspection tips, you can help to extend the life of your bike’s brake pads and ensure optimal braking performance. Remember to always refer to your bike’s repair manual or online instructions for specific guidance on maintaining and inspecting your bike’s brake pads. Installing brake pads bike can be a relatively simple process, but it’s essential to follow the correct procedures to ensure optimal braking performance and safety.