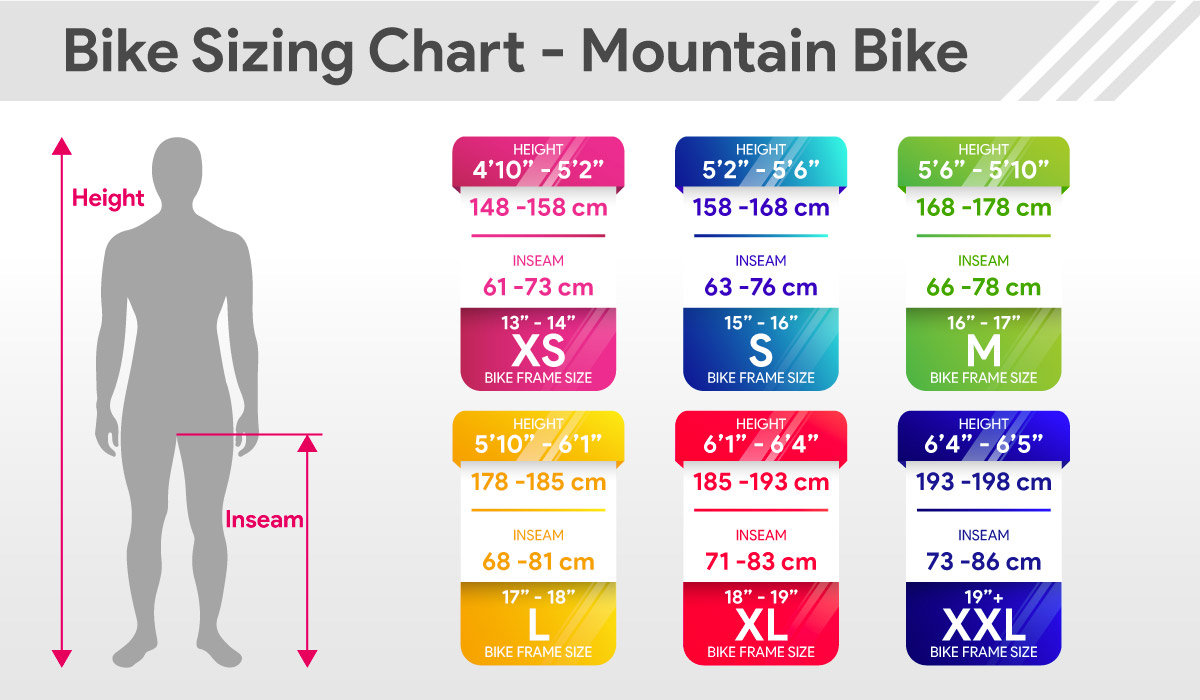
Understanding Mountain Bike Sizing: The Basics
Mountain bike sizing is a crucial aspect of ensuring a comfortable, safe, and enjoyable riding experience. Proper sizing not only enhances performance but also reduces the risk of injury and fatigue. Three key elements play a significant role in determining the right bike fit: frame size, saddle height, and reach.
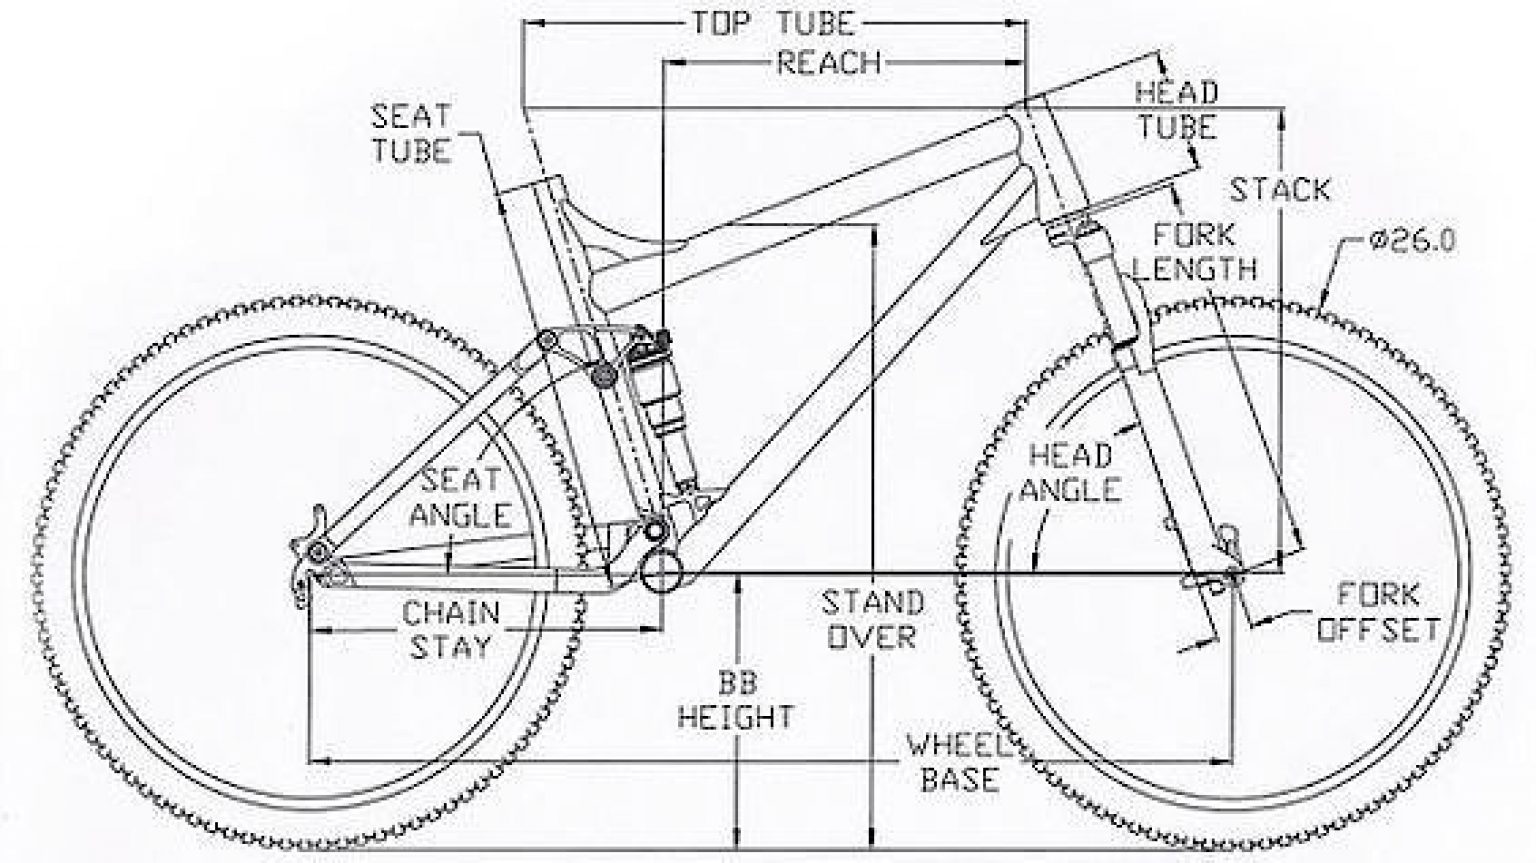
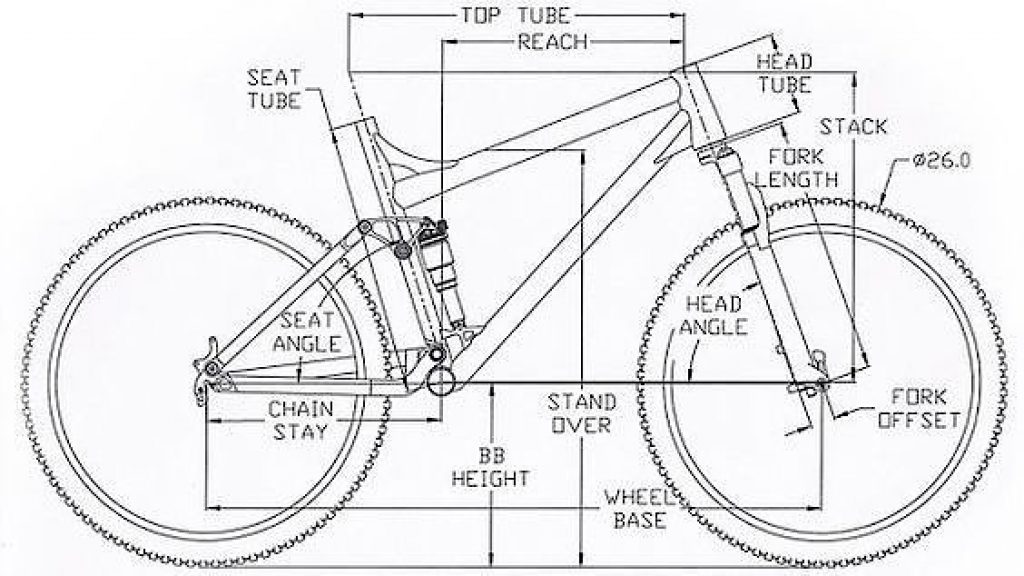
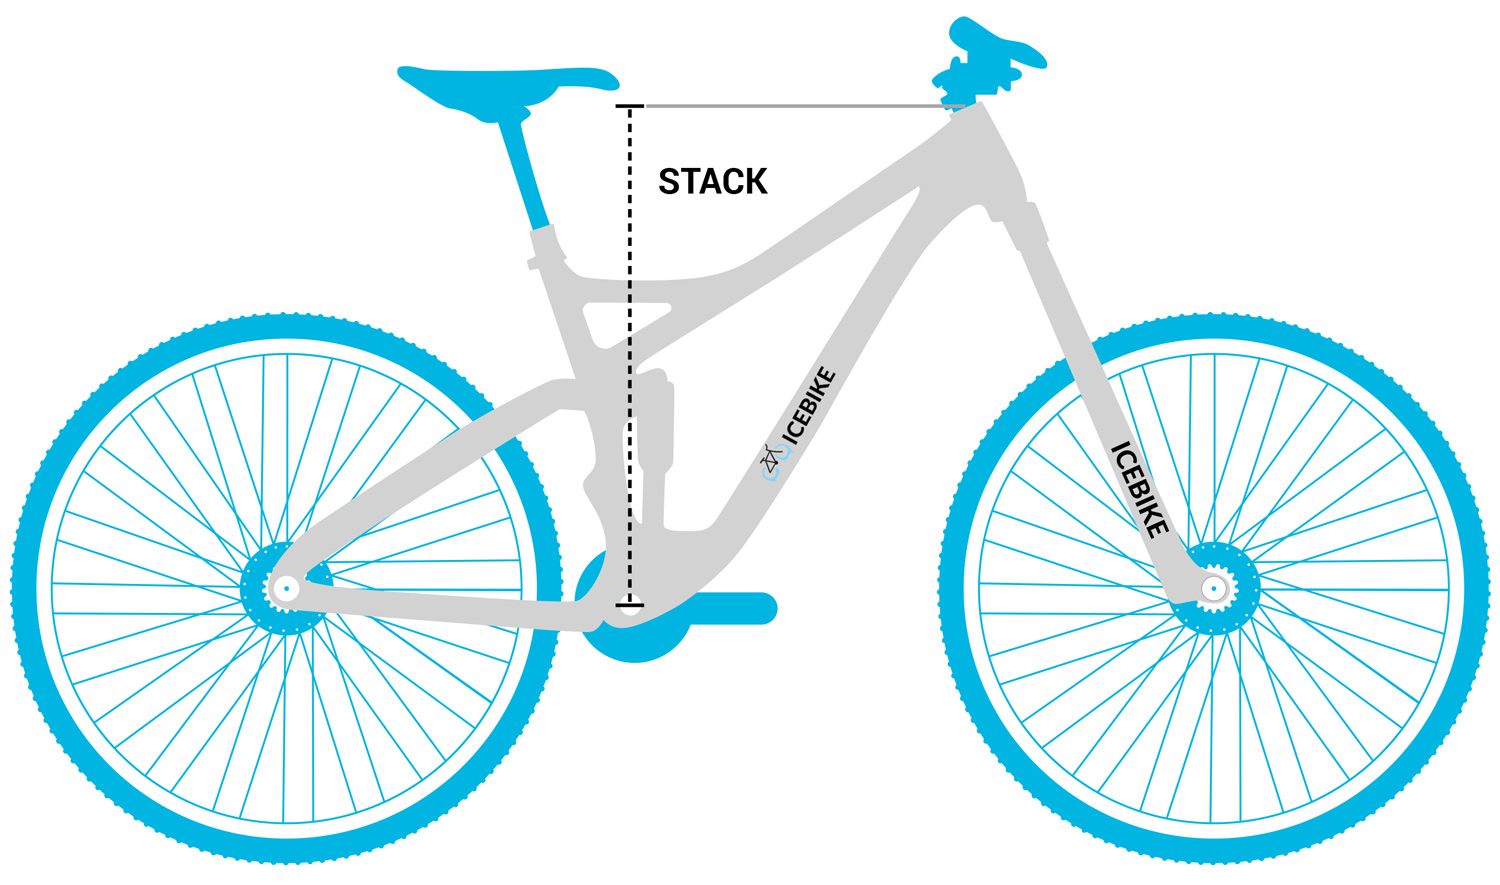
Frame size is the most commonly discussed aspect of mountain bike sizing. It refers to the length of the seat tube, which is the vertical tube that connects the saddle to the bottom bracket. Frame size is typically measured in inches or centimeters and is often the starting point for determining the right bike fit. However, frame size alone does not guarantee a proper bike fit, as saddle height and reach also need to be considered.
Saddle height is the distance between the top of the saddle and the center of the pedal axle. A proper saddle height allows for a slight bend in the knee at the bottom of the pedal stroke, which helps to optimize power transfer and reduce strain on the knee joint. Adjusting saddle height is a relatively simple process that can significantly impact the overall comfort and efficiency of the ride.
Reach refers to the horizontal distance between the saddle and the handlebars. A proper reach ensures that the rider’s weight is evenly distributed between the saddle and the handlebars, reducing strain on the back and shoulders. Adjusting reach typically involves changing the stem length or adjusting the saddle position. A bike with the correct reach provides a comfortable and stable riding position, allowing the rider to maintain control and confidence on the trail.
In summary, proper mountain bike sizing involves more than just selecting the right frame size. Saddle height and reach are equally important in ensuring a comfortable and efficient riding position. Understanding the basics of mountain bike sizing is the first step in finding the perfect fit for your next adventure. A well-fitted mountain bike can significantly enhance your riding experience, making it more enjoyable, safe, and performance-oriented.
How to Measure Yourself for a Mountain Bike: A Step-by-Step Guide
To ensure a proper mountain bike fit, it’s essential to measure your body dimensions accurately. Here’s a step-by-step guide on how to measure inseam length, height, and arm length to determine the appropriate mountain bike size:
Measuring Inseam Length
To measure your inseam length, follow these steps:
- Stand with your back against a wall, barefoot, and feet about shoulder-width apart.
- Place a book or a level between your legs, as high as possible, without it falling.
- Make sure the book or level is touching the wall and mark the height with a pencil.
- Measure the distance from the floor to the mark with a measuring tape.
Measuring Height
Measuring your height is straightforward. Use a measuring tape to measure the distance from the floor to the top of your head while standing barefoot on a flat surface.
Measuring Arm Length
To measure your arm length, follow these steps:
- Stand straight with your arms relaxed at your sides.
- Measure the distance from the center of the AC joint (the bony bump at the top of your shoulder) to the middle of the wrist crease.
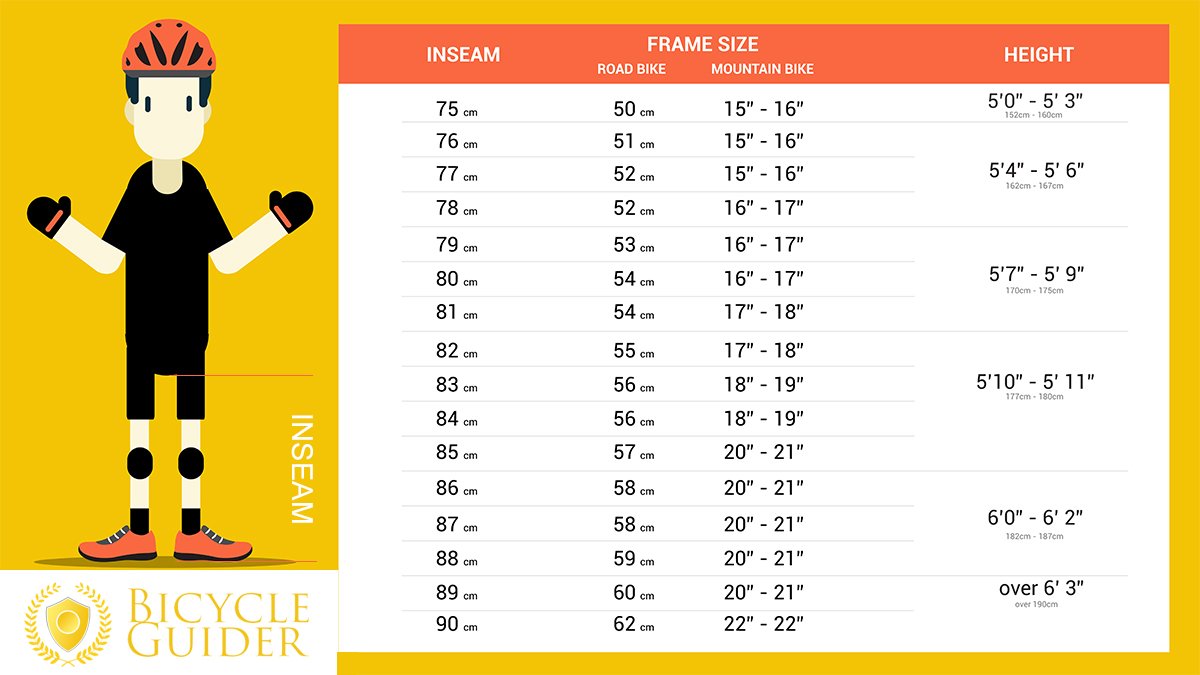
Once you have these measurements, you can use a mountain bike sizing chart to determine the appropriate frame size. However, keep in mind that saddle height and reach also need to be adjusted for a customized fit. Here are some tips on how to adjust saddle height and reach:
Adjusting Saddle Height
To adjust saddle height, follow these steps:
- Mount the bike and place your heels on the pedals.
- Pedal backward until the crank arm is at its lowest point.
- Your leg should be almost fully extended, with a slight bend in the knee.
- If your knee is significantly bent or fully extended, adjust the saddle height accordingly.
Adjusting Reach
To adjust reach, follow these steps:
- Mount the bike and ensure your saddle height is correct.
- Check if your arms are fully extended and your back is straight while holding the handlebars.
- If you feel too stretched or cramped, adjust the stem length or saddle position to achieve a comfortable and stable riding position.
By following this step-by-step guide, you can ensure a proper mountain bike fit for a comfortable and enjoyable riding experience. Remember that a well-fitted mountain bike can significantly enhance your performance, safety, and overall satisfaction on the trails.
Mountain Bike Sizing Charts: A Comparison of Leading Brands
Mountain bike sizing charts are essential tools for determining the appropriate bike size for your body dimensions. Leading brands like Trek, Giant, and Specialized have their unique sizing philosophies, which can sometimes lead to confusion among riders. Here’s a comparison of mountain bike sizing charts from these leading brands and insights on how to interpret each chart:
Trek Mountain Bike Sizing Chart
Trek’s mountain bike sizing chart is based on inseam length and height. They provide recommended frame sizes based on these two measurements. Trek’s chart is easy to interpret, and they offer a range of sizes from XS to XXL. They also provide a detailed guide on how to measure inseam length and height, ensuring that riders can accurately determine their appropriate frame size.
Giant Mountain Bike Sizing Chart
Giant’s mountain bike sizing chart is based on height and rider style. They offer a range of sizes from XS to XL and provide recommendations for cross-country, trail, and enduro riding styles. Giant’s chart is easy to interpret, and they offer detailed descriptions of each riding style, helping riders choose the right bike size for their preferred riding discipline.
Specialized Mountain Bike Sizing Chart
Specialized’s mountain bike sizing chart is based on height, inseam length, and riding style. They offer a range of sizes from XS to XXL and provide recommendations for cross-country, trail, and enduro riding styles. Specialized’s chart is easy to interpret, and they offer detailed descriptions of each riding style, helping riders choose the right bike size for their preferred riding discipline. They also provide tips on how to adjust saddle height and reach for a customized fit.
When interpreting mountain bike sizing charts, it’s essential to consider the following:
- Riding style: Different riding styles require different bike geometries, which can impact the bike’s fit and feel. For example, cross-country bikes typically have a more aggressive riding position, while enduro bikes have a more relaxed riding position.
- Terrain: The terrain you’ll be riding on can also impact the bike’s fit and feel. For example, rocky or technical terrain may require a different bike fit than smooth or flowy terrain.
- Body proportions: While height and inseam length are essential measurements, body proportions can also impact the bike’s fit and feel. For example, riders with longer arms or legs may need to adjust the saddle height or stem length to achieve a comfortable and stable riding position.
By comparing mountain bike sizing charts from leading brands and considering the impact of riding style, terrain, and body proportions, riders can ensure a proper bike fit for a comfortable and enjoyable riding experience. Remember that a well-fitted mountain bike can significantly enhance your performance, safety, and overall satisfaction on the trails.
Choosing the Right Mountain Bike Size: Factors to Consider
Choosing the right mountain bike size is crucial for a comfortable and enjoyable riding experience. While frame size is an essential factor, it’s not the only one to consider. Riding style, terrain, and body proportions can also impact the bike’s fit and feel. Here’s how to choose the right size bike for different types of riding:
Cross-Country Riding
Cross-country riding typically requires a more aggressive riding position, with a lower handlebar height and a longer reach. Riders should choose a bike size that allows for a comfortable and efficient pedaling position while maintaining control on technical terrain. A bike that’s too small may feel cramped, while a bike that’s too large may feel unstable on steep climbs or tight turns.
Downhill Riding
Downhill riding requires a more relaxed riding position, with a higher handlebar height and a shorter reach. Riders should choose a bike size that allows for a stable and confident riding position while maintaining control on steep descents and rough terrain. A bike that’s too small may feel unstable on steep descents, while a bike that’s too large may feel unwieldy on tight turns.
Enduro Riding
Enduro riding requires a balance between uphill and downhill performance. Riders should choose a bike size that allows for a comfortable and efficient pedaling position while maintaining control on technical terrain. A bike that’s too small may feel cramped on long climbs, while a bike that’s too large may feel unstable on steep descents or tight turns.
Body proportions can also impact the bike’s fit and feel. Riders with longer arms or legs may need to adjust the saddle height or stem length to achieve a comfortable and stable riding position. It’s essential to consider these factors when choosing a mountain bike size, as a proper bike fit can significantly enhance performance, safety, and overall satisfaction on the trails.
Here are some tips to ensure a proper bike fit:
- Measure your inseam length, height, and arm length accurately.
- Consult a mountain bike sizing chart from a reputable brand like Trek, Giant, or Specialized.
- Consider your riding style and preferred terrain.
- Adjust the saddle height and reach for a customized fit.
- Consider the benefits of adjustable seatposts, dropper posts, and stem length.
By considering these factors, riders can ensure a proper bike fit for a comfortable and enjoyable riding experience. Remember that a well-fitted mountain bike can significantly enhance your performance, safety, and overall satisfaction on the trails.
Mountain Bike Sizing: Common Mistakes to Avoid
Choosing the right mountain bike size is crucial for a comfortable and enjoyable riding experience. However, many riders make common mistakes that can lead to an ill-fitting bike. Here are some common mistakes to avoid and tips on how to ensure a proper bike fit:
Relying Solely on Frame Size
Many riders assume that frame size is the only factor to consider when choosing a mountain bike. However, saddle height and reach are equally important in determining the right bike fit. Riders should consider these factors in addition to frame size to ensure a proper bike fit.
Ignoring Body Proportions
Riders come in all shapes and sizes, and body proportions can significantly impact the bike’s fit and feel. Riders with longer arms or legs may need to adjust the saddle height or stem length to achieve a comfortable and stable riding position. It’s essential to consider these factors when choosing a mountain bike size.
Assuming One Size Fits All
Many riders assume that one mountain bike size fits all riding styles and terrains. However, different types of riding require different bike geometries, which can impact the bike’s fit and feel. For example, cross-country bikes typically have a more aggressive riding position, while enduro bikes have a more relaxed riding position. Riders should choose a bike size that’s appropriate for their preferred riding style and terrain.
Neglecting to Adjust Saddle Height and Reach
Even if riders choose the right mountain bike size, neglecting to adjust saddle height and reach can lead to an ill-fitting bike. Riders should adjust the saddle height and reach for a customized fit, ensuring a comfortable and efficient pedaling position while maintaining control on technical terrain.
Ignoring the Benefits of Adjustable Seatposts, Dropper Posts, and Stem Length
Adjustable seatposts, dropper posts, and stem length can significantly enhance the bike’s fit and feel. Adjustable seatposts and dropper posts allow riders to adjust the saddle height on the fly, while stem length can impact the bike’s handling and stability. Riders should consider these customization options when choosing a mountain bike size.
By avoiding these common mistakes, riders can ensure a proper bike fit for a comfortable and enjoyable riding experience. Remember that a well-fitted mountain bike can significantly enhance your performance, safety, and overall satisfaction on the trails.
Mountain Bike Sizing: Adjustments and Customization
Even with the right mountain bike size, riders may still need to make adjustments and customizations to achieve a perfect fit. Here are some adjustments and customization options to consider:
Saddle Height
Saddle height is one of the most critical adjustments to make when fitting a mountain bike. A properly adjusted saddle height allows for a comfortable and efficient pedaling position while maintaining control on technical terrain. To adjust saddle height, follow these steps:
- Mount the bike and place your heels on the pedals.
- Pedal backward until the crank arm is at its lowest point.
- Your leg should be almost fully extended, with a slight bend in the knee.
- If your knee is significantly bent or fully extended, adjust the saddle height accordingly.
Saddle Fore/Aft Position
The saddle fore/aft position can impact the bike’s handling and rider comfort. To adjust the saddle fore/aft position, follow these steps:
- Mount the bike and ensure the pedals are level.
- Place your heel on the pedal in the 3 o’clock position.
- Your knee should be directly over the pedal axle.
- If your knee is in front of or behind the pedal axle, adjust the saddle fore/aft position accordingly.
Stem Length
Stem length can impact the bike’s handling and stability. A longer stem can make the bike feel more stable but may also make it harder to maneuver. A shorter stem can make the bike feel more agile but may also make it feel less stable. To adjust stem length, follow these steps:
- Loosen the stem bolts and slide the stem to the desired length.
- Ensure the handlebars are level and centered over the stem.
- Tighten the stem bolts to the recommended torque specification.
Adjustable Seatposts and Dropper Posts
Adjustable seatposts and dropper posts allow riders to adjust the saddle height on the fly. Adjustable seatposts are ideal for riders who need to adjust saddle height for climbing or descending, while dropper posts are ideal for riders who need to lower the saddle for technical descents. To adjust an adjustable seatpost or dropper post, follow the manufacturer’s instructions.
By making these adjustments and customizations, riders can ensure a proper bike fit for a comfortable and enjoyable riding experience. Remember that a well-fitted mountain bike can significantly enhance your performance, safety, and overall satisfaction on the trails.
Mountain Bike Sizing: Frequently Asked Questions
Here are some frequently asked questions about mountain bike sizing:
“Can I ride a bike that’s too big or too small?”
Riding a bike that’s too big or too small can impact your comfort, safety, and performance on the trails. A bike that’s too big can feel unwieldy and difficult to control, while a bike that’s too small can feel cramped and uncomfortable. It’s essential to choose a bike that fits your body proportions and riding style to ensure a comfortable and enjoyable riding experience.
“How do I know if my bike fit is correct?”
A proper bike fit should allow for a comfortable and efficient pedaling position while maintaining control on technical terrain. Here are some signs of a proper bike fit:
- Your knee should be directly over the pedal axle when the pedal is at the 3 o’clock position.
- Your saddle height should allow for a slight bend in your knee when the pedal is at the bottom of the stroke.
- Your reach should allow for a comfortable grip on the handlebars without overreaching or feeling cramped.
- Your handlebars should be level and centered over the stem.
“What should I do if my bike doesn’t fit properly?”
If your bike doesn’t fit properly, there are several steps you can take to achieve a better fit. First, try making adjustments to the saddle height, saddle fore/aft position, and stem length. If these adjustments don’t improve the fit, consider visiting a bike fit specialist or trying out different bike sizes at a local bike shop.
By answering these frequently asked questions, riders can ensure a proper bike fit for a comfortable and enjoyable riding experience. Remember that a well-fitted mountain bike can significantly enhance your performance, safety, and overall satisfaction on the trails.
Mountain Bike Sizing: Conclusion and Next Steps
Choosing the right mountain bike size is crucial for a comfortable and enjoyable riding experience. By understanding the basics of mountain bike sizing, measuring yourself accurately, and interpreting mountain bike sizing charts, you can find the perfect bike fit for your body proportions and riding style. Remember to consider factors such as riding style, terrain, and body proportions when choosing a mountain bike size. Avoid common mistakes such as relying solely on frame size or ignoring body proportions.
If you’re still unsure about your mountain bike size, consider visiting a bike fit specialist. A bike fit specialist can help you make adjustments and customizations to your bike for a better fit, ensuring a comfortable and efficient pedaling position while maintaining control on technical terrain. They can also provide practical advice and solutions for common mountain bike sizing issues.
Another option is to try out different bike sizes at a local bike shop. Many bike shops offer demo programs that allow you to test ride different bikes and sizes before making a purchase. This can help you determine the right bike fit for your body proportions and riding style.
In summary, finding the perfect mountain bike size is essential for a comfortable and enjoyable riding experience. By following the tips and advice in this article, you can ensure a proper bike fit for optimal performance, safety, and satisfaction on the trails. Remember to consider factors such as riding style, terrain, and body proportions when choosing a mountain bike size, and don’t hesitate to seek professional advice if needed.


