How to Choose the Right Mountain Bike Size for Your Riding Style
Choosing the right mountain bike size is crucial for a comfortable and efficient ride. A well-fitting bike can improve performance, reduce fatigue, and prevent injuries. When selecting a mountain bike, it’s essential to consider the rider’s body size, riding style, and the type of terrain they’ll be riding on. A mtb bike size chart can be a useful tool in determining the optimal size, but it’s not the only factor to consider.

Click Image to Find eBike Products
Riders who are new to mountain biking may not be aware of the importance of proper bike fit. A bike that is too small can lead to discomfort, fatigue, and decreased performance, while a bike that is too large can be difficult to handle and increase the risk of injury. By considering the rider’s height, inseam, and arm length, as well as their riding style and preferences, it’s possible to find a bike that fits perfectly.
For example, a cross-country rider may prefer a smaller bike with a more upright riding position, while a downhill rider may prefer a larger bike with a more aggressive riding position. By understanding the different types of mountain biking and the corresponding bike sizes, riders can make an informed decision when selecting a bike.
In addition to considering the rider’s body size and riding style, it’s also essential to think about the type of terrain they’ll be riding on. A bike that is designed for smooth, flowing trails may not be suitable for technical, rocky terrain. By considering the terrain and the rider’s skill level, it’s possible to find a bike that is well-suited to their needs.
Ultimately, choosing the right mountain bike size requires a combination of research, testing, and experimentation. By using a mtb bike size chart as a guide, and considering the rider’s body size, riding style, and terrain, it’s possible to find a bike that fits perfectly and provides a comfortable and efficient ride.
Understanding Mountain Bike Size Charts: A Breakdown of the Key Measurements
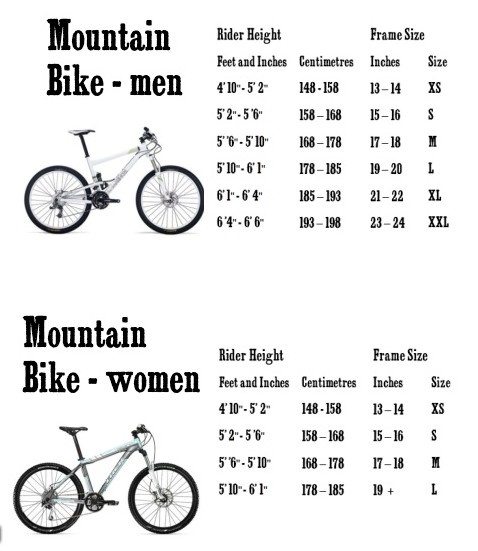
Mountain bike size charts can be a valuable tool in determining the optimal bike size for a rider. However, understanding the key measurements used in these charts is crucial to making an informed decision. The three main measurements used in mtb bike size charts are standover height, seat tube length, and reach.
Standover height refers to the distance between the ground and the top tube of the bike. This measurement is important because it determines the rider’s ability to stand over the bike with both feet flat on the ground. A general rule of thumb is to look for a standover height that allows for at least 1-2 inches of clearance between the rider’s inseam and the top tube.
Seat tube length, on the other hand, refers to the length of the tube that connects the saddle to the bottom bracket. This measurement is important because it determines the rider’s saddle height and overall riding position. A longer seat tube length can result in a more upright riding position, while a shorter seat tube length can result in a more aggressive position.
Reach refers to the distance between the saddle and the handlebars. This measurement is important because it determines the rider’s ability to comfortably reach the handlebars and maintain a neutral riding position. A longer reach can result in a more stretched-out riding position, while a shorter reach can result in a more compact position.
By understanding these key measurements and how they relate to the rider’s body size and riding position, it’s possible to use a mtb bike size chart to determine the optimal bike size. However, it’s also important to consider other factors, such as the rider’s height, inseam, and arm length, as well as the bike’s geometry and intended use.
For example, a rider with a longer inseam may require a bike with a longer seat tube length to maintain a comfortable riding position. Similarly, a rider with a shorter arm length may require a bike with a shorter reach to avoid feeling stretched out.
By considering these factors and using a mtb bike size chart as a guide, riders can find a bike that fits perfectly and provides a comfortable and efficient ride.
Factors to Consider When Selecting a Mountain Bike Size
When selecting a mountain bike size, there are several factors to consider beyond just the rider’s height and inseam. These factors include the rider’s arm length, torso length, and riding style, as well as the bike’s geometry and intended use.
Rider height is an obvious factor to consider when selecting a mountain bike size. However, it’s not the only factor, and relying solely on height can lead to a poor fit. For example, a rider with a longer torso may require a larger bike to accommodate their body position, while a rider with a shorter torso may be able to fit on a smaller bike.
Inseam is another important factor to consider, as it affects the rider’s standover height and ability to comfortably straddle the bike. However, inseam alone is not enough to determine the optimal bike size. For example, a rider with a longer inseam may require a bike with a longer seat tube length to maintain a comfortable riding position.
Arm length is also an important factor to consider, as it affects the rider’s ability to comfortably reach the handlebars. A rider with longer arms may require a bike with a longer reach to maintain a neutral riding position, while a rider with shorter arms may require a bike with a shorter reach.
Riding style is also an important factor to consider when selecting a mountain bike size. For example, a cross-country rider may prefer a smaller bike with a more upright riding position, while a downhill rider may prefer a larger bike with a more aggressive riding position.
Finally, the bike’s geometry and intended use must also be considered when selecting a mountain bike size. For example, a bike designed for technical trail riding may require a more compact frame size to maintain agility and maneuverability, while a bike designed for high-speed downhill riding may require a larger frame size to maintain stability and control.
By considering these factors and using a mtb bike size chart as a guide, riders can find a bike that fits perfectly and provides a comfortable and efficient ride.
For example, a rider who is 5’10” with a 32″ inseam and a 24″ arm length may require a medium-sized bike with a 17″ seat tube length and a 23″ reach. However, this is just a starting point, and the rider may need to adjust the bike’s fit based on their individual needs and preferences.

Mountain Bike Size Charts: A Comparison of Popular Brands
When it comes to mountain bike sizing, different brands have different approaches. While some brands may use similar measurements and sizing charts, others may have unique approaches that set them apart. In this section, we’ll compare the size charts of popular mountain bike brands, including Trek, Specialized, and Giant.
Trek’s mountain bike size chart is based on the rider’s height and inseam. They offer a range of sizes, from 14.5 inches to 23 inches, and recommend that riders choose a size based on their height and inseam. For example, a rider who is 5’10” with a 32″ inseam would fit on a Trek mountain bike with a 17.5″ frame size.
Specialized’s mountain bike size chart is also based on the rider’s height and inseam. However, they also take into account the rider’s arm length and torso length. They offer a range of sizes, from 15 inches to 24 inches, and recommend that riders choose a size based on their height, inseam, and arm length. For example, a rider who is 5’10” with a 32″ inseam and a 24″ arm length would fit on a Specialized mountain bike with a 18″ frame size.
Giant’s mountain bike size chart is based on the rider’s height and inseam, as well as the type of riding they’ll be doing. They offer a range of sizes, from 14 inches to 23 inches, and recommend that riders choose a size based on their height, inseam, and riding style. For example, a rider who is 5’10” with a 32″ inseam and plans to do mostly cross-country riding would fit on a Giant mountain bike with a 17″ frame size.
While there are some differences between the size charts of these popular brands, there are also some similarities. All three brands recommend that riders choose a size based on their height and inseam, and all three offer a range of sizes to fit different riders. However, the specific measurements and sizing approaches used by each brand may vary.
When choosing a mountain bike, it’s essential to consult the size chart of the specific brand and model you’re interested in. This will ensure that you get a bike that fits you perfectly and provides a comfortable and efficient ride. Additionally, consider visiting a local bike shop to get a professional bike fit and ensure that your new bike is set up correctly.
How to Measure Yourself for a Mountain Bike
To ensure a proper fit on a mountain bike, it’s essential to take accurate measurements of your body. Here’s a step-by-step guide on how to measure yourself for a mountain bike:
**Standover Height:** Standover height is the distance between the ground and the top tube of the bike. To measure your standover height, stand over a mountain bike with your feet flat on the ground and your legs straight. Measure the distance from the ground to the top tube of the bike. This measurement should be at least 1-2 inches to ensure a comfortable fit.
**Inseam:** Inseam is the distance from the ground to the crotch of your pants. To measure your inseam, stand against a wall with your feet flat on the ground and your legs straight. Measure the distance from the ground to the crotch of your pants. This measurement will help you determine the optimal seat tube length for your mountain bike.
**Arm Length:** Arm length is the distance from the center of your back to the tip of your middle finger. To measure your arm length, stand against a wall with your feet flat on the ground and your arms at your sides. Measure the distance from the center of your back to the tip of your middle finger. This measurement will help you determine the optimal reach for your mountain bike.
**Torso Length:** Torso length is the distance from the base of your neck to the top of your hip bone. To measure your torso length, stand against a wall with your feet flat on the ground and your arms at your sides. Measure the distance from the base of your neck to the top of your hip bone. This measurement will help you determine the optimal seat tube length and reach for your mountain bike.
**Using a MtB Bike Size Chart:** Once you have taken your measurements, use a mtb bike size chart to determine the optimal bike size for your body. Compare your measurements to the size chart to find the best fit for your riding style and preferences.
Remember, taking accurate measurements is crucial to ensuring a proper fit on a mountain bike. By following these steps and using a mtb bike size chart, you can find a bike that fits you perfectly and provides a comfortable and efficient ride.
Common Mistakes to Avoid When Choosing a Mountain Bike Size
When choosing a mountain bike size, there are several common mistakes to avoid. These mistakes can lead to a poor fit, reduced performance, and increased risk of injury. Here are some common mistakes to avoid when choosing a mountain bike size:
**Relying too heavily on standover height:** While standover height is an important measurement, it’s not the only factor to consider when choosing a mountain bike size. Ignoring other key measurements, such as seat tube length and reach, can lead to a poor fit and reduced performance.
**Ignoring other key measurements:** In addition to standover height, other key measurements, such as seat tube length and reach, are crucial to ensuring a proper fit. Ignoring these measurements can lead to a bike that is too small or too large, resulting in reduced performance and increased risk of injury.
**Not considering riding style:** Different riding styles require different bike sizes. For example, a cross-country rider may prefer a smaller bike with a more upright riding position, while a downhill rider may prefer a larger bike with a more aggressive riding position. Not considering riding style can lead to a poor fit and reduced performance.
**Not taking into account bike geometry:** Bike geometry, including factors such as head tube angle and seat tube angle, can affect the fit of the bike. Not taking into account bike geometry can lead to a poor fit and reduced performance.
**Not test riding the bike:** Test riding a bike is essential to ensuring a proper fit. Not test riding the bike can lead to a poor fit and reduced performance.
**Using a mtb bike size chart incorrectly:** MtB bike size charts are designed to provide a general guideline for choosing a bike size. However, using a mtb bike size chart incorrectly can lead to a poor fit and reduced performance. It’s essential to use a mtb bike size chart in conjunction with other factors, such as riding style and bike geometry, to ensure a proper fit.
By avoiding these common mistakes, riders can ensure a proper fit and optimal performance on their mountain bike.

Real-World Examples: How to Apply Mountain Bike Size Charts to Popular Models
Now that we’ve discussed the key measurements and factors to consider when choosing a mountain bike size, let’s take a look at some real-world examples of how to apply mountain bike size charts to popular models.
**Trek Fuel EX:** The Trek Fuel EX is a popular cross-country mountain bike that comes in a range of sizes, from 15.5 inches to 23 inches. To determine the optimal size for this bike, we can use the Trek mountain bike size chart. For example, a rider who is 5’10” with a 32″ inseam and a 24″ arm length would fit on a Trek Fuel EX with a 17.5″ frame size.
**Specialized Stumpjumper:** The Specialized Stumpjumper is a popular trail mountain bike that comes in a range of sizes, from 15 inches to 23 inches. To determine the optimal size for this bike, we can use the Specialized mountain bike size chart. For example, a rider who is 5’10” with a 32″ inseam and a 24″ arm length would fit on a Specialized Stumpjumper with a 18″ frame size.
**Giant TCX:** The Giant TCX is a popular cross-country mountain bike that comes in a range of sizes, from 15.5 inches to 23 inches. To determine the optimal size for this bike, we can use the Giant mountain bike size chart. For example, a rider who is 5’10” with a 32″ inseam and a 24″ arm length would fit on a Giant TCX with a 17.5″ frame size.
By using these real-world examples, we can see how to apply mountain bike size charts to popular models and ensure a proper fit. Remember to always consult the manufacturer’s size chart and take into account your riding style and preferences when choosing a mountain bike size.
Additionally, it’s essential to test ride a mountain bike before purchasing to ensure the perfect fit. By test riding a bike, you can get a feel for how it handles and make any necessary adjustments to the fit.
Tips for Test Riding a Mountain Bike to Ensure the Perfect Fit
Test riding a mountain bike is an essential step in ensuring the perfect fit. Here are some tips to help you make the most of your test ride:
**Adjust the bike’s fit on the fly:** Don’t be afraid to make adjustments to the bike’s fit during the test ride. This will help you get a feel for how the bike handles and make any necessary adjustments to the fit.
**Pay attention to your body position:** Pay attention to your body position on the bike, including your seat height, handlebar height, and foot position. Make sure you’re comfortable and able to maintain a neutral position.
**Check your standover height:** Make sure you have enough standover height to comfortably stand over the bike with your feet flat on the ground.
**Test the bike’s handling:** Test the bike’s handling by riding it on different terrain, including hills, trails, and smooth roads. This will help you get a feel for how the bike handles and make any necessary adjustments to the fit.
**Take notes:** Take notes during the test ride to help you remember how the bike felt and what adjustments you made. This will help you compare different bikes and make a more informed decision.
**Don’t be afraid to ask for help:** Don’t be afraid to ask for help from a sales associate or a professional bike fitter. They can help you make adjustments to the bike’s fit and provide valuable insights into how the bike handles.
By following these tips, you can ensure the perfect fit on your mountain bike and enjoy a comfortable and efficient ride.