
Getting Started: Essential Tools and Safety Precautions
Before putting together a bike, it’s crucial to have the right tools and take necessary safety precautions to ensure a successful and enjoyable assembly process. A well-equipped workspace and attention to safety details can make all the difference in avoiding common mistakes and potential injuries. When assembling a bike, it’s essential to have a torque wrench, Allen wrenches, screwdrivers, pliers, and safety glasses within reach. Additionally, a clean and well-lit workspace is vital for accurately identifying and assembling the various components. By prioritizing safety and preparation, you’ll be well on your way to building a reliable and high-performance bike that meets your riding needs. Remember, putting together a bike requires patience, attention to detail, and the right tools for the job. By following these guidelines, you’ll be able to tackle the assembly process with confidence and ensure a safe and enjoyable ride.

Click Image to Find eBike Products
![]()
Unpacking and Inventory: A Step-by-Step Guide
Once you’ve gathered the necessary tools and safety gear, it’s time to unpack and inventory the bike’s components. This crucial step sets the stage for a successful assembly process. When unpacking the components, take your time and carefully remove each part from its packaging. Inspect each component for any signs of damage or defects, and set aside any parts that appear damaged. Next, organize the components into categories, such as wheels, brakes, gears, and frame components. This will help you quickly identify and access the parts as needed. A well-organized workspace is essential when putting together a bike, as it reduces the risk of misplaced parts and saves time in the long run. By following these steps, you’ll be able to efficiently inventory the components and ensure a smooth assembly process.

How to Assemble the Frame and Fork
Assembling the frame and fork is a critical step in putting together a bike. It requires attention to detail and a thorough understanding of the components involved. Begin by attaching the fork to the frame, ensuring proper alignment and securement. Next, install the headset, making sure it is properly seated and tightened to the recommended torque specification. The frame and fork assembly process can be complex, and it’s essential to follow the manufacturer’s instructions and take necessary safety precautions to avoid damage or injury. When assembling the frame and fork, it’s crucial to ensure proper torque specifications are met to prevent damage to the components. Additionally, take the time to inspect the frame and fork for any signs of damage or defects, and address any issues before proceeding with the assembly process. By following these steps and taking the necessary precautions, you’ll be able to successfully assemble the frame and fork, setting the stage for a smooth and enjoyable ride.
Installing the Wheels and Brakes: A Beginner’s Guide
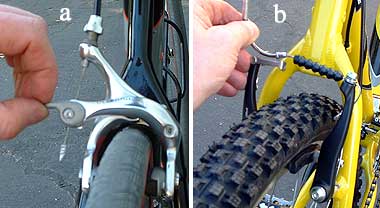
When putting together a bike, installing the wheels and brakes is a crucial step that requires attention to detail and a thorough understanding of the components involved. Begin by attaching the wheels to the frame, ensuring proper securement and alignment. Next, install the brake calipers and brake pads, making sure they are properly aligned and adjusted. It’s essential to follow the manufacturer’s instructions and take necessary safety precautions to avoid damage or injury. When installing the wheels and brakes, it’s crucial to ensure proper torque specifications are met to prevent damage to the components. Additionally, take the time to inspect the wheels and brakes for any signs of damage or defects, and address any issues before proceeding with the assembly process. By following these steps and taking the necessary precautions, you’ll be able to successfully install the wheels and brakes, setting the stage for a smooth and enjoyable ride.
Some common mistakes to avoid when installing the wheels and brakes include over-tightening the brake calipers, which can cause damage to the brake pads, and failing to properly secure the wheels, which can lead to wheel damage or even accidents. By being mindful of these potential pitfalls and following the manufacturer’s instructions, you’ll be able to avoid common mistakes and ensure a safe and enjoyable ride.
Setting Up the Gears and Derailleurs
When putting together a bike, setting up the gears and derailleurs is a critical step that requires attention to detail and a thorough understanding of the components involved. Begin by installing the derailleurs, ensuring proper alignment and securement to the frame. Next, install the gear cassette and chainrings, making sure they are properly aligned and secured. It’s essential to follow the manufacturer’s instructions and take necessary safety precautions to avoid damage or injury. When setting up the gears and derailleurs, it’s crucial to ensure proper torque specifications are met to prevent damage to the components.
To ensure smooth shifting, adjust the derailleurs according to the manufacturer’s instructions, taking care to align the derailleurs with the gear cassette and chainrings. Additionally, lubricate the chain and cables to ensure smooth operation and prevent wear and tear. Some common mistakes to avoid when setting up the gears and derailleurs include misaligning the derailleurs, which can cause poor shifting performance, and failing to properly secure the gear cassette, which can lead to damage or loss of the cassette.
By following these steps and taking the necessary precautions, you’ll be able to successfully set up the gears and derailleurs, ensuring a smooth and enjoyable ride. Remember, putting together a bike requires patience, attention to detail, and a thorough understanding of the components involved. By following these guidelines and taking the necessary precautions, you’ll be able to create a bike that is safe, reliable, and tailored to your specific needs and preferences.
Adding the Finishing Touches: Handlebars, Seatpost, and Pedals
When putting together a bike, adding the finishing touches is a crucial step that requires attention to detail and a thorough understanding of the components involved. The handlebars, seatpost, and pedals are essential components that affect the overall comfort and performance of the bike. Begin by installing the handlebars, ensuring proper alignment and securement to the stem. Next, install the seatpost, making sure it is properly secured to the frame and adjusted to the correct height.
When installing the pedals, ensure they are properly secured to the crankset and adjusted to the correct position. It’s essential to follow the manufacturer’s instructions and take necessary safety precautions to avoid damage or injury. Additionally, consider the rider’s comfort and preferences when adjusting the handlebars, seatpost, and pedals. For example, the handlebars should be at a comfortable height and distance from the rider, while the seatpost should be adjusted to the correct height to ensure proper leg extension.
Some common mistakes to avoid when adding the finishing touches include misaligning the handlebars, which can cause discomfort and affect the bike’s handling, and failing to properly secure the seatpost, which can lead to accidents or injuries. By following these steps and taking the necessary precautions, you’ll be able to successfully add the finishing touches, ensuring a comfortable and enjoyable ride. Remember, putting together a bike requires patience, attention to detail, and a thorough understanding of the components involved. By following these guidelines and taking the necessary precautions, you’ll be able to create a bike that is tailored to your specific needs and preferences.

Tuning and Testing: A Pre-Ride Checklist
Before taking your newly assembled bike out for a spin, it’s essential to perform a thorough pre-ride checklist to ensure the bike is safe and ready to ride. This critical step can help prevent accidents, injuries, and costly repairs down the line. When putting together a bike, it’s crucial to review critical safety components, including the brakes, gears, and tires, to ensure they are properly installed and adjusted.
Begin by checking the brakes, making sure they are properly secured and adjusted. Next, inspect the gears and derailleurs, ensuring they are properly aligned and adjusted for smooth shifting. Additionally, check the tire pressure, making sure it is at the recommended level, and inspect the tires for any signs of wear or damage.
Other critical components to review include the chain, pedals, and handlebars, ensuring they are properly secured and adjusted. It’s also essential to perform a test ride, checking for any unusual noises, vibrations, or performance issues. This test ride protocol should include a series of checks, including braking, shifting, and cornering, to ensure the bike is handling properly.
By following this comprehensive pre-ride checklist, you’ll be able to identify and address any potential issues before they become major problems. Remember, putting together a bike requires attention to detail and a thorough understanding of the components involved. By taking the time to review critical safety components and perform a test ride, you’ll be able to ensure a safe and enjoyable ride.
Troubleshooting Common Issues: Tips and Tricks
When putting together a bike, it’s not uncommon to encounter issues or mistakes that can be frustrating and time-consuming to resolve. However, with the right troubleshooting tips and tricks, you can quickly identify and fix common problems, getting your bike back on track in no time.
One of the most common issues encountered when assembling a bike is misaligned brakes. To troubleshoot this issue, check the brake pads and calipers, ensuring they are properly aligned and adjusted. If the problem persists, try adjusting the brake cables or replacing the brake pads altogether.
Another common issue is difficulty shifting gears. To troubleshoot this issue, check the derailleur alignment and adjustment, ensuring it is properly secured to the frame and adjusted for smooth shifting. Additionally, check the gear cables, ensuring they are properly secured and adjusted.
Other common issues that may arise when putting together a bike include loose or damaged components, such as the stem, handlebars, or pedals. To troubleshoot these issues, check the components, ensuring they are properly secured and adjusted. If the problem persists, try replacing the component altogether.
By following these troubleshooting tips and tricks, you’ll be able to quickly identify and fix common issues, ensuring a smooth and enjoyable ride. Remember, putting together a bike requires patience, attention to detail, and a thorough understanding of the components involved. By taking the time to troubleshoot common issues, you’ll be able to create a bike that is tailored to your specific needs and preferences.
Additionally, it’s essential to keep in mind that prevention is key when it comes to troubleshooting common issues. By following the steps outlined in this guide, you’ll be able to avoid common mistakes and ensure a smooth assembly process. However, if issues do arise, don’t hesitate to seek professional help or consult the manufacturer’s instructions for guidance.
