Understanding Handlebar Height and Its Impact on Riding Position
Handlebar height plays a crucial role in determining a rider’s position on a road bike. The height of the handlebars affects the rider’s posture, comfort, and overall performance. When the handlebars are too low, the rider is forced to lean forward, putting pressure on their back and neck. This can lead to discomfort, pain, and even long-term injury.
On the other hand, when the handlebars are too high, the rider may feel uncomfortable and unable to maintain a stable position. This can affect the bike’s handling and stability, making it more difficult to control. Therefore, it is essential to find the optimal handlebar height that allows the rider to maintain a comfortable and efficient riding position.
The relationship between handlebar height, saddle height, and leg extension is critical in determining the rider’s position on the bike. When the handlebars are raised, the saddle height may need to be adjusted to maintain a comfortable riding position. Similarly, the leg extension may need to be adjusted to ensure that the rider’s legs are not too stretched or too bent.
A comfortable riding position can improve performance and reduce discomfort. When the rider is comfortable, they are able to generate more power and efficiency, which can lead to improved speed and endurance. Additionally, a comfortable riding position can reduce the risk of injury and discomfort, allowing the rider to enjoy their ride for longer periods.
It is essential to note that the optimal handlebar height varies from rider to rider, depending on their individual preferences, riding style, and body type. Therefore, it is crucial to experiment with different handlebar heights to find the one that works best for you.
Tools and Materials Needed for the Job
Raising the handlebars on a road bike requires a few essential tools and materials. Before starting the process, it’s crucial to gather the necessary items to ensure a smooth and successful adjustment. The following tools and materials are required:
Allen wrenches: These are used to loosen the stem and remove any existing spacers. A set of Allen wrenches in various sizes (3, 4, 5, and 6 mm) is recommended.
Torque wrenches: A torque wrench is necessary to tighten the stem and ensure it’s securely in place. A torque wrench with a range of 10-20 Nm is suitable for most road bikes.
Handlebar spacers or risers: These are used to raise the handlebars to the desired height. Handlebar spacers or risers come in various sizes and materials, including aluminum, steel, and carbon fiber.
Other materials: Depending on the type of bike and handlebars, additional materials may be required, such as handlebar tape, grips, or brake lever spacers.
It’s essential to note that the specific tools and materials required may vary depending on the bike’s make and model. Consult the bike’s manual or manufacturer’s website for specific recommendations.
Before starting the adjustment process, ensure that all the necessary tools and materials are within reach. This will save time and prevent any potential delays or complications.
A Step-by-Step Guide to Raising Your Handlebars
Raising the handlebars on a road bike is a relatively straightforward process that can be completed with a few simple tools. Here’s a step-by-step guide to help you raise your handlebars and improve your riding experience:
Step 1: Loosen the Stem
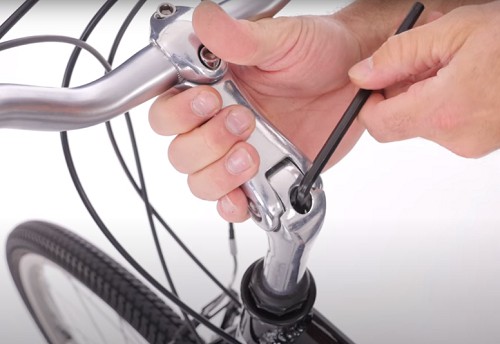
Begin by loosening the stem using an Allen wrench. Turn the wrench counterclockwise to loosen the stem, but do not remove it yet. This will give you access to the handlebar spacers or risers.
Step 2: Remove Existing Spacers or Risers
Next, remove any existing spacers or risers from the handlebars. This will give you a clean slate to work with and allow you to install new spacers or risers.
Step 3: Install New Spacers or Risers
Now, install the new spacers or risers onto the handlebars. Make sure they are securely attached and evenly spaced. You can use a torque wrench to tighten the spacers or risers, but be careful not to overtighten.
Step 4: Reinstall the Stem
Once the new spacers or risers are installed, reinstall the stem. Make sure it is securely attached and tightened to the recommended torque specification.
Step 5: Check the Handlebar Height
Finally, check the handlebar height to ensure it is at the desired level. You can use a level or a measuring tape to double-check the height. Make any necessary adjustments to the spacers or risers to achieve the perfect height.
By following these steps, you can successfully raise your handlebars and improve your riding experience. Remember to always refer to your bike’s manual or manufacturer’s website for specific instructions and recommendations.
Tips for Finding the Perfect Handlebar Height
Finding the perfect handlebar height is crucial for a comfortable and efficient riding experience. When raising the handlebars on a road bike, it’s essential to consider several factors to ensure the ideal height is achieved. Here are some tips to help you find the perfect handlebar height:
Consider Your Riding Position
The first factor to consider is your riding position. If you’re a casual rider, you may prefer a more upright position, while competitive riders may prefer a more aggressive position. The handlebar height should be adjusted accordingly to accommodate your riding style.
Arm Length and Personal Preference
Arm length and personal preference also play a significant role in determining the ideal handlebar height. Riders with longer arms may prefer a higher handlebar height, while those with shorter arms may prefer a lower height. Additionally, some riders may prefer a more relaxed position, while others may prefer a more aggressive position.
Experiment with Different Heights
To find the perfect handlebar height, it’s essential to experiment with different heights. Start by raising the handlebars in small increments and testing the height. Pay attention to your body position, comfort level, and overall riding experience.
Check Your Body Position
When testing different handlebar heights, pay attention to your body position. Make sure your back is straight, your shoulders are relaxed, and your hands are in a comfortable position on the handlebars. If you’re feeling uncomfortable or experiencing pain, adjust the handlebar height accordingly.
Get Professional Help
If you’re unsure about how to find the perfect handlebar height or need help adjusting your bike, consider consulting a professional bike fitter. They can help you determine the ideal handlebar height based on your riding style, body position, and personal preference.
Common Mistakes to Avoid When Raising Your Handlebars
When raising the handlebars on a road bike, there are several common mistakes to avoid. These mistakes can lead to a poor riding experience, discomfort, and even safety issues. Here are some common mistakes to avoid:
Over-Tightening
One of the most common mistakes is over-tightening the stem or handlebars. This can lead to a rigid and uncomfortable riding position, as well as damage to the bike’s components. Make sure to tighten the stem and handlebars to the recommended torque specification.
Under-Tightening
Under-tightening the stem or handlebars is another common mistake. This can lead to a loose and unstable riding position, which can be dangerous. Make sure to tighten the stem and handlebars securely, but avoid over-tightening.
Neglecting to Check the Bike’s Overall Fit and Alignment
When raising the handlebars, it’s essential to check the bike’s overall fit and alignment. This includes checking the saddle height, cleat position, and other components to ensure a comfortable and efficient riding position. Neglecting to check the bike’s fit and alignment can lead to discomfort, poor performance, and even safety issues.
Not Considering the Rider’s Body Position
When raising the handlebars, it’s essential to consider the rider’s body position. This includes considering the rider’s height, arm length, and personal preference. Not considering the rider’s body position can lead to a poor riding experience and discomfort.
Not Using the Correct Tools and Materials
When raising the handlebars, it’s essential to use the correct tools and materials. This includes using Allen wrenches, torque wrenches, and handlebar spacers or risers. Not using the correct tools and materials can lead to damage to the bike’s components and a poor riding experience.
How to Check and Adjust Your Bike’s Fit After Raising the Handlebars
After raising the handlebars on your road bike, it’s essential to re-check the bike’s fit and alignment to ensure a comfortable and efficient riding position. Here’s a step-by-step guide on how to check and adjust your bike’s fit:
Check the Saddle Height
The saddle height is critical in determining the rider’s position on the bike. After raising the handlebars, check the saddle height to ensure it’s still at the optimal level. If the saddle height needs to be adjusted, use an Allen wrench to loosen the seatpost clamp and adjust the saddle height accordingly.
Check the Cleat Position
The cleat position is also crucial in determining the rider’s position on the bike. After raising the handlebars, check the cleat position to ensure it’s still at the optimal level. If the cleat position needs to be adjusted, use an Allen wrench to loosen the cleat bolts and adjust the cleat position accordingly.
Check the Handlebar Position
After raising the handlebars, check the handlebar position to ensure it’s still at the optimal level. If the handlebar position needs to be adjusted, use an Allen wrench to loosen the stem and adjust the handlebar position accordingly.
Check the Brake Lever Position
The brake lever position is also critical in determining the rider’s position on the bike. After raising the handlebars, check the brake lever position to ensure it’s still at the optimal level. If the brake lever position needs to be adjusted, use an Allen wrench to loosen the brake lever clamp and adjust the brake lever position accordingly.
Test the Bike’s Fit
After making any adjustments, test the bike’s fit by taking it for a ride. Pay attention to your body position, comfort level, and overall riding experience. If you’re feeling uncomfortable or experiencing pain, make further adjustments as needed.
Conclusion: Enjoy the Ride with Your Newly Adjusted Handlebars
Raising the handlebars on a road bike can have a significant impact on the rider’s comfort and performance. By following the steps outlined in this guide, riders can enjoy a more comfortable and efficient riding experience. Remember to always check the bike’s fit and alignment after raising the handlebars to ensure a comfortable and efficient riding position.
The benefits of raising the handlebars on a road bike are numerous. Improved comfort, reduced strain on the back and neck, and enhanced overall riding experience are just a few of the advantages of adjusting the handlebar height. Additionally, raising the handlebars can improve performance by allowing riders to maintain a more aerodynamic position and generate more power.
Whether you’re a casual rider or a competitive cyclist, raising the handlebars on your road bike can take your riding experience to the next level. By following the tips and guidelines outlined in this article, you can enjoy a more comfortable and performance-enhancing ride. So why not give it a try? Raise your handlebars and elevate your ride today!
In conclusion, raising the handlebars on a road bike is a simple and effective way to improve comfort and performance. By following the steps outlined in this guide, riders can enjoy a more comfortable and efficient riding experience. Remember to always check the bike’s fit and alignment after raising the handlebars to ensure a comfortable and efficient riding position. Happy riding!


