Why Tubeless Tires Need Special Care
Tubeless tires have revolutionized the world of cycling, offering numerous benefits that enhance the overall riding experience. With reduced weight, improved traction, and increased puncture resistance, it’s no wonder why many cyclists are making the switch to tubeless tires. However, these benefits come with unique maintenance requirements, including the need for specialized repair techniques. When it comes to repairing tubeless bike tires, it’s essential to understand the intricacies of these tires and how to properly care for them.

Click Image to Find eBike Products
One of the primary advantages of tubeless tires is their ability to maintain air pressure without the need for an inner tube. This design feature allows for improved traction, reduced weight, and increased puncture resistance. However, this also means that tubeless tires require specialized tools and techniques for repair. Unlike traditional tires with inner tubes, tubeless tires rely on a sealant to maintain air pressure, which can be affected by various factors, including temperature, humidity, and tire pressure.
As a result, cyclists who opt for tubeless tires must be prepared to invest time and effort into maintaining and repairing their tires. This includes regular inspections, cleaning, and application of sealant to ensure the tire remains airtight. Additionally, cyclists must be equipped with the necessary tools and knowledge to repair punctures and other forms of damage that may occur. By understanding the unique needs of tubeless tires, cyclists can ensure a safe and enjoyable riding experience.
Repairing tubeless bike tires requires a combination of technical knowledge, specialized tools, and attention to detail. By mastering the art of tubeless tire repair, cyclists can extend the life of their tires, prevent costly repairs, and enjoy a seamless riding experience. In the following sections, we will delve into the essential tools and materials needed for tubeless tire repair, as well as provide step-by-step instructions on how to inspect, prepare, and repair tubeless tires.
Essential Tools and Materials for Tubeless Tire Repair
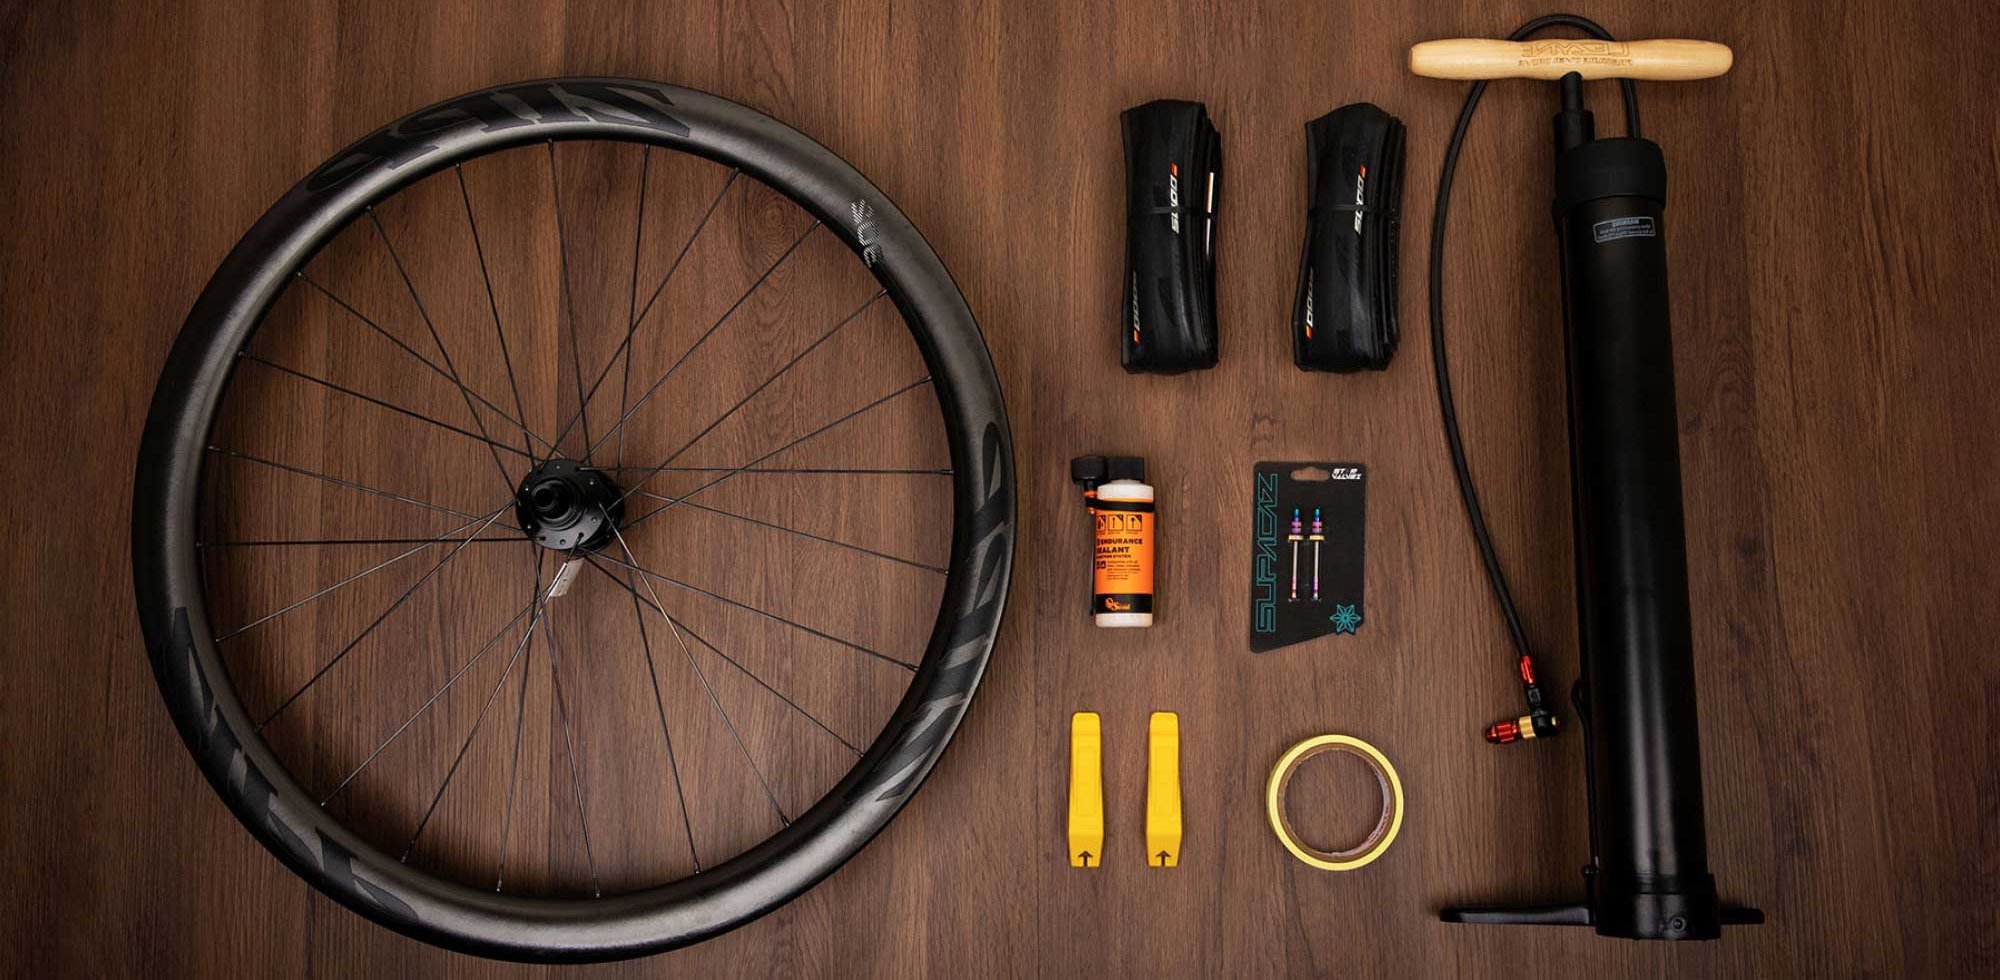
When it comes to repairing tubeless bike tires, having the right tools and materials is crucial for a successful outcome. In this section, we will outline the essential tools and materials needed to repair tubeless tires, including tire levers, sealant, and patch kits.
Tire levers are a critical tool for repairing tubeless tires. They are used to pry the tire off the rim and to remove any debris or objects that may be lodged in the tire. Park Tool’s TL-4.2 Tire Lever is a popular choice among cyclists, as it is durable and easy to use. Other options include Lezyne’s Tire Lever and Pedro’s Tire Lever.
Sealant is another essential component of tubeless tire repair. It is used to seal any punctures or cuts in the tire, and to maintain air pressure. Stan’s NoTubes Tire Sealant is a popular choice among cyclists, as it is effective and easy to use. Other options include Orange Seal and Finish Line Sealant.
Patch kits are also necessary for repairing more extensive damage, such as cuts and tears. They typically include a patch, some glue, and instructions. Park Tool’s Patch Kit and Lezyne’s Patch Kit are popular choices among cyclists.
In addition to these essential tools and materials, it is also important to have a clean and well-lit workspace, as well as a pair of gloves to protect your hands from the sealant and other materials. By having the right tools and materials on hand, you will be well-equipped to repair your tubeless tires and get back on the road quickly.
When repairing tubeless bike tires, it is also important to consider the type of tire and rim you are working with. Different tires and rims may require different tools and materials, so be sure to consult your owner’s manual or manufacturer’s instructions for specific recommendations.

How to Inspect and Prepare Your Tubeless Tires for Repair
Before attempting to repair a tubeless tire, it’s essential to inspect the tire for damage and prepare it for repair. This step is crucial in ensuring a successful repair and preventing further damage to the tire.
To inspect the tire, start by removing any debris or objects that may be lodged in the tire. Use a tire lever to pry the tire off the rim, and then inspect the tire for punctures, cuts, and worn-out tread. Check the tire’s sidewalls and tread for any signs of damage, such as cracks, cuts, or excessive wear.
Next, clean the tire thoroughly to remove any dirt, grime, or old sealant. Use a soft-bristled brush and mild soap to clean the tire, and then dry it with a clean towel. This will help ensure that the repair area is clean and free of debris.
Once the tire is clean, remove any old sealant from the tire. Use a sealant remover or a rag to wipe away any remaining sealant, and then inspect the tire again for any signs of damage.
If the tire has a puncture, use a tire boot or a patch kit to repair it. If the tire has a cut or tear, use a patch kit to repair it. Make sure to follow the manufacturer’s instructions for the specific repair product you are using.
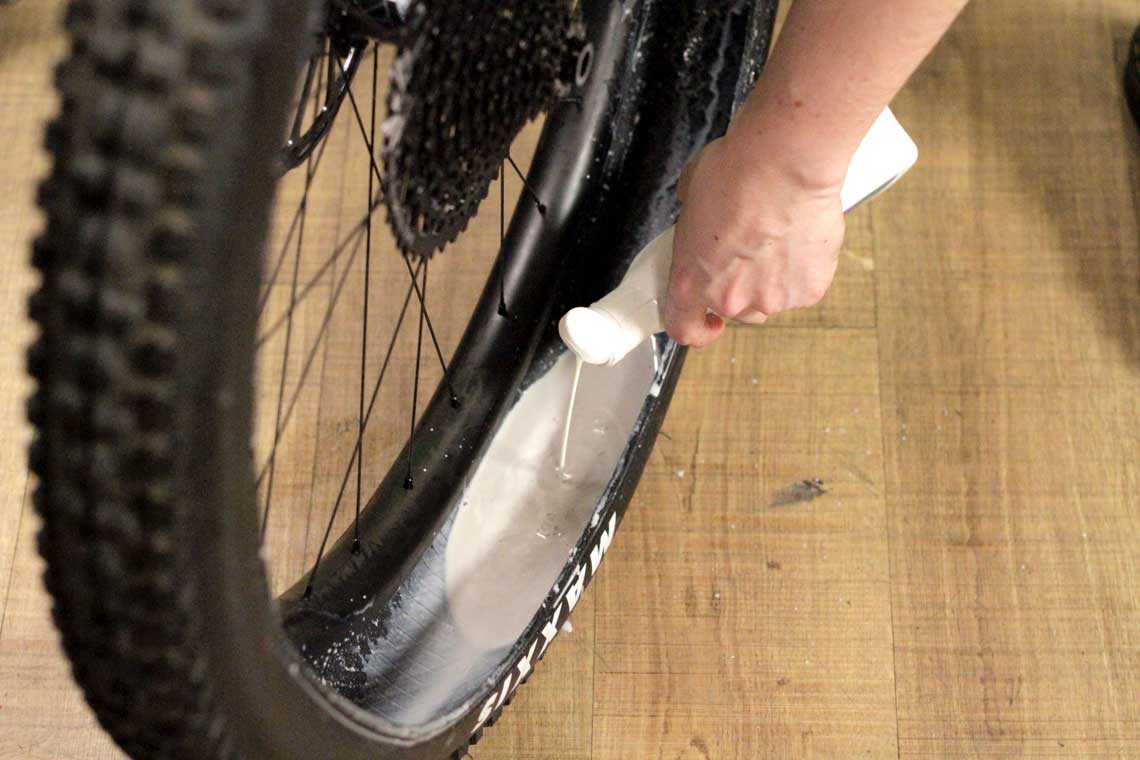
After repairing the tire, reapply sealant to the tire. Use a sealant that is specifically designed for tubeless tires, such as Stan’s NoTubes Tire Sealant or Orange Seal. Follow the manufacturer’s instructions for the recommended amount of sealant to apply.
Finally, reinstall the tire and re-seat the bead. Use tire levers to ensure proper tire seating, and then inflate the tire to the recommended pressure.
By following these steps, you can ensure that your tubeless tire is properly inspected and prepared for repair. This will help prevent further damage to the tire and ensure a successful repair.

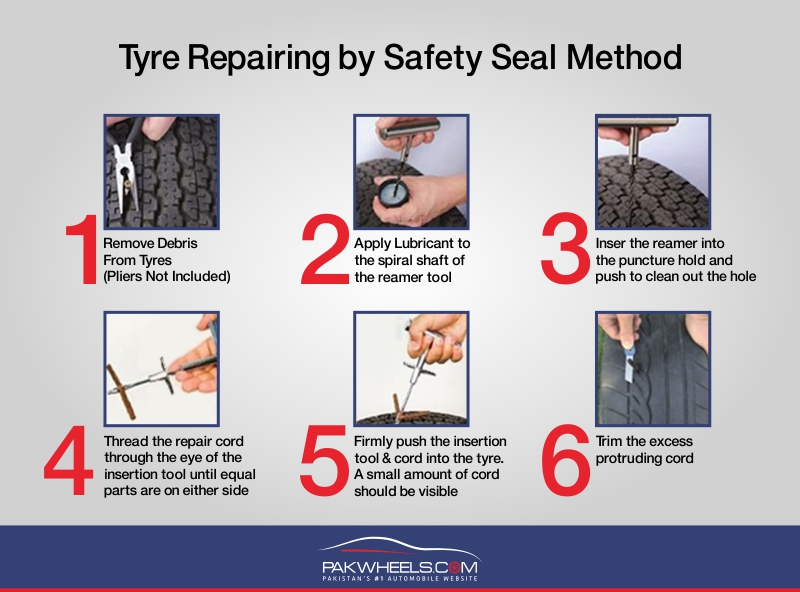
Repairing Punctures: A Step-by-Step Guide
Repairing punctures in tubeless tires is a relatively straightforward process that can be done with the right tools and techniques. In this section, we will provide a step-by-step guide on how to repair punctures in tubeless tires.
Step 1: Locate the Puncture
The first step in repairing a puncture is to locate the source of the leak. Use a tire lever to pry the tire off the rim, and then inspect the tire for any signs of damage. Check the tire’s sidewalls and tread for any punctures, cuts, or excessive wear.
Step 2: Remove the Object
Once you have located the puncture, remove the object that caused the puncture. Use a pair of tweezers or a small tool to carefully remove the object, taking care not to push it further into the tire.
Step 3: Clean the Area
After removing the object, clean the area around the puncture with a soft-bristled brush and mild soap. This will help remove any dirt or debris that may have accumulated in the area.
Step 4: Apply Sealant
Next, apply a small amount of sealant to the puncture. Use a sealant that is specifically designed for tubeless tires, such as Stan’s NoTubes Tire Sealant or Orange Seal. Follow the manufacturer’s instructions for the recommended amount of sealant to apply.
Step 5: Reinstall the Tire
After applying the sealant, reinstall the tire and re-seat the bead. Use tire levers to ensure proper tire seating, and then inflate the tire to the recommended pressure.
Tips for Preventing Future Punctures
To prevent future punctures, make sure to regularly inspect your tires for any signs of damage or wear. Check the tire’s sidewalls and tread for any punctures, cuts, or excessive wear, and replace the tire if necessary. Additionally, make sure to maintain proper tire pressure and avoid hazardous terrain.
By following these steps and tips, you can ensure that your tubeless tires are properly repaired and maintained, and that you can enjoy a seamless riding experience.
Fixing Cuts and Tears: Advanced Repair Techniques
While punctures are a common issue with tubeless tires, cuts and tears can be a more challenging problem to repair. However, with the right techniques and tools, it is possible to fix more extensive damage and get back on the road.
Using Patch Kits
Patch kits are a great way to repair cuts and tears in tubeless tires. These kits usually include a patch, some glue, and instructions. To use a patch kit, start by cleaning the area around the cut or tear with a soft-bristled brush and mild soap. Then, apply a small amount of glue to the patch and attach it to the tire, making sure to center it over the damaged area.
Using Tire Boots
Tire boots are another option for repairing cuts and tears in tubeless tires. These boots are essentially a piece of rubber or plastic that is inserted into the tire to cover the damaged area. To use a tire boot, start by cleaning the area around the cut or tear with a soft-bristled brush and mild soap. Then, insert the boot into the tire, making sure it is centered over the damaged area.
Importance of Proper Patching Techniques
When repairing cuts and tears in tubeless tires, it is essential to use proper patching techniques to ensure a reliable seal. This includes making sure the patch is centered over the damaged area, applying the right amount of glue, and ensuring the tire is properly inflated.
Tips for Successful Repair
To ensure a successful repair, make sure to follow these tips:
Use the right tools and materials for the job.
Follow the manufacturer’s instructions for the patch kit or tire boot.
Make sure the tire is properly inflated before and after the repair.
Test the tire after the repair to ensure it is holding air.
By following these tips and using the right techniques and tools, you can successfully repair cuts and tears in tubeless tires and get back on the road.

Reinstalling the Tire and Re-Seating the Bead
After repairing a tubeless tire, it’s essential to reinstall the tire and re-seat the bead properly to ensure a safe and reliable ride. In this section, we’ll provide step-by-step instructions on how to reinstall the tire and re-seat the bead.
Step 1: Inspect the Rim
Before reinstalling the tire, inspect the rim for any debris or dirt that may have accumulated during the repair process. Use a soft-bristled brush and mild soap to clean the rim, and then dry it with a clean towel.
Step 2: Apply Tire Lever
Next, apply a tire lever to the tire and rim. Make sure the lever is securely attached to the rim and the tire is properly seated.
Step 3: Inflate the Tire
Inflate the tire to the recommended pressure, making sure the bead is properly seated on the rim. Use a tire pressure gauge to ensure the pressure is accurate.
Step 4: Check the Bead
Once the tire is inflated, check the bead to ensure it is properly seated on the rim. Use a tire lever to make any necessary adjustments.
Step 5: Test the Tire
Finally, test the tire to ensure it is holding air and the bead is properly seated. Take the bike for a spin to ensure the tire is properly inflated and the bead is secure.
Tips for Proper Tire Seating
To ensure proper tire seating, make sure to:
Use the correct tire lever for the job.
Apply the correct amount of pressure to the tire.
Check the bead regularly to ensure it is properly seated.
By following these steps and tips, you can ensure a safe and reliable ride by properly reinstalling the tire and re-seating the bead.

Tips for Preventing Future Tubeless Tire Issues
While repairing tubeless tires can be a straightforward process, preventing future issues is crucial for a safe and enjoyable riding experience. In this section, we’ll provide tips on how to prevent future tubeless tire issues, including regular maintenance, proper tire pressure, and avoiding hazardous terrain.
Regular Maintenance
Regular maintenance is key to preventing future tubeless tire issues. This includes checking the tire pressure regularly, inspecting the tire for any signs of damage or wear, and cleaning the tire and rim regularly.
Proper Tire Pressure
Proper tire pressure is essential for preventing future tubeless tire issues. Underinflated tires can lead to increased wear and tear, while overinflated tires can lead to reduced traction and increased risk of punctures.
Avoiding Hazardous Terrain
Avoiding hazardous terrain is also crucial for preventing future tubeless tire issues. This includes avoiding sharp rocks, glass, and other debris that can cause punctures or damage to the tire.
Additional Tips
In addition to regular maintenance, proper tire pressure, and avoiding hazardous terrain, here are some additional tips for preventing future tubeless tire issues:
Use a tire liner to protect the tire from sharp objects.
Use a tire sealant to help seal any punctures that may occur.
Regularly inspect the tire and rim for any signs of damage or wear.
By following these tips, you can help prevent future tubeless tire issues and ensure a safe and enjoyable riding experience.
Conclusion: Mastering Tubeless Tire Repair for a Seamless Ride
In conclusion, repairing tubeless bike tires requires a combination of knowledge, skills, and the right tools and materials. By following the steps and tips outlined in this article, you can master the art of tubeless tire repair and ensure a seamless riding experience.
Remember, tubeless tires offer many benefits, including reduced weight, improved traction, and increased puncture resistance. However, these benefits come with unique maintenance requirements, including the need for specialized repair techniques.
By mastering tubeless tire repair, you can enjoy a safe and enjoyable riding experience, free from the worry of punctures and other tire-related issues. Whether you’re a seasoned cyclist or just starting out, the skills and knowledge outlined in this article will help you to become a more confident and self-sufficient rider.
So, the next time you’re out on a ride and you get a puncture, don’t panic. Instead, use the skills and knowledge you’ve gained from this article to repair your tubeless tire and get back on the road. With practice and experience, you’ll become a master of tubeless tire repair, and you’ll be able to enjoy a seamless riding experience every time you ride.