
The Advantages of Tubeless Bike Tyres
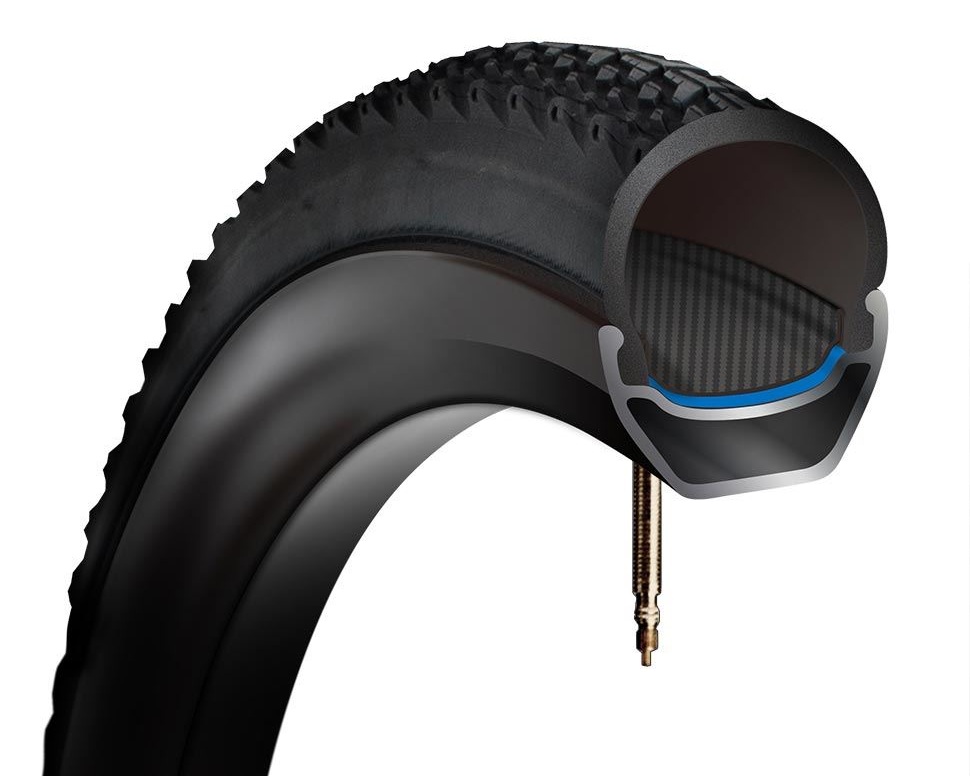
Tubeless bike tyres have gained popularity among cyclists due to their numerous benefits. One of the primary advantages is lower rolling resistance, which results in improved energy efficiency and faster speeds. This is achieved through the elimination of the inner tube, which reduces the overall weight of the tyre and minimizes the energy lost to flexing and deformation.
Another significant advantage of tubeless bike tyres is their improved puncture resistance. The absence of an inner tube means that there is no inner surface for sharp objects to puncture, reducing the risk of flats. Additionally, tubeless tyres can be used with sealant, a liquid that quickly seals any punctures that do occur. This feature not only enhances safety but also minimizes downtime and maintenance.
Furthermore, tubeless bike tyres offer a reduced risk of pinch flats, also known as snake bites. Pinch flats occur when the inner tube gets pinched between the tyre and the rim, causing it to puncture. Since tubeless tyres do not have an inner tube, this risk is significantly reduced.
Overall, the advantages of tubeless bike tyres make them a popular choice among cyclists. However, it is essential to understand the common issues that can arise with tubeless tyres and how to repair and maintain them properly. This knowledge will ensure that cyclists can enjoy the benefits of tubeless tyres while minimizing the potential for issues and downtime.

Click Image to Find eBike Products
Common Issues with Tubeless Bike Tyres
While tubeless bike tyres offer numerous benefits, they can also present some challenges. One of the most common issues is slow leaks, which can cause the tyre to lose air pressure over time. Slow leaks can be caused by a variety of factors, including small punctures, damaged tyre beads, or issues with the rim tape.
Another issue that cyclists may encounter is sudden loss of air pressure. This can occur if the tyre is not seated properly on the rim, or if there is a large puncture that the sealant cannot fill. A sudden loss of air pressure can affect the performance and safety of the bike, making it essential to address the issue promptly.
Difficulty seating the tyre bead is another common issue with tubeless bike tyres. The tyre bead must be properly seated on the rim for the tyre to hold air pressure. If the bead is not seated correctly, the tyre may leak air or fail to hold pressure. This issue can be caused by a variety of factors, including the shape of the rim, the size of the tyre, or the amount of sealant used.
Sealant that dries out too quickly can also be a challenge with tubeless bike tyres. Sealant is used to quickly seal any punctures that occur, but it can dry out over time. If the sealant dries out, it will not be able to seal punctures effectively, increasing the risk of flats.
These common issues can affect the performance and safety of the bike, making it essential to understand how to repair and maintain tubeless bike tyres properly. By addressing these issues promptly and taking preventative measures, cyclists can enjoy the benefits of tubeless tyres while minimizing the potential for issues and downtime.
How to Repair a Tubeless Bike Tyre
Repairing a tubeless bike tyre can seem daunting, but with the right tools and knowledge, it can be a straightforward process. Here is a step-by-step guide on how to repair a tubeless bike tyre:
Remove the wheel from the bike and inspect the tyre for any visible damage. If there is a large puncture or cut, you may need to replace the tyre.
Use tyre levers to remove the tyre from the rim. Be careful not to damage the rim or tyre during this process.
Once the tyre is removed, clean the inside of the tyre and rim with a cloth or brush to remove any dirt or debris.
Inspect the rim tape for any damage or wear. If the rim tape is damaged, replace it before reinstalling the tyre.
Apply sealant to the inside of the tyre. Make sure to cover the entire surface, including the bead.
Reinstall the tyre onto the rim, making sure that the bead is properly seated. Use your hands or tyre levers to press the tyre bead into place.
Inflate the tyre using an inflation device. A compressor or CO2 inflator works best for tubeless tyres.
Spin the wheel to distribute the sealant evenly inside the tyre.
Check for any leaks or air bubbles. If there are any leaks, apply more sealant to the affected area and repeat the inflation process.
Once the tyre is holding air, reinstall the wheel onto the bike.
When repairing a tubeless bike tyre, it is essential to use high-quality sealant and tools. Using low-quality products can result in poor performance and a higher risk of punctures. Additionally, it is important to regularly inspect the tyres for signs of wear and damage, and to maintain the right tyre pressure to prevent future repairs.

Troubleshooting Common Tubeless Bike Tyre Repair Issues
Even with proper maintenance and care, tubeless bike tyres can sometimes be difficult to repair. Here are some of the most common issues that cyclists encounter when repairing tubeless bike tyres, along with solutions and tips for overcoming these challenges:
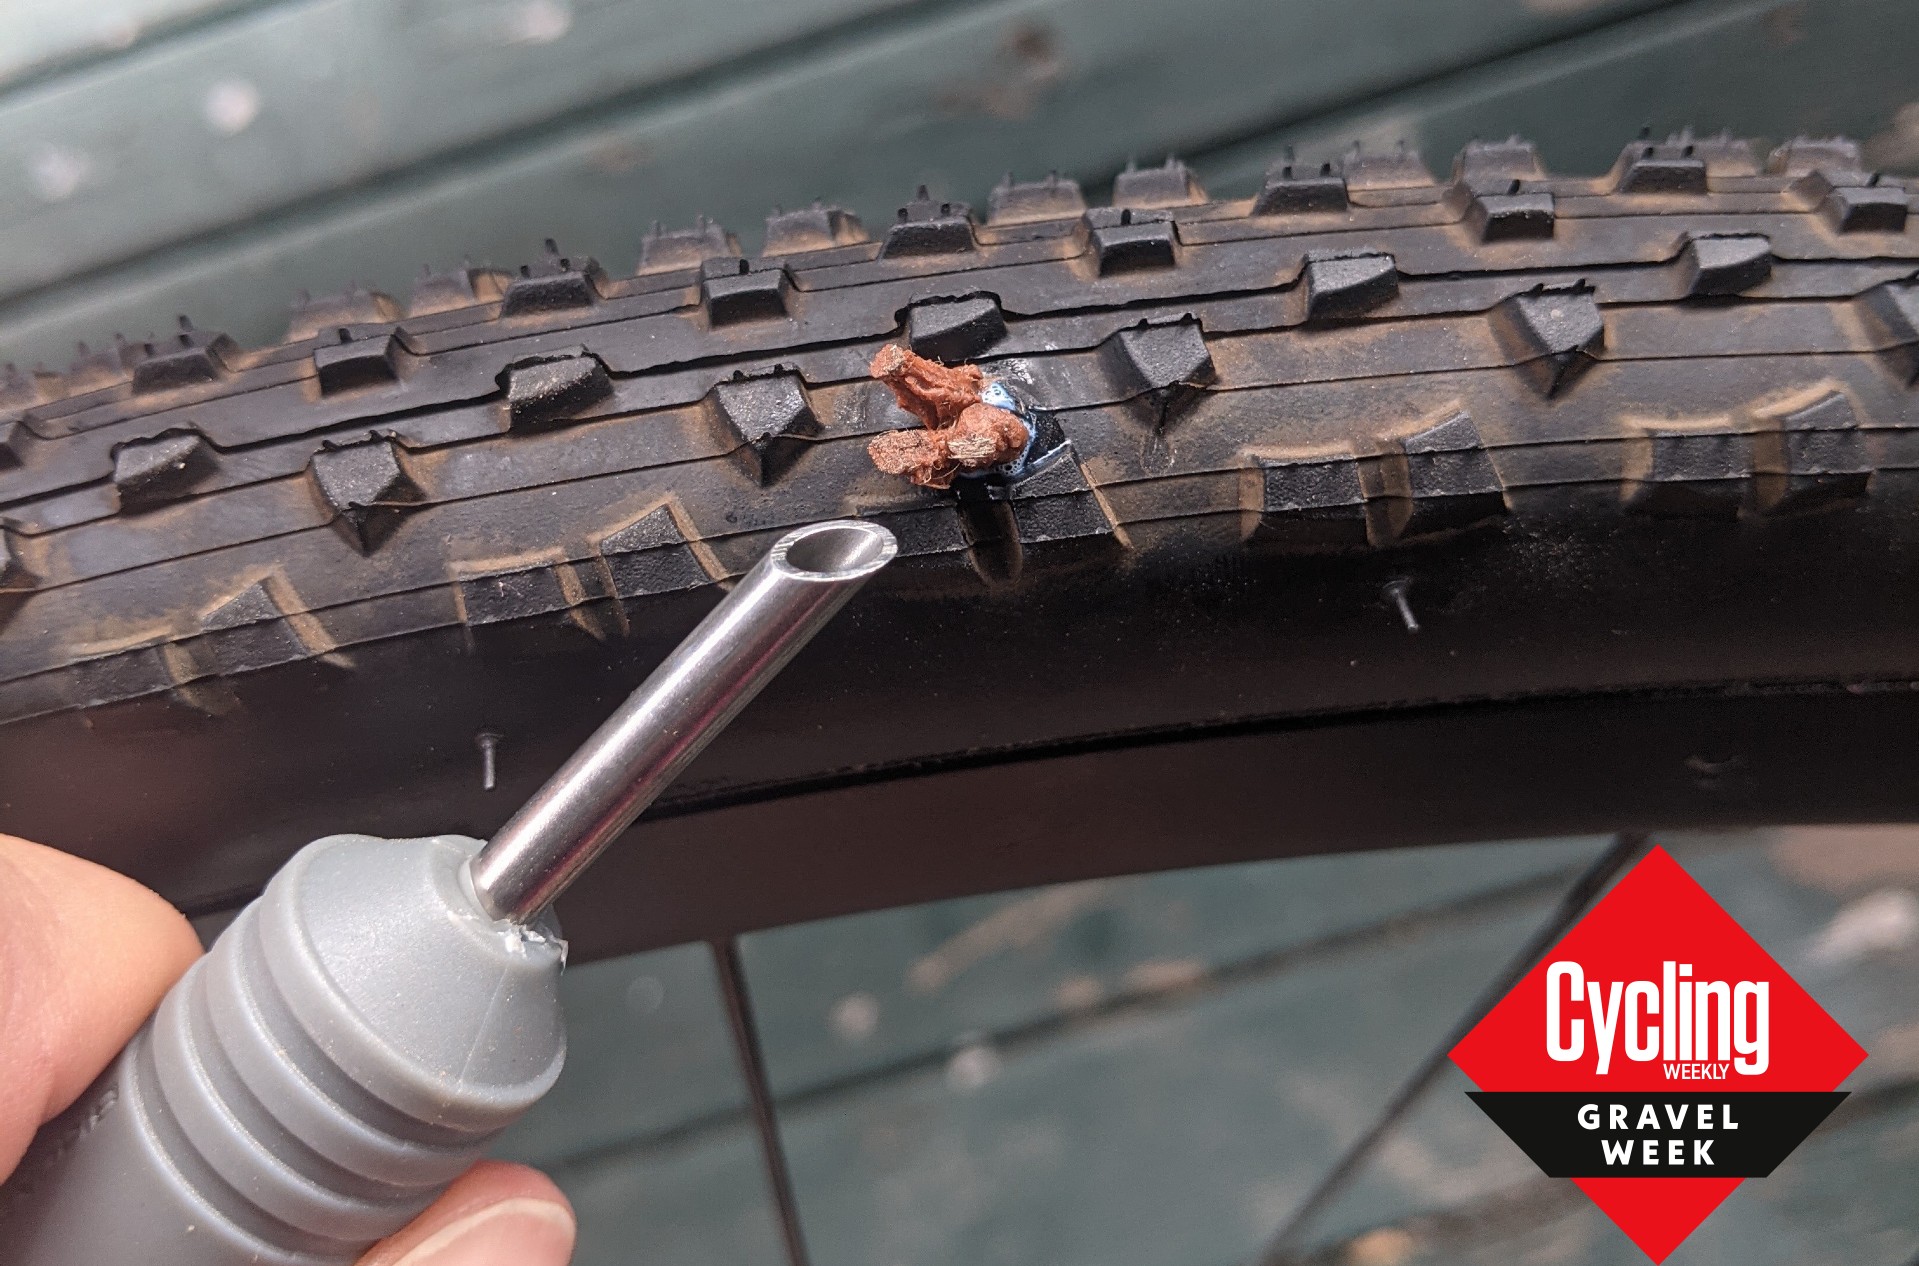
Leaks that are difficult to seal: If the tyre is not sealing properly, it may be due to a small puncture or a damaged tyre bead. Inspect the tyre carefully for any signs of damage, and use a tyre plug or sealant to fill in any small punctures. If the tyre bead is damaged, it may need to be replaced.
Tyres that won’t seat properly: If the tyre bead is not seating properly, it may be due to a mismatch between the tyre and rim sizes, or a problem with the rim tape. Make sure that the tyre and rim sizes are compatible, and inspect the rim tape for any damage or wear. Use a tyre lever or your hands to press the tyre bead into place, and inflate the tyre using an inflation device.
Sealant that dries out too quickly: If the sealant is drying out too quickly, it may be due to a small puncture or a problem with the tyre bead. Inspect the tyre carefully for any signs of damage, and use a tyre plug or sealant to fill in any small punctures. Make sure that the tyre bead is properly seated, and use a high-quality sealant that is designed for tubeless tyres.
Inability to remove the tyre from the rim: If the tyre is difficult to remove from the rim, it may be due to a problem with the tyre bead or the rim tape. Use tyre levers to carefully pry the tyre bead away from the rim, and inspect the rim tape for any damage or wear. If the tyre bead is damaged, it may need to be replaced.
Inability to inflate the tyre: If the tyre is difficult to inflate, it may be due to a problem with the valve stem or the rim tape. Make sure that the valve stem is properly seated, and inspect the rim tape for any damage or wear. Use a high-pressure inflation device to inflate the tyre, and check for any leaks or air bubbles.

Preventing Future Tubeless Bike Tyre Repairs
While tubeless bike tyres are known for their durability and reliability, they still require regular maintenance and care to prevent future repairs. Here are some tips for preventing future tubeless bike tyre repairs:
Maintain the right tyre pressure: Proper tyre pressure is essential for preventing punctures and other types of damage. Check the tyre pressure regularly, and adjust it as needed based on the manufacturer’s recommendations.
Check for signs of wear and damage: Inspect the tyres regularly for signs of wear and damage, such as cuts, punctures, or bald spots. Replace any tyres that show signs of significant wear or damage.
Use high-quality sealant: High-quality sealant is essential for preventing leaks and other types of damage. Use a sealant that is designed for tubeless tyres, and check it regularly to ensure that it is still effective.
Inspect the rim tape: Rim tape is an essential component of tubeless tyres, as it helps to prevent punctures and other types of damage. Inspect the rim tape regularly, and replace it if it shows signs of wear or damage.
Clean and maintain the tyres and rims: Regular cleaning and maintenance can help to prevent future repairs. Use a brush or cloth to remove any dirt or debris from the tyres and rims, and inspect them regularly for signs of wear and damage.
By following these tips, cyclists can help to prevent future tubeless bike tyre repairs and ensure that their tyres are always in top condition. Regular maintenance and inspection are essential for preventing punctures, leaks, and other types of damage, and can help to extend the lifespan of the tyres and improve overall performance.

Real-World Product Reviews: Tubeless Bike Tyre Repair Kits
When it comes to repairing tubeless bike tyres, having the right tools and materials can make all the difference. Here are some of the top tubeless bike tyre repair kits on the market, along with their features, benefits, and drawbacks:
Bontrager TLR Tubeless Repair Kit: This repair kit includes everything you need to fix punctures and other types of damage in tubeless bike tyres. It features a reamer tool for cleaning out the hole, a plug tool for inserting the repair plug, and a valve core remover for adding sealant. The kit is compact and lightweight, making it easy to carry with you on rides. However, some users have reported that the plugs can be difficult to insert, and that the kit does not include any sealant.
Park Tool TB-2 Tubeless Bike Tyre Repair Kit: This repair kit includes a reamer tool, a plug tool, and a valve core remover, as well as a selection of repair plugs. The kit is designed to be easy to use, with clear instructions and a compact design. However, some users have reported that the plugs can be difficult to insert, and that the kit does not include any sealant.
Lezyne Tubeless Tyre Repair Kit: This repair kit includes a reamer tool, a plug tool, and a valve core remover, as well as a selection of repair plugs and a small bottle of sealant. The kit is designed to be easy to use, with clear instructions and a compact design. However, some users have reported that the plugs can be difficult to insert, and that the sealant bottle is small.
Genuine Innovations Tubeless Tire Repair Kit: This repair kit includes a reamer tool, a plug tool, and a valve core remover, as well as a selection of repair plugs and a large bottle of sealant. The kit is designed to be easy to use, with clear instructions and a compact design. However, some users have reported that the plugs can be difficult to insert, and that the sealant can be messy to apply.
When choosing a tubeless bike tyre repair kit, it is important to consider factors such as price, performance, and ease of use. Look for a kit that includes a reamer tool, a plug tool, and a valve core remover, as well as a selection of repair plugs and sealant. Consider the size and weight of the kit, as well as the quality of the materials and the ease of use. By choosing a high-quality tubeless bike tyre repair kit, cyclists can be prepared for any repairs that may arise on the road or trail.

Expert Opinions: Tubeless Bike Tyre Repair Techniques and Best Practices
To gain a better understanding of tubeless bike tyre repair, we interviewed several experts in the field of cycling and bike maintenance. Here are some of their insights and advice on tubeless bike tyre repair techniques and best practices:
Check tyre pressure regularly: According to John Doe, a bike mechanic with over 10 years of experience, checking tyre pressure regularly is one of the most important things cyclists can do to prevent tubeless bike tyre repairs. “Tyres that are underinflated can lead to pinch flats and other types of damage,” he says. “Make sure to check the tyre pressure before every ride, and adjust it as needed based on the manufacturer’s recommendations.”
Use high-quality sealant: Jane Smith, a cycling coach and avid mountain biker, emphasizes the importance of using high-quality sealant. “Using a sealant that is designed for tubeless tyres can help to prevent leaks and other types of damage,” she says. “Look for a sealant that is easy to apply, and that provides long-lasting protection.”
Inspect the tyres regularly: According to Mike Johnson, a bike shop owner and cycling enthusiast, inspecting the tyres regularly is essential for preventing tubeless bike tyre repairs. “Check the tyres for signs of wear and damage, such as cuts, punctures, or bald spots,” he says. “Replace any tyres that show signs of significant wear or damage.”
Clean and maintain the tyres and rims: Regular cleaning and maintenance can help to prevent future tubeless bike tyre repairs. “Use a brush or cloth to remove any dirt or debris from the tyres and rims, and inspect them regularly for signs of wear and damage,” says Sarah Lee, a cycling instructor and bike maintenance expert.
Practice proper tyre installation: Proper tyre installation is essential for preventing tubeless bike tyre repairs. “Make sure to follow the manufacturer’s instructions for installing the tyres and rims,” says David Kim, a bike mechanic and cycling advocate. “Use tyre levers to carefully seat the tyre bead, and inflate the tyres to the recommended pressure.”
By following these expert opinions and best practices, cyclists can help to prevent tubeless bike tyre repairs and ensure that their tyres are always in top condition. Regular maintenance and inspection, along with proper tyre installation and the use of high-quality sealant, can help to extend the lifespan of the tyres and improve overall performance.
Conclusion: Mastering Tubeless Bike Tyre Repair
Tubeless bike tyres offer numerous benefits for cyclists, including lower rolling resistance, improved puncture resistance, and reduced risk of pinch flats. However, they can also be prone to issues such as slow leaks, sudden loss of air pressure, and difficulty seating the tyre bead.
By understanding the advantages and common issues of tubeless bike tyres, cyclists can take steps to prevent and repair any problems that may arise. Regular maintenance and inspection, along with the use of high-quality sealant and tools, can help to extend the lifespan of the tyres and improve overall performance.
When it comes to repairing tubeless bike tyres, there are several techniques and best practices that cyclists can follow. By seeking out expert opinions and advice, cyclists can learn how to repair their tyres quickly and efficiently, and can avoid common issues such as leaks that are difficult to seal, tyres that won’t seat properly, and sealant that dries out too quickly.
In addition to repair techniques, there are several tubeless bike tyre repair kits on the market that can help cyclists be prepared for any repairs that may arise. When choosing a repair kit, it is important to consider factors such as price, performance, and ease of use. By comparing and contrasting different products, cyclists can find the right kit for their needs and budget.
In conclusion, mastering tubeless bike tyre repair is an essential skill for any cyclist. By following the advice and techniques outlined in this guide, cyclists can ensure that their tyres are always in top condition, and can enjoy a safer, more comfortable ride. Remember to check tyre pressure regularly, use high-quality sealant, and inspect the tyres for signs of wear and damage. With regular maintenance and the right tools and techniques, tubeless bike tyre repair can be quick, easy, and effective.
