The Advantages of Tubeless Bike Tyres for Mountain Biking
Mountain biking is an exhilarating and challenging sport that requires the right equipment to fully enjoy. One crucial component of any mountain bike is the tyres, and tubeless bike tyres have become increasingly popular in recent years. These tyres offer several advantages over traditional tyres with inner tubes, making them an excellent choice for serious mountain bikers.
First and foremost, tubeless bike tyres provide improved puncture resistance. Without an inner tube, there is no risk of a puncture from a sharp object piercing the tube. Instead, the tyre itself is sealed directly to the rim, creating a barrier that is much more resistant to punctures. This feature is particularly useful when riding on rough or technical terrain, where sharp rocks and other hazards are common.
Another advantage of tubeless bike tyres is lower rolling resistance. Rolling resistance is the force required to keep the tyre moving forward, and reducing this force can result in faster speeds and improved efficiency. Tubeless tyres have a lower rolling resistance than traditional tyres because they can be run at lower pressures without the risk of pinch flats. This lower pressure allows the tyre to conform to the terrain better, reducing the amount of energy required to propel the bike forward.
Finally, tubeless bike tyres offer better traction than traditional tyres. The ability to run lower pressures without the risk of pinch flats means that the tyre can have a larger contact patch with the ground. This larger contact patch provides more grip, allowing the rider to corner, climb, and descend with more confidence. Additionally, tubeless tyres can be used with sealant, which can help to fill in small gaps and imperfections in the tyre, further improving traction.
In summary, tubeless bike tyres offer several advantages over traditional tyres for mountain biking. They provide improved puncture resistance, lower rolling resistance, and better traction, making them an excellent choice for serious riders. However, it is essential to consider the key factors when choosing tubeless bike tyres for mountain biking, such as tyre width, tread pattern, casing, and compound, to ensure that you select the right tyres for your specific needs.
Click Image to Find eBike Products
Understanding Tubeless Bike Tyres: A Closer Look
Tubeless bike tyres are a relatively new innovation in the world of mountain biking, and they offer several advantages over traditional tyres with inner tubes. At their most basic level, tubeless bike tyres consist of three main components: the rim, the tyre, and the sealant.
The rim is the circular component of the wheel that the tyre is mounted on. In a tubeless system, the rim is designed with a bead lock or hook that helps to keep the tyre in place. This bead lock or hook creates an airtight seal between the tyre and the rim, preventing air from escaping.
The tyre itself is similar to a traditional bike tyre, but it is designed to be airtight and to form a seal with the rim. Tubeless tyres are typically made from a more robust and durable material than traditional tyres, which helps to improve puncture resistance and durability.
The final component of a tubeless bike tyre system is the sealant. Sealant is a liquid that is injected into the tyre and rim assembly, where it coats the inside of the tyre and rim. The sealant is designed to quickly seal any small punctures or leaks that may occur, preventing air from escaping and maintaining the airtight seal.
One of the key benefits of tubeless bike tyres is that they can be run at lower pressures than traditional tyres. This lower pressure allows the tyre to conform to the terrain better, improving traction and reducing the risk of pinch flats. Additionally, tubeless tyres are less prone to punctures than traditional tyres, as there is no inner tube to pierce.
However, it is important to note that tubeless bike tyres can be more challenging to install than traditional tyres. This is because the tyre must be mounted on the rim and then inflated to create an airtight seal. This process can be made easier with the use of a compressor or a specialised tyre inflator, but it can still be more time-consuming than installing a traditional tyre.
In summary, tubeless bike tyres consist of three main components: the rim, the tyre, and the sealant. These tyres offer several advantages over traditional tyres, including improved puncture resistance, lower rolling resistance, and better traction. However, they can be more challenging to install and require the use of sealant to maintain the airtight seal.
Selecting the Right Tubeless MTB Tyres: Factors to Consider
When it comes to selecting tubeless bike tyres for mountain biking, there are several key factors to consider. These factors include tyre width, tread pattern, casing, and compound.
Tyre width is an important consideration, as it can affect the bike’s handling and traction. A wider tyre can provide more traction and stability, but it can also be slower and more challenging to manoeuvre. Conversely, a narrower tyre can be faster and more agile, but it may not provide as much traction or stability.
Tread pattern is another crucial factor to consider when choosing tubeless bike tyres for mountain biking. Different tread patterns are designed for different types of terrain, so it is essential to choose a tyre with a tread pattern that is well-suited to the terrain you will be riding on. For example, a tyre with a more aggressive tread pattern may be better suited to muddy or loose terrain, while a tyre with a smoother tread pattern may be better suited to hard-packed or smooth terrain.
Casing is the material that the tyre is made from, and it can affect the tyre’s durability, puncture resistance, and weight. A tyre with a thicker casing may be more durable and puncture-resistant, but it may also be heavier and slower. Conversely, a tyre with a thinner casing may be lighter and faster, but it may not be as durable or puncture-resistant.
Compound is the material that the tyre’s tread is made from, and it can affect the tyre’s grip, durability, and rolling resistance. A softer compound may provide better grip, but it may also wear down more quickly. Conversely, a harder compound may be more durable, but it may not provide as much grip.
When choosing tubeless bike tyres for mountain biking, it is essential to consider all of these factors and to choose a tyre that is well-suited to your specific needs and riding style. By taking the time to carefully consider your options, you can ensure that you select the right tyres for your bike and your riding style, which can help to improve your performance and enjoyment on the trails.
Top Tubeless MTB Tyres: A Comparative Analysis
How to Convert Your MTB to Tubeless: A Step-by-Step Guide
Converting your mountain bike to tubeless can provide numerous benefits, including improved puncture resistance, lower rolling resistance, and better traction. However, the conversion process can be intimidating for those who are new to tubeless technology. In this step-by-step guide, we will walk you through the process of converting your mountain bike to tubeless, from gathering the necessary tools and materials to completing the conversion.
Tools and Materials Needed
To convert your mountain bike to tubeless, you will need the following tools and materials:
Tubeless-ready rim tape
Tubeless valve stems
Sealant
Tyre levers
Air compressor or tubeless inflator
Rag or paper towel
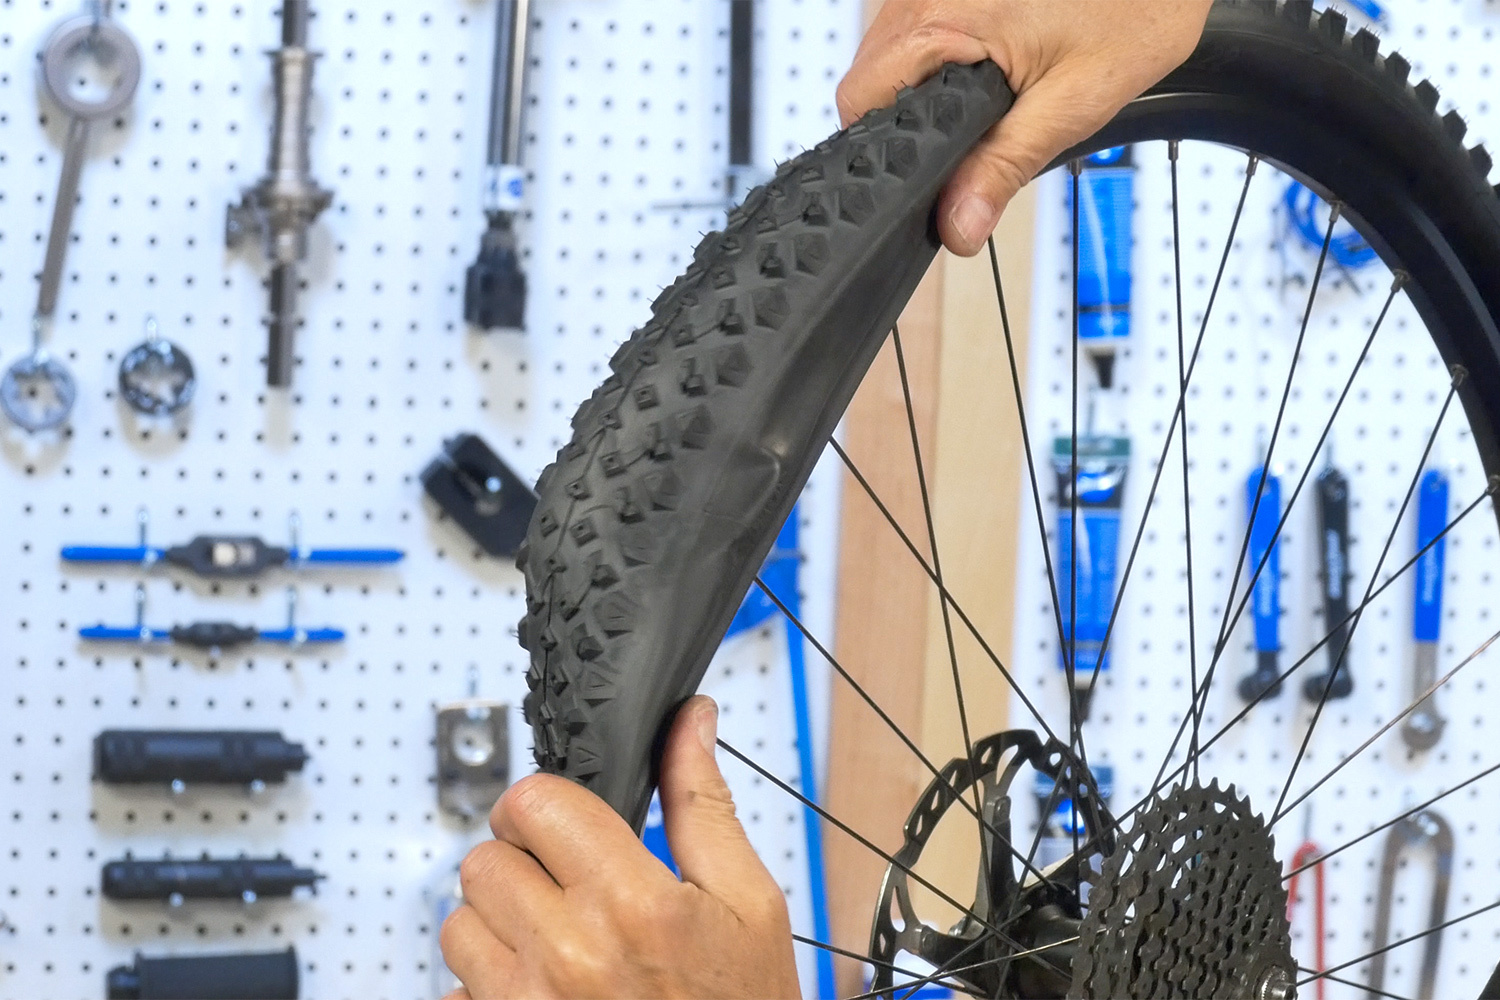
Step 1: Remove the Old Tube and Tyre
The first step in converting your mountain bike to tubeless is to remove the old tube and tyre. Start by deflating the tyre completely, then use tyre levers to pry one side of the tyre off the rim. Once one side of the tyre is off, pull the tube out of the tyre and set it aside.
Step 2: Install Rim Tape
Next, install tubeless-ready rim tape on the rim. This tape will create an airtight seal between the rim and the tyre. Start by cleaning the rim thoroughly, then wrap the tape around the rim, covering the spoke holes. Be sure to smooth out any wrinkles or bubbles as you go.
Step 3: Install the Tubeless Valve Stem
Once the rim tape is installed, it’s time to install the tubeless valve stem. Start by removing the core of the valve stem, then thread it through the rim tape. Screw the valve stem into the rim, then tighten it with a valve tool or pliers.
Step 4: Install the Tyre
Now it’s time to install the tyre. Start by applying a thin layer of sealant to the inside of the tyre. This will help to create an airtight seal between the tyre and the rim. Next, insert one side of the tyre onto the rim, then use your hands or a tyre lever to work the other side of the tyre onto the rim. Be sure to smooth out any wrinkles or bubbles as you go.
Step 5: Inflate the Tyre
Once the tyre is installed, it’s time to inflate it. Start by attaching the tubeless inflator or air compressor to the valve stem. Then, inflate the tyre until it pops into place. You may need to use a rag or paper towel to catch any excess sealant that sprays out during inflation.
Step 6: Check for Leaks
After inflating the tyre, check for leaks. You can do this by spraying soapy water on the tyre and rim, then looking for bubbles. If you find any leaks, use sealant to fill them in.
Step 7: Add More Sealant
Finally, add more sealant to the tyre. This will help to ensure that the tyre remains airtight and provides better puncture resistance. Use a sealant injector or syringe to add the sealant through the valve stem, then rotate the tyre to distribute the sealant evenly. By following these steps, you can convert your mountain bike to tubeless and enjoy the numerous benefits that tubeless technology provides. Remember to check the tyre pressure regularly and add sealant as needed to maintain the airtight seal.
Maintaining Your Tubeless Bike Tyres: Tips and Tricks
Once you’ve made the switch to tubeless bike tyres for your mountain bike, it’s important to maintain them properly to ensure optimal performance and longevity. In this section, we’ll share some tips and tricks for maintaining your tubeless bike tyres, including how to add sealant, fix punctures, and replace worn-out tyres.
Adding Sealant
Adding sealant to your tubeless bike tyres is an essential part of maintaining the airtight seal that tubeless technology provides. Sealant helps to prevent punctures and leaks by filling in small gaps and holes in the tyre. It’s recommended to add sealant to your tubeless bike tyres every few months, depending on how often you ride and the conditions you ride in. To add sealant to your tubeless bike tyres, follow these steps:
Insert the sealant into the tyre through the valve stem using a sealant injector or syringe.
Reinstall the valve core and inflate the tyre to the recommended pressure.
Rotate the tyre to distribute the sealant evenly.
Fixing Punctures
While tubeless bike tyres are less prone to punctures than traditional tyres, they can still get punctured. However, fixing punctures in tubeless bike tyres is often easier and faster than fixing punctures in traditional tyres. To fix a puncture in a tubeless bike tyre, follow these steps:
Deflate the tyre completely.
Remove the object that caused the puncture, if possible.
Locate the puncture and clean the area around it with a rag or paper towel.
Inflate the tyre to the recommended pressure to seat the plug and ensure a proper seal.
Replacing Worn-Out Tyres
Eventually, your tubeless bike tyres will wear out and need to be replaced. When replacing your tubeless bike tyres, be sure to choose tyres that are tubeless-ready and compatible with your rim. To replace a worn-out tubeless bike tyre, follow these steps:
Deflate the tyre completely.
Remove the tyre from the rim using tyre levers.
Clean the rim thoroughly and inspect it for damage.
Install the new tyre onto the rim, being sure to smooth out any wrinkles or bubbles as you go.
Install the tubeless valve stem and inflate the tyre to the recommended pressure.
Check for leaks and add sealant as needed.
By following these tips and tricks, you can maintain your tubeless bike tyres for mountain biking and ensure optimal performance and longevity. Remember to check the tyre pressure regularly and add sealant as needed to maintain the airtight seal.
Common Myths and Misconceptions about Tubeless Bike Tyres for Mountain Biking
Tubeless bike tyres for mountain biking have become increasingly popular in recent years, but there are still many myths and misconceptions surrounding them. In this section, we’ll debunk some of the most common myths and misconceptions about tubeless bike tyres for mountain biking, including the difficulty of installation, the need for an air compressor, and the risk of burping.
Myth 1: Tubeless Tyres are Difficult to Install
One of the most common misconceptions about tubeless bike tyres for mountain biking is that they are difficult to install. While installing tubeless tyres can be more challenging than installing traditional tyres, with the right tools and techniques, it can be a relatively straightforward process. To install tubeless bike tyres, you’ll need a tubeless-ready rim, tubeless-ready tyres, tubeless valves, and sealant. You’ll also need a tyre lever, a compressor or a tubeless inflator, and a sealant injector.
Start by removing the valve core from the valve stem and installing the tubeless valve. Then, install one side of the tyre onto the rim using a tyre lever. Next, apply the sealant into the tyre using a sealant injector or syringe. Finally, install the other side of the tyre onto the rim and inflate the tyre using a compressor or tubeless inflator.
Myth 2: You Need an Air Compressor to Install Tubeless Tyres
Another common misconception about tubeless bike tyres for mountain biking is that you need an air compressor to install them. While an air compressor can make the installation process easier, it’s not strictly necessary. If you don’t have access to an air compressor, you can use a tubeless inflator or a shock pump to inflate the tyre. Alternatively, you can use a technique called the “soap and water method” to help the tyre bead seat properly. To do this, mix soapy water in a spray bottle and spray it onto the tyre bead. Then, inflate the tyre using a shock pump or tubeless inflator. The soapy water will help to reduce the friction between the tyre bead and the rim, making it easier to inflate the tyre.
Myth 3: Tubeless Tyres are Prone to Burping
Burping is a term used to describe when the tyre bead separates from the rim, causing a loss of air pressure. While it’s true that tubeless tyres can burp, it’s not as common as some people think. To prevent burping, it’s important to ensure that the tyre bead is properly seated on the rim. This can be done by inflating the tyre to a higher pressure than normal and then deflating it slowly. You can also use a tubeless tyre sealant that contains small particles that help to seal any small leaks or gaps in the tyre.
Myth 4: Tubeless Tyres Require More Maintenance Than Traditional Tyres
Some people believe that tubeless bike tyres for mountain biking require more maintenance than traditional tyres. However, this is not necessarily true. While tubeless tyres do require some maintenance, such as adding sealant every few months, they can actually be easier to maintain than traditional tyres. This is because tubeless tyres are less prone to punctures and leaks than traditional tyres, which means that you may not need to repair or replace them as often.
Myth 5: Tubeless Tyres are More Expensive Than Traditional Tyres
While tubeless bike tyres for mountain biking can be more expensive than traditional tyres, the cost difference is often offset by the benefits that tubeless tyres provide. Tubeless tyres offer improved puncture resistance, lower rolling resistance, and better traction than traditional tyres. They also require less maintenance and can be easier to repair than traditional tyres.
In conclusion, tubeless bike tyres for mountain biking are a great option for riders who want improved performance and reliability. While there are some common myths and misconceptions surrounding tubeless tyres, with the right tools and techniques, they can be a relatively straightforward and rewarding upgrade. By understanding the benefits and limitations of tubeless tyres, riders can make informed decisions about whether tubeless tyres are right for them.
Frequently Asked Questions about Tubeless Bike Tyres for Mountain Biking
If you’re considering making the switch to tubeless bike tyres for your mountain bike, you may have some questions about how they work and what the benefits and drawbacks are. In this section, we’ll answer some of the most frequently asked questions about tubeless bike tyres for mountain biking.
Can I use tubeless tyres with a regular rim?
In general, tubeless tyres are designed to work with tubeless-ready rims. However, some riders have successfully converted traditional rims to tubeless using a conversion kit. If you’re considering converting a traditional rim to tubeless, it’s important to ensure that the rim is compatible with tubeless tyres and that you follow the instructions carefully.
How often should I add sealant to my tubeless tyres?
The frequency with which you need to add sealant to your tubeless tyres will depend on several factors, including how often you ride, the conditions you ride in, and the type of sealant you use. As a general rule of thumb, it’s a good idea to check the sealant level every few months and add more as needed. Some sealants are designed to last for several months, while others may need to be added more frequently.
What pressure should I run in my tubeless tyres?
The recommended tyre pressure for tubeless bike tyres will depend on several factors, including the tyre size, the rider’s weight, and the terrain being ridden. As a general rule of thumb, it’s a good idea to start with a lower pressure than you would use with traditional tyres and then adjust as needed. Tubeless tyres can often be run at lower pressures than traditional tyres, which can provide better traction and a more comfortable ride.
Can I repair a tubeless tyre puncture on the trail?
Yes, it’s possible to repair a tubeless tyre puncture on the trail using a tubeless tyre repair kit. These kits typically include a reamer for cleaning out the hole, a plug for sealing the hole, and a tool for installing the plug. It’s a good idea to carry a repair kit with you on long rides or in remote areas where access to a bike shop may be limited.
Are tubeless tyres more expensive than traditional tyres?
Tubeless bike tyres for mountain biking can be more expensive than traditional tyres, but the cost difference is often offset by the benefits that tubeless tyres provide. Tubeless tyres offer improved puncture resistance, lower rolling resistance, and better traction than traditional tyres. They also require less maintenance and can be easier to repair than traditional tyres.
Do I need an air compressor to install tubeless tyres?
While an air compressor can make the installation process easier, it’s not strictly necessary. If you don’t have access to an air compressor, you can use a tubeless inflator or a shock pump to inflate the tyre. Alternatively, you can use a technique called the “soap and water method” to help the tyre bead seat properly. To do this, mix soapy water in a spray bottle and spray it onto the tyre bead. Then, inflate the tyre using a shock pump or tubeless inflator. The soapy water will help to reduce the friction between the tyre bead and the rim, making it easier to inflate the tyre.
Can I convert my current tyres to tubeless?
In some cases, it may be possible to convert traditional tyres to tubeless using a conversion kit. However, it’s important to ensure that the tyres are compatible with tubeless technology and that you follow the instructions carefully. In general, it’s easier and more reliable to use tyres that are specifically designed for tubeless use.
What are the disadvantages of tubeless tyres?
While tubeless bike tyres for mountain biking offer many benefits, there are also some potential disadvantages to consider. Tubeless tyres can be more expensive than traditional tyres, and the installation process can be more challenging. Tubeless tyres can also be more prone to burping, which can cause a loss of air pressure. Additionally, tubeless tyres may not be as suitable for certain types of riding, such as road cycling or BMX.