
The Role of High-Quality Bicycle Tape for Handlebars
Bicycle tape for handlebars plays a crucial role in enhancing the overall cycling experience. By wrapping the handlebars with suitable tape, cyclists can benefit from improved grip, better shock absorption, and increased control of their bicycles. The right material, thickness, and design of the handlebar tape contribute to a safer and more enjoyable ride. This article will discuss the importance of selecting high-quality bicycle tape for handlebars and how it significantly impacts the rider’s comfort and safety.

Click Image to Find eBike Products
Selecting the Perfect Bicycle Tape for Handlebars: A Product-Centric Review
When it comes to enhancing the comfort and control of your bicycle, selecting the right bicycle tape for handlebars is essential. This section will provide an in-depth review of top-rated handlebar tapes, comparing their features, benefits, and drawbacks. Some of the products to be discussed include:
- Lizard Skins DSP 2.5mm: Known for its exceptional durability and vibration-dampening properties, this tape is a popular choice among cyclists. Its thin design allows for a better grip and maintains the bicycle’s original feel.
- Cinelli Cork Handlebar Tape: This classic handlebar tape offers a comfortable grip and a touch of elegance. Its natural cork material provides excellent shock absorption, while its classic appearance appeals to many cyclists.
- Brooks Rubber Bar Tape: With its unique design and robust rubber construction, this tape offers superior grip in various weather conditions. Its sleek appearance and long-lasting durability make it an attractive option for cyclists who prioritize style and resilience.
By understanding the unique features and benefits of each product, cyclists can make informed decisions when selecting bicycle tape for handlebars, ultimately improving their overall cycling experience.
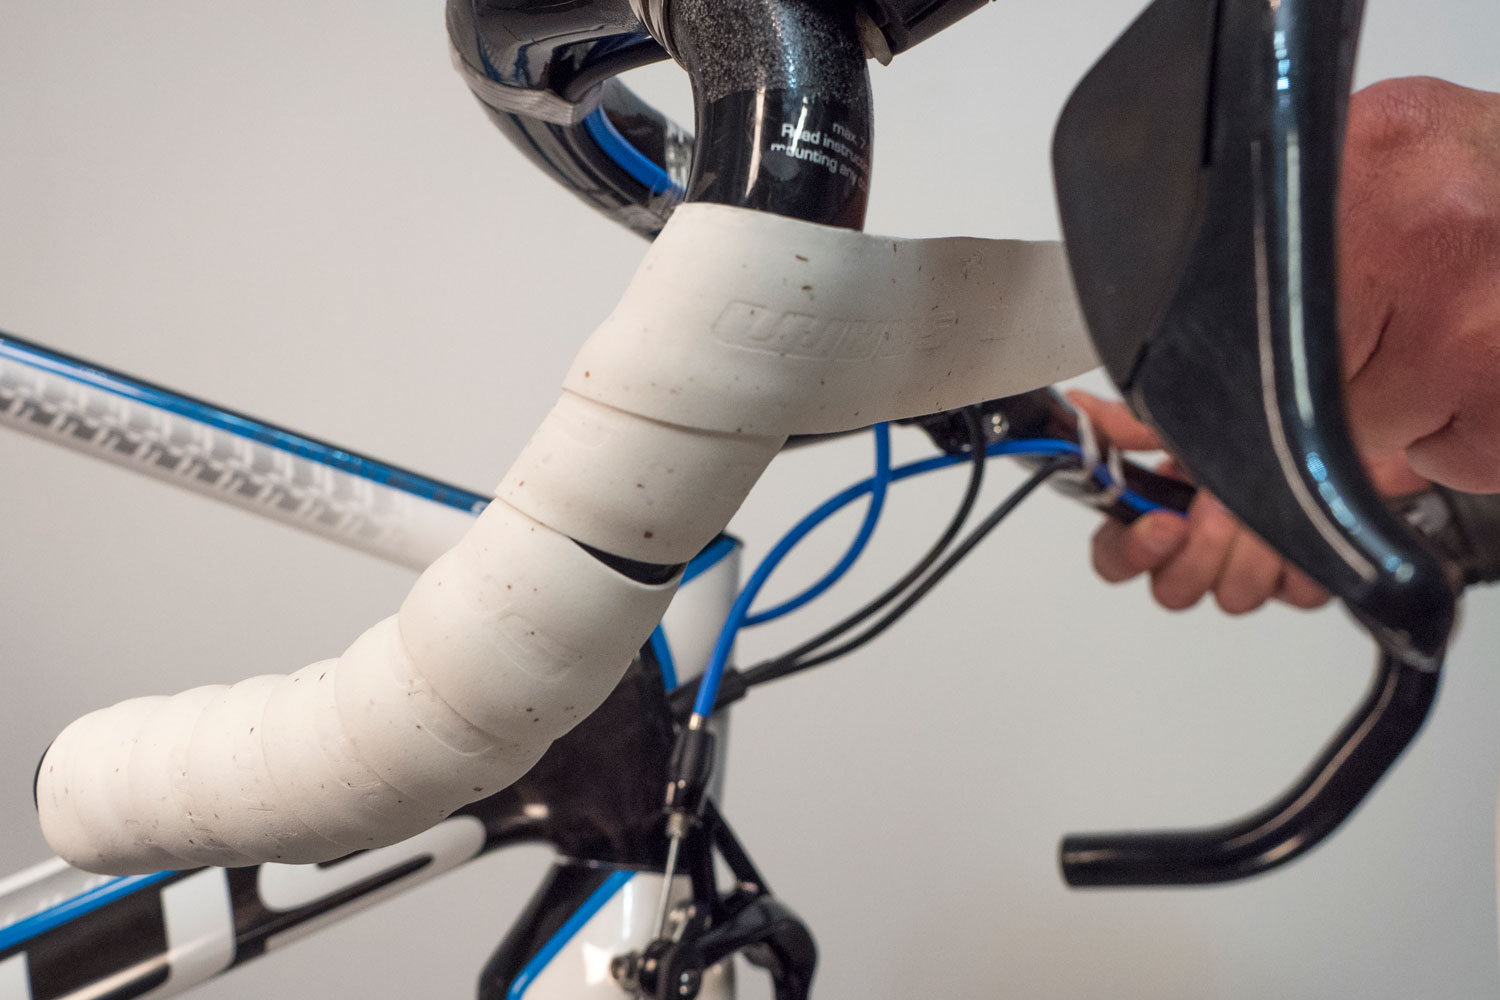
How to Install Bicycle Tape for Handlebars: A Step-by-Step Guide
Installing bicycle tape for handlebars may seem like a daunting task, but with the right tools and techniques, it can be an easy and rewarding process. Follow these steps to achieve a professional-looking finish:
- Prepare the handlebars: Ensure the handlebars are clean and free from any dirt or debris. Remove any old tape or residue using rubbing alcohol and a clean cloth.
- Measure and cut the tape: Measure the length of the handlebars and cut the tape accordingly, leaving a few extra inches for overlapping and finishing. Use scissors or a sharp knife for a clean cut.
- Start at the bottom: Begin wrapping the tape at the bottom of the handlebars, keeping it tight and even. Make sure the edge of the tape is aligned with the brake lever clamp.
- Maintain tension: As you wrap the tape, maintain consistent tension to prevent any loose areas or bubbles. Use your fingers or a tape-wrapping tool to ensure a snug fit.
- Overlap and finish: Overlap each layer by approximately one-third to one-half of the tape’s width. Finish the tape by tucking the end under the previous layer and securing it with electrical tape or finishing tape.
- Adjust tension and trim excess: Once the tape is installed, double-check the tension and trim any excess tape using scissors or a sharp knife. Be cautious not to cut too close to the handlebar, as this may cause damage.
By following these steps, cyclists can enjoy a comfortable and secure grip, improved shock absorption, and enhanced overall control of their bicycles. Proper installation techniques also contribute to the longevity and appearance of the bicycle tape for handlebars.
Material Choices for Bicycle Handlebar Tape: Pros and Cons
Bicycle handlebar tape is available in various materials, each with its unique properties, advantages, and disadvantages. Understanding these differences can help cyclists make informed decisions when selecting the ideal tape for their needs. Some popular materials include:
- Cork: Cork handlebar tape is a classic choice, offering a comfortable grip and good shock absorption. Its natural material provides a touch of elegance and is environmentally friendly. However, cork may not be as durable as synthetic materials and may require more frequent replacement.
- Gel: Gel handlebar tape is designed to offer superior shock absorption and vibration dampening. Its soft, cushioned texture makes it an excellent choice for long-distance rides or cyclists with sensitive hands. However, gel tape may retain moisture and become slippery in wet conditions, affecting grip and control.
- Foam: Foam handlebar tape is lightweight and provides good grip and shock absorption. Its synthetic material is durable and resistant to wear and tear, making it a popular choice for performance-oriented cyclists. However, foam tape may not offer the same level of elegance as natural materials like cork.
- Leather: Leather handlebar tape is a luxurious and durable option, offering a classic appearance and a comfortable grip. Its natural material provides excellent shock absorption and can develop a unique patina over time. However, leather tape may require more maintenance and may not be as weather-resistant as synthetic materials.
By considering factors such as comfort, durability, and aesthetics, cyclists can choose the best material for their bicycle tape for handlebars, ensuring a safer and more enjoyable riding experience.

Maintaining and Cleaning Bicycle Handlebar Tape: Best Practices
Proper maintenance and cleaning of bicycle handlebar tape can significantly extend its lifespan and preserve its appearance. By following these best practices, cyclists can ensure their handlebar tape remains in optimal condition:
- Regular cleaning: Clean the handlebar tape after every ride, especially if it has been exposed to sweat, dirt, or moisture. Use a soft, damp cloth to gently wipe down the tape, ensuring no abrasive materials come into contact with the surface.
- Deep cleaning: For more thorough cleaning, mix a mild dish soap with warm water and gently clean the tape using a soft cloth or sponge. Avoid using harsh chemicals or abrasive materials, as these can damage the tape’s surface and cause it to deteriorate faster.
- Drying: After cleaning, allow the handlebar tape to air dry completely before reinstalling any protective covers or handlebar bags. Moisture trapped between the tape and these accessories can lead to mold growth and accelerated deterioration.
- Protecting from damage: Use handlebar protectors or handlebar bags to prevent damage from scratches, scuffs, or other forms of wear and tear. These accessories can help maintain the appearance and longevity of the bicycle tape for handlebars.
- Inspecting for wear: Regularly inspect the handlebar tape for signs of wear, such as fraying, discoloration, or loss of grip. Addressing these issues promptly can prevent further damage and ensure a safer, more comfortable riding experience.
By following these best practices, cyclists can maintain their bicycle handlebar tape in pristine condition, maximizing its lifespan and preserving its appearance. Regular cleaning and maintenance also contribute to a safer, more enjoyable riding experience.
Customizing Bicycle Handlebar Tape: Adding a Personal Touch
Beyond functionality, bicycle handlebar tape offers an opportunity for cyclists to express their personal style and coordinate their bike’s aesthetic. By exploring color, pattern, and design options, cyclists can create a unique and visually appealing ride.
- Color: Handlebar tape is available in a wide range of colors, from classic black and white to vibrant hues like neon green or electric blue. Cyclists can choose a color that complements their bike frame, accessories, or jersey, creating a cohesive look.
- Pattern: Patterned handlebar tape can add a touch of flair to any bicycle. From subtle textures to bold geometric designs, patterned tape can make a statement and reflect the rider’s personality.
- Design: Custom handlebar tape designs can be created using various techniques, such as layering different colors, using tape with unique finishes (like leather or carbon fiber), or incorporating custom decals and logos. These personalized touches can make a bike truly one-of-a-kind.
When customizing bicycle handlebar tape, it’s essential to consider factors such as comfort, durability, and maintenance. Opt for materials and designs that not only look great but also provide a secure grip, absorb shock, and withstand wear and tear. By striking a balance between style and functionality, cyclists can enjoy a personalized and comfortable riding experience.

Bicycle Handlebar Tape vs. Grips: A Comparative Analysis
Bicycle handlebar tape and grips are two common methods of enhancing control and comfort on a bicycle. While both options serve similar purposes, they differ in terms of design, installation, and maintenance. Understanding these differences can help cyclists determine which choice is best for their specific needs and riding style.
- Design: Handlebar tape is a continuous, adhesive-backed material that wraps around the handlebars, providing a smooth and seamless surface. Grips, on the other hand, are separate components that slide onto the handlebar ends, covering the area where the rider’s hands typically rest. Both options offer a variety of materials, colors, and patterns, allowing cyclists to customize their bikes to their preferences.
- Installation: Installing handlebar tape requires more time and effort than installing grips. Cyclists must carefully measure, cut, and wrap the tape around the handlebars, ensuring a snug and even fit. Grips, however, can be quickly and easily installed by sliding them onto the handlebars and securing them with set screws or adhesive.
- Maintenance: Handlebar tape generally requires more maintenance than grips, as it can become worn, frayed, or dirty over time. Regular cleaning, drying, and inspection can help maintain the tape’s appearance and functionality. Grips, being a separate component, are less prone to wear and tear and typically require less maintenance. However, they may eventually become loose or slippery, requiring re-tightening or replacement.
Ultimately, the choice between handlebar tape and grips depends on factors such as personal preference, riding style, and maintenance considerations. Cyclists seeking a more customizable and aesthetically pleasing option may prefer handlebar tape, while those prioritizing ease of installation and maintenance may opt for grips. By understanding the advantages and disadvantages of each choice, cyclists can make an informed decision and enjoy a safer, more comfortable riding experience.
