Why Measuring Your Bicycle Matters
When it comes to cycling, having a bike that fits you well is crucial for a comfortable and safe riding experience. A properly sized bicycle can significantly enhance your performance, reduce the risk of injury, and make your rides more enjoyable. That’s why it’s essential to learn how to measure the size of a bicycle accurately.
A bike that is too small or too large can lead to various issues, such as poor posture, increased strain on your muscles and joints, and even decreased control over the bike. By measuring the size of your bicycle, you can ensure that it is the right fit for your body type and riding style, which can ultimately lead to a more enjoyable and productive cycling experience.
Furthermore, if you’re in the market for a new bike, knowing how to measure the size of a bicycle can help you make an informed decision when selecting a bike that fits you well. With the right measurements, you can compare different bikes and find the one that suits you best, whether you’re a casual rider or a competitive cyclist.

Click Image to Find eBike Products

Gathering the Necessary Tools and Materials
Before you start measuring your bicycle, it’s essential to gather the necessary tools and materials to ensure accurate and reliable results. Here’s what you’ll need:
- A tape measure: A flexible measuring tape is ideal for measuring various parts of your bicycle accurately.
- A level: A small level can help ensure that your bike is properly aligned when measuring certain components.
- A friend: Having an extra pair of hands can be helpful, especially when measuring hard-to-reach areas of your bike.
When measuring the size of a bicycle, it’s crucial to use accurate and reliable tools to ensure that your measurements are as precise as possible. Using a low-quality tape measure or an inaccurate level can lead to incorrect measurements, which can ultimately impact the fit and performance of your bike.
Additionally, it’s essential to take your time and double-check your measurements to ensure that they are accurate. Measuring the size of a bicycle may seem like a straightforward task, but even small errors can lead to significant differences in the overall fit and feel of your bike.
By gathering the necessary tools and materials and taking your time to ensure accuracy, you can measure the size of your bicycle with confidence and make any necessary adjustments to ensure a comfortable and safe riding experience.

Measuring the Frame Size
The frame size of a bicycle is one of the most critical measurements to consider when ensuring a proper fit. Here’s how to measure the frame size of your bicycle:
- Stand your bicycle upright and locate the bottom bracket, which is the part of the frame where the pedal cranks are attached.
- Measure the distance from the center of the bottom bracket to the top of the seat tube, where the seat post enters the frame. This distance is the frame size.
- Record your measurement in the appropriate unit of measurement. In the United States, frame sizes are typically measured in inches, while in Europe, centimeters are more common.
It’s important to note that different types of bicycles may have slightly different methods for measuring the frame size. For example, some bicycles may have a sloping top tube, which can affect the measurement. In these cases, it’s best to consult the manufacturer’s guidelines for measuring the frame size.
When measuring the frame size of a bicycle, it’s essential to use accurate and reliable tools to ensure that your measurements are as precise as possible. A flexible measuring tape is ideal for measuring the frame size, as it can easily conform to the shape of the bicycle frame.
Additionally, it’s important to double-check your measurements to ensure that they are accurate. Measuring the size of a bicycle frame may seem like a straightforward task, but even small errors can lead to significant differences in the overall fit and feel of your bike.
By measuring the frame size of your bicycle accurately, you can ensure that it is the right fit for your body type and riding style, which can ultimately lead to a more enjoyable and productive cycling experience.
Measuring the Wheel Size
The wheel size of a bicycle is another critical measurement to consider when ensuring a proper fit. Here’s how to measure the wheel size of your bicycle:
- Locate the wheel’s diameter, which is the distance from one edge of the rim to the opposite edge.
- Measure the diameter of the wheel in millimeters. This measurement is the wheel size.
- Record your measurement. Common wheel sizes for adult bicycles include 26 inches, 27.5 inches, 29 inches, and 700c (which is equivalent to 29 inches).
It’s important to note that the wheel size of a bicycle can impact the overall feel and performance of the bike. For example, larger wheels can provide a smoother ride over rough terrain, while smaller wheels can be more maneuverable in tight spaces.
When measuring the wheel size of a bicycle, it’s essential to use accurate and reliable tools to ensure that your measurements are as precise as possible. A rigid measuring tape is ideal for measuring the wheel diameter, as it can provide a more accurate measurement than a flexible tape measure.
Additionally, it’s important to double-check your measurements to ensure that they are accurate. Measuring the wheel size of a bicycle may seem like a straightforward task, but even small errors can lead to significant differences in the overall fit and feel of your bike.
By measuring the wheel size of your bicycle accurately, you can ensure that it is the right fit for your body type and riding style, which can ultimately lead to a more enjoyable and productive cycling experience.
Measuring the Seat Tube and Seatpost
The seat tube and seatpost are critical components of a bicycle that can significantly impact the overall fit and comfort of the bike. Here’s how to measure the seat tube and seatpost of a bicycle:
- Locate the seat tube, which is the vertical tube that connects the bottom bracket to the saddle.
- Measure the length of the seat tube from the center of the bottom bracket to the top of the seat tube, where the seatpost enters the frame. This measurement is the seat tube length.
- Record your measurement in the appropriate unit of measurement. In the United States, seat tube lengths are typically measured in inches, while in Europe, centimeters are more common.
- Next, measure the diameter of the seatpost where it enters the seat tube. This measurement is the seatpost diameter.
- Record your measurement. Common seatpost diameters for adult bicycles include 27.2mm, 30.4mm, and 31.6mm.
When measuring the seat tube and seatpost of a bicycle, it’s essential to ensure that the saddle is at the correct height for optimal comfort and performance. A saddle that is too high or too low can lead to discomfort, inefficiency, and even injury.
To adjust the saddle height, loosen the seatpost clamp and adjust the saddle to the desired height. Then, tighten the seatpost clamp securely to ensure that the saddle remains at the correct height.
When measuring the seat tube and seatpost of a bicycle, it’s essential to use accurate and reliable tools to ensure that your measurements are as precise as possible. A rigid measuring tape is ideal for measuring the seat tube length and seatpost diameter, as it can provide a more accurate measurement than a flexible tape measure.
Additionally, it’s important to double-check your measurements to ensure that they are accurate. Measuring the seat tube and seatpost of a bicycle may seem like a straightforward task, but even small errors can lead to significant differences in the overall fit and feel of your bike.
By measuring the seat tube and seatpost of your bicycle accurately, you can ensure that the saddle is at the correct height for optimal comfort and performance, which can ultimately lead to a more enjoyable and productive cycling experience.

Measuring the Handlebars and Stem
The handlebars and stem are critical components of a bicycle that can significantly impact the overall fit and comfort of the bike. Here’s how to measure the handlebars and stem of a bicycle:
- Locate the handlebars, which are the bars that you hold onto while riding.
- Measure the width of the handlebars from one end to the other. This measurement is the handlebar width.
- Record your measurement. Common handlebar widths for adult bicycles include 38cm, 40cm, 42cm, and 44cm.
- Next, locate the stem, which is the component that connects the handlebars to the fork.
- Measure the length of the stem from the center of the steerer tube to the center of the handlebar clamp. This measurement is the stem length.
- Record your measurement. Common stem lengths for adult bicycles include 80mm, 90mm, 100mm, and 110mm.
- Finally, measure the angle of the stem. This measurement is the stem angle.
- Record your measurement. Common stem angles for adult bicycles include 0 degrees, 7 degrees, 17 degrees, and 25 degrees.
When measuring the handlebars and stem of a bicycle, it’s essential to ensure that the handlebars are at the correct width and height for optimal comfort and control. Handlebars that are too wide or too narrow can lead to discomfort and inefficiency, while a stem that is too long or too short can impact the stability and handling of the bike.
To adjust the handlebars and stem, loosen the stem bolts and adjust the handlebars to the desired width and height. Then, adjust the stem length and angle to the desired position. Finally, tighten the stem bolts securely to ensure that the handlebars and stem remain in the correct position.
When measuring the handlebars and stem of a bicycle, it’s essential to use accurate and reliable tools to ensure that your measurements are as precise as possible. A rigid measuring tape is ideal for measuring the handlebar width and stem length, as it can provide a more accurate measurement than a flexible tape measure.
Additionally, it’s important to double-check your measurements to ensure that they are accurate. Measuring the handlebars and stem of a bicycle may seem like a straightforward task, but even small errors can lead to significant differences in the overall fit and feel of your bike.
By measuring the handlebars and stem of your bicycle accurately, you can ensure that they are at the correct width and height for optimal comfort and control, which can ultimately lead to a more enjoyable and productive cycling experience.

Measuring the Crank Length and Chainstays
The crank length and chainstays are two important measurements that can impact the overall fit and performance of a bicycle. Here’s how to measure the crank length and chainstays of a bicycle:
- Locate the crank arms, which are the arms that connect the pedals to the bottom bracket.
- Measure the length of the crank arms from the center of the bottom bracket to the center of the pedal axle. This measurement is the crank length.
- Record your measurement. Common crank lengths for adult bicycles include 165mm, 170mm, 172.5mm, and 175mm.
- Next, locate the chainstays, which are the tubes that connect the bottom bracket to the rear wheel.
- Measure the length of the chainstays from the center of the bottom bracket to the center of the rear axle. This measurement is the chainstay length.
- Record your measurement. Common chainstay lengths for adult bicycles range from 400mm to 430mm, depending on the type and size of the bike.
When measuring the crank length and chainstays of a bicycle, it’s essential to consider the impact that these measurements can have on pedaling efficiency and stability. A longer crank length can provide more power and torque, but it can also increase the stress on the knees and other joints. A shorter crank length can reduce the stress on the joints, but it can also decrease pedaling efficiency.
Similarly, a longer chainstay length can provide more stability and traction, but it can also make the bike feel sluggish and unresponsive. A shorter chainstay length can make the bike feel more agile and responsive, but it can also decrease stability and traction.
To adjust the crank length and chainstays, you may need to replace the existing components with components of a different length. This can be a complex and time-consuming process, so it’s important to consult with a professional mechanic or fitter to ensure that the adjustments are made correctly.
When measuring the crank length and chainstays of a bicycle, it’s essential to use accurate and reliable tools to ensure that your measurements are as precise as possible. A rigid measuring tape is ideal for measuring the crank length and chainstay length, as it can provide a more accurate measurement than a flexible tape measure.
Additionally, it’s important to double-check your measurements to ensure that they are accurate. Measuring the crank length and chainstays of a bicycle may seem like a straightforward task, but even small errors can lead to significant differences in the overall fit and feel of your bike.
By measuring the crank length and chainstays of your bicycle accurately, you can ensure that they are optimized for your riding style and body type, which can ultimately lead to a more enjoyable and productive cycling experience.

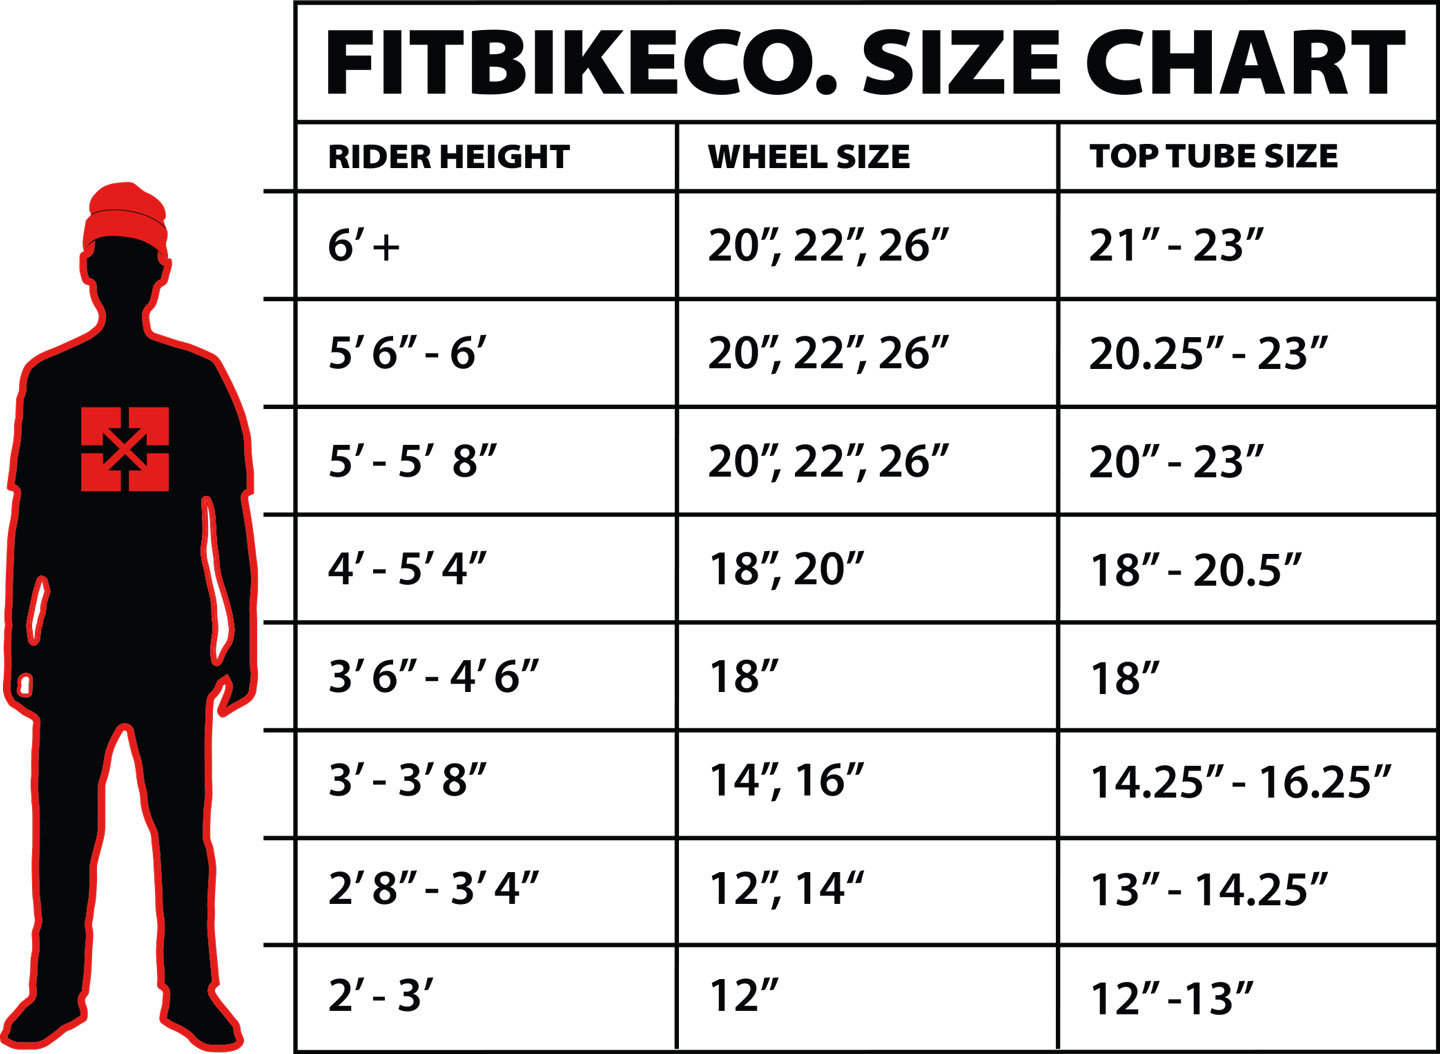
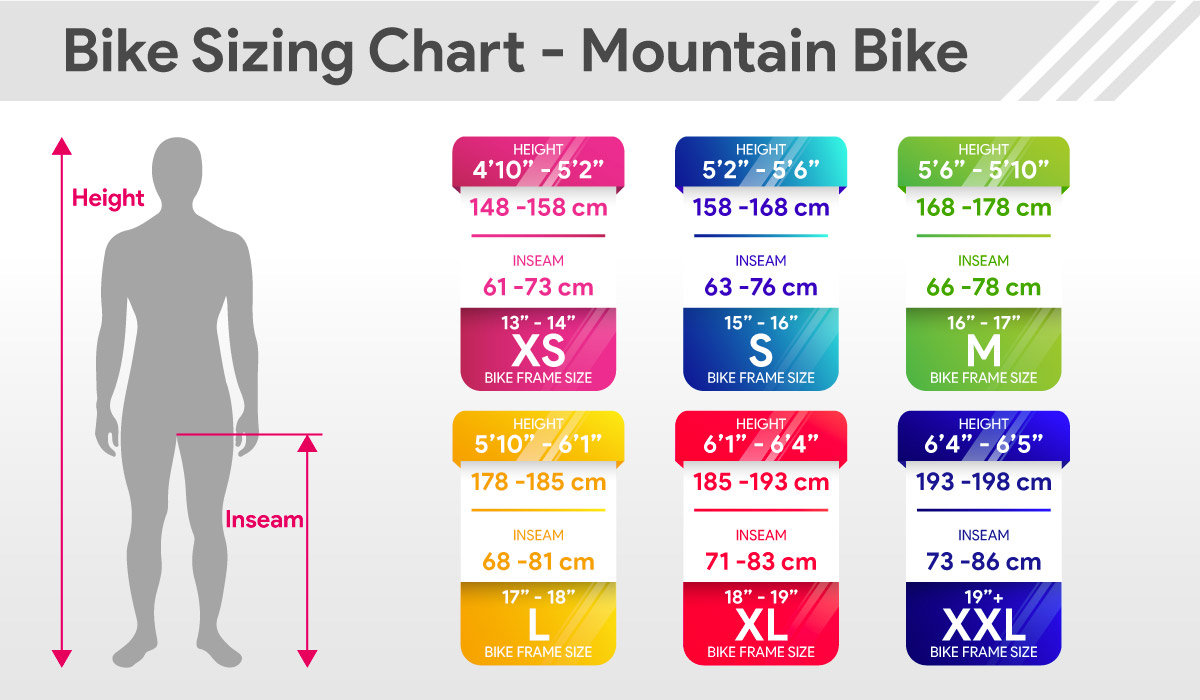
Comparing Your Measurements to Bike Sizing Charts
Once you have measured the various components of your bicycle, you can use bike sizing charts to compare your measurements to standard bike sizes. Here’s how to use bike sizing charts to ensure a proper fit:
- Locate a reputable bike sizing chart. Many bike manufacturers and retailers provide sizing charts on their websites.
- Input your measurements into the chart. Some charts may require measurements such as your inseam length, height, and arm length, while others may only require your height and frame size.
- Interpret the chart. The chart will provide a range of bike sizes that are suitable for your measurements. The chart may also provide recommendations for adjusting the seatpost, stem, and other components to achieve a proper fit.
- Compare your measurements to standard bike sizes. If your measurements don’t match any standard bike size, don’t worry. Bike sizing charts are only a guide, and there is often some overlap between sizes. It’s more important to focus on achieving a proper fit than on matching a specific bike size.
- Make adjustments and compromises. If your measurements fall between two standard bike sizes, or if you are unable to achieve a perfect fit with a standard bike size, you may need to make some adjustments and compromises. For example, you may need to adjust the seatpost or stem to achieve a more comfortable riding position, or you may need to switch to a different saddle or handlebar style.
When using bike sizing charts, it’s important to remember that they are only a guide. Every rider is unique, and there is no one-size-fits-all approach to bike fitting. It’s always best to consult with a professional bike fitter if you are unsure about your bike size or fit.
By comparing your measurements to bike sizing charts, you can ensure that your bicycle is the right size for your body type and riding style. This can ultimately lead to a more comfortable and enjoyable cycling experience, with improved performance, safety, and efficiency.
When using bike sizing charts, it’s essential to use accurate and reliable measurements to ensure the best possible fit. A digital scale or measuring tape can provide more accurate measurements than an analog scale or tape measure. It’s also important to double-check your measurements to ensure that they are accurate.
By using bike sizing charts and focusing on achieving a proper fit, you can ensure that your bicycle is optimized for your body type and riding style, which can ultimately lead to a more enjoyable and productive cycling experience.