
The Significance of Cleats on Spin Shoes
Cleats play a crucial role in enhancing the performance and safety of spin shoes. By attaching cleats to the soles of your spin shoes, you create a secure and efficient connection between your feet and the pedals. This connection offers several benefits, such as improved power transfer, increased stability, and better pedaling efficiency.
Power transfer refers to the effective transmission of force from your legs to the bike’s drivetrain. With cleats, you can apply force throughout the entire pedal stroke, maximizing your output and conserving energy. As a result, you can maintain a higher average speed and tackle challenging terrains more easily.
Stability is another significant advantage of using cleats on spin shoes. By locking your feet into place, you reduce the risk of foot slippage or unwanted movement during intense rides. This increased stability not only improves your control over the bike but also reduces the strain on your legs and ankles, minimizing the likelihood of injuries.
Lastly, cleats contribute to better pedaling efficiency by promoting a smooth and natural pedal stroke. The engagement of your feet with the pedals encourages a consistent circular motion, which helps to eliminate dead spots in your pedaling and maintain a steady cadence. Consequently, you can enjoy a more comfortable and enjoyable riding experience while preserving your energy for longer rides.

Click Image to Find eBike Products
Choosing the Right Cleats for Your Spin Shoes
When selecting cleats for your spin shoes, you will encounter various types in the market, including SPD, LOOK, and SPD-SL. Each cleat system has its unique features, advantages, and disadvantages, making it essential to understand their differences before making a decision.
Shimano’s SPD (Shimano Pedaling Dynamics) cleats are renowned for their walkability and versatility. SPD cleats are characterized by a two-bolt design, which allows for a more natural walking motion compared to other cleat systems. This feature makes SPD cleats an excellent choice for riders who frequently dismount and walk during their rides, such as mountain bikers or bike commuters. Additionally, SPD cleats offer a wide range of float and tension adjustability, allowing riders to customize their pedaling experience.
LOOK cleats, on the other hand, are known for their secure engagement and efficient power transfer. LOOK cleats feature a three-bolt design and are commonly used in road cycling. They offer a stiffer connection between the shoe and the pedal, which helps to maximize power transfer and reduce energy loss. However, LOOK cleats are generally less walkable than SPD cleats, making them less suitable for riders who frequently dismount.
SPD-SL cleats, also manufactured by Shimano, are similar to LOOK cleats in terms of their three-bolt design and focus on power transfer. SPD-SL cleats are characterized by a larger contact area between the cleat and the pedal, which further enhances power transfer and stability. Like LOOK cleats, SPD-SL cleats are less walkable than SPD cleats, making them more suitable for dedicated road cyclists.
When choosing the right cleats for your spin shoes, consider your riding style and bike compatibility. If you frequently dismount and walk during your rides, SPD cleats might be the best option. However, if you are a dedicated road cyclist seeking maximum power transfer and stability, LOOK or SPD-SL cleats might be more suitable. Always ensure that your chosen cleats are compatible with your bike’s pedals and your spin shoes.
Gathering the Essential Tools and Materials
Before installing cleats on your spin shoes, ensure you have the necessary tools and materials to complete the task successfully. High-quality tools can make the installation process smoother and more precise, reducing the risk of damage or misalignment. The essential tools and materials for installing cleats on spin shoes include:
- Cleat tool: A cleat tool is a specialized wrench designed to securely hold and tighten the cleat screws during installation. Cleat tools are typically included with new cleats or pedals, but they can also be purchased separately.
- Allen wrenches: Allen wrenches, also known as hex keys, are used to secure the cleats to the shoe sole. Ensure you have the correct size Allen wrenches for your specific cleat screws, as they can vary between brands and models.
- Clean, flat surface: Installing cleats on a clean, flat surface, such as a table or workbench, can help maintain proper alignment and prevent the cleats from shifting during installation.
Additionally, you may want to gather a few other materials to facilitate the installation process, such as:
- Masking tape: Use masking tape to temporarily hold the cleats in place while you adjust their position. This can help ensure accurate alignment before securing the cleats with screws.
- Paper template: Some cleat manufacturers provide paper templates that you can use to mark the mounting points on your shoe sole. This can be helpful for maintaining consistent cleat placement between multiple shoes or for transferring cleat positions from old to new shoes.
- Ruler or measuring tape: Use a ruler or measuring tape to double-check the distance between the cleats and the shoe edges, ensuring proper alignment and balance.
By gathering these essential tools and materials beforehand, you can ensure a smooth and successful cleat installation process.
Preparing Your Spin Shoes for Cleat Installation
Before installing cleats on your spin shoes, it is crucial to prepare them properly to ensure a successful installation. Follow these steps to prepare your spin shoes for cleat installation:
- Clean the shoe sole: Start by cleaning the shoe sole to remove any dirt, debris, or residue that may interfere with the cleat installation. Use a soft brush, cloth, or sponge and a mild detergent to gently scrub the sole, then rinse with water and let it dry completely.
- Identify the mounting points: Locate the mounting points on the shoe sole, which are typically marked with small dimples or indentations. These points indicate the recommended positions for the cleats, ensuring proper alignment and balance. If your shoe sole does not have pre-marked mounting points, consult the shoe manufacturer’s guidelines or use a paper template provided by the cleat manufacturer to determine the correct positions.
- Ensure proper alignment: Align the cleats parallel to the shoe’s long axis and equidistant from the shoe’s edge. This alignment helps maintain a natural and balanced pedal stroke, reducing strain on your knees and ankles. You can use a ruler or measuring tape to double-check the distance between the cleats and the shoe edges, ensuring consistent alignment.
By following these steps, you can properly prepare your spin shoes for cleat installation, ensuring accurate alignment and optimal performance.
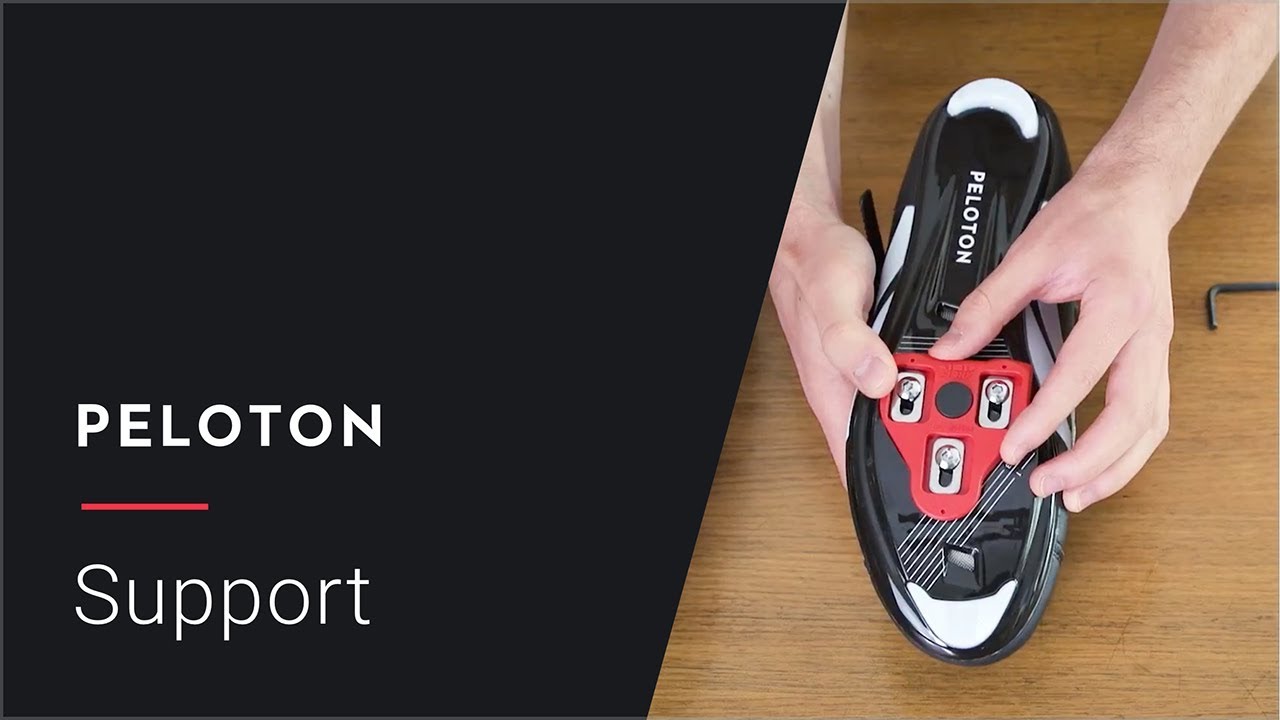
Installing the Cleats: Step-by-Step Guide
Follow these steps to install the cleats on your spin shoes:
- Position the cleats: Place the cleats on the shoe sole, aligning them with the mounting points. Ensure that the cleats are parallel to the shoe’s long axis and equidistant from the shoe’s edge. You can use masking tape to temporarily hold the cleats in place while you adjust their position.
- Secure the cleats with screws: Using the appropriate Allen wrench, tighten the screws that secure the cleats to the shoe sole. Do not overtighten the screws, as this may damage the shoe sole.
- Adjust the tension: Most cleat systems allow you to adjust the tension or release angle, also known as float. Consult the cleat manufacturer’s guidelines for recommended tension settings and adjust accordingly using the cleat tool or Allen wrenches.
- Verify the alignment: Double-check the alignment by pedaling a short distance and observing your foot position. Ensure that your feet are not excessively rotated inward or outward, as this may lead to discomfort or injury. Make any necessary adjustments to the cleat position or tension as needed.
By following these steps, you can successfully install the cleats on your spin shoes, enhancing your performance and safety on the bike.

Testing and Fine-Tuning Your Cleat Position
After installing the cleats on your spin shoes, it is crucial to test and fine-tune the cleat position to ensure optimal performance and comfort. Follow these steps to check the alignment, float, and tension, and make any necessary adjustments:
- Check the alignment: While wearing the spin shoes, pedal a short distance and observe your foot position. Ensure that your feet are not excessively rotated inward or outward, as this may lead to discomfort or injury. If the alignment is off, loosen the screws, adjust the cleat position, and re-tighten the screws. Repeat this process until the alignment is correct.
- Test the float: The float refers to the degree of lateral movement allowed between the cleat and the pedal. Consult the cleat manufacturer’s guidelines for recommended float settings and adjust accordingly. While pedaling, check if your feet can move naturally and comfortably within the float range. If you experience excessive resistance or discomfort, adjust the float setting as needed.
- Verify the tension: The tension setting determines how much force is required to clip in and out of the pedals. If the tension is too high, it may cause difficulty clipping in and out; if it is too low, your feet may accidentally unclip during intense pedaling. Consult the cleat manufacturer’s guidelines for recommended tension settings and adjust accordingly. Test the tension by clipping in and out of the pedals several times to ensure a smooth and secure connection.
Regularly testing and fine-tuning the cleat position can help prevent injuries, improve pedaling efficiency, and ensure a comfortable riding experience. Make it a habit to check your cleat position before and after long rides, as well as after replacing cleats or shoes.

Maintaining Your Cleats and Spin Shoes
Regular maintenance of your cleats and spin shoes is essential to ensure optimal performance, prolong their lifespan, and prevent injuries. Follow these best practices for maintaining your gear:
- Cleaning: Regularly clean your cleats and spin shoes to remove dirt, debris, and sweat. Use a soft brush, cloth, or sponge and a mild detergent to gently scrub the surfaces. Rinse with water and let them dry completely before using or storing them. Avoid using high-pressure water or abrasive materials, as these may damage the cleats or shoe materials.
- Checking for wear and tear: Inspect your cleats and spin shoes for signs of wear and tear, such as worn-out treads, loose screws, or damaged components. Replace any worn-out parts as needed to maintain the functionality and safety of your gear.
- Tightening screws: Periodically check the screws that secure the cleats to the shoe sole. If you notice any loose screws, tighten them using the appropriate Allen wrench. Ensure that the screws are not overtightened, as this may strip the threads or damage the shoe sole.
- Lubricating moving parts: For cleat systems with moving parts, such as float adjustment mechanisms, apply a suitable lubricant, such as a light oil or silicone-based lubricant, to ensure smooth operation and prevent corrosion.
- Storing your gear: Store your cleats and spin shoes in a cool, dry place away from direct sunlight and extreme temperatures. This can help prevent material degradation, warping, and other forms of damage.
By incorporating these maintenance practices into your routine, you can keep your cleats and spin shoes in excellent condition, ensuring optimal performance and safety during your rides.

Troubleshooting Common Cleat-Related Issues
Riders may occasionally encounter issues with their cleats, such as slipping, creaking, or difficulty clipping in and out. This section provides practical solutions and preventive measures to help riders overcome these challenges:
Slipping cleats
Slipping cleats can be caused by insufficient tension, worn-out cleats, or an incorrect cleat position. To address this issue, ensure that the tension is set correctly, replace worn-out cleats, and double-check the cleat position. If the problem persists, consider using a cleat shim to improve the contact between the cleat and the pedal.
Creaking cleats
Creaking cleats are often the result of insufficient lubrication, loose screws, or debris trapped between the cleat and the pedal. To resolve this issue, apply a suitable lubricant, such as a light oil or silicone-based lubricant, to the moving parts. Tighten any loose screws and clean the area between the cleat and the pedal to remove debris.
Difficulty clipping in and out
Difficulty clipping in and out can be caused by excessive tension, an incorrect cleat position, or a damaged cleat or pedal. To alleviate this issue, adjust the tension to a more manageable level, double-check the cleat position, and inspect the cleat and pedal for any signs of damage. If necessary, replace damaged components.
By understanding these common cleat-related issues and implementing the suggested solutions, riders can ensure a smooth and enjoyable riding experience.
![]()