
Understanding Children’s Bike Sizing: Why It Matters
Choosing the right size bike for your child is crucial for several reasons. Proper fit ensures that your child can enjoy riding their bike with ease and confidence, reducing the risk of accidents and injuries. A bike that is too small or too large can lead to discomfort, fatigue, and even loss of interest in cycling. Contrary to popular belief, age alone is not a reliable indicator of the right bike size. Children grow at different rates, and their abilities can vary widely, making it essential to consider other factors when selecting a bike.

Click Image to Find eBike Products
How to Measure Your Child for a Bike: A Step-by-Step Guide
To ensure a proper fit for your child’s bike, follow these steps:
- Gather the necessary tools: a measuring tape, a pen or pencil, and a piece of paper. You may also need a book or a small box to help your child maintain proper posture during the measurement process.
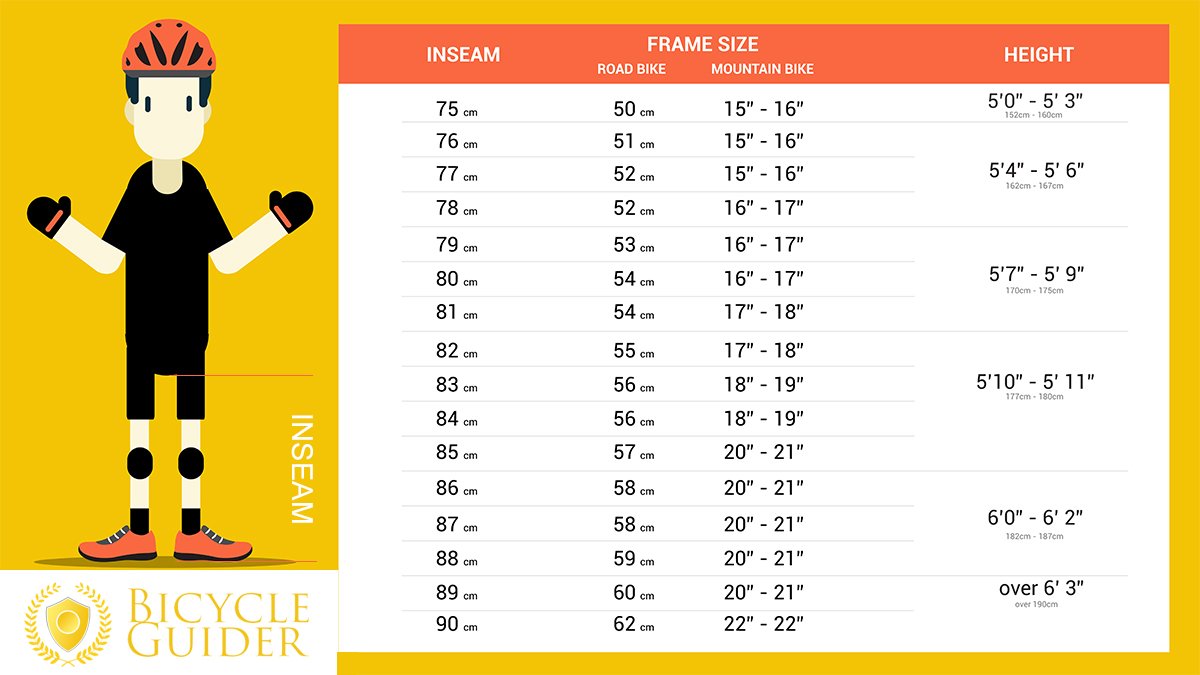
- Measure your child’s inseam: Have your child stand straight with their back against a wall, barefoot or wearing socks. Place a book or a small box between their legs, as high as possible while still allowing them to comfortably straddle it. Measure the distance from the ground to the top of the book or box. This is your child’s inseam length.
- Determine the right bike frame size: Refer to a children’s bike size chart (such as the ones provided by popular brands) to find the recommended bike frame size based on your child’s inseam length. Keep in mind that different types of bikes may have slightly different size recommendations.
- Check the standover height: Ensure that your child can stand over the bike frame with both feet flat on the ground, leaving at least 1-2 inches of clearance between their crotch and the top tube. This is known as the standover height and is crucial for safety and comfort.
- Adjust the seat height: Set the seat height so that your child’s leg is almost fully extended when the pedal is at its lowest point. A slight bend in the knee is ideal to ensure a comfortable and efficient pedaling position.
- Test the bike fit: Have your child take the bike for a short test ride to ensure that they feel comfortable and confident. Make any necessary adjustments to the seat height, seat position, or handlebar height to achieve the best fit.
If your child falls between sizes, consider the type of bike and their riding style. A slightly larger bike may be more appropriate for a confident rider who enjoys longer rides, while a smaller bike may be better for a beginner or a child who prefers short, casual rides. Ultimately, the right bike size will depend on your child’s measurements, abilities, and preferences.
Children’s Bike Sizing Charts: A Helpful Resource
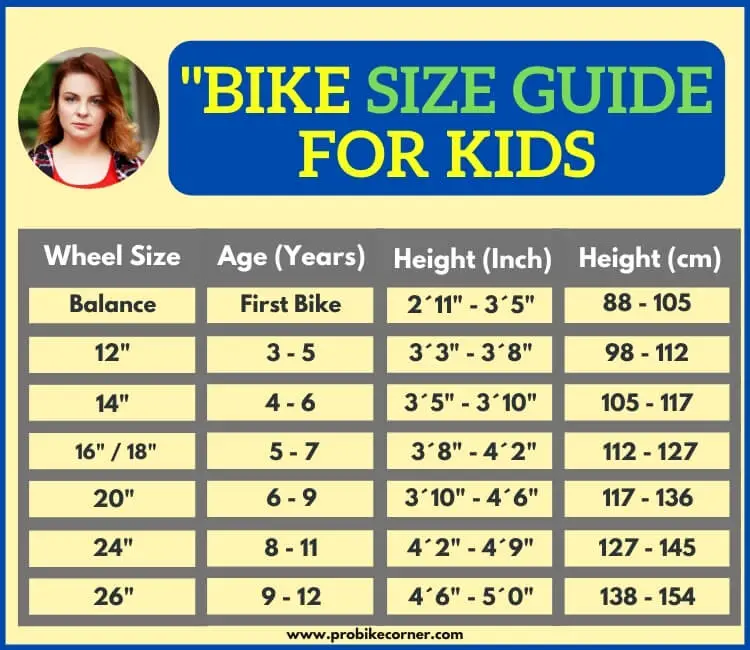
When selecting the right bike for your child, children’s bike sizing charts can be an invaluable resource. These charts, provided by reputable bike brands and retailers, offer recommended bike sizes based on a child’s height or inseam measurement. By using a sizing chart, you can ensure a proper fit for your child, enhancing safety, enjoyment, and overall biking experience.
How to Read and Interpret Children’s Bike Sizing Charts
Children’s bike sizing charts typically list recommended bike sizes based on a child’s height or inseam measurement. To use the chart, locate the row corresponding to your child’s measurement and find the recommended bike size. Keep in mind that sizing charts are general guidelines, and individual needs and preferences may vary. Always double-check the bike’s specifications and consult the manufacturer’s recommendations to ensure the best fit for your child.
Popular Brands with Children’s Bike Sizing Charts
Several well-known bike brands offer sizing charts to help you determine the right bike size for your child. Some popular brands include:
These brands provide charts specifically designed for their product lines, making it easier to find the right bike size for your child. Remember to consider the type of bike you are interested in, as different categories (such as balance bikes, pedal bikes, and mountain bikes) may have unique size and age considerations.

Different Types of Children’s Bikes: Size and Age Considerations
When selecting the right children’s bike, it’s essential to consider the various types available and their corresponding size and age considerations. Here, we discuss balance bikes, pedal bikes, and mountain bikes, providing tips on how to choose the right type of bike for a child’s abilities and interests.
Balance Bikes
Balance bikes, also known as running bikes or push bikes, are designed to help toddlers and young children learn balance and steering skills without the need for pedals or training wheels. Typically, balance bikes are suitable for children aged 18 months to 5 years, and the bike size is determined by the child’s inseam measurement.
- Inseam range: 12 to 20 inches (30 to 51 cm)
- Recommended age: 18 months to 5 years
Pedal Bikes
Pedal bikes are designed for children who have outgrown balance bikes or are ready to transition to a bike with pedals. These bikes typically come with training wheels or are designed to be easily converted to balance bikes. Proper bike fit and size are crucial for safety, confidence, and enjoyment.
- Inseam range: 16 to 24 inches (41 to 61 cm) for traditional pedal bikes; 12 to 14 inches (30 to 36 cm) for bikes with removable training wheels
- Recommended age: 3 to 8 years for traditional pedal bikes; 2 to 5 years for bikes with removable training wheels
Mountain Bikes
Mountain bikes are designed for off-road adventures and are suitable for older children with some biking experience. These bikes typically have wider tires, shock-absorbing suspension, and lower gearing for tackling various terrains. Ensure that your child has the necessary strength and coordination to handle a mountain bike before making a purchase.
- Wheel size: 20 to 24 inches (51 to 61 cm)
- Recommended age: 6 to 12 years
By understanding the different types of children’s bikes and their corresponding size and age considerations, you can make an informed decision and choose the right bike for your child’s abilities and interests. Always prioritize safety and fit over convenience and cost to ensure an enjoyable and rewarding biking experience for your child.

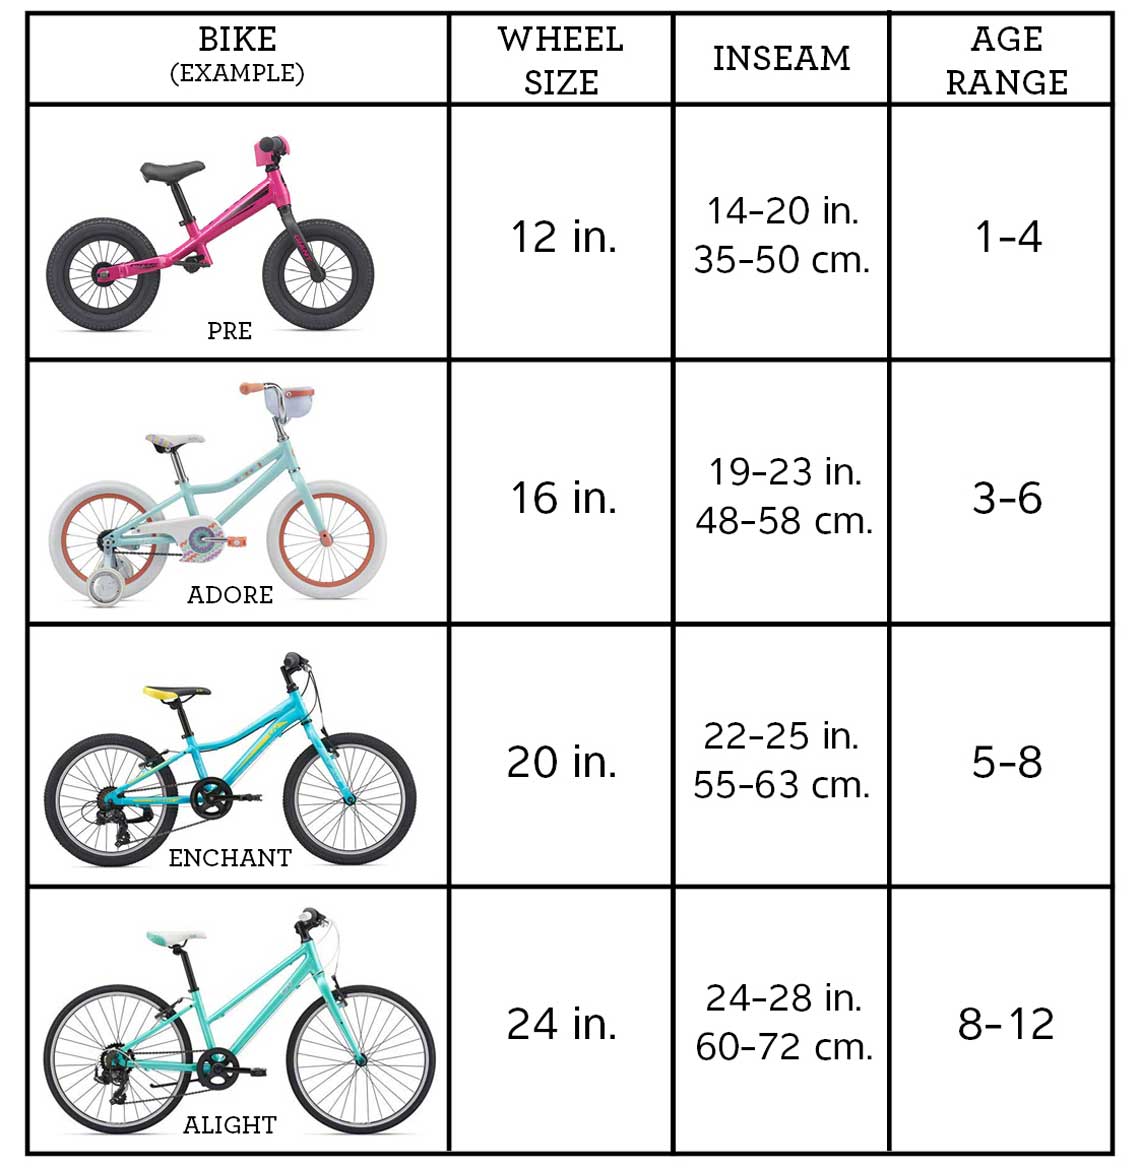
Real-Life Examples: Popular Children’s Bike Models and Sizes
To help you better understand how to choose the right size children’s bike, let’s look at some popular bike models and their corresponding sizes. By familiarizing yourself with these well-known brands and their sizing guidelines, you can make an informed decision and ensure a proper fit for your child.
Woom Bikes
Woom is a popular brand known for its high-quality, lightweight children’s bikes. Woom provides a detailed sizing chart based on a child’s height and inseam measurement. Here are some examples of Woom bike models and their recommended heights:
- Woom 1: Suitable for children between 18 months and 3 years, with a height range of 31 to 39 inches (79 to 99 cm)
- Woom 2: Suitable for children between 3 and 4.5 years, with a height range of 37 to 45 inches (94 to 114 cm)
- Woom 3: Suitable for children between 4 and 5.5 years, with a height range of 41 to 49 inches (104 to 124 cm)
Prevelo Bikes
Prevelo is another popular brand that focuses on creating high-quality, durable children’s bikes. Prevelo offers a sizing chart based on a child’s height and inseam measurement. Here are some examples of Prevelo bike models and their recommended heights:
- Prevelo Alpha One: Suitable for children between 2 and 3 years, with a height range of 31 to 37 inches (79 to 94 cm)
- Prevelo Alpha Two: Suitable for children between 3 and 5 years, with a height range of 37 to 45 inches (94 to 114 cm)
- Prevelo Alpha Three: Suitable for children between 4 and 6 years, with a height range of 41 to 49 inches (104 to 124 cm)
Tips for Choosing the Right Size Based on a Child’s Measurements and Abilities
When selecting a bike based on a child’s measurements and abilities, consider the following tips:
- Ensure the child can comfortably straddle the bike with both feet flat on the ground.
- Check that the child can reach the handlebars and brakes without overreaching or hunching over.
- Confirm that the child can pedal smoothly and efficiently, with a slight bend in the knee at the bottom of the pedal stroke.
- Consider the child’s confidence and biking experience when selecting a bike type and size.
By understanding the different types of children’s bikes and their corresponding size and age considerations, and by familiarizing yourself with popular bike models and their sizing guidelines, you can help your child find the perfect bike for their abilities and interests. Always prioritize safety and fit over convenience and cost to ensure an enjoyable and rewarding biking experience for your child.
Tips for a Smooth Transition: Upgrading to a Larger Bike
When the time comes to upgrade your child to a larger bike, it’s essential to ensure a smooth transition to maintain their enthusiasm and confidence in cycling. Here are some tips on how to adjust the bike for a comfortable fit and help your child build skills on the new bike.
First, it’s crucial to understand that upgrading to a larger bike is not just about the wheel size. The frame size, saddle height, and handlebar position are equally important to ensure a proper fit and comfortable riding position. When selecting a new bike, refer to children’s bike sizing charts and follow the step-by-step guide provided in this article to determine the right size based on your child’s measurements.
Once you have the new bike, adjusting it for a comfortable fit is essential. Start by setting the saddle height to the correct position, which should allow your child to place both feet flat on the ground while straddling the bike. Then, adjust the handlebars so that your child can reach them comfortably without overreaching or hunching over. Finally, double-check that the bike’s brakes and gears are functioning correctly and that your child understands how to use them safely.
To help your child build confidence and skills on the new bike, start by practicing in a safe and familiar environment, such as a park or a quiet residential street. Encourage your child to take it slow at first and gradually build up their speed and confidence. If your child is transitioning from a balance bike to a pedal bike, remind them of the skills they learned on the balance bike, such as balancing, steering, and braking.
It’s also essential to ensure that your child is wearing appropriate safety gear, such as a helmet, knee and elbow pads, and closed-toe shoes. This will not only protect your child from injuries but also help them feel more confident and secure while riding.
In summary, upgrading to a larger bike requires careful consideration of the bike’s size and fit, as well as your child’s skills and confidence level. By following these tips, you can ensure a smooth transition and help your child enjoy the benefits of cycling for years to come.

Common Mistakes to Avoid: Children’s Bike Sizing Pitfalls
When it comes to choosing the right children’s bike, there are several common mistakes that parents and caregivers should avoid. By understanding these pitfalls, you can ensure a safer and more enjoyable riding experience for your child.
One of the most common mistakes is choosing a bike based solely on age. While age can be a helpful starting point, it’s not the only factor to consider when determining the right bike size. Children grow at different rates, and some may be taller or shorter than their peers for their age. Therefore, it’s essential to measure your child’s inseam and height to determine the right bike size, as discussed in the step-by-step guide provided in this article.
Another mistake is assuming that a bike is the right size because it’s the next size up. While it’s true that children will eventually grow into larger bikes, starting with a bike that’s too big can be dangerous and hinder their learning progress. A bike that’s too large can be challenging to control, causing your child to lose confidence and interest in cycling. On the other hand, a bike that’s too small can be outgrown quickly, requiring you to purchase a new bike sooner than necessary.
Additionally, some parents and caregivers may neglect to adjust the bike’s components, such as the saddle height and handlebar position, to fit the child’s measurements. Neglecting these adjustments can lead to an uncomfortable riding position, causing your child to experience discomfort or pain during or after riding. Properly adjusting the bike’s components can also help your child develop good cycling habits and prevent injuries.
To avoid these common mistakes, it’s crucial to prioritize safety and fit over convenience and cost. While it may be tempting to purchase a bike that’s a few sizes up to save money or time, doing so can compromise your child’s safety and enjoyment of cycling. Instead, take the time to measure your child accurately, consult children’s bike sizing charts, and adjust the bike’s components to fit your child’s measurements. By doing so, you can ensure a safer and more enjoyable riding experience for your child.

Where to Buy Children’s Bikes: In-Store vs. Online
When it comes to buying a children’s bike, parents and caregivers have the option of purchasing in-store or online. Both options have their advantages and disadvantages, and it’s essential to consider safety, fit, and convenience when making a decision.
Buying a children’s bike in-store allows you to see and touch the bike before purchasing, ensuring that it meets your quality and safety standards. You can also consult with knowledgeable sales staff who can provide guidance on sizing, features, and maintenance. Additionally, many bike shops offer assembly and tuning services, ensuring that the bike is ready to ride safely and efficiently. However, in-store purchases may be limited to the bikes in stock, and prices may be higher due to overhead costs.
On the other hand, buying a children’s bike online offers a wider selection of bikes, brands, and prices, allowing you to compare and choose the best option for your child’s needs and budget. Online purchases can also be more convenient, as you can shop from the comfort of your home and have the bike delivered directly to your door. However, when buying online, it’s crucial to ensure that the bike is the right size and fit for your child, as you won’t have the opportunity to try it on before purchasing. Additionally, online purchases may require assembly and tuning, which can be challenging for those without experience or tools.
To find the right bike size online, consult children’s bike sizing charts and measure your child’s inseam and height accurately. Look for bikes with adjustable components, such as saddle height and handlebar position, to ensure a comfortable and safe riding position. Additionally, read product reviews and ratings to gauge the bike’s quality and performance. When buying in-store, ask the sales staff for guidance on sizing and fit, and ensure that the bike is assembled and tuned correctly before leaving the store.
In summary, when buying a children’s bike, it’s essential to prioritize safety and fit over convenience and cost. Whether you choose to buy in-store or online, take the time to measure your child accurately, consult sizing charts, and adjust the bike’s components to fit your child’s measurements. By doing so, you can ensure a safer and more enjoyable riding experience for your child.